来瞧瞧,WPF 炫酷走马灯!
来瞧瞧,WPF 炫酷走马灯!
控件名:SpotLight
作者:WPFDevelopersOrg
框架使用大于等于
.NET40;Visual Studio 2022;项目使用 MIT 开源许可协议;
用Canvas做容器方便针对文本TextBlock做裁剪Clip动画操作;
Canvas内部创建两个TextBlock;
第一个做为背景字体设置字体颜色为浅灰
Foreground="#323232",也可以通过依赖属性设置DefaultForeground;第二个字体设置会彩虹色当聚光灯走到某个区域后并显示;
Duration可设置动画的从左到右的时长,默认3秒;
根据字体的实际宽度ActualWidth做动画展示从左到右并循环Forever播放;
1)SpotLight.cs 代码如下;
using System;

using System.Windows;

using System.Windows.Controls;

using System.Windows.Media;

using System.Windows.Media.Animation;

namespace WPFDevelopers.Controls

{

    [TemplatePart(Name = TextBlockBottomTemplateName, Type = typeof(TextBlock))]

    [TemplatePart(Name = TextBlockTopTemplateName, Type = typeof(TextBlock))]

    [TemplatePart(Name = EllipseGeometryTemplateName, Type = typeof(EllipseGeometry))]

    public class SpotLight : Control

    {

        private const string TextBlockBottomTemplateName = "PART_TextBlockBottom";

        private const string TextBlockTopTemplateName = "PART_TextBlockTop";

        private const string EllipseGeometryTemplateName = "PART_EllipseGeometry";

        public static readonly DependencyProperty TextProperty =

            DependencyProperty.Register("Text", typeof(string), typeof(SpotLight),

                new PropertyMetadata("WPFDevelopers"));

        public static readonly DependencyProperty DefaultForegroundProperty =

            DependencyProperty.Register("DefaultForeground", typeof(Brush), typeof(SpotLight),

                new PropertyMetadata(new SolidColorBrush((Color)ColorConverter.ConvertFromString("#323232"))));

        public static readonly DependencyProperty DurationProperty =

            DependencyProperty.Register("Duration", typeof(TimeSpan), typeof(SpotLight),

                new PropertyMetadata(TimeSpan.FromSeconds(3)));

        private EllipseGeometry _ellipseGeometry;

        private TextBlock _textBlockBottom, _textBlockTop;

        static SpotLight()

        {

            DefaultStyleKeyProperty.OverrideMetadata(typeof(SpotLight),

                new FrameworkPropertyMetadata(typeof(SpotLight)));

        }

        public TimeSpan Duration

        {

            get => (TimeSpan)GetValue(DurationProperty);

            set => SetValue(DurationProperty, value);

        }

        public Brush DefaultForeground

        {

            get => (Brush)GetValue(DefaultForegroundProperty);

            set => SetValue(DefaultForegroundProperty, value);

        }

        public string Text

        {

            get => (string)GetValue(TextProperty);

            set => SetValue(TextProperty, value);

        }

        public override void OnApplyTemplate()

        {

            base.OnApplyTemplate();

            _textBlockBottom = GetTemplateChild(TextBlockBottomTemplateName) as TextBlock;

            _textBlockTop = GetTemplateChild(TextBlockTopTemplateName) as TextBlock;

            _ellipseGeometry = GetTemplateChild(EllipseGeometryTemplateName) as EllipseGeometry;

            var center = new Point(FontSize / 2, FontSize / 2);

            _ellipseGeometry.RadiusX = FontSize;

            _ellipseGeometry.RadiusY = FontSize;

            _ellipseGeometry.Center = center;

            if (_textBlockBottom != null && _textBlockTop != null && _ellipseGeometry != null)

                _textBlockTop.Loaded += _textBlockTop_Loaded;

        }

        private void _textBlockTop_Loaded(object sender, RoutedEventArgs e)

        {

            var doubleAnimation = new DoubleAnimation

            {

                From = 0,

                To = _textBlockTop.ActualWidth,

                Duration = Duration

            };

            Storyboard.SetTarget(doubleAnimation, _textBlockTop);

            Storyboard.SetTargetProperty(doubleAnimation,

                new PropertyPath("(UIElement.Clip).(EllipseGeometry.Transform).(TranslateTransform.X)"));

            var storyboard = new Storyboard

            {

                RepeatBehavior = RepeatBehavior.Forever,

                AutoReverse = true

            };

            storyboard.Children.Add(doubleAnimation);

            storyboard.Begin();

        }

    }

}
2)SpotLight.xaml 代码如下;
<ResourceDictionary xmlns="http://schemas.microsoft.com/winfx/2006/xaml/presentation"

                    xmlns:x="http://schemas.microsoft.com/winfx/2006/xaml"

                    xmlns:controls="clr-namespace:WPFDevelopers.Controls">

    <ResourceDictionary.MergedDictionaries>

        <ResourceDictionary Source="Basic/ControlBasic.xaml"/>

    </ResourceDictionary.MergedDictionaries>

    <LinearGradientBrush x:Key="RainbowBrush" EndPoint="1,1" MappingMode="RelativeToBoundingBox" StartPoint="0,0">

        <GradientStop Color="#FF9C1031" Offset="0.1"/>

        <GradientStop Color="#FFBE0E20" Offset="0.2"/>

        <GradientStop Color="#FF9C12AC" Offset="0.7"/>

        <GradientStop Color="#FF0A8DC3" Offset="0.8"/>

        <GradientStop Color="#FF1AEBCC" Offset="1"/>

    </LinearGradientBrush>

    <Style TargetType="{x:Type controls:SpotLight}" BasedOn="{StaticResource ControlBasicStyle}">

        <Setter Property="Background" Value="#222222"/>

        <Setter Property="FontSize" Value="60"/>

        <Setter Property="FontFamily" Value="Arial Black"/>

        <Setter Property="FontWeight" Value="Bold"/>

        <Setter Property="Foreground" Value="{StaticResource RainbowBrush}"/>

        <Setter Property="VerticalAlignment" Value="Center"/>

        <Setter Property="HorizontalAlignment" Value="Center"/>

        <Setter Property="Template">

            <Setter.Value>

                <ControlTemplate TargetType="{x:Type controls:SpotLight}">

                    <Grid x:Name="PART_Canvas" Background="{TemplateBinding Background}">

                        <TextBlock x:Name="PART_TextBlockBottom" Text="{TemplateBinding Text}"

                                   FontSize="{TemplateBinding FontSize}"

                                   FontFamily="{TemplateBinding FontFamily}"

                                   FontWeight="{TemplateBinding FontWeight}"

                                   Foreground="{TemplateBinding DefaultForeground}"/>

                        <TextBlock x:Name="PART_TextBlockTop" Text="{TemplateBinding Text}"

                                   FontSize="{TemplateBinding FontSize}"

                                   FontFamily="{TemplateBinding FontFamily}"

                                   FontWeight="{TemplateBinding FontWeight}"

                                   Foreground="{TemplateBinding Foreground}">

                            <TextBlock.Clip>

                                <EllipseGeometry x:Name="PART_EllipseGeometry">

                                    <EllipseGeometry.Transform>

                                        <TranslateTransform/>

                                    </EllipseGeometry.Transform>

                                </EllipseGeometry>

                            </TextBlock.Clip>

                        </TextBlock>

                    </Grid>

                </ControlTemplate>

            </Setter.Value>

        </Setter>

    </Style>

</ResourceDictionary>
3)SpotLightExample.xaml代码如下如何使用;
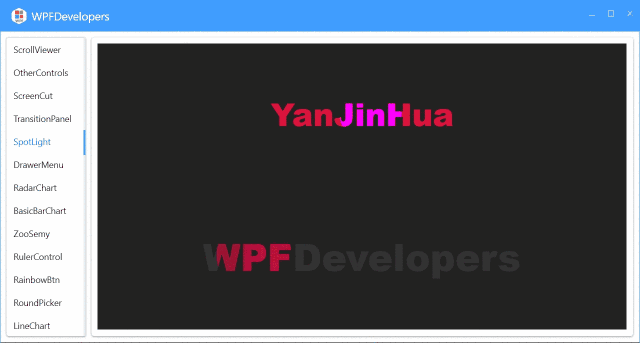
<UniformGrid Rows="2" Background="#222222">

        <wpfdev:SpotLight FontSize="50" Text="YanJinHua"

                          DefaultForeground="Crimson"

                          Foreground="Fuchsia"

                          Duration="00:00:05" />

        <wpfdev:SpotLight/>

</UniformGrid>
SpotLight.cs|Github
SpotLight.cs|码云
SpotLight.xaml|Github
SpotLight.xaml|码云
来瞧瞧,WPF 炫酷走马灯!的更多相关文章
- WPF炫酷UI及动画
偶然看见了一张图,感觉挺好看的,花了点时间将他转化成了我代码仓库的一部分.虽然不难但也费时间.其中除了背景是百度的一张底图,其他所有内容均通过WPF的Path.Line.TextBlock.Borde ...
- Photoshop和WPF双剑配合,打造炫酷个性的进度条控件
现在如果想打造一款专业的App,UI的设计和操作的简便性相当重要.UI设计可以借助Photoshop或者AI等设计工具,之前了解到WPF设计工具Expression Blend可以直接导入PSD文件或 ...
- 基于WPF的酷炫GUI窗口的实现全过程
title: 基于WPF的酷炫GUI窗口的实现全过程 date: 2020-08-14 permalink: /build/wpfgui sidebarDepth: 2 tags: wpf gui 软 ...
- swiper3d横向滚动多张炫酷切换banner
最近有了个新需求,swiper3d横向滚动多张炫酷切换banner要和elementUI里边走马灯的卡片化card 类似,但是还需要h5手机触摸滚动啊啊啊啊,昨天折腾了半个早上总算完成,今天乖乖跑来m ...
- WebGIS简单实现一个区域炫酷的3D立体地图效果
1.别人的效果 作为一个GIS专业的,做一个高大上的GIS系统一直是我的梦想,虽然至今为止还没有做出一个理想中的系统,但是偶尔看看别人做的,学习下别人的技术还是很有必要的.眼睛是最容易误导我们的,有时 ...
- 炫酷的jQuery对话框插gDialog
js有alert,prompt和confirm对话框,不过不是很美体验也不是很好,用jQuery也能实现, 体验效果:http://hovertree.com/texiao/jquery/34/ 代码 ...
- html5跟随鼠标炫酷网站引导页动画特效
html5跟随鼠标炫酷网站引导页动画特效一款非常不错的引导页,文字效果渐变,鼠标跟随出绚丽的条纹.html5炫酷网站引导页,鼠标跟随出特效. 体验效果:http://hovertree.com/tex ...
- 简单CSS3实现炫酷读者墙
如题,给大家介绍和讲解几个常用的CSS3属性,并用到实处. 先看demo(请使用Chrome或者Firefox浏览,IE的靠边): 点此查看实例 觉得爽的可以继续阅读下面的知识点,感觉不爽的可绕行. ...
- 【DevOps】DevOps成功的八大炫酷工具
为自动化和分析所设计的软件及服务正加速devops改革的步伐,本文为你盘点了Devops成功的八大炫酷工具 Devops凭借其连接弥合开发与运营团队的能力正在各个行业呈现席卷之势.开发人员和运营人员历 ...
随机推荐
- 回流&重绘
浏览器加载解析页面:把HTML解析为DOM树,解析CSS生成CSSOM树,HTML DOM树和CSSOM树组合构建render树,首次触发回流和重绘后将页面结构信息发送给GPU进行绘制渲染. 回流:当 ...
- 【Java面试】Mysql为什么使用B+Tree作为索引结构
一个工作8年的粉丝私信了我一个问题. 他说这个问题是去阿里面试的时候被问到的,自己查了很多资料也没搞明白,希望我帮他解答. 问题是: "Mysql为什么使用B+Tree作为索引结构" ...
- 3.对互斥事件和条件概率的相互理解《zobol的考研概率论教程》
tag:这篇文章没太多思考的地方,就是做个过渡 1.从条件概率来定义互斥和对立事件 2.互斥事件是独立事件吗? 3.每个样本点都可以看作是互斥事件,来重新看待条件概率 一.从条件概率来定义互斥和对立事 ...
- 使用React.js写一个类似单选框与复选框的功能
单选框 <!DOCTYPE html> <html> <head> <meta charset="UTF-8" /> <tit ...
- 一分钟入门 Babel(下一代 JavaScript 语法的编译器)
简单来说把 JavaScript 中 es2015/2016/2017/2046 的新语法转化为 es5,让低端运行环境(如浏览器和 node )能够认识并执行.严格来说,babel 也可以转化为更低 ...
- ansible对文件内容操作
ansible lineinfile 简介 lineinfile该模块是操作文件中的每一行内容,他是按照行为单位的,和下面的replace模块并不冲突. 修改匹配行,如果不存在就会添加 tasks: ...
- 【炼丹Trick】EMA的原理与实现
在进行深度学习训练时,同一模型往往可以训练出不同的效果,这就是炼丹这件事的玄学所在.使用一些trick能够让你更容易追上目前SOTA的效果,一些流行的开源代码中已经集成了不少trick,值得学习一番. ...
- elastic-job和spring cloud版本冲突2
***************************APPLICATION FAILED TO START*************************** Description: An at ...
- centos一些mysql常用命令
# service mysqld status #命令来查看mysql 的启动状态,active (running) 是运行中 systemctl start mysqld.service ...
- 5-7 分页查询PageHelper
1. PageHelper实现分页查询 Day08 1.1 PH作用: PageHelper框架可以实现我们提供页码和每页条数, 自动实现分页效果,收集分页信息 1.2 PH原理: PageHelpe ...