
Python爬虫入门:爬取pixiv
终于想开始爬自己想爬的网站了。于是就试着爬P站试试手。
我爬的图的目标网址是: http://www.pixiv.net/search.php?word=%E5%9B%9B%E6%9C%88%E3%81%AF%E5%90%9B%E3%81%AE%E5%98%98,目标是将每一页的图片都爬下来。
一开始以为不用登陆,就直接去爬图片了。
后来发现是需要登录的,但是不会只好去学模拟登陆。
这里是登陆网站 https://accounts.pixiv.net/login?lang=zh&source=pc&view_type=page&ref=wwwtop_accounts_index 的headers,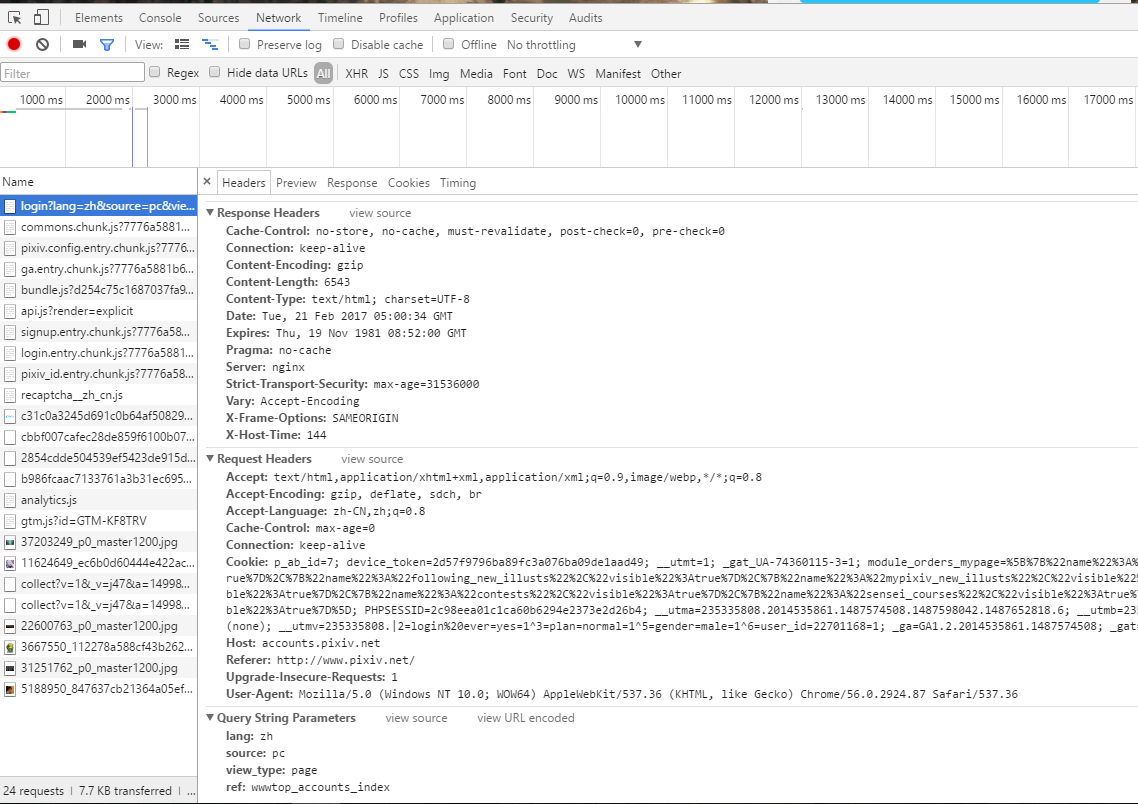
然后还要去获取我们登陆时候需要的data。点住上面的presevelog,找到登陆的网址,点开查看Form Data就可以知道我们post的时候的data需要什么了。这里可以看到有个postkey,多试几次可以发现这个是变化的,即我们要去捕获它,而不能直接输入。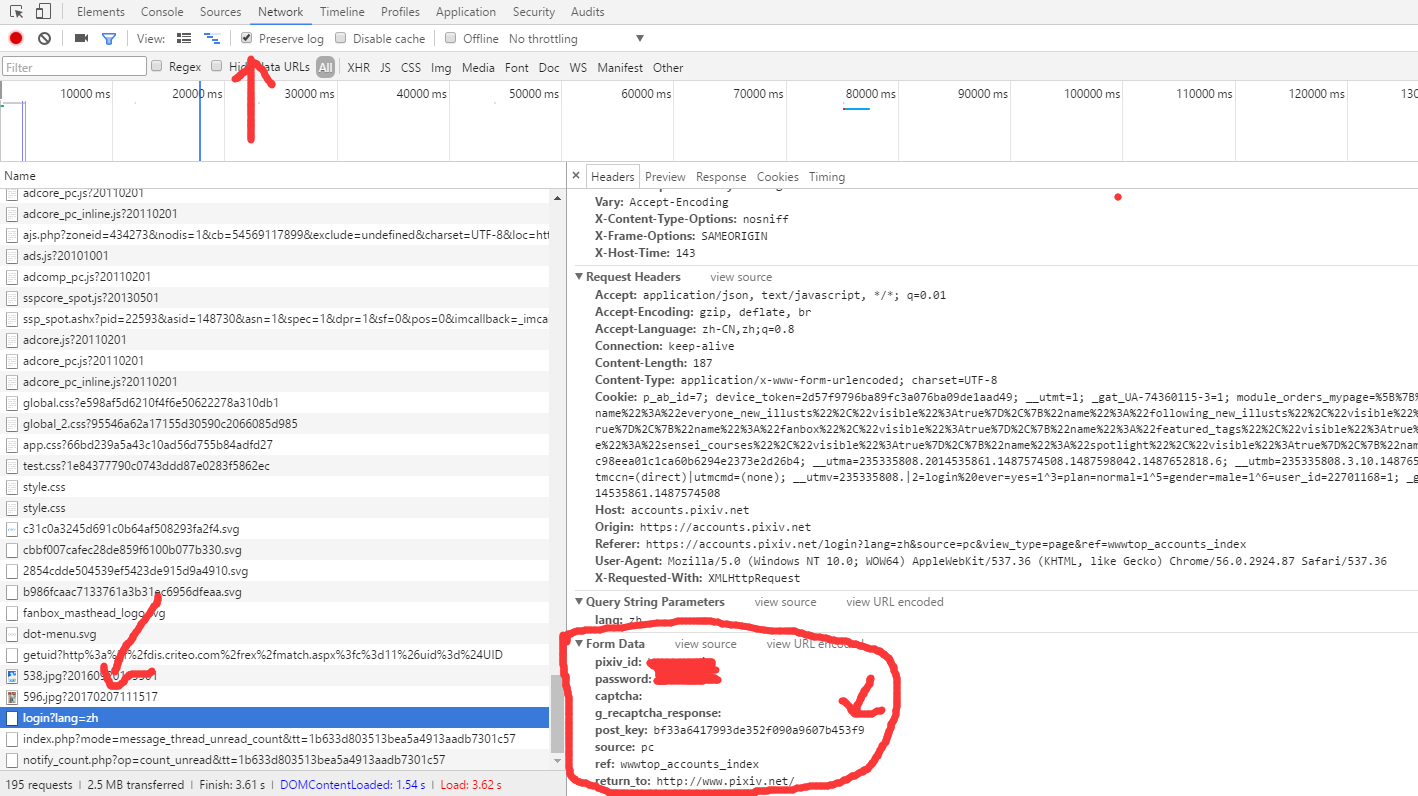
于是退回到登陆界面,F12查看源码,发现有一个postkey,那么我们就可以写一个东西去捕获它,然后把它放到我们post的data里面。
这里给出登陆界面需要的代码:
     def __init__(self):

         self.base_url = 'https://accounts.pixiv.net/login?lang=zh&source=pc&view_type=page&ref=wwwtop_accounts_index'

         self.login_url = 'https://accounts.pixiv.net/api/login?lang=zh'

         self.target_url = 'http://www.pixiv.net/search.php?' \

                           'word=%E5%9B%9B%E6%9C%88%E3%81%AF%E5%90%9B%E3%81%AE%E5%98%98&order=date_d&p='

         self.main_url = 'http://www.pixiv.net'

         # headers只要这两个就可以了,之前加了太多其他的反而爬不上

         self.headers = {

             'Referer': 'https://accounts.pixiv.net/login?lang=zh&source=pc&view_type=page&ref=wwwtop_accounts_index',

             'User-Agent': 'Mozilla/5.0 (Windows NT 10.0; WOW64) '

                           'AppleWebKit/537.36 (KHTML, like Gecko) Chrome/56.0.2924.87 Safari/537.36'

         }

         self.pixiv_id = 'userid'

         self.password = '*****'

         self.post_key = []

         self.return_to = 'http://www.pixiv.net/'

         self.load_path = 'D:\psdcode\Python\pixiv_pic'

         self.ip_list = []

     def login(self):

         post_key_html = se.get(self.base_url, headers=self.headers).text

         post_key_soup = BeautifulSoup(post_key_html, 'lxml')

         self.post_key = post_key_soup.find('input')['value']

         # 上面是去捕获postkey

         data = {

             'pixiv_id': self.pixiv_id,

             'password': self.password,

             'return_to': self.return_to,

             'post_key': self.post_key

         }

         se.post(self.login_url, data=data, headers=self.headers)
愉快地解决完登陆问题之后,就可以开始爬图片啦。
进入target_url:上面的目标网址。
点击目标的位置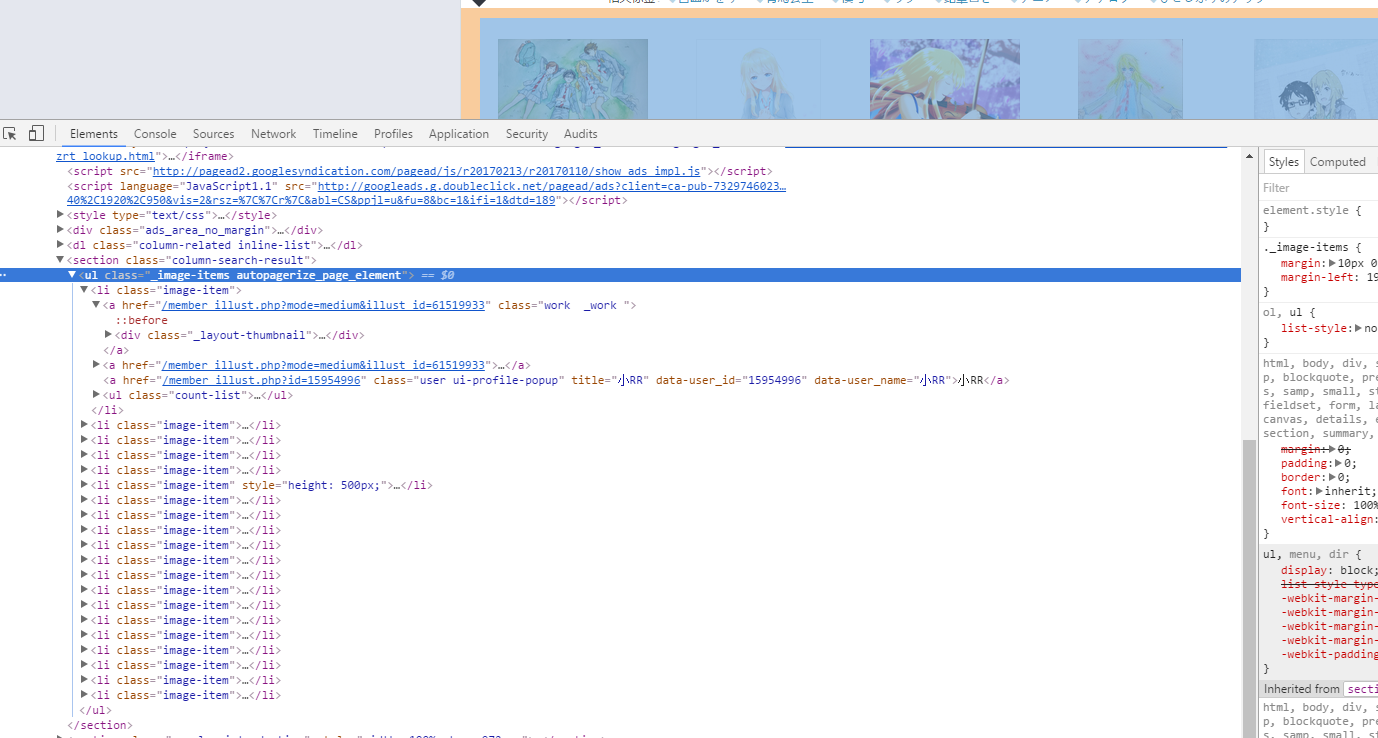
点开ul这个标签,发现图片全部都是在<li class="image-item">这里面的,因为我们要爬大一点的图(爬个小图有什么用啊!),所以还要进入一层第一个链接的网址去获取大图,我们可以发现我们只要在main_url((http://www.pixiv.net)),再加上第一个href,就可以跑到图片所在的网址了,于是我们先跳转到图片网址看看怎么提取图片。
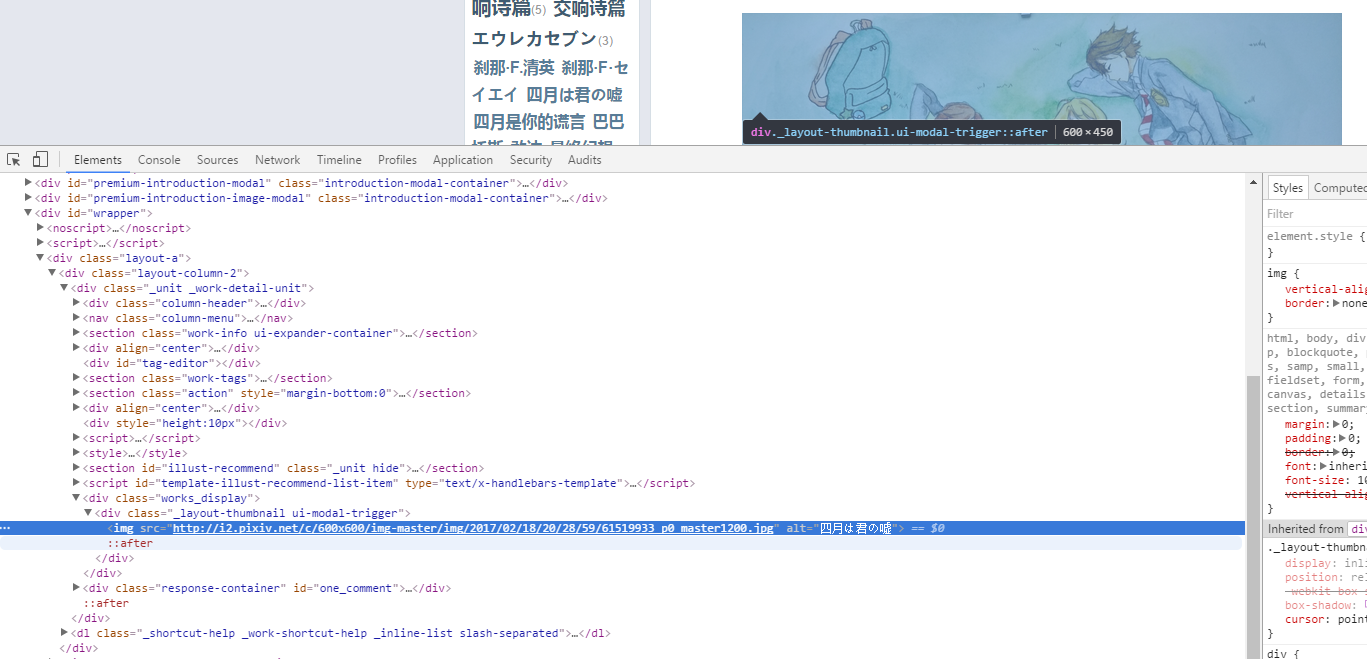
发现图片就躺在这里了,而且连标题都有,直接方便了我们存图的名字了。于是我们就可以直接去提取图片了。
注意我们在请求获取图片的时候要加一个referer,否则会403的。referer的找法就和上面一样。
     def get_img(self, html, page_num):

         li_soup = BeautifulSoup(html, 'lxml')  # 传入第page_num页的html

         li_list = li_soup.find_all('li', attrs={'class', 'image-item'})   # 找到li所在位置

         # print('get_list succeed')

         # print(li_list)

         for li in li_list:

             href = li.find('a')['href']  # 直接提取第一个href

             # print('get_href succeed')

             # print(href)

             jump_to_url = self.main_url + href  # 跳转到目标的url

             # print('get_jump_to_url succeed')

             jump_to_html = self.get_html(jump_to_url, 3).text  # 获取图片的html

             # print('get_jump_to_html succeed')

             img_soup = BeautifulSoup(jump_to_html, 'lxml')

             img_info = img_soup.find('div', attrs={'class', 'works_display'})\

                 .find('div', attrs={'class', '_layout-thumbnail ui-modal-trigger'})

             # 找到目标位置的信息

             if img_info is None:  # 有些找不到url,如果不continue会报错

                 continue

             self.download_img(img_info, jump_to_url, page_num)  # 去下载这个图片

     def download_img(self, img_info, href, page_num):

         title = img_info.find('img')['alt']  # 提取标题

         src = img_info.find('img')['src']  # 提取图片位置

         src_headers = self.headers

         src_headers['Referer'] = href  # 增加一个referer,否则会403,referer就像上面登陆一样找

         try:

             html = requests.get(src, headers=src_headers)

             img = html.content

         except:  # 有时候会发生错误导致不能获取图片.直接跳过这张图吧

             print('获取该图片失败')

             return False
接下来轮到下载图片了。这个之前还不怎么会,临时学了一下。
首先是创建文件夹,我这里是每一页就开一个文件夹。
     def mkdir(self, path):

         path = path.strip()

         is_exist = os.path.exists(os.path.join(self.load_path, path))

         if not is_exist:

             print('创建一个名字为 ' + path + ' 的文件夹')

             os.makedirs(os.path.join(self.load_path, path))

             os.chdir(os.path.join(self.load_path, path))

             return True

         else:

             print('名字为 ' + path + ' 的文件夹已经存在')

             os.chdir(os.path.join(self.load_path, path))

             return False
    def download_img(self, img_info, href, page_num):

         title = img_info.find('img')['alt']  # 提取标题

         src = img_info.find('img')['src']  # 提取图片位置

         src_headers = self.headers

         src_headers['Referer'] = href  # 增加一个referer,否则会403,referer就像上面登陆一样找

         try:

             html = requests.get(src, headers=src_headers)

             img = html.content

         except:  # 有时候会发生错误导致不能获取图片.直接跳过这张图吧

             print('获取该图片失败')

             return False

         title = title.replace('?', '_').replace('/', '_').replace('\\', '_').replace('*', '_').replace('|', '_')\

             .replace('>', '_').replace('<', '_').replace(':', '_').replace('"', '_').strip()

         # 去掉那些不能在文件名里面的.记得加上strip()去掉换行

         if os.path.exists(os.path.join(self.load_path, str(page_num), title + '.jpg')):

             for i in range(1, 100):

                 if not os.path.exists(os.path.join(self.load_path, str(page_num), title + str(i) + '.jpg')):

                     title = title + str(i)

                     break

         # 如果重名了,就加上一个数字

         print('正在保存名字为: ' + title + ' 的图片')

         with open(title + '.jpg', 'ab') as f:

             f.write(img)

         print('保存该图片完毕')
这样我们的大体工作就做完了。剩下的是写一个work函数让它开始跑。
     def work(self):

         self.login()

         for page_num in range(1, 51):  # 太多页了,只跑50页

             path = str(page_num)  # 每一页就开一个文件夹

             self.mkdir(path)  # 创建文件夹

             # print(self.target_url + str(page_num))

             now_html = self.get_html(self.target_url + str(page_num), 3)  # 获取页码

             self.get_img(now_html.text, page_num)  # 获取图片

             print('第 {page} 页保存完毕'.format(page=page_num))

             time.sleep(2)  # 防止太快被反
启动!
大概跑了10页之后,会弹出一大堆信息什么requests不行怎么的。问了下别人应该是被反爬了。
于是去搜了一下资料,http://cuiqingcai.com/3256.html,照着他那样写了使用代理的东西。(基本所有东西都在这学的)。
于是第一个小爬虫就好了。不过代理的东西还没怎么懂,到时候看看,50页爬了两个多钟。
对了。可能网站的源代码会有改动的。因为我吃完饭后用吃饭前的代码继续工作的时候出错了,然后要仔细观察重新干。
 # -*- coding:utf-8 -*-

 import requests

 from bs4 import BeautifulSoup

 import os

 import time

 import re

 import random

 se = requests.session()

 class Pixiv():

     def __init__(self):

         self.base_url = 'https://accounts.pixiv.net/login?lang=zh&source=pc&view_type=page&ref=wwwtop_accounts_index'

         self.login_url = 'https://accounts.pixiv.net/api/login?lang=zh'

         self.target_url = 'http://www.pixiv.net/search.php?' \

                           'word=%E5%9B%9B%E6%9C%88%E3%81%AF%E5%90%9B%E3%81%AE%E5%98%98&order=date_d&p='

         self.main_url = 'http://www.pixiv.net'

         # headers只要这两个就可以了,之前加了太多其他的反而爬不上

         self.headers = {

             'Referer': 'https://accounts.pixiv.net/login?lang=zh&source=pc&view_type=page&ref=wwwtop_accounts_index',

             'User-Agent': 'Mozilla/5.0 (Windows NT 10.0; WOW64) '

                           'AppleWebKit/537.36 (KHTML, like Gecko) Chrome/56.0.2924.87 Safari/537.36'

         }

         self.pixiv_id = 'userid'

         self.password = '*****'

         self.post_key = []

         self.return_to = 'http://www.pixiv.net/'

         self.load_path = 'D:\psdcode\Python\pixiv_pic'

         self.ip_list = []

     def login(self):

         post_key_html = se.get(self.base_url, headers=self.headers).text

         post_key_soup = BeautifulSoup(post_key_html, 'lxml')

         self.post_key = post_key_soup.find('input')['value']

         # 上面是去捕获postkey

         data = {

             'pixiv_id': self.pixiv_id,

             'password': self.password,

             'return_to': self.return_to,

             'post_key': self.post_key

         }

         se.post(self.login_url, data=data, headers=self.headers)

     def get_proxy(self):

         html = requests.get('http://haoip.cc/tiqu.htm')

         ip_list_temp = re.findall(r'r/>(.*?)<b', html.text, re.S)

         for ip in ip_list_temp:

             i = re.sub('\n', '', ip)

             self.ip_list.append(i.strip())

             print(i.strip())

     ''' 会被反爬,改成使用代理

         def get_tml(self, url):

             response = se.get(url, headers=self.headers)

             return response

     '''

     def get_html(self, url, timeout, proxy=None, num_entries=5):

         if proxy is None:

             try:

                 return se.get(url, headers=self.headers, timeout=timeout)

             except:

                 if num_entries > 0:

                     print('获取网页出错,5秒后将会重新获取倒数第', num_entries, '次')

                     time.sleep(5)

                     return self.get_html(url, timeout, num_entries = num_entries - 1)

                 else:

                     print('开始使用代理')

                     time.sleep(5)

                     ip = ''.join(str(random.choice(self.ip_list))).strip()

                     now_proxy = {'http': ip}

                     return self.get_html(url, timeout, proxy = now_proxy)

         else:

             try:

                 return se.get(url, headers=self.headers, proxies=proxy, timeout=timeout)

             except:

                 if num_entries > 0:

                     print('正在更换代理,5秒后将会重新获取第', num_entries, '次')

                     time.sleep(5)

                     ip = ''.join(str(random.choice(self.ip_list))).strip()

                     now_proxy = {'http': ip}

                     return self.get_html(url, timeout, proxy = now_proxy, num_entries = num_entries - 1)

                 else:

                     print('使用代理失败,取消使用代理')

                     return self.get_html(url, timeout)

     def get_img(self, html, page_num):

         li_soup = BeautifulSoup(html, 'lxml')  # 传入第page_num页的html

         li_list = li_soup.find_all('li', attrs={'class', 'image-item'})   # 找到li所在位置

         # print('get_list succeed')

         # print(li_list)

         for li in li_list:

             href = li.find('a')['href']  # 直接提取第一个href

             # print('get_href succeed')

             # print(href)

             jump_to_url = self.main_url + href  # 跳转到目标的url

             # print('get_jump_to_url succeed')

             jump_to_html = self.get_html(jump_to_url, 3).text  # 获取图片的html

             # print('get_jump_to_html succeed')

             img_soup = BeautifulSoup(jump_to_html, 'lxml')

             img_info = img_soup.find('div', attrs={'class', 'works_display'})\

                 .find('div', attrs={'class', '_layout-thumbnail ui-modal-trigger'})

             # 找到目标位置的信息

             if img_info is None:  # 有些找不到url,如果不continue会报错

                 continue

             self.download_img(img_info, jump_to_url, page_num)  # 去下载这个图片

     def download_img(self, img_info, href, page_num):

         title = img_info.find('img')['alt']  # 提取标题

         src = img_info.find('img')['src']  # 提取图片位置

         src_headers = self.headers

         src_headers['Referer'] = href  # 增加一个referer,否则会403,referer就像上面登陆一样找

         try:

             html = requests.get(src, headers=src_headers)

             img = html.content

         except:  # 有时候会发生错误导致不能获取图片.直接跳过这张图吧

             print('获取该图片失败')

             return False

         title = title.replace('?', '_').replace('/', '_').replace('\\', '_').replace('*', '_').replace('|', '_')\

             .replace('>', '_').replace('<', '_').replace(':', '_').replace('"', '_').strip()

         # 去掉那些不能在文件名里面的.记得加上strip()去掉换行

         if os.path.exists(os.path.join(self.load_path, str(page_num), title + '.jpg')):

             for i in range(1, 100):

                 if not os.path.exists(os.path.join(self.load_path, str(page_num), title + str(i) + '.jpg')):

                     title = title + str(i)

                     break

         # 如果重名了,就加上一个数字

         print('正在保存名字为: ' + title + ' 的图片')

         with open(title + '.jpg', 'ab') as f:  # 图片要用b

             f.write(img)

         print('保存该图片完毕')

     def mkdir(self, path):

         path = path.strip()

         is_exist = os.path.exists(os.path.join(self.load_path, path))

         if not is_exist:

             print('创建一个名字为 ' + path + ' 的文件夹')

             os.makedirs(os.path.join(self.load_path, path))

             os.chdir(os.path.join(self.load_path, path))

             return True

         else:

             print('名字为 ' + path + ' 的文件夹已经存在')

             os.chdir(os.path.join(self.load_path, path))

             return False

     def work(self):

         self.login()

         for page_num in range(1, 51):  # 太多页了,只跑50页

             path = str(page_num)  # 每一页就开一个文件夹

             self.mkdir(path)  # 创建文件夹

             # print(self.target_url + str(page_num))

             now_html = self.get_html(self.target_url + str(page_num), 3)  # 获取页码

             self.get_img(now_html.text, page_num)  # 获取图片

             print('第 {page} 页保存完毕'.format(page=page_num))

             time.sleep(2)  # 防止太快被反

 pixiv = Pixiv()

 pixiv.work()
Python爬虫入门:爬取pixiv的更多相关文章
- Python学习 —— 爬虫入门 - 爬取Pixiv每日排行中的图片
更新于 2019-01-30 16:30:55 我另外写了一个面向 pixiv 的库:pixiver 支持通过作品 ID 获取相关信息.下载等,支持通过日期浏览各种排行榜(包括R-18),支持通过 p ...
- Python爬虫之爬取淘女郎照片示例详解
这篇文章主要介绍了Python爬虫之爬取淘女郎照片示例详解,文中通过示例代码介绍的非常详细,对大家的学习或者工作具有一定的参考学习价值,需要的朋友们下面随着小编来一起学习学习吧 本篇目标 抓取淘宝MM ...
- Python爬虫之爬取慕课网课程评分
BS是什么? BeautifulSoup是一个基于标签的文本解析工具.可以根据标签提取想要的内容,很适合处理html和xml这类语言文本.如果你希望了解更多关于BS的介绍和用法,请看Beautiful ...
- [Python爬虫] Selenium爬取新浪微博客户端用户信息、热点话题及评论 (上)
转载自:http://blog.csdn.net/eastmount/article/details/51231852 一. 文章介绍 源码下载地址:http://download.csdn.net/ ...
- from appium import webdriver 使用python爬虫,批量爬取抖音app视频(requests+Fiddler+appium)
使用python爬虫,批量爬取抖音app视频(requests+Fiddler+appium) - 北平吴彦祖 - 博客园 https://www.cnblogs.com/stevenshushu/p ...
- Python爬虫之爬取站内所有图片
title date tags layut Python爬虫之爬取站内所有图片 2018-10-07 Python post 目标是 http://www.5442.com/meinv/ 如需在非li ...
- python爬虫实战---爬取大众点评评论
python爬虫实战—爬取大众点评评论(加密字体) 1.首先打开一个店铺找到评论 很多人学习python,不知道从何学起.很多人学习python,掌握了基本语法过后,不知道在哪里寻找案例上手.很多已经 ...
- python爬虫项目-爬取雪球网金融数据(关注、持续更新)
(一)python金融数据爬虫项目 爬取目标:雪球网(起始url:https://xueqiu.com/hq#exchange=CN&firstName=1&secondName=1_ ...
- 初次尝试python爬虫,爬取小说网站的小说。
本次是小阿鹏,第一次通过python爬虫去爬一个小说网站的小说. 下面直接上菜. 1.首先我需要导入相应的包,这里我采用了第三方模块的架包,requests.requests是python实现的简单易 ...
- python 爬虫之爬取大街网(思路)
由于需要,本人需要对大街网招聘信息进行分析,故写了个爬虫进行爬取.这里我将记录一下,本人爬取大街网的思路. 附:爬取得数据仅供自己分析所用,并未用作其它用途. 附:本篇适合有一定 爬虫基础 crawl ...
随机推荐
- x86汇编指令脚本虚拟机
简介 这是一个可以直接解释执行从ida pro里面提取出来的x86汇编代码的虚拟机. 非常精简,整体架构上不能跟那些成熟的虚拟机相比,主要目标是够用.能用.轻量就行,如果觉得代码架构设计的不是很好的话 ...
- .NET Core 中使用 Humanizer 显示友好时间格式
今天在将一个 .net framework 项目迁移至 .net core 的过程中,在迁移到显示友好时间格式(比如“1分钟前”,“1小时前”)的代码时,找了找看有没有对应的开源库,结果找到了 Hum ...
- BAT-把当前用户以管理员权限运行(用户帐户控制:用于内置管理员帐户的管理员批准模式)
相关资料: http://jingyan.baidu.com/article/72ee561a5dc24fe16138df95.html 网友求助:联想Y400,Win8系统 怎样获得管理员身份 要求 ...
- 关于jquery.fileupload结合PHP上传图片的开发用法流程
这阵子做了一个项目,涉及到了图片上传,以往用的都是uploadify这个插件,感觉它在PC上的使用还是很强大的, 不过最近这个项目涉及到了移动端的上传,其实uploadify也可以,但是他有一个 up ...
- 关于DexOpt: not all deps represented
最近在做android BSP 4.2的时候遇到一个BUG,编译user 版本的时候,系统刷进手机里面去,无限循环在开机动画,编译userdebug 刷机进去的时候发现正常,于是我先回滚到正常的版本, ...
- win2003浏览器提示是否需要将当前访问的网站添加到自己信任的站点中去
Win2003的操作系统,的确比其它操作系统在安全上增加了不少,这是为用户所考虑的.当然,既然提供了安全性,尤其是在上网的时候,可以禁止某些活动脚本的显示,这样,就可以多方面的避免在使用Win2003 ...
- ASP.NET MVC3在Visual Studio 2010中的变化
在VS2010中新建一个MVC3项目可以看出与以往的MVC2发生了很明显的变化 1.ASP.NET MVC3必要的运行环境为.NET 4.0 (想在3.5用MVC3,没门!) 2.默认MVC3模板项目 ...
- java.lang.ClassNotFoundException: org.hibernate.ejb.HibernatePersistence 解决方法
编译遇到错误,如下: May 11, 2017 1:49:42 PM org.springframework.web.context.ContextLoader initWebApplicationC ...
- Kong:Nginx支持的API Gateway管理解决方案
Kong的主要功能 Kong可灵活扩展:只要增添更多的服务器实例,它就能横向扩展,毫无问题,那样你可以支持更多流量,同时确保网络延迟很短. Kong可在任何地方运行:它可以部署在单个或多个数据中心环境 ...
- Centos 7 防火墙 firewalld 简单使用说明
1.firewalld简介 firewalld是centos7的一大特性,最大的好处有两个:支持动态更新,不用重启服务:第二个就是加入了防火墙的“zone”概念 2.firewalld命令行界面管 ...