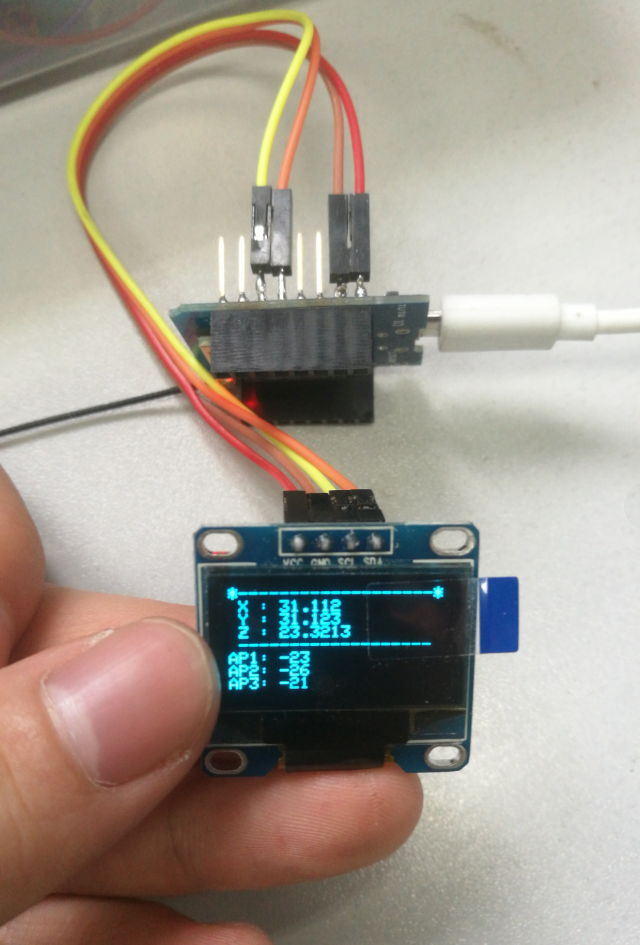
OLED液晶屏幕(4)串口读取文字并分割,液晶屏幕显示
ESP8266-07
0.93存 液晶屏 128*64 驱动芯片 ssd1306
接线
VCC-5v
GND-GND
SCL-D1(SCL)
SDA-D2(SDA)
安装两个库
#include <Adafruit_GFX.h>
#include <Adafruit_SSD1306.h>
串口输入一句话
液晶屏幕显示出来
#include <SPI.h>

#include <Wire.h>

#include <Adafruit_GFX.h>

#include <Adafruit_SSD1306.h>

#define SCREEN_WIDTH 128 // OLED display width, in pixels

#define SCREEN_HEIGHT 64 // OLED display height, in pixels

// Declaration for an SSD1306 display connected to I2C (SDA, SCL pins)

#define OLED_RESET    -1 //4  Reset pin # (or -1 if sharing Arduino reset pin)

Adafruit_SSD1306 display(SCREEN_WIDTH, SCREEN_HEIGHT, &Wire, OLED_RESET);

#define NUMFLAKES     10 // Number of snowflakes in the animation example

#define LOGO_HEIGHT   16

#define LOGO_WIDTH    16

String comdata = "";

void oledint(){

  // SSD1306_SWITCHCAPVCC = generate display voltage from 3.3V internally

  if(!display.begin(SSD1306_SWITCHCAPVCC, 0x3C)) { // Address 0x3D for 128x64

    Serial.println("SSD1306 allocation failed");

    for(;;); // Don't proceed, loop forever

  }

  Serial.println("success");

  // Show initial display buffer contents on the screen --

  // the library initializes this with an Adafruit splash screen.

  display.display();

  delay(2000); // Pause for 2 seconds

  // Clear the buffer

  display.clearDisplay();

  // Draw a single pixel in white

  display.drawPixel(10, 10, WHITE);

  // Show the display buffer on the screen. You MUST call display() after

  // drawing commands to make them visible on screen!

  display.display();

  delay(2000);

  // Invert and restore display, pausing in-between

  display.invertDisplay(true);

  delay(1000);

  display.invertDisplay(false);

  delay(1000);

  }

void setup() {

  Serial.begin(9600);

  while(Serial.read()>= 0){} //clear serialbuffer

  oledint();

}

void loop() {

   if(Serial.available()>0){

      delay(100);

      comdata = Serial.readString();

    //  Serial.print("Serial.readString:");

    //  Serial.println(comdata);

      testdrawstyles(comdata);

    }

    comdata = "";

}

String getValue(String data, char separator, int index)

{

  int found = 0;

  int strIndex[] = {0, -1};

  int maxIndex = data.length()-1;

  for(int i=0; i<=maxIndex && found<=index; i++){

    if(data.charAt(i)==separator || i==maxIndex){

        found++;

        strIndex[0] = strIndex[1]+1;

        strIndex[1] = (i == maxIndex) ? i+1 : i;

    }

  }

  return found>index ? data.substring(strIndex[0], strIndex[1]) : "";

}

// x;31.112;y;31.123;z;23.3213;AP1;-23;AP2;-26;AP3;-21

void testdrawstyles(String msg) {

  display.clearDisplay();

  display.setTextSize(1);             // Normal 1:1 pixel scale

  display.setTextColor(WHITE);        // Draw white text

  display.setCursor(0,0);             // Start at top-left corner

 //display.println(msg);

 display.println(  "*-------------------*");

      String part01 = getValue(msg,';',1);

   display.print(F(" X : "));   display.println(part01);

       String part02 = getValue(msg,';',3);

   display.print(F(" Y : "));   display.println(part02);

       String part03 = getValue(msg,';',5);

    display.print(F(" Z : "));   display.println(part03);

 display.println(  " ------------------- ");

      String part04 = getValue(msg,';',7);

   display.print(F("AP1: "));   display.println(part04);

       String part05 = getValue(msg,';',9);

   display.print(F("AP2: "));   display.println(part05);

       String part06 = getValue(msg,';',11);

    display.print(F("AP3: "));   display.println(part06);

  display.display();

  delay(2000);

}
OLED液晶屏幕(4)串口读取文字并分割,液晶屏幕显示的更多相关文章
- OLED液晶屏幕(3)串口读取文字并分割
https://blog.csdn.net/iracer/article/details/50334041 String comdata = ""; void setup() { ...
- [Arduino] 在串口读取多个字符串,并且转换为数字数组
功能如题目.在串口收到逗号分割的6串数字比如100,200,45,4,87,99然后在6个PWM端口3, 5, 6, 9, 10, 11输出对应PWM值代码注释很详细了,就不再说明了. //定义一个c ...
- Arduino学习笔记A6(补充) - 在串口读取多个字符串,并且转换为数字数组
功能如题目. 在串口收到逗号分割的6串数字比如 100,200,45,4,87,99 然后在6个PWM端口3, 5, 6, 9, 10, 11输出对应PWM值 代码注释很详细了,就不再说明了. ARD ...
- VS编程,C#串口通讯,通过串口读取数据的一种方法
一.可能需要的软件:1.虚拟串口vspd(Virtual Serial Port Driver,用来在电脑上虚拟出一对串口,模拟通讯. 2.友善串口调试助手,用来发送.读取数据. 二.思路1.查询本机 ...
- 一篇提及如何通过串口读取并提取GPS信号的论文
一篇提及如何通过串口读取并提取GPS信号的论文 作者:崔杰 梁计春 王国军 目前,在用计算机进行数据传输时,常用的是串行通信方式.在Visual C++的编程中,既可以用Windows API函数进行 ...
- C# 从串口读取数据
最近要做系统集成,需要从串口读取数据,随学习一下相关知识: 以下是从串口读取数据 public static void Main() { SerialPort mySerialPort = new S ...
- labview初始学习过程中遇到串口读取框红蓝色交替闪烁的处理
labview工程的程序框图VISA串口读取框红蓝交替闪烁,前面板接收数据错乱,或者是接受不了,这是你不小心设置了断点.
- SPLIT(文字列の分割)
概要 SPLIT命令は特定の文字で値を分割する命令だ.タブ区切りや.カンマ区切り等のファイルからデータを取得し値を各項目に振り分けたい時に使用する事が多いだろう.また.XMLファイル等を使用してインタ ...
- Python + opencv 实现图片文字的分割
实现步骤: 1.通过水平投影对图形进行水平分割,获取每一行的图像: 2.通过垂直投影对分割的每一行图像进行垂直分割,最终确定每一个字符的坐标位置,分割出每一个字符: 先简单介绍一下投影法:分别在水平和 ...
随机推荐
- Python3 - 数字类型
在 Python 中,数字并不是一个真正的对象类型,而是一组类似类型的分类.Python 不仅支持通常的数字类型(整数和浮点数),而且还能够通过常量去直接创建数字以及处理数字的表达式.数字数据类型是不 ...
- golang(一)
开篇先来个Go语言的吉祥物-金花鼠Gordon. golang是谷歌2009年发布的开源编程语言,截止目前go的release版本已经到了1.10.go语言的开发人员都是计算机界大神一般的存在: Th ...
- centos7划分vlan
1. lsmod|grep 8021q 确认内核是够载入了802.1q模组 2.modprobe -a 8021q 如果没载入使用这个命令载入模组 3.配置vlan需要vconfig命令,由于c ...
- kubernetes--配置文件
- 【转载】C#中List集合使用Contains方法判断是否包含某个对象
在C#的List集合中,如果要查找List集合是否包含某一个值或者对象,如果不使用List集合类的扩展方法的话一般会使用for循环或者foreach遍历来查找,其实List集合类中的扩展方法Conta ...
- bootstrap fileinput实现限制图片上传数量及如何控制分批多次上传
废话没有,直奔主题 问题点: fileinput提供了一个maxFileCount用于限制图片上传的数量,设置maxFileCount为1时,一次性选择超过一张会有如下提示: 当选择一张,不点上传,再 ...
- 纯css实现省略号,兼容火狐,IE9,chrome
<!DOCTYPE html> <html lang="en"> <head> <meta charset="UTF-8&quo ...
- Java 之 HTTP 协议
HTTP 协议 一.基础 1.概念 HTTP:Hyper Text Transfer Protocol 超文本传输协议. 传输协议:定义了客户端和服务器端通信时,发送数据的格式. 2.特点 (1)基 ...
- Java的基本知识之线程池篇
1.基本概念 1.共享资源 多个线程对同一份资源进行访问(读写操作),该资源被称为共享资源.如何保证多个线程访问到的数据是一致的,则被称为数据同步或资源同步. 2.线程通信 线程通信,又叫进程内通信, ...
- 使用PATH变量进行Linux权限升级技巧
0x00 前言 在解决了几个OSCP挑战之后,我们决定写一篇关于用于Linux权限升级的各种方法的文章,这对我们的读者在其渗透测试项目中有所帮助.在本文中,我们将学习“使用$path变量的各种方法”以 ...