
Xamarin.Android开发实践(八)
Xamarin.Android其他类型的服务
一、前言
前面我们已经学了关于服务的很多知识,但是对于真实的开发那些远远不够,通过这节我们将学习其他类型的服务,比如前台服务、IntentService和消息服务。下面我们开始进入正题。
二、前台服务
顾名思义,就是拥有前台的优先等级。当然服务还是不可见的。因为前面我们介绍过 Android系统会在低内存的情况下将一些长时间不用的应用关闭,如果还是不够,那么就会通过关闭服务服务来达到目的,然而对于某些应用而言,这样将会 影响用户的正常使用。比如听音乐,我们基本上都会打开应用选择歌曲后将应用置为后台。但是你会发现通知栏中会存在这个通知并且无法移除,只有正确的退出这 个应用了才会消失,而这节我们就要实现这个功能。
首先我们必须要用一个通知,通过这个通知我们的服务才能够变成前台服务,这里我们新建一个名为ForegroundService的服务,然后重写OnStartCommand方法。
1         public override StartCommandResult OnStartCommand(Intent intent, StartCommandFlags flags, int startId)

2         {

3             var notify = new Notification(Resource.Drawable.Icon, "前台服务");

4             var activityIntent = new Intent(this, typeof(MainActivity));

5             var activityPintent = PendingIntent.GetActivity(this, 0, activityIntent, PendingIntentFlags.UpdateCurrent);

6             notify.SetLatestEventInfo(this, "标题", "内容", activityPintent);

7             StartForeground((int)NotificationFlags.ForegroundService, notify);

8             return StartCommandResult.Sticky;

9         }
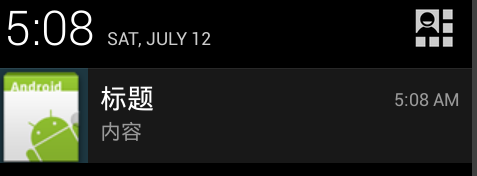
很多代码都是我们在讨论通知的时候都已经掌握的了,既然是前台服务,自然最后发送这个方法是不同的,我们需要使用服务的StartForeground来发送这个通知,同时第一个参数也要设置为前台服务,这样我们就可以看到如图的结果了(需要在MainActivity的OnCreate方法中开启该服务)。
虽然已经是一个前台服务了,但是我们只能通过服务不断的更新这个通知,而无法接收用户的事件,下面我们还要实现一个自定义界面的通知,上面有一个Text和两个Button用户点击不同的按钮后将由服务去更新通知,从而改变Text中的值。
首先我们在Resources/layout/下新建一个NotificationLayout视图,并在其中写入如下的xml标记。
 1 <?xml version="1.0" encoding="utf-8"?>

 2 <RelativeLayout xmlns:p1="http://schemas.android.com/apk/res/android"

 3     p1:minWidth="25px"

 4     p1:minHeight="25px"

 5     p1:layout_width="match_parent"

 6     p1:layout_height="match_parent"

 7     p1:id="@+id/relativeLayout1">

 8     <TextView

 9         p1:text="0"

10         p1:textAppearance="?android:attr/textAppearanceLarge"

11         p1:layout_width="wrap_content"

12         p1:layout_height="match_parent"

13         p1:id="@+id/textView1" />

14     <Button

15         p1:text="显示1"

16         p1:layout_width="wrap_content"

17         p1:layout_height="match_parent"

18         p1:layout_toRightOf="@id/textView1"

19         p1:id="@+id/button1" />

20     <Button

21         p1:text="显示2"

22         p1:layout_width="wrap_content"

23         p1:layout_height="match_parent"

24         p1:layout_toRightOf="@id/button1"

25         p1:id="@+id/button2" />

26 </RelativeLayout>
打开ForegroundService并在其中新建一个CreateNotify方法,并在其中写入如下代码。
 1         public Notification CreateNotify(string text)

 2         {

 3             notify = new Notification(Resource.Drawable.Icon, "前台服务");

 4             var sintent = new Intent(this, typeof(MainActivity));

 5             sintent.SetFlags(ActivityFlags.LaunchedFromHistory);

 6             notify.ContentView = new RemoteViews(PackageName, Resource.Layout.NotificationLayout);

 7             notify.ContentIntent = PendingIntent.GetActivity(this, 0, sintent, PendingIntentFlags.NoCreate);

 8

 9             var btn1Intent = new Intent(this, typeof(ForegroundService));

10             btn1Intent.PutExtra("showBtn1", true);

11             var btn1Pintent = PendingIntent.GetService(this, 0, btn1Intent, PendingIntentFlags.UpdateCurrent);

12             notify.ContentView.SetOnClickPendingIntent(Resource.Id.button1, btn1Pintent);

13

14             var btn2Intent = new Intent(this, typeof(ForegroundService));

15             btn2Intent.PutExtra("showBtn2", true);

16             var btn2Pintent = PendingIntent.GetService(this, 1, btn2Intent, PendingIntentFlags.UpdateCurrent);

17             notify.ContentView.SetOnClickPendingIntent(Resource.Id.button2, btn2Pintent);

18

19             notify.ContentView.SetTextViewText(Resource.Id.textView1, text);

20             return notify;

21         }
这里需要说明下,一旦通知发送出去了我们是无法同ContentView的Set去修改控件的,只能重新发送这个同时去更新旧的通知,所以笔者才需要一个单独的方法负责创建通知。上面的代码我们之前都已经学习过了,不理解的可以看这篇文件《Xamarin.Android通知详解》。笔者设置按钮的点击事件是打开服务本身,同时还通过Intent传递了一个参数,因为后面我们需要通过这些参数去区分哪个按钮按下了,同时还要注意PendingIntent的GetService方法的第二个参数,我们两者都是0那么会造成按下按钮1和按纽2都传递同样的参数。下面我们在OnStartCommand中实现响应。
 1         public override StartCommandResult OnStartCommand(Intent intent, StartCommandFlags flags, int startId)

 2         {

 3             if (notify == null)

 4             {

 5                 notify = CreateNotify("初始化");

 6                 StartForeground((int)NotificationFlags.ForegroundService, notify);

 7             }

 8             bool isBtn1Click = intent.GetBooleanExtra("showBtn1", false);

 9             bool isBtn2Click = intent.GetBooleanExtra("showBtn2", false);

10             if (isBtn1Click)

11             {

12                 if (notify != null)

13                 {

14                     notify = CreateNotify("来自按钮1");

15                     StartForeground((int)NotificationFlags.ForegroundService, notify);

16                 }

17             }

18             else if (isBtn2Click)

19             {

20                 if (notify != null)

21                 {

22                     notify = CreateNotify("来自按钮2");

23                     StartForeground((int)NotificationFlags.ForegroundService, notify);

24                 }

25             }

26             return StartCommandResult.Sticky;

27         }
可以看到我们通过GetBooleanExtra获取了通过意图传递的参数,当然笔者这里的用法不同于前面的方式,我还传入了第二个参数,这样做的目的就是在意图中不存在该值的时候将会把第二参数返回,下面就是进行不同的判断从而更新通知。
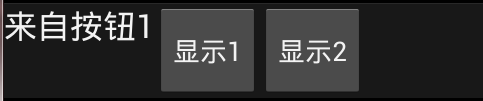
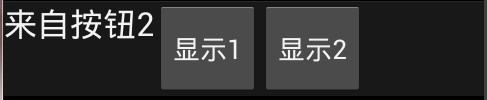
最终运行结果如下所示:
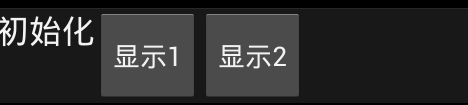
按下“显示1”后
按下“显示2”后
至此我们就完成了前台服务的学习。
三、IntentService
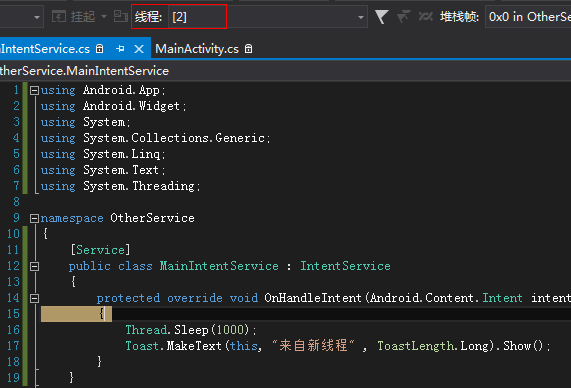
很多时候我们都需要利用服务进行耗时的操作,势必需要创建新的线程去处理。但是普通的Service并不会主动创建而需要开发者自行在OnStartCommand中去创建,为此就繁衍出了IntentService类,它会为我们创建好线程去执行我们的代码,从而避免一些代码。但是我们不能重写OnStartCommand方法而应该是OnHandleIntent方法。比如下面的代码。
1     [Service]

2     public class MainIntentService : IntentService

3     {

4         protected override void OnHandleIntent(Android.Content.Intent intent)

5         {

6             Thread.Sleep(1000);

7             Toast.MakeText(this, "来自新线程" , ToastLength.Long).Show();

8         }

9     }
通过下面的截图我们可以看到OnHandleIntent中执行的代码是新建的一个线程
关于IntentService的使用非常简单。
四、通信服务
上一节关于绑定服务的学习中,活动必须确切的知道服务的类型才能使用,这样就加大了他们之间的耦合度,而通过本节我们将会学习如何通过消息机制将他们解耦,首先我们需要理解Handler类,它将会负责处理发送过来的消息,我们需要继承该类,并重写HandleMessage方法,我们新建一个MainHandler类并继承该类,然后重写。
1     public class MainHandler : Handler

2     {

3         public override void HandleMessage(Message msg)

4         {

5             Toast.MakeText(Application.Context, "接收到的消息的what为" + msg.What.ToString() + " 内容为" + msg.Data.GetString("_str"), ToastLength.Short).Show();

6         }

7 }
这里我们仅仅只是简单的输出了消息的类型以及消息传递的参数,下面我们还需要一个服务将这个消息传递给活动。
 1     [Service]

 2     public class MessengerService : Service

 3     {

 4         Messenger messenger;

 5

 6         public MessengerService()

 7         {

 8             messenger = new Messenger(new MainHandler());

 9         }

10

11         public override Android.OS.IBinder OnBind(Android.Content.Intent intent)

12         {

13             return messenger.Binder;

14         }

15 }
这里我们还需要Messenger去封装MainHandler,因为MainHandler是无法在OnBind中直接返回的,只有Messenger的Binder属性可以,自然活动那边就需要接收这个接口,下面是IserviceConnection的实现。
 1     public class MessengerServiceConnection : Java.Lang.Object , IServiceConnection

 2     {

 3         MainActivity mainActivity;

 4

 5         public MessengerServiceConnection(MainActivity ma)

 6         {

 7             mainActivity = ma;

 8         }

 9

10         public void OnServiceConnected(ComponentName name, Android.OS.IBinder service)

11         {

12             mainActivity.messenger = new Messenger(service);

13         }

14

15         public void OnServiceDisconnected(ComponentName name)

16         {

17             mainActivity.messenger.Dispose();

18             mainActivity.messenger = null;

19         }

20 }
这里的方式依然是使用之前我们讲述绑定服务时候的方法,只是在我们接收接口的时候是用Messenger的去封装的,这样就统一了。我们的活动只要有Messenger,并且对应的服务都满足这个接口那么我们的活动就可以灵活的绑定任意服务,使用他们的功能了,最后是MainActivity的代码(需要在Main.axml中拖拽两个按钮,以便发送消息给服务)。
 1     [Activity(Label = "OtherService", MainLauncher = true, Icon = "@drawable/icon")]

 2     public class MainActivity : Activity

 3     {

 4         public Messenger messenger;

 5

 6         protected override void OnCreate(Bundle bundle)

 7         {

 8             base.OnCreate(bundle);

 9             SetContentView(Resource.Layout.Main);

10             BindService(new Intent(this, typeof(MessengerService)), new MessengerServiceConnection(this), Bind.AutoCreate);

11             Button btn1 = FindViewById<Button>(Resource.Id.button1);

12             btn1.Click += (e, s) =>

13             {

14                 Message msg = Message.Obtain();

15                 Bundle b = new Bundle();

16                 b.PutString("_str", "消息1");

17                 msg.Data = b;

18                 msg.What = 1;

19                 messenger.Send(msg);

20             };

21

22             Button btn2 = FindViewById<Button>(Resource.Id.button2);

23             btn2.Click += (e, s) =>

24             {

25                 Message msg = Message.Obtain();

26                 Bundle b = new Bundle();

27                 b.PutString("_str", "消息2");

28                 msg.Data = b;

29                 msg.What = 2;

30                 messenger.Send(msg);

31             };

32         }

33 }
唯一要说的就是发送消息,我们需要实例化Messager(不是Messenger),设置它的what,如果我们还需要传递更多的参数我们可以实例化一个Bundle,然后通过其PutXXX方法赋值,最后赋给Message的Data类型,最后要通过Messenger实例的Send方法发送这个消息,那么MainHandler就可以处理这个消息了。
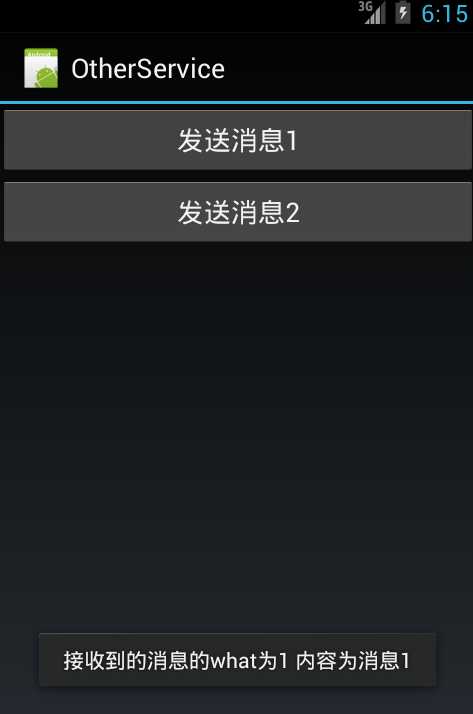
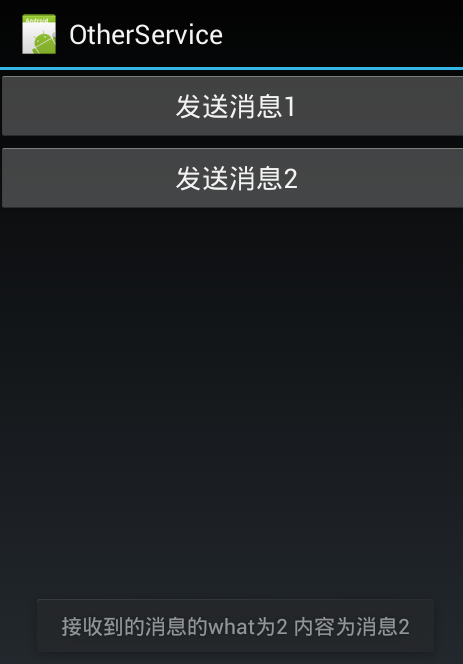
下面是实际的运行图。
点击“发送消息1”按钮后
点击“发送消息2”按钮后
Xamarin.Android开发实践(八)的更多相关文章
- Xamarin.Android开发实践(五)
原文:Xamarin.Android开发实践(五) 一.服务的生命周期 服务与活动一样,在它的整个生命周期中存在着一些事件,下图可以很好解释整个过程以及涉及到的方法: 在真实的使用中,Service来 ...
- Xamarin.Android开发实践(四)
原文:Xamarin.Android开发实践(四) Xamarin.Android下获取与解析JSON 一.新建项目 1.新建一个Android项目,并命名为为NetJsonList 2.右击引用,选 ...
- Xamarin.Android开发实践(三)
原文:Xamarin.Android开发实践(三) 一.前言 用过Android手机的人一定会发现一种现象,当你把一个应用置于后台后,一段时间之后在打开就会发现应用重新打开了,但是之前的相关的数据却没 ...
- Xamarin.Android开发实践(二)
原文:Xamarin.Android开发实践(二) 一.准备 开始学习本教程前必须先完成该教程http://www.cnblogs.com/yaozhenfa/p/xamarin_android_qu ...
- Xamarin.Android开发实践(一)
原文:Xamarin.Android开发实践(一) 一.准备工作 1.创建一个空的解决方案,并命名为Phoneword 2.右击解决方案 新建->新建项目 并命名为Phoneword_Droid ...
- Xamarin.Android开发实践(十八)
Xamarin.Android之SlidingMenu 一.前言 有位网友在评论中希望能够出个在Xamarin.Android下实现SlidingMenu效果的随笔,刚好昨天在观看官网示例项目的时候也 ...
- Xamarin.Android开发实践(十七)
Xamarin.Android之定位 一.前言 打开我们手中的应用,可以发现越来越多的应用使用了定位,从而使我们的生活更加方便,所以本章我们将学习如何在Xamarin中进行定位的开发. 二.准备工作 ...
- Xamarin.Android开发实践(十五)
Xamarin.Android学习之应用程序首选项 一.前言 任何App都会存在设置界面,如果开发者利用普通控件并绑定监听事件保存设置,这 一过程会非常的枯燥,而且耗时.我们可以看到Android系统 ...
- Xamarin.Android开发实践(十四)
Xamarin.Android之ListView和Adapter 一.前言 如今不管任何应用都能够看到列表的存在,而本章我们将学习如何使用Xamarin去实现它,以及如何使用适配器和自定义适配器(本文 ...
随机推荐
- iptables相关
⑴.Iptables规则写法的基本格式是: Iptables [-ttable] COMMAND chain CRETIRIA -j ACTION ⑵.Iptables规则相关参数说明: ...
- struts+spring action应配置为scope="prototype"
truts+spring action应配置为scope="prototype" <bean id="personAction" scope=" ...
- ubuntu系统自带的火狐(firefox)如何安装Adobe Flash
当你刚装完系统,发现打开某些网站时,提示你“需要安装flash”,然后你点击确定,过了一会,提示你安装失败. 我也是遇到这种情况.我第一个反应是,我先不用firefox,我安装chrome. 可是当你 ...
- thinkphp中where方法
今天来给大家讲下查询最常用但也是最复杂的where方法,where方法也属于模型类的连贯操作方法之一,主要用于查询和操作条件的设置.where方法的用法是ThinkPHP查询语言的精髓,也是Think ...
- hdu 5183. Negative and Positive (哈希表)
Negative and Positive (NP) Time Limit: 3000/1500 MS (Java/Others) Memory Limit: 65536/65536 K (Ja ...
- Who Gets the Most Candies?(线段树 + 反素数 )
Who Gets the Most Candies? Time Limit:5000MS Memory Limit:131072KB 64bit IO Format:%I64d &am ...
- Unity中下载和本地保存实例
原地址:http://www.linuxidc.com/Linux/2011-10/45888.htm Download.cs using UnityEngine; using System.Coll ...
- SIFT+HOG+鲁棒统计+RANSAC
今天的计算机视觉课老师讲了不少内容,不过都是大概讲了下,我先记录下,细讲等以后再补充. SIFT特征: 尺度不变性:用不同参数的高斯函数作用于图像(相当于对图像进行模糊,得到不同尺度的图像),用得到的 ...
- Android自动登录与记住密码
// 获取实例对象 sp = this.getSharedPreferences("userInfo", Context.MODE_WORLD_READABLE); rem_pw ...
- WINDOWS和Linux上安装php7 alpha 并安装 yaf
WINDOWS和Linux上安装php7 alpha 并安装 yaf PHP技术 widuu 2个月前 (06-15) 126浏览 0评论 windows 1.windows上安装 php7 ...