[异常解决] How to build a gcc toolchain for nRF51 on linux (very detailed!!!)
1、Install gcc-arm-none-eabi
https://devzone.nordicsemi.com/tutorials/7/This link shows that development with GCC and Eclipse, As it say we should download 、extract and configure arm-none-eabi-gcc. But I find it's hard to download arm-none-eabi-gcc in China(You can chose XunLei to download). Besides I find a easy way to install it in Ubuntu-16.04 as following:
beautifulzzzz@lpc:~$ arm-none-eabi-gcc --version

The program 'arm-none-eabi-gcc' is currently not installed. You can install it by typing:

sudo apt install gcc-arm-none-eabi

beautifulzzzz@lpc:~$ sudo apt install gcc-arm-none-eabi
2、Download Nordic nRF5x SDK
Download the least nRF5x SDK from http://developer.nordicsemi.com/nRF5_SDK/ (the same to the arm-none-eabi-gcc, you can chose the XunLei to download) ,and then extract it in SDK-DIR(as you wish). The following shows the composition of SDK:
beautifulzzzz@lpc:~/Documents/nRF5_SDK_12..0_f012efa$ tree -L 2
.

├── components

│   ├── ant

│   ├── ble

│   ├── boards

│   ├── device

│   ├── drivers_ext

│   ├── drivers_nrf

│   ├── libraries

│   ├── nfc

│   ├── proprietary_rf

│   ├── sdk_validation.h

│   ├── serialization

│   ├── softdevice

│   └── toolchain

├── documentation

│   ├── index.html

│   ├── license.txt

│   ├── NordicS.jpg

│   ├── nRF5x_series_logo.png

│   └── release_notes.txt

├── examples

│   ├── ant

│   ├── ble_central

│   ├── ble_central_and_peripheral

│   ├── ble_peripheral

│   ├── crypto

│   ├── dfu

│   ├── dtm

│   ├── multiprotocol

│   ├── nfc

│   ├── peripheral

│   ├── proprietary_rf

│   └── readme.txt

├── external

│   ├── cifra_AES128-EAX

│   ├── fatfs

│   ├── freertos

│   ├── licenses_external.txt

│   ├── micro-ecc

│   ├── nano-pb

│   ├── nfc_adafruit_library

│   ├── nrf_cc310

│   ├── protothreads

│   ├── rtx

│   ├── segger_rtt

│   └── tiny-AES128

├── licenses.txt

├── nRF5x_MDK_8_11_1_IAR.msi

├── nRF5x_MDK_8_11_1_Keil4.msi

└── svd

    ├── nrf51.svd

    ├── nrf52840.svd

    └── nrf52.svd
3、Before Use Makefile To Bulid nRF51 Project
To build an example in the SDK you first need to set the toolchain path in makefile.windows or makefile.posix depending on platform you are using. That is, the .posix should be edited if your are working on either Linux or OS X. These files are located in:
<SDK>/components/toolchain/gcc
Open the file in a text editor, and make sure that the GNU_INSTALL_ROOT variable is pointing to your Gnu tools for ARM embedded Processors install directory.
Correct values for my current setup(my arm-none-eabi-gcc install in /usr/bin):
GNU_INSTALL_ROOT :=/usr

GNU_VERSION := 4.9.

GNU_PREFIX := arm-none-eabi
4、Use Makefile To Bulid nRF51 Project
Now you can try to build one of the example projects. Will use the blinky example here to keep it simple:
Open terminal and change directory to:
<SDK>/examples/peripheral/<board name>/blank/armgcc/
Type 'make'. GNU Make should start the build using the Makefile and output the result in the _build directory. If everything works you should get the output shown in the screenshot below.
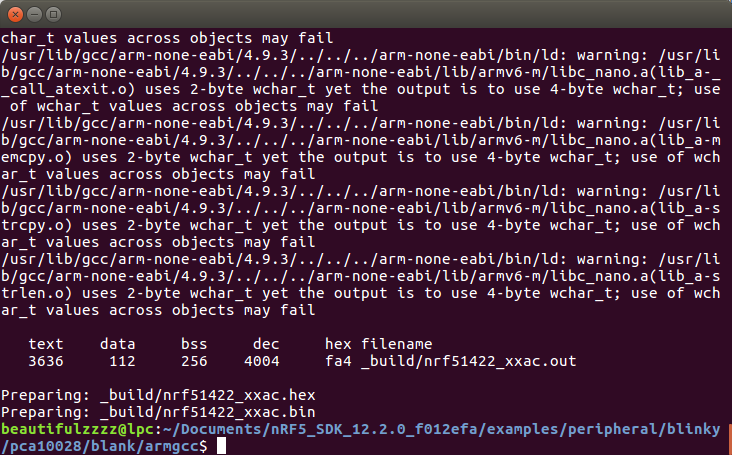
If you instead get an error saying something like "the sysem cannot find the files specified" it typically means that the GNU toolchain path is set incorrectly. Verify the path in makefile.windows/posix if you get this.
5、Install JLink-driver-for-linux
Refer to the blog: [异常解决] ubuntu上安装JLink驱动遇到的坑及给后来者的建议,downloading the corresponding version driver is ok. But I find that the older version driver(older then 5.12) cna't find!!!

Unfortunately my JLink version is 4.80. Finally, I find a Jlink-Linux-v480h-x64 in CSDN: http://download.csdn.net/download/u013903297/6990853 and I also upload it in: https://pan.baidu.com/s/1qXN2uOc. This file is not *.deb file, so we should install it as following:
beautifulzzzz@lpc:~/Downloads$ sudo cp JLink_Linux_V480h_x86_64.tgz /dev/bus

...

beautifulzzzz@lpc:/dev/bus$ sudo tar zxvf JLink_Linux_V480h_x86_64.tgz

beautifulzzzz@lpc:/dev/bus$ sudo rm JLink_Linux_V480h_x86_64.tgz
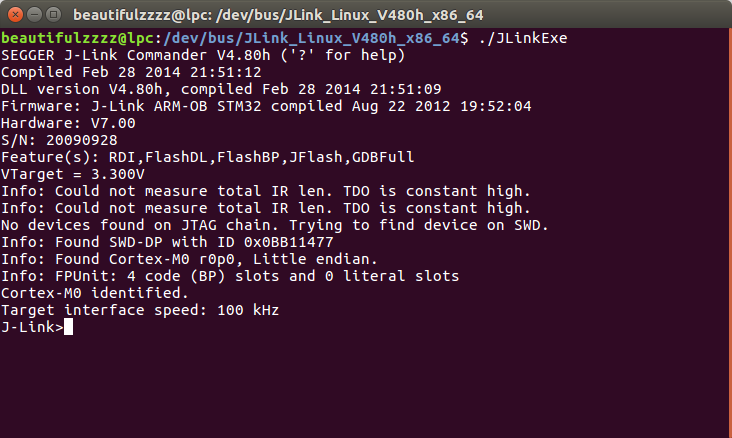
Now plug the JLink device into the USB and then goto the install-path(here is /dev/bus/JLink_Linux_V480h_x86_64), type ./JLinkExe command, you will see(as following screenshot) a Contex-M0 device was fond and the target interface speed is 100khz. If could not find a device, please check whether the JLink device is inserted or the JLink driver version is correct.
6、Loadfile into nRf5x
Now you can use some JLink commands to erase、load、run、quit...
/* Open Jlink Commander from terminal in _build directory */

JLinkExe  -device <nRF51/nRF52>

> erase // Optional: erase target if not already blank

> loadfile <name>.hex // loads FW

> r // Reset and halt

> g // Run

> q //  Exit
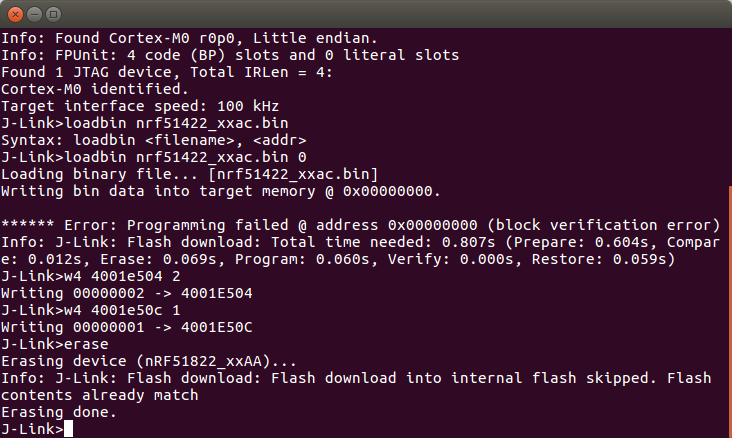
If you get an error (Error: Programming failed @ address 0x00000000 (block verification error)) when tpye erase\loadfile command, you should write one and two to the memory at 4001E50C and 4001E504:(get this from: Getting started with nRF51 development on Mac OS X)
Afer erase whole chip, loading the file into nRF51 is simple—— For simplicity in this tutorial copy the softdevice (S110) .hex file to the _build folder of the Heart Rate Monitor example. The programming is performed from the _build folder:
_build em$ JLinkExe -device nrf51822_xxaa -if swd -speed

[...]

J-Link>loadbin s110_nrf51822_7..0_softdevice.bin

J-Link>loadbin ble_app_hrs_s110_xxaa.hex 0x16000

J-Link>r

J-Link>g

J-Link>exit
Setting the correct device is crucial, and the speed setting is needed to make the programming fast enough. The softdevice is first programmed in the beginning (location 0) and the application is programmed immediately after (0x16000 for S110 v7.0). After the programming a reset is needed ('r' + 'g').
Next I will write use MakeFile to achieve automating tasks~
@beautifulzzzz

智能硬件、物联网,热爱技术,关注产品

博客:http://blog.beautifulzzzz.com

sina:http://weibo.com/beautifulzzzz?is_all=1
[异常解决] How to build a gcc toolchain for nRF51 on linux (very detailed!!!)的更多相关文章
- Ant运行build.xml执行服务器scp,异常解决jsch.jar
公司ant打包上线 一直出现这个问题. Ant运行build.xml执行服务器scp,异常解决jsch.jar BUILD FAILEDD:\eclipse\eclipse-jee-luna-SR2- ...
- 【tips】编译epic异常解决
目标:编译 epic 异常信息一: No CMAKE_C_COMPILER could be found. No CMAKE_CXX_COMPILER could be found. 解决方法: ...
- Android HttpURLConnection.connect找不到源 HttpURLConnection连接失败 HttpURLConnection.connect IO异常 解决办法
Android HttpURLConnection.connect找不到源 HttpURLConnection连接失败 HttpURLConnection.connect IO异常 解决办法 以下代 ...
- Java与SQL Server, MySql, Oracle, Access的连接方法以及一些异常解决
Java与SQL Server, MySql, Oracle, Access的连接方法以及一些异常解决 I. 概述 1.1 JDBC概念 JDBC(Java Database Connectivity ...
- orcal 数据库 maven架构 ssh框架 的全xml环境模版 及常见异常解决
创建maven项目后,毫不犹豫,超简单傻瓜式搞定dependencies(pom.xml 就是maven的依赖管理),这样你就有了所有你要的包 <project xmlns="http ...
- Android 异常解决方法【汇总】
(1)异常:Android中引入第三方Jar包的方法(Java.lang.NoClassDefFoundError解决办法) 1.在工程下新建lib文件夹,将需要的第三方包拷贝进来.2.将引用的第三方 ...
- [异常解决] 初玩SAE遇到的小问题——注册&创建项目+MyEclipse装插件直接部署+一个简单的JSP部署实现
① 新浪SAE快速上手教程:http://jingyan.baidu.com/season/43090 上面一个链接是针对PHP的相关介绍,如果用java还有点不一样,具体请看新浪SAE官网:http ...
- redis 异常解决办法
redis 异常解决办法 26069:M 08 Aug 17:06:58.858 # WARNING: The TCP backlog setting of 511 cannot be enforce ...
- ClientAbortException 异常解决办法
http://blog.sina.com.cn/s/blog_43eb83b90102ds8w.html ClientAbortException 异常解决办法 当我们用Servlet导出图片,或用J ...
随机推荐
- webp图片实践之路
最近,我们在项目中实践了webp图片,并且抽离出了工具模块,整合到了项目的基础模板中.传闻IOS10也将要支持webp,那么使用webp带来的性能提升将更加明显.估计在不久的将来,webp会成为标配. ...
- Hyper-v 安装CentOS 7 (其他虚拟机一样参考)
平台之大势何人能挡? 带着你的Net飞奔吧!http://www.cnblogs.com/dunitian/p/4822808.html hyper-v安装很多人没弄过,我这里介绍一下.(其他虚拟机参 ...
- 在windows下安装gulp —— 基于 Gulp 的前端集成解决方案(一)
相关连接导航 在windows下安装gulp —— 基于 Gulp 的前端集成解决方案(一) 执行 $Gulp 时发生了什么 —— 基于 Gulp 的前端集成解决方案(二) 常用 Gulp 插件汇总 ...
- nodejs进阶(1)—输出hello world
下面将带领大家一步步学习nodejs,知道怎么使用nodejs搭建服务器,响应get/post请求,连接数据库等. 搭建服务器页面输出hello world var http = require ...
- nginx源码分析之网络初始化
nginx作为一个高性能的HTTP服务器,网络的处理是其核心,了解网络的初始化有助于加深对nginx网络处理的了解,本文主要通过nginx的源代码来分析其网络初始化. 从配置文件中读取初始化信息 与网 ...
- Android 扫描条形码(Zxing插件)
使用Android Studio 一.在build.gradle(Module:app)添加代码 下载,调用插件 1 apply plugin: 'com.android.application' ...
- 多本地代码工作点更新到2个远端GIT仓库
摘要:本文介绍了笔者多个本地工作节点(地方)的多台电脑(PC/笔记本电脑)同步源码到2个远端的GIT(一个GITHUB国外强制公开,一个oschina国内可不公开). 作者:太初 转载说明:请指明原作 ...
- 鱼眼模式(Fisheye projection)的软件实现
简单实现 鱼眼模式(Fisheye)和普通的透视投影(Perspective projection),一个很大的区别就是鱼眼的投影算法是非线性的(non-linear),实际照相机的情况是在镜头外面包 ...
- bootstrap
访问Bootstrap中文网,下载bootstrap中文文档,选择用于生产环境的bootstrap. 在官网使用ctrl+f查找想要的内容. 这里记一下Visual Studio Code软件的用法: ...
- MVVM大比拼之vue.js源码精析
VUE 源码分析 简介 Vue 是 MVVM 框架中的新贵,如果我没记错的话作者应该毕业不久,现在在google.vue 如作者自己所说,在api设计上受到了很多来自knockout.angularj ...