
ELK——在 CentOS/Linux 把 Kibana 3.0 部署在 Nginx 1.9.12
迁移到:http://www.bdata-cap.com/newsinfo/1712690.html
上一篇文章《安装 logstash 2.2.0、elasticsearch 2.2.0 和 Kibana 3.0》,介绍了如何安装 Logstash、Elasticsearch 以及用 Python 的 SimpleHTTPServer 模块部署 Kibana。
本文介绍如何在 Linux 上把 Kibana 部署在 Nginx。
假设,我机器 IP 是 10.1.8.166,Kibana 和 Nginx 都安装在这个机器上。
- 下载 Nginx。下载 Nginx,并上传到你的服务器上,我放在 /usr/local/src/nginx。
- 解压 Nginx。
[root@vcyber nginx]# pwd
/usr/local/src/nginx
[root@vcyber nginx-1.9.12]# tar -zxvf nginx-1.5.9.tar.gz
[root@vcyber nginx]# ls
nginx-1.9.12 nginx-1.9.12.tar.gz
[root@vcyber nginx]#
- 配置 Nginx。指定把 Nginx 安装到 /usr/local/nginx。
[root@vcyber nginx]# cd nginx-1.9.12
[root@vcyber nginx-1.9.12]# ls
auto CHANGES.ru configure html Makefile objs src
CHANGES conf contrib LICENSE man README
[root@vcyber nginx-1.9.12]# ./configure --prefix=/usr/local/nginx
checking for OS
+ Linux 2.6.32-504.23.4.el6.x86_64 x86_64
checking for C compiler ... found
+ using GNU C compiler
+ gcc version: 4.4.7 20120313 (Red Hat 4.4.7-16) (GCC)
checking for gcc -pipe switch ... found
checking for -Wl,-E switch ... found
checking for gcc builtin atomic operations ... found
checking for C99 variadic macros ... found
checking for gcc variadic macros ... found
checking for gcc builtin 64 bit byteswap ... found
checking for unistd.h ... found
……
./configure: error: the HTTP rewrite module requires the PCRE library.
You can either disable the module by using --without-http_rewrite_module
option, or install the PCRE library into the system, or build the PCRE library
statically from the source with nginx by using --with-pcre=<;path> option.
[root@vcyber nginx-1.9.12]#
具体配置参数,参看 http://nginx.org/en/linux_packages.html
报错了~说,HTTP rewrite 模块需要 pcre-devel 库。安装一个就行。因为我机器用了有段时间,也懒得看是否有,总之,没有再安装。
- 安装 PCRE 库。
[root@vcyber bin]# yum -y install pcre-devel
Loaded plugins: fastestmirror
Setting up Install Process
Loading mirror speeds from cached hostfile
* base: mirrors.yun-idc.com
* epel: mirrors.yun-idc.com
* extras: mirrors.yun-idc.com
* updates: mirrors.yun-idc.com
Resolving Dependencies
-->; Running transaction check
--->; Package pcre-devel.x86_64 0:7.8-7.el6 will be installed
-->; Finished Dependency Resolution
……
Complete!
[root@vcyber bin]#
Nginx 除了依赖 pcre-devel 库,还有 openssl、openssl-devel、zlib-devel、gcc。如果你的机器上没有,就用 yum 安装一下。
- 再试一次
[root@vcyber nginx-1.9.12]# ls
auto CHANGES.ru configure html Makefile objs src
CHANGES conf contrib LICENSE man README
[root@vcyber nginx-1.9.12]# ./configure --prefix=/usr/local/nginx
checking for OS
+ Linux 2.6.32-504.23.4.el6.x86_64 x86_64
checking for C compiler ... found
+ using GNU C compiler
+ gcc version: 4.4.7 20120313 (Red Hat 4.4.7-16) (GCC)
checking for gcc -pipe switch ... found
……
Configuration summary
+ using system PCRE library
+ OpenSSL library is not used
+ md5: using system crypto library
+ sha1: using system crypto library
+ using system zlib library
nginx path prefix: "/usr/local/nginx"
……
[root@vcyber nginx-1.9.12]#
这次成功了~
- 编译安装 Nginx。
[root@vcyber nginx-1.9.12]# make & make install
- 检查是否安装成功。
[root@vcyber sbin]# pwd
/usr/local/nginx/sbin
[root@vcyber sbin]# ./nginx -t
nginx: the configuration file /usr/local/nginx/conf/nginx.conf syntax is ok
nginx: configuration file /usr/local/nginx/conf/nginx.conf test is successful
[root@vcyber sbin]#
显示,OK 和 successful。
- 启动 Nginx
[root@vcyber sbin]# ./nginx
[root@vcyber sbin]#
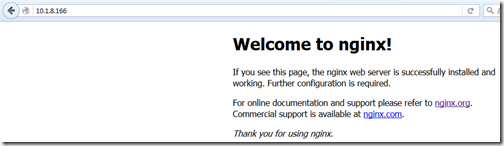
在浏览器地址栏输入,访问80端口,
- 把 Kibana 部署到 Nginx。
其实,很简单~只需要修改 Nginx 配置 nginx.conf 的 server 小节即可。下面配置文件,是截取,并不完整。
[root@vcyber conf]# pwd
/usr/local/nginx/conf
[root@vcyber conf]# cat nginx.conf
#user nobody;
worker_processes 1;
#error_log logs/error.log;
#error_log logs/error.log notice;
#error_log logs/error.log info;
#pid logs/nginx.pid;
events {
worker_connections 1024;
}
http {
include mime.types;
default_type application/octet-stream;
#log_format main '$remote_addr - $remote_user [$time_local] "$request" '
# '$status $body_bytes_sent "$http_referer" '
# '"$http_user_agent" "$http_x_forwarded_for"';
#access_log logs/access.log main;
sendfile on;
#tcp_nopush on;
#keepalive_timeout 0;
keepalive_timeout 65;
#gzip on;
server {
listen 80;
server_name localhost;
#charset koi8-r;
#access_log logs/host.access.log main;
location / {
#root html;
root /usr/local/kibana/kibana-3.0/src;
index index.html index.htm;
}
……
}
……
}
[root@vcyber conf]#
server.location 下的 root,指向你 Kibana 的位置,必须是 Kibana 的 src 位置。
安装 logstash 2.2.0、elasticsearch 2.2.0 和 Kibana 3.0
为调试 Logstash Grok 表达式,安装 GrokDebuger 环境
ELK——在 CentOS/Linux 把 Kibana 3.0 部署在 Nginx 1.9.12的更多相关文章
- CentOS Linux release 7.6.1810全新安装 Zimbra 8.8.12邮箱
1.1 基础环境配置 1.1.1 主机名配置 [root@mail ~]# hostnamectl --static set-hostname mail.example.com [root@mai ...
- centos下gitlab私服完整安装部署(nginx+MySQL+redis+gitlab-ce+gitlab-shell+)
系统环境cat /etc/redhat-release CentOS release 6.8 (Final) nginx -vnginx version: nginx/1.9.15 redis-cli ...
- ELK——安装 logstash 2.2.0、elasticsearch 2.2.0 和 Kibana 3.0
本文内容 Elasticsearch logstash Kibana 参考资料 本文介绍安装 logstash 2.2.0 和 elasticsearch 2.2.0,操作系统环境版本是 CentOS ...
- linux centos安装编译phantomjs 2.0的方法
phantomjs 2.0最新版的官方不提供编译好的文件下载,只能自己编译,有教程但是过于简单,特别是服务器上要安装N多的支持.折腾到现在终于装好了并且能正常运行了,截图mark一下: linux c ...
- centos / Linux 服务环境下安装 Redis 5.0.3
原文:centos / Linux 服务环境下安装 Redis 5.0.3 1.首先进入你要安装的目录 cd /usr/local 2.下载目前最新稳定版本 Redis 5.0.3 wget http ...
- Centos LInux 7.0 内核3.1 升级简化流程
Centos LInux 7.0 内核3.1 升级建华流程 1)#导入ELRepo软件仓库的公共秘钥rpm --import https://www.elrepo.org/RPM-GPG-KEY-el ...
- ELK 架构之 Elasticsearch、Kibana、Logstash 和 Filebeat 安装配置汇总(6.2.4 版本)
相关文章: ELK 架构之 Elasticsearch 和 Kibana 安装配置 ELK 架构之 Logstash 和 Filebeat 安装配置 ELK 架构之 Logstash 和 Filebe ...
- ELK6.0部署:Elasticsearch+Logstash+Kibana搭建分布式日志平台
一.前言 1.ELK简介 ELK是Elasticsearch+Logstash+Kibana的简称 ElasticSearch是一个基于Lucene的分布式全文搜索引擎,提供 RESTful API进 ...
- 编译安装 Centos 7 x64 + tengine.2.0.3 (实测+笔记)
系统硬件:vmware vsphere (CPU:2*4核,内存2G) 系统版本:CentOS Linux release 7.0.1406 安装步骤: 1.系统环境 1.1 更新系统 [root@c ...
随机推荐
- java矩阵相乘的计算
package a123; import java.util.Scanner; public class a132 { public static void main(String args[]) { ...
- over分析函数
select empno,ename,job,sal,sum(sal) over (order by empno) 累计 from emp ;
- java环境配置总结
最近接触java,在环境配置上费了不少劲.总结一下: 1.首先安装jdk和Eclipse,jdk我安装的是1.6,Eclipse可以从官网下载:http://download.eclipse.org/ ...
- Windows 8.1 应用再出发 - 几种新增控件(1)
Windows 8.1 新增的一些控件,分别是:AppBar.CommandBar.DatePicker.TimePicker.Flyout.MenuFlyout.SettingsFlyout.Hub ...
- iOS手势(滑动)返回的实现(自定义返回按钮)
如果各位使用的是storyboard布局的话,且用的是系统的返回按钮,那么是自动会有滑动返回效果的,但是相信各位做项目的,一般都是用的自定义的返回按钮,所以我贴几行代码,看看怎么实现系统自带的滑动返回 ...
- 个性二维码开源专题<替换元素点>
基础方法:ChangeFillShape //修改填充形状 ChangeFillShape(...) // 摘要: // 修改填充形状 // // 参数: // g: // 图形画板 // // Fo ...
- Dynamic CRM 2013学习笔记(三十九)流程2 - 业务流程(Business Process Flows)用法详解
业务流程(Business Process Flows)是CRM 2013 里一个新的流程,它提供了可视化的流程表现.业务人员创建有效.流线型的业务流程让最终用户知道当前在哪.下一步要做什么,用户可以 ...
- TypeScript:类(Classes)
返回TypeScript手册总目录 传统的Javascript关注的是函数(function)和基于原型(prototype-based)的继承作为构建可重复使用组件的基本方式,但是与更舒服地使用面向 ...
- 实验四 时序逻辑电路的VHDL设计
一.实验目的 熟悉QuartusⅡ的VHDL文本设计过程,学习简单时序逻辑电路的设计.仿真和测试方法. 二.实验 1. 基本命题 用VHDL文本设计触发器,触发器的类型可任选一种.给出程序设计.仿真分 ...
- Win32 多线程学习笔记
学到的API函数 一.线程 创建线程.结束线程.获取线程的结束码 CreateThread ExitThread GetExitCodeThread 二.线程结束时触发 创建线程之后,等待线程的结束之 ...