
【Angular 5】数据绑定、事件绑定和双向绑定
本文为Angular5的学习笔记,IDE使用Visual Studio Code,内容是关于数据绑定,包括Property Binding、Class Binding、Style Binding。
在Angular里,有两种绑定,一种是数据绑定(Data Binding),另一种是事件绑定(Event Binding)。
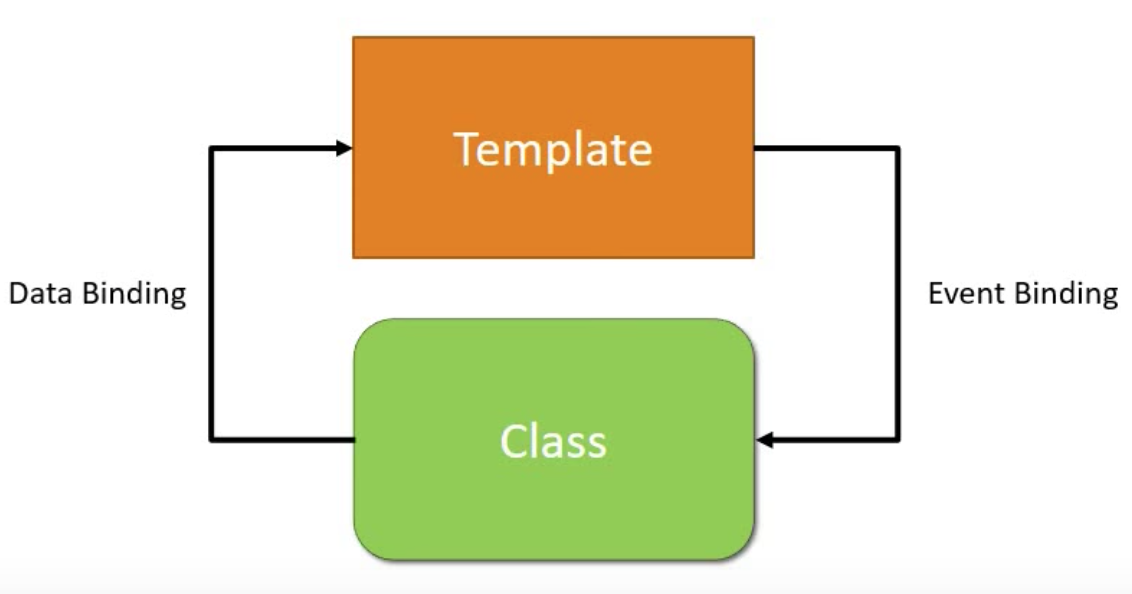
数据流从类到视图则是数据绑定,即在类中改变变量的值,UI视图会跟着改变;反之,事件绑定是随着触发UI视图,类中也会产生相应的变化,比如鼠标点击、键盘点击触发事件。双向绑定则是数据绑定+事件绑定的结合。下面讲一一介绍数据绑定、事件绑定和双向绑定。
一、数据绑定 Data Binding
打开使用Angular CLI命令创建一个组件,命名为test
ng g c test
文件根目录如下:

app.component.x 系列为页面的根模块,可由多个components组成,上述的test就是其中之一,每一个component中包括属于自己.html, .css,.ts文件,在根结构中可以引用各个component。
app.component.ts 里可以定义元数据,比如@Component,其里面的templateUrl、styleUrls会告诉 Angular 从哪里获取你为组件指定html和css文件。
方法一:
app.component.ts
import { Component } from '@angular/core';

@Component({

  selector: 'app-root',

  templateUrl: './app.component.html',

  styleUrls: ['./app.component.css']

})

export class AppComponent {

  title = 'app';

}
方法二:可以使用在元数据里的template和styles直接定义html和css,如下方式
app.component.ts
    <h2>

      Welcome {{name}}

    </h2>

  `

 ,

  styles: [`

    .text-success {

      color : green;

    }

    .text-danger {

      color : red;

    }

    .text-special {

      font-style : italic;

    }

  `]
若使用方法一,则可以在其对应的html中,引用其他模块,比如test模块,以标签<app-test></app-test> 的方式嵌入。
app.component.html
<!--The content below is only a placeholder and can be replaced.-->

<div style="text-align:center">

  <h1>

    From AppComponent!

  </h1>

  <app-test></app-test>

</div>
1. Property Binding
Property Binding是对html中标签属性进行绑定,下面在test模块下进行一系列绑定操作,在此模块使用上述方法二对进行模块开发,代码皆在test.component.ts下编写。
import { Component, OnInit } from '@angular/core';

@Component({

  selector: 'app-test',

  template: `

    <h2>

      Welcome {{name}}

    </h2>

    <input id = {{myId}} type = "text" value = "Vishwas">

    <input [id] = "myId" type = "text" value = "Wish">

  `

 ,

  styles: [`

    .text-success {

      color : green;

    }

    .text-danger {

      color : red;

    }

    .text-special {

      font-style : italic;

    }

  `]

})

export class TestComponent implements OnInit {

 public name = "Dan"

  public myId = "testId"

  constructor() { }

  ngOnInit() {

  }

}
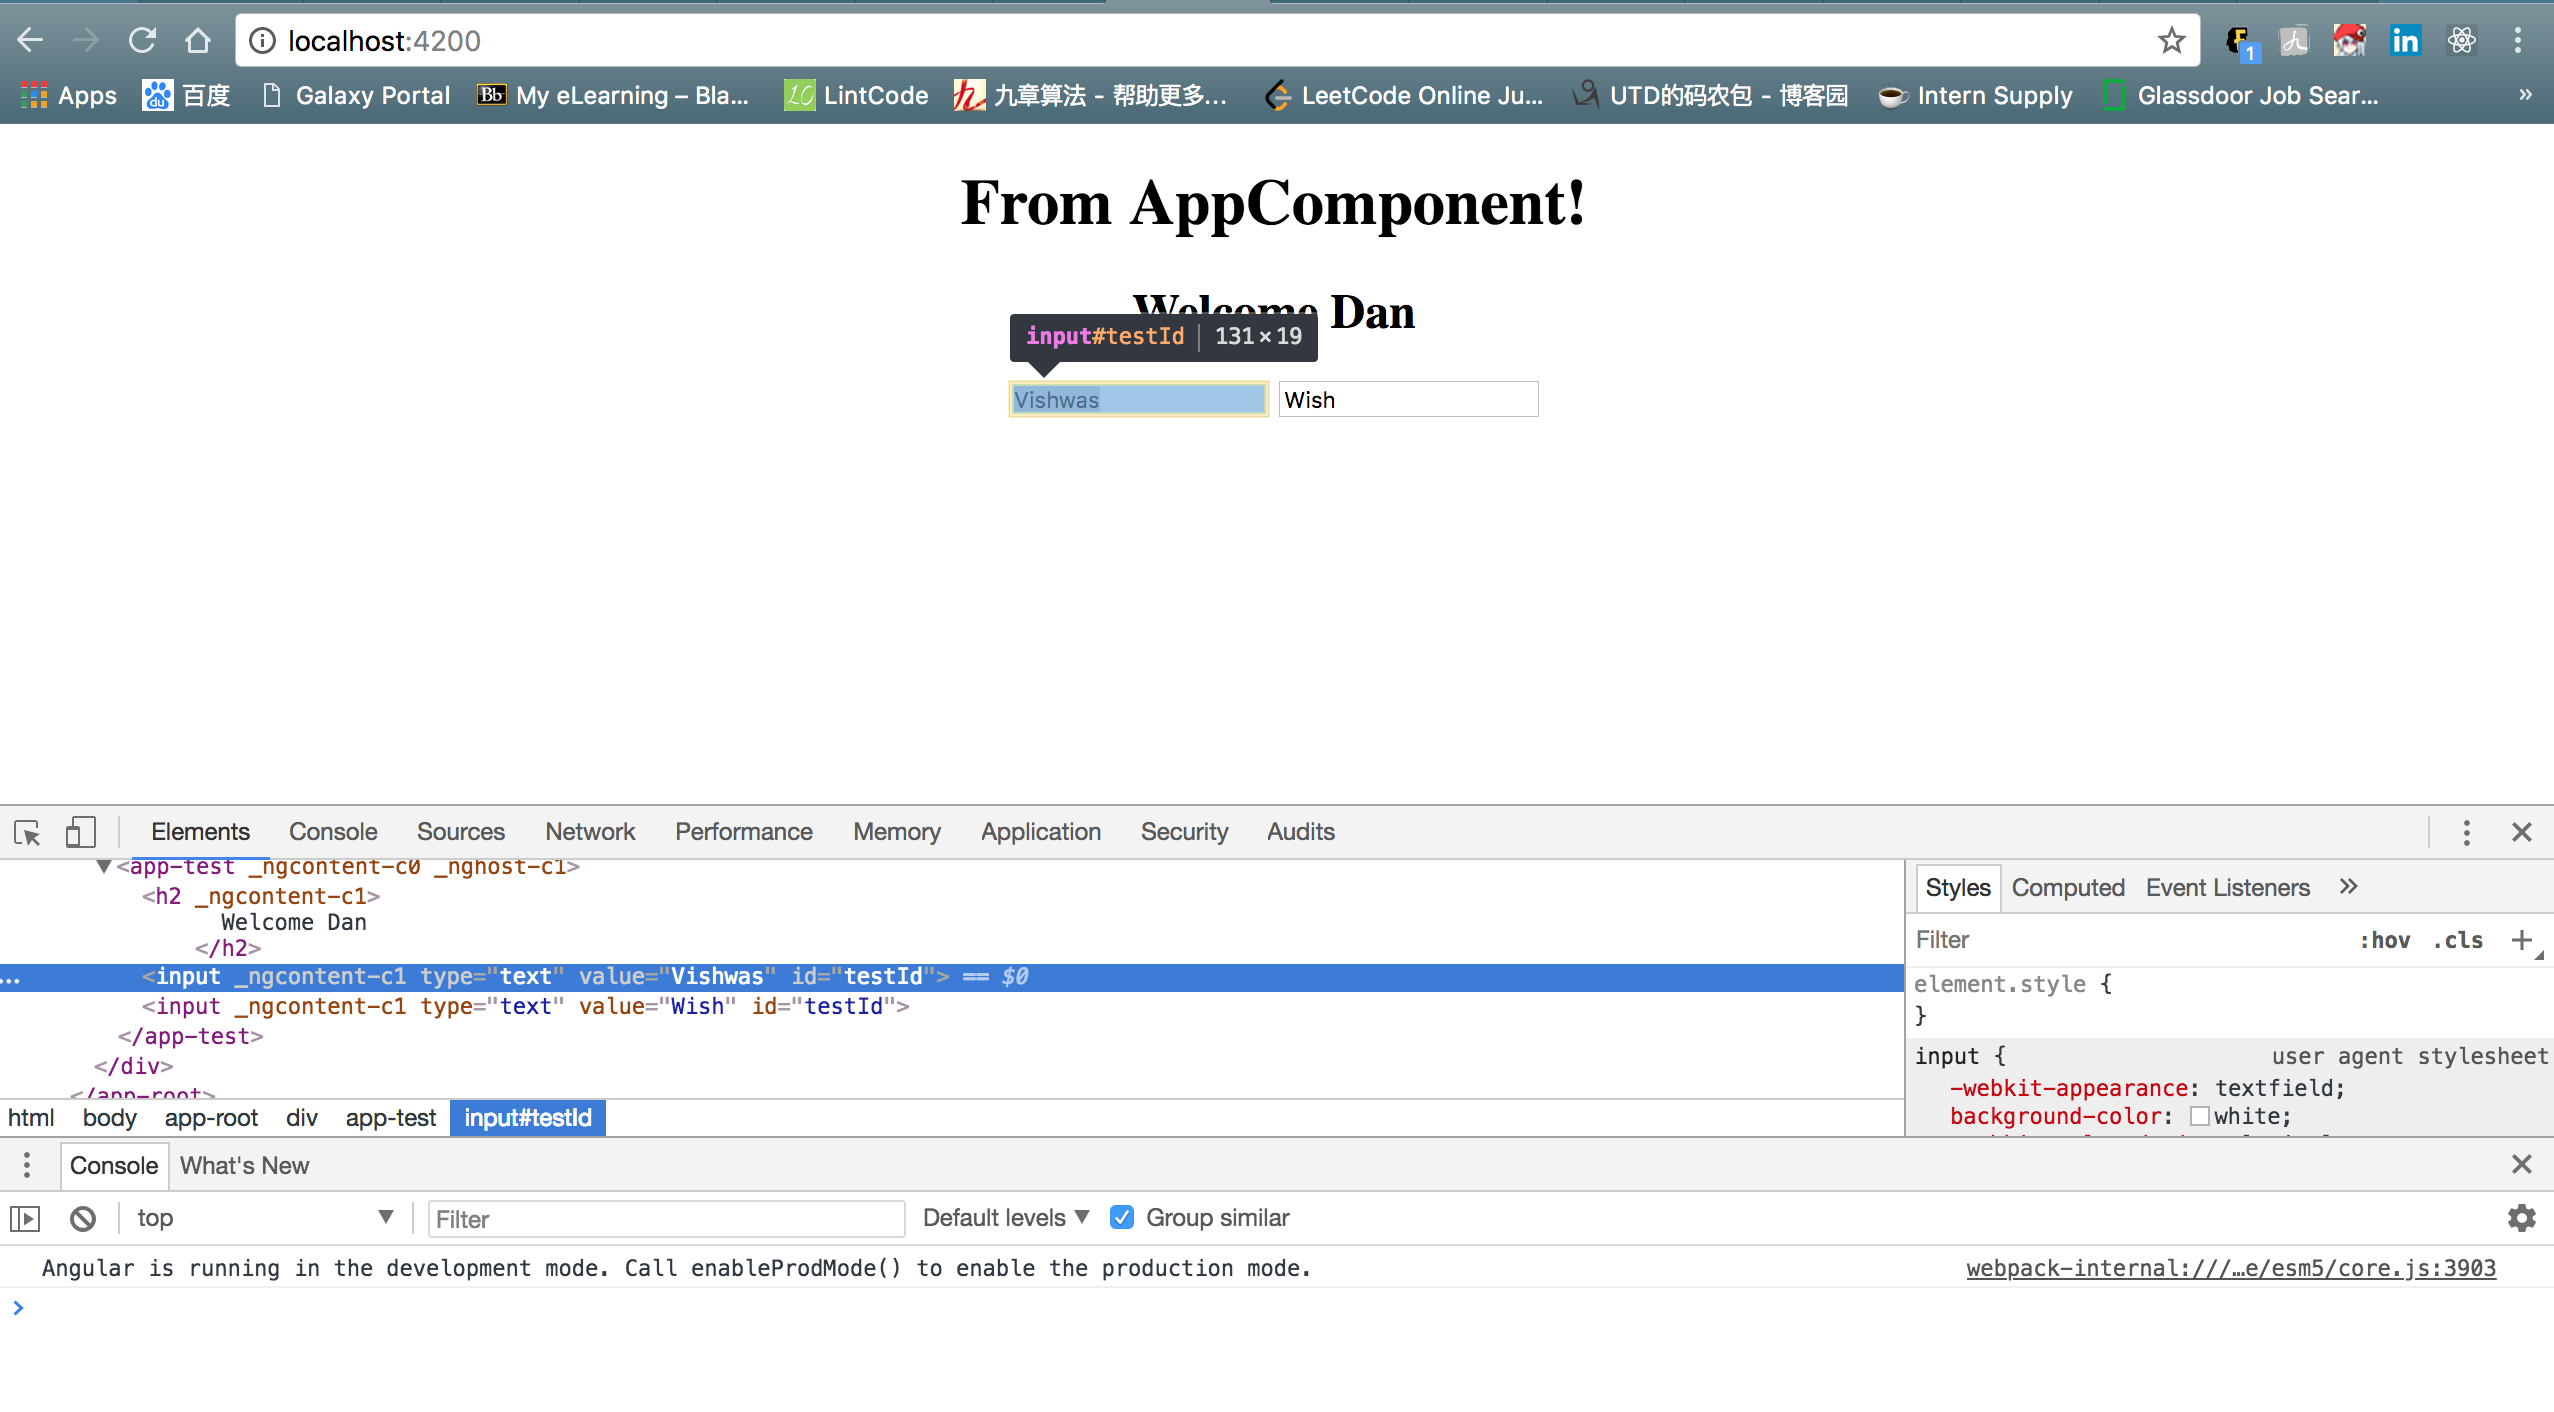
[id] = "myId" 是把在TestComponent里声明的myId的值赋给html的相应标签中id属性,即id = "testId",并绑定该属性。
在命令行内CLI输入 ng serve,开启http://localhost:4200/服务,在浏览器下访问http://localhost:4200/,并对控件进行监测(inspect),效果如下,显示为 id = "testId",说明绑定成功!
2. Class Binding
Class Binding是对 css 中的class类进行绑定,方法和Property Binding相似。
import { Component, OnInit } from '@angular/core';

@Component({

  selector: 'app-test',

  template: `

    <h2>

      Welcome {{name}}

    </h2>

    <input id = {{myId}} type = "text" value = "Vishwas">

    <input [id] = "myId" type = "text" value = "Wish">

    <h2 class="text-success">

      Convolution

    </h2>

    <h2 [class]="successClass">

      Convolution

    </h2>

    <h2 [class.text-danger] = "hasError">

      Convolution

    </h2>

    <h2 [ngClass]="messageClasses">

      Convolution

    </h2>

    `

 ,

  styles: [`

    .text-success {

      color : green;

    }

    .text-danger {

      color : red;

    }

    .text-special {

      font-style : italic;

    }

  `]

})

export class TestComponent implements OnInit {

  public name = "Dan";

  public myId = "testId"

  public isDisabled = false;

  public successClass = "text-success"

  public hasError = true;

  public isSpecial = true;

  public messageClasses = {

    "text-success": !this.hasError, //false

    "text-danger": this.hasError,  //true

    "text-special": this.isSpecial //true

  }

  constructor() { }

  ngOnInit() {

  }

}
[class.text-danger] = "hasError" 若hasError变量为true,则应用text-danger,显示为红色;否则,显示为默认颜色,黑色。
[ngClass]="messageClasses"> 只应用messageClasses集合中结果为true的类,如果有两个以及的变量为true,则同时应用于该标签。必须"text-danger"和"text-special"为true,显示为斜体红色。
效果图如下:

3. Style Binding
Style Binding是对 css 中的style进行绑定,方法和Class Binding相似。直接贴代码:
import { Component, OnInit } from '@angular/core';

@Component({

  selector: 'app-test',

  template: `

    <h2>

      Welcome {{name}}

    </h2>

    <h2 [style.color] = "hasError ? 'red':'green'">

      Style Binding

    </h2>

    <h2 [style.color] = "highlightColor">

      Style Binding2

    </h2>

    <h2 [ngStyle] = "titleStyles">

    Style Binding3

  </h2>

    `

 ,

  styles: []

})

export class TestComponent implements OnInit {

  public name = "Dan";

  public highlightColor = "orange"

  public titleStyles = {

    color: "blue",

    fontStyle: "italic"

  }

  constructor() { }

  ngOnInit() {

  }

}
效果图如下:

二、事件绑定和双向绑定 Event Binding & Two Ways Binding
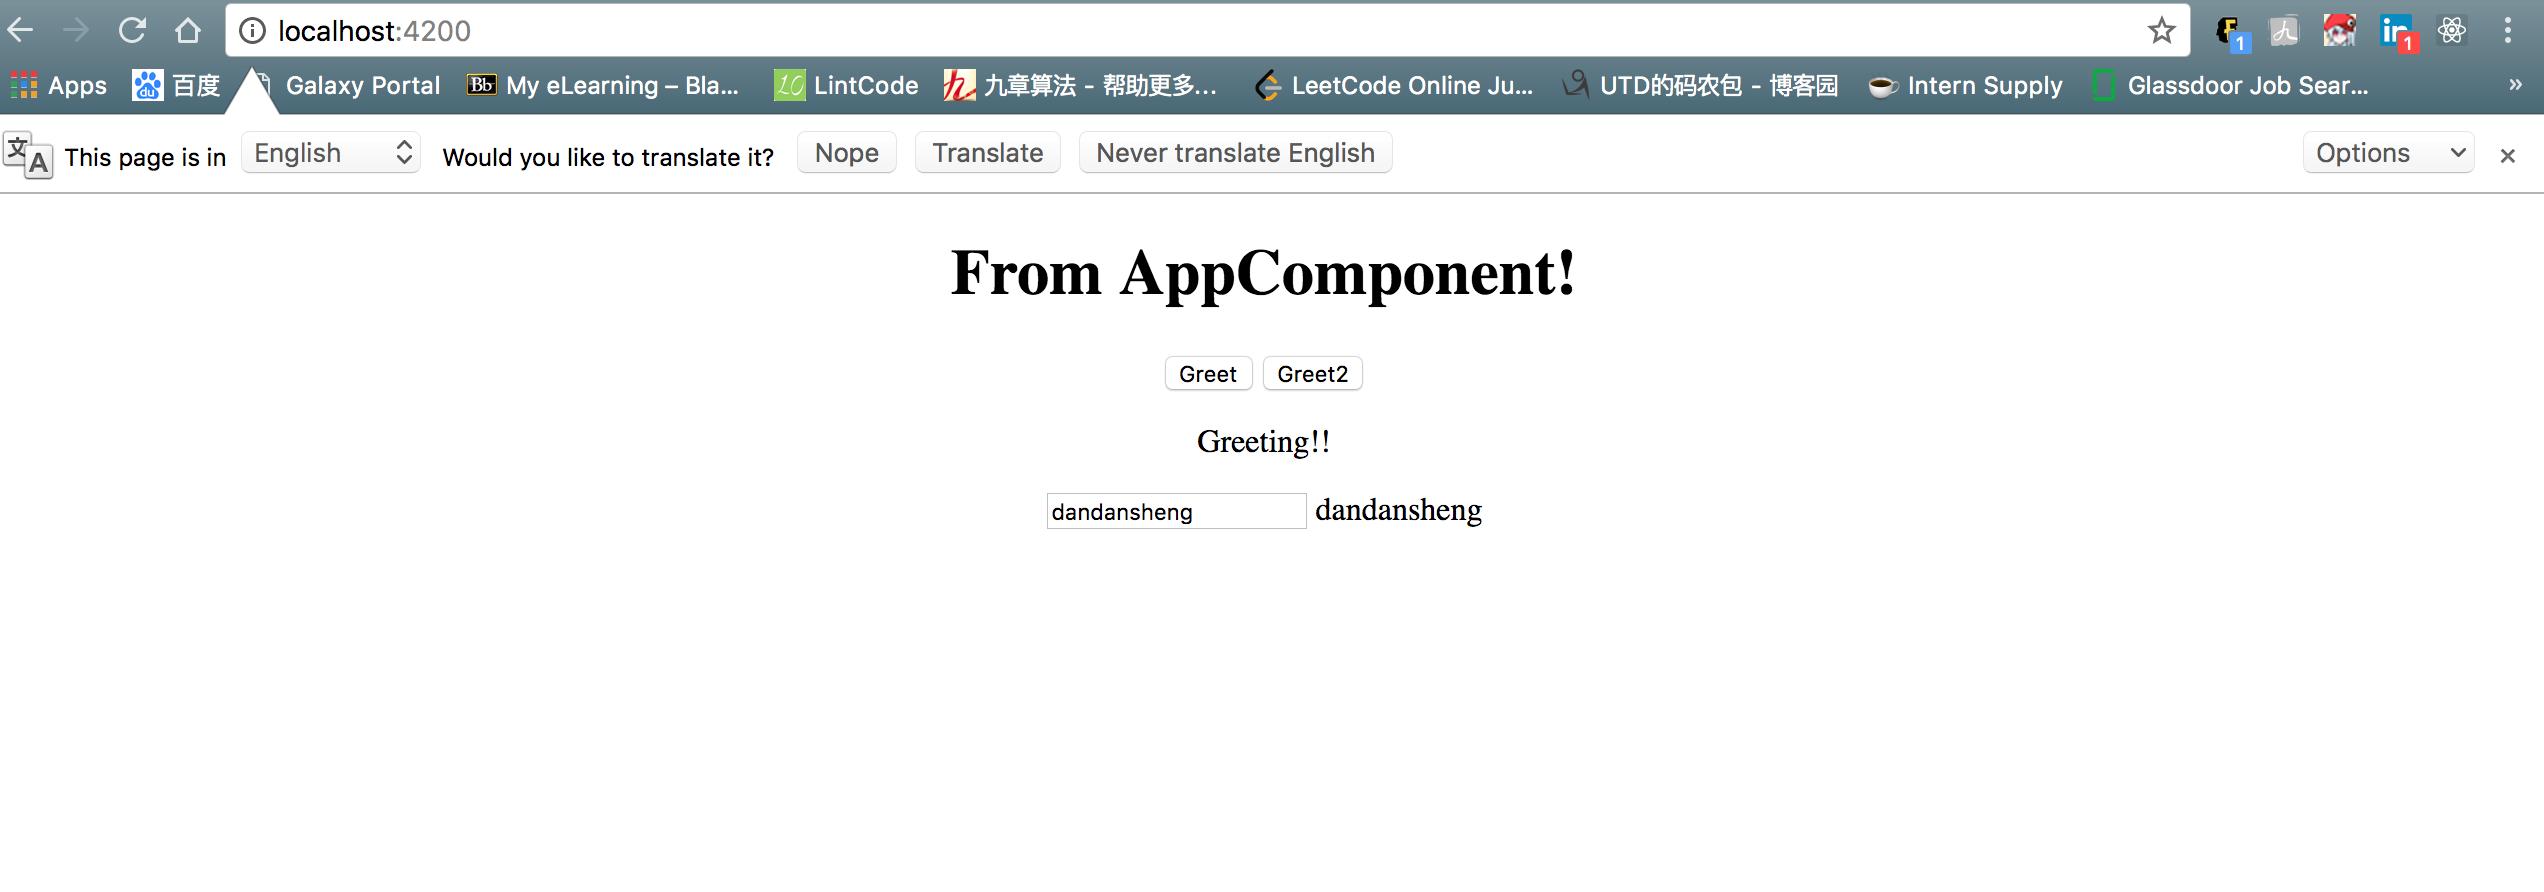
通过点击按钮,改变类中的变量,在呈现到视图上,这个过程就是一种事件绑定。粉色代码处为事件绑定。
实时监视UI的控件,若有值的变化,变量可以接收到此变化,并重新分配该值,再自动把该值更新到视图,这就是双向绑定。蓝色代码处为双向绑定。
temp.component.ts
import { Component, OnInit } from '@angular/core';

@Component({

  selector: 'app-temp',

  template: `

    <button (click) = "onClick($event)">Greet</button>

    <button (click) = "greeting = 'inline Greet!!'">Greet2</button>

    <p>{{greeting}}</p>

    <input [(ngModel)] = "name" type="text">

    {{name}}

  `,

  styles: []

})

export class TempComponent implements OnInit {

  public name = "";

  public greeting = "";

  onClick(event){

    this.greeting = 'Greeting!!';

    //console.log(event);

    console.log(event.type);

  }

  constructor() { }

  ngOnInit() {

  }

}
Angular不能直接识别ngModel,需要通过一个单独的模块FormsModule来访问,因此我们要引用这个模块,即在app.module.ts里import FormsModule,如下代码:
app.module.ts
import { BrowserModule } from '@angular/platform-browser';

import { NgModule } from '@angular/core';

import {FormsModule} from '@angular/forms';

import { AppComponent } from './app.component';

import { TestComponent } from './test/test.component';

import { TempComponent } from './temp/temp.component';

@NgModule({

  declarations: [

    AppComponent,

    TestComponent,

    TempComponent

  ],

  imports: [

    BrowserModule,

    FormsModule

  ],

  providers: [],

  bootstrap: [AppComponent]

})

export class AppModule { }
效果图如下:
本集完结,期待下一集,撒花~
【Angular 5】数据绑定、事件绑定和双向绑定的更多相关文章
- IOS自带输入法中文不触发KEYUP事件导致vue双向绑定错误问题
先上图: 可以看到输入框中的内容和弹出框的内容不一致, <input class="am-fr labRight" id="txcode" type=&q ...
- Vuejs——(1)入门(单向绑定、双向绑定、列表渲染、响应函数)
版权声明:出处http://blog.csdn.net/qq20004604 目录(?)[+] 参照链接: http://cn.vuejs.org/guide/index.html [起步]部 ...
- vuejs属性绑定和双向绑定
属性绑定 html <div v-bind:title="title">hello world</div> js new Vue({ el:'#root', ...
- vue 双向绑定(v-model 双向绑定、.sync 双向绑定、.sync 传对象)
1. v-model实现自定义组件双向绑定 v-model其实是个语法糖,如果没按照相应的规范定义组件,直接写v-model是不会生效的.再说一遍,类似于v-on:click可以简写成@click,v ...
- Angular数据双向绑定
Angular数据双向绑定 AngularJS诞生于2009年,由Misko Hevery 等人创建,后为Google所收购.是一款优秀的前端JS框架,已经被用于Google的多款产品当中.Angul ...
- C#使用Xamarin开发可移植移动应用(3.进阶篇MVVM双向绑定和命令绑定)附源码
前言 系列目录 C#使用Xamarin开发可移植移动应用目录 源码地址:https://github.com/l2999019/DemoApp 可以Star一下,随意 - - 说点什么.. 嗯..前面 ...
- angularjs bind与model配合双向绑定 表达式方法输出
<!doctype html><html lang="en"><head> <meta charset="UTF-8" ...
- C#使用Xamarin开发可移植移动应用(4.进阶篇MVVM双向绑定和命令绑定)附源码
前言 系列目录 C#使用Xamarin开发可移植移动应用目录 源码地址:https://github.com/l2999019/DemoApp 可以Star一下,随意 - - 说点什么.. 嗯..前面 ...
- vue双向绑定原理及实现
vue双向绑定原理及实现 一.总结 一句话总结:vue中的双向绑定主要是通过发布者-订阅者模式来实现的 发布 订阅 1.单向绑定和双向绑定的区别是什么? model view 更新 单向绑定:mode ...
随机推荐
- redis 在 php 中的应用(Hash篇)
本文为我阅读了 redis参考手册 之后结合 博友的博客 编写,注意 php_redis 和 redis-cli 的区别(主要是返回值类型和参数用法) Redis hash 是一个string类型的f ...
- MongoDB 3.4 安装以 Windows 服务方式运行
1.首先从https://www.mongodb.com/download-center#community 下载社区版,企业版也是类似. 2.双击运行安装,可自定义安装路径,这里采用默认路径(C:\ ...
- 三分钟了解Go语言的前世今生
一. 为什么需要一个新的语言最近十年来,C/C++在计算领域没有很好得到发展,并没有新的系统编程语言出现.对开发程度和系统效率在很多情况下不能兼得.要么执行效率高,但低效的开发和编译,如C++:要么执 ...
- zabbix监控服务搭建
命令配置 浏览器配置: 检查必须全部ok(若有warning,检查是否漏装包,重启php-fpm服务) 数据库信息 主机名(zabbix server ip).端口号(默认).名字(随意) 配置摘要 ...
- Vue 组件&组件之间的通信 之 子组件向父组件传值
子组件向父组件传值:子组件通过$.emit()方法以事件形式向父组件发送消息传值: 使用步骤: 定义组件:现有自定义组件com-a.com-b,com-a是com-b的父组件: 准备获取数据:父组件c ...
- 使用 Nginx 内置 $http_user_agent 来区分( 电脑 pc、手机 mobile、平板 pad )端的内容访问
location / { #pc端内容访问 set $flag "pc"; set $num 1; set $hua "${http_user_agent}"; ...
- 【Alpha】Scrum Meeting 7
目录 前言 任务分配 燃尽图 会议照片 签入记录 困难 前言 第7次会议在4月11日19:00由PM在教一317召开. 交流确认了任务进度,对下一阶段任务进行分配.时长60min. 任务分配 姓名 当 ...
- jQuery Gantt Edit:(一)参数以及方法说明
jQuery Gantt editor jQuery Gantt Edit(以下简称GE)是一款开源的基于jQuery的甘特图插件,作者:robicch. GitHub地址:https://githu ...
- express中cookie的使用
一.Cookie 简介● cookie 是存储于访问者的计算机中的变量.可以让我们用同一个浏览器访问同一个域名的时候共享数据.● HTTP 是无状态协议.简单地说,当你浏览了一个页面,然后转到同一个网 ...
- 论文笔记:Prediction-Tracking-Segmentation
Prediction-Tracking-Segmentation 2019-04-09 18:47:30 Paper:https://arxiv.org/pdf/1904.03280.pdf 之所以要 ...