Elasticsearch6.3.2启动过程源码阅读记录
Elasticsearch6.3.2启动过程源码阅读记录
网上有很多关于es的源码分析,觉得自己技术深度还不够,所以这些文章只是看源码过程中的一个笔记,谈不上分析。
整个启动过程以类名.方法名,按顺序依次描述如下:
Elasticsearch.main启动入口类,注册JVM关闭钩子用来清理资源。Command.mainwithoutErrorHandling在es正式启动之前,加载一些命令:比如./elasticsearch -help命令
   starts elasticsearch

   Option                Description

   ------                -----------

   -E <KeyValuePair>     Configure a setting

   -V, --version         Prints elasticsearch version information and exits

   -d, --daemonize       Starts Elasticsearch in the background

   -h, --help            show help
EnvironmentAwareCommand.execute加载配置参数putSystemPropertyIfSettingIsMissing(settings, "path.data", "es.path.data");
putSystemPropertyIfSettingIsMissing(settings, "path.home", "es.path.home");
putSystemPropertyIfSettingIsMissing(settings, "path.logs", "es.path.logs");
InternalSettingsPrepare.prePareEnvironment解析ElasticSearch.yml中的配置参数Prepares the settings by gathering all elasticsearch system properties, optionally loading the configuration settings,and then replacing all property placeholders.and then replacing all property placeholders.
ElasticSearch.execute执行初始化命令。另外在源码中还有看到一些有趣的注释,比如必须设置java.io.tmpdir,这个参数在config/jvm.options文件中指定。// a misconfigured java.io.tmpdir can cause hard-to-diagnose problems later, so reject it immediately
try {
env.validateTmpFile();
} catch (IOException e) {
throw new UserException(ExitCodes.CONFIG, e.getMessage());
}
Bootstrap.init正式开始启动ElasticSearch。This method is invoked by {@link Elasticsearch#main(String[])} to startup elasticsearch。创建节点启动时需要的环境变量参数
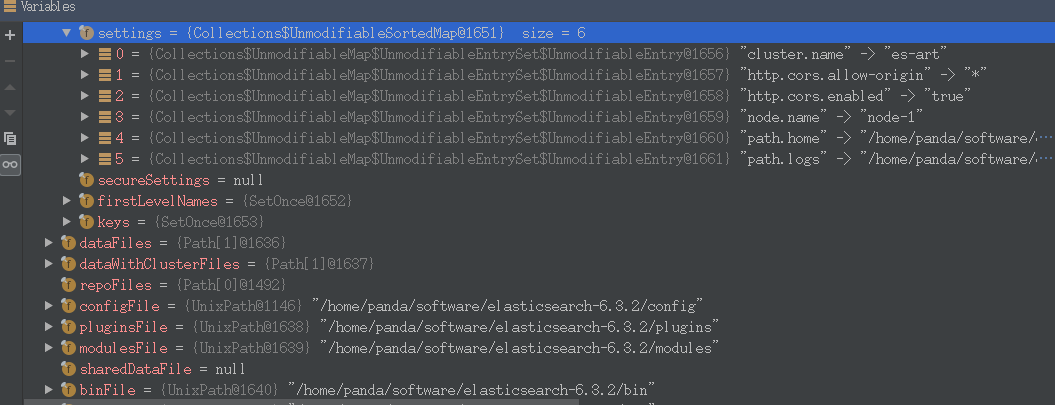
final Environment environment = createEnvironment(foreground, pidFile, keystore, initialEnv.settings(), initialEnv.configFile());checkLucene()检查匹配的Lucene jar包。创建节点,在下面Node构造方法中将详细分析这个过程。
        node = new Node(environment) {

            @Override

            protected void validateNodeBeforeAcceptingRequests(

                final BootstrapContext context,

                final BoundTransportAddress boundTransportAddress, List<BootstrapCheck> checks) throws NodeValidationException {

                BootstrapChecks.check(context, boundTransportAddress, checks);

            }

        };
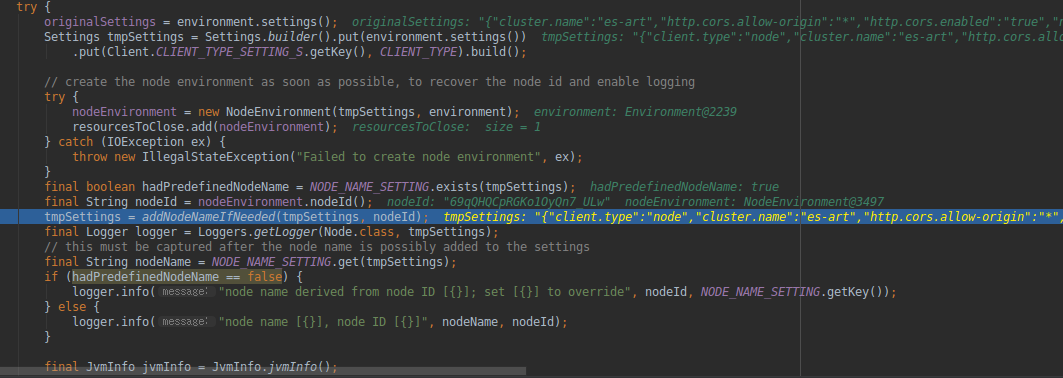
Node.java 构造方法 Node(final Environment environment, Collection<Class<? extends Plugin>> classpathPlugins)。在这个构建方法里面,完成了创建一个节点所需的各种信息,这个方法非常重要,下面就例举出几个节点创建过程中几个重要的流程:- 设置节点环境变量信息(A component that holds all data paths for a single node.)
nodeEnvironment = new NodeEnvironment(tmpSettings, environment);
构造插件服务(PluginService),
this.pluginsService = new PluginsService(tmpSettings, environment.configFile(), environment.modulesFile(), environment.pluginsFile(), classpathPlugins);
看这个构造方法的注释:
    /**

     * Constructs a new PluginService

     * @param settings The settings of the system

     * @param modulesDirectory The directory modules exist in, or null if modules should not be loaded from the filesystem

     * @param pluginsDirectory The directory plugins exist in, or null if plugins should not be loaded from the filesystem

     * @param classpathPlugins Plugins that exist in the classpath which should be loaded

     */

    public PluginsService(Settings settings, Path configPath, Path modulesDirectory, Path pluginsDirectory, Collection<Class<? extends Plugin>> classpathPlugins) {
其实就是加载:
elasticsearch-6.3.2/modules和elasticsearch-6.3.2/plugins两个目录下的内容。

创建自定义的线程池,节点执行各种任务用的吧。
final ThreadPool threadPool = new ThreadPool(settings, executorBuilders.toArray(new ExecutorBuilder[0]));
创建NodeClient,Client that executes actions on the local node。
client = new NodeClient(settings, threadPool);
AnalysisModule (An internal registry for tokenizer, token filter, char filter and analyzer)各种分词器。
AnalysisModule analysisModule = new AnalysisModule(this.environment, pluginsService.filterPlugins(AnalysisPlugin.class));
SettingsModule(A module that binds the provided settings to the {@link Settings} interface) 各种配置参数用到。比如 jvm.options 和 elasticsearch.yml里面配置的各种参数。
final SettingsModule settingsModule = new SettingsModule(this.settings, additionalSettings, additionalSettingsFilter);
节点是集群的一份子,肯定需要集群相关的服务
final ClusterService clusterService = new ClusterService(settings, settingsModule.getClusterSettings(), threadPool,

               ClusterModule.getClusterStateCustomSuppliers(clusterPlugins));
集群信息相关服务(Interface for a class used to gather information about a cluster at regular intervals) 周期性同步集群状态。
final ClusterInfoService clusterInfoService = newClusterInfoService(settings, clusterService, threadPool, client, listener::onNewInfo);
创建Module
ModulesBuilder modules = new ModulesBuilder();

// plugin modules must be added here, before others or we can get crazy injection errors...

            for (Module pluginModule : pluginsService.createGuiceModules()) {

                modules.add(pluginModule);

            }
比如:SearchModule(Sets up things that can be done at search time like queries, aggregations, and suggesters)
SearchModule searchModule = new SearchModule(settings, false, pluginsService.filterPlugins(SearchPlugin.class));
还有 ActionModule(Builds and binds the generic action map, all {@link TransportAction}s, and {@link ActionFilters}.)
ActionModule actionModule = new ActionModule(false, settings, clusterModule.getIndexNameExpressionResolver(),

                settingsModule.getIndexScopedSettings(), settingsModule.getClusterSettings(), settingsModule.getSettingsFilter(),

                threadPool, pluginsService.filterPlugins(ActionPlugin.class), client, circuitBreakerService, usageService);

            modules.add(actionModule);
还有 DiscoveryModule(A module for loading classes for node discovery)
final DiscoveryModule discoveryModule = new DiscoveryModule(this.settings, threadPool, transportService, namedWriteableRegistry,

                networkService, clusterService.getMasterService(), clusterService.getClusterApplierService(),

                clusterService.getClusterSettings(), pluginsService.filterPlugins(DiscoveryPlugin.class),

                clusterModule.getAllocationService());
看一下,一共都有哪些module:
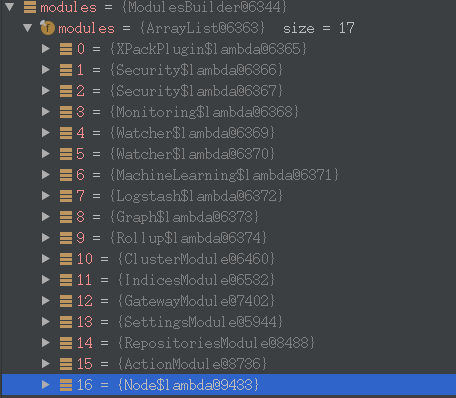
最终关联了一大批的Module
modules.add(b -> {

                    b.bind(Node.class).toInstance(this);

                    b.bind(NodeService.class).toInstance(nodeService);

                    b.bind(NamedXContentRegistry.class).toInstance(xContentRegistry);

                    b.bind(PluginsService.class).toInstance(pluginsService);

                    b.bind(Client.class).toInstance(client);

                    b.bind(NodeClient.class).toInstance(client);

                    b.bind(Environment.class).toInstance(this.environment);

                    b.bind(ThreadPool.class).toInstance(threadPool);

                    b.bind(NodeEnvironment.class).toInstance(nodeEnvironment);

                    b.bind(ResourceWatcherService.class).toInstance(resourceWatcherService);

                    b.bind(CircuitBreakerService.class).toInstance(circuitBreakerService);

                    b.bind(BigArrays.class).toInstance(bigArrays);

                    b.bind(ScriptService.class).toInstance(scriptModule.getScriptService());

                    b.bind(AnalysisRegistry.class).toInstance(analysisModule.getAnalysisRegistry());

                    b.bind(IngestService.class).toInstance(ingestService);

                    b.bind(UsageService.class).toInstance(usageService);

                    b.bind(NamedWriteableRegistry.class).toInstance(namedWriteableRegistry);

                    b.bind(MetaDataUpgrader.class).toInstance(metaDataUpgrader);

                    b.bind(MetaStateService.class).toInstance(metaStateService);

                    b.bind(IndicesService.class).toInstance(indicesService);

                    b.bind(SearchService.class).toInstance(searchService);

                    b.bind(SearchTransportService.class).toInstance(searchTransportService);

                    b.bind(SearchPhaseController.class).toInstance(new SearchPhaseController(settings,

                        searchService::createReduceContext));

                    b.bind(Transport.class).toInstance(transport);

                    b.bind(TransportService.class).toInstance(transportService);

                    b.bind(NetworkService.class).toInstance(networkService);

                    b.bind(UpdateHelper.class).toInstance(new UpdateHelper(settings, scriptModule.getScriptService()));

                    b.bind(MetaDataIndexUpgradeService.class).toInstance(metaDataIndexUpgradeService);

                    b.bind(ClusterInfoService.class).toInstance(clusterInfoService);

                    b.bind(GatewayMetaState.class).toInstance(gatewayMetaState);

                    b.bind(Discovery.class).toInstance(discoveryModule.getDiscovery());
总之,Node.java的构造方法里面实现了创建一个ElasticSearch节点所必须的各种信息,想要了解ElasticSearch节点的内部结构,应该就得多看看这个方法里面的代码吧。
ModulesBuilder.createInjector使用了Guice 依赖注入。injector = modules.createInjector();
Node.start,前面创建了节点,现在开始启动节点。(Start the node. If the node is already started, this method is no-op)先拿到对象实例,再启动
        injector.getInstance(MappingUpdatedAction.class).setClient(client);

        injector.getInstance(IndicesService.class).start();

        injector.getInstance(IndicesClusterStateService.class).start();

        injector.getInstance(SnapshotsService.class).start();

        injector.getInstance(SnapshotShardsService.class).start();

        injector.getInstance(RoutingService.class).start();

        injector.getInstance(SearchService.class).start();

        nodeService.getMonitorService().start();

//...

        Discovery discovery = injector.getInstance(Discovery.class);

      clusterService.getMasterService().setClusterStatePublisher(discovery::publish);

        discovery.start(); // start before cluster service so that it can set initial state on ClusterApplierService

        clusterService.start();
里面的每个方法,都值得花时间去深入研究下。哈哈。。。
总结
总的来看,Elasticsearch启动过程三大步,第一步:加载各种配置信息,这些配置信息既有自定义的配置信息,也有机器的环境变量信息,它们告诉es,我想要创建一个什么样的节点。第二步:创建节点,节点具有各种各样的功能,比如说执行搜索查询请求、选主、与其他节点同步集群状态信息……这些功能需要各种服务/插件/模块Module来实现。第三步:启动节点,其实就是各种模块、插件、服务的启动。
最后放一张整理上上面的9个方法的调用关系图:

原文:https://www.cnblogs.com/hapjin/p/10124269.html
Elasticsearch6.3.2启动过程源码阅读记录的更多相关文章
- ZooKeeper单机客户端的启动流程源码阅读
客户端的启动流程 看上面的客户端启动的脚本图,可以看到,zookeeper客户端脚本运行的入口ZookeeperMain.java的main()方法, 关于这个类可以理解成它是程序启动的辅助类,由它提 ...
- Flume-NG启动过程源码分析(二)(原创)
在上一节中讲解了——Flume-NG启动过程源码分析(一)(原创) 本节分析配置文件的解析,即PollingPropertiesFileConfigurationProvider.FileWatch ...
- Netty入门一:服务端应用搭建 & 启动过程源码分析
最近周末也没啥事就学学Netty,同时打算写一些博客记录一下(写的过程理解更加深刻了) 本文主要从三个方法来呈现:Netty核心组件简介.Netty服务端创建.Netty启动过程源码分析 如果你对Ne ...
- Android系统默认Home应用程序(Launcher)的启动过程源码分析
在前面一篇文章中,我们分析了Android系统在启动时安装应用程序的过程,这些应用程序安装好之后,还须要有一个Home应用程序来负责把它们在桌面上展示出来,在Android系统中,这个默认的Home应 ...
- Android Content Provider的启动过程源码分析
本文參考Android应用程序组件Content Provider的启动过程源码分析http://blog.csdn.net/luoshengyang/article/details/6963418和 ...
- Android Activity启动流程源码全解析(1)
前言 Activity是Android四大组件的老大,我们对它的生命周期方法调用顺序都烂熟于心了,可是这些生命周期方法到底是怎么调用的呢?在启动它的时候会用到startActivty这个方法,但是这个 ...
- Android Activity启动流程源码全解析(2)
接上之前的分析 ++Android Activity启动流程源码全解析(1)++ 1.正在运行的Activity调用startPausingLocked 一个一个分析,先来看看startPausing ...
- (3.4)mysql基础深入——mysql.server启动脚本源码阅读与分析
(3.4)mysql基础深入——mysql.server启动脚本源码阅读与分析 my.server主要分为3大部分 [1]变量初始化部分 [2]函数声明部分 [3]具体执行部分 #!/bin/sh # ...
- Spring IOC容器启动流程源码解析(四)——初始化单实例bean阶段
目录 1. 引言 2. 初始化bean的入口 3 尝试从当前容器及其父容器的缓存中获取bean 3.1 获取真正的beanName 3.2 尝试从当前容器的缓存中获取bean 3.3 从父容器中查找b ...
随机推荐
- Scheme来实现八皇后问题(2)
版权申明:本文为博主窗户(Colin Cai)原创,欢迎转帖.如要转贴,必须注明原文网址 http://www.cnblogs.com/Colin-Cai/p/9790466.html 作者:窗户 Q ...
- 【Linux基础】查看硬件信息-硬盘
一.基础知识 1.磁盘分区 磁盘的分区主要分为基本分区(primary partion)和扩充分区(extension partion)两种,基本分区和扩充分区的数目之和不能大于四个.且基本分区可以 ...
- e297: write error in swap file
磁盘空间不足: [root@ipservice fountain]# df -h Filesystem Size Used Avail Use% Mounted on /dev/mapper/dock ...
- C# for循环或者foreach往List中添加对象的时候前面的数据总被最后加入的覆盖
昨天我旁边小姐姐遇到一个问题,就是在执行for循环往list添加数据的时候,前面的数据信息总是被后面的数据信息所覆盖. 这样编写就会造成这样的数据效果:(所有的数据都会被覆盖) 问题原因:对 ...
- 从开始到头皮炸裂的python第5天
头皮炸裂的一天从学到一个新的数据类型开始,这个数据类型的新成员叫做字典,基本的格式为data={键:值,键:值},info.keys()表示所有的键,info.values()表示所有的值,info. ...
- odoo12.0 在Ubutu 18.04下环境的搭建
sudo apt-get update sudo apt- postgresql nano virtualenv gcc python3.-dev libxml2-dev libxslt1-dev l ...
- 错误: after element list
SyntaxError: missing ] after element list note: [ opened at line 18, column 16 可能出现重复引用
- jQuery对象与DOM对象之间的转换(转)
原文:https://www.cnblogs.com/lsy0403/p/5907084.html 什么是DOM对象 使用JavaScript中的方法获取页面中的元素返回的对象就是dom对象.比如使用 ...
- 工作小结:xml文件导入到oracle
上周遇到xml文件导入到oracle数据库中,发现正常的xml转成excle格式导入,只针对于1m以下的xml文件.当xml文件太大的时候,就没有作用了. 这时候,我找到了两种办法,一个是java,一 ...
- Shell命令-文件及目录操作之cp、find
文件及目录操作 - cp.find 1.cp:复制文件或目录 cp命令的功能说明 cp命令用于复制文件或目录. cp命令的语法格式 cp [OPTION]... SOURCE... DIRECTORY ...