babylon.js 学习笔记(3)
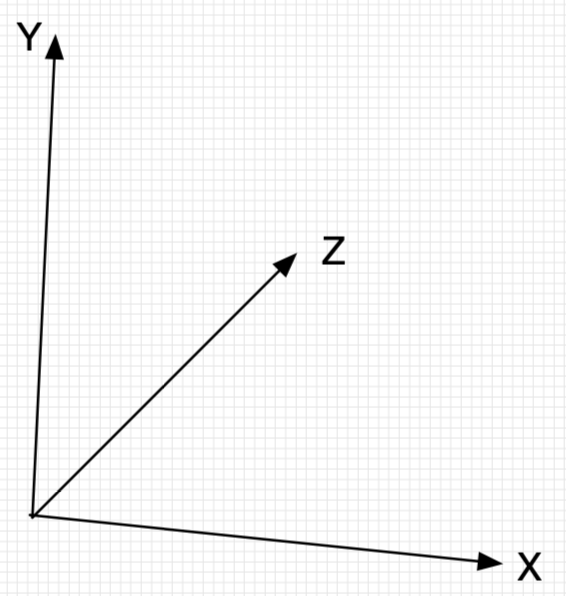
一、理解babylon.js 坐标系
const createScene = function () {

    const scene = new BABYLON.Scene(engine);

    const camera = new BABYLON.ArcRotateCamera("camera", -Math.PI / 2, Math.PI / 2.5, 3, new BABYLON.Vector3(0, 0, 0));

    camera.attachControl(canvas, true);

    const light = new BABYLON.HemisphericLight("light", new BABYLON.Vector3(1, 1, 0));

    //方块1(靠左,靠下,靠前)

    const box1 = BABYLON.MeshBuilder.CreateBox("box", { size: 0.4 }, scene);

    //Vector(x,y,z) 表示x,y,z三轴的坐标值

    box1.position = new BABYLON.Vector3(-1, -0.199, -0.4);

    //方块2(放在正中央)

    const box2 = BABYLON.MeshBuilder.CreateBox("box", { size: 0.4 }, scene);

    box2.position = new BABYLON.Vector3(0, 0, 0);

    //方块3(靠右,靠上,靠后)

    const box3 = BABYLON.MeshBuilder.CreateBox("box", { size: 0.4 }, scene);

    box3.position = new BABYLON.Vector3(1, 0.2, 0.4);

    var ground = BABYLON.MeshBuilder.CreateGround("ground", { width: 3, height: 1.5 }, scene);

    let groundMaterial = new BABYLON.StandardMaterial("Ground Material", scene);

    ground.material = groundMaterial;

    ground.material.diffuseColor = BABYLON.Color3.Black();

    return scene;

};
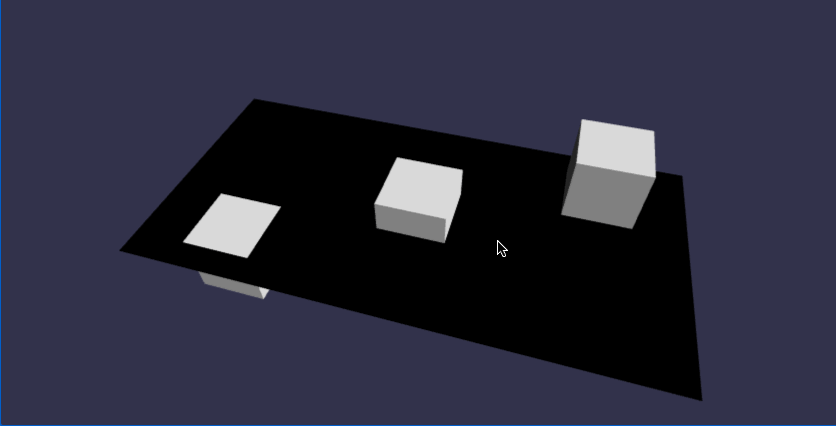
在线地址:https://yjmyzz.github.io/babylon_js_study/day03/01.html
//方块1(靠左,靠下,靠前)

const box1 = BABYLON.MeshBuilder.CreateBox("box", { size: 0.4 }, scene);

//Vector(x,y,z) 表示x,y,z三轴的坐标值

box1.position = new BABYLON.Vector3(-1, -0.199, -0.4);

box1.scaling = new BABYLON.Vector3(0.5, 1, 1);

//方块2(放在正中央)

const box2 = BABYLON.MeshBuilder.CreateBox("box", { size: 0.4 }, scene);

box2.position = new BABYLON.Vector3(0, 0, 0);

box2.scaling = new BABYLON.Vector3(1, 0.5, 1);

//绕y轴转45度

box2.rotation = new BABYLON.Vector3(0,Math.PI/4,0);

//方块3(靠右,靠上,靠后)

const box3 = BABYLON.MeshBuilder.CreateBox("box", { size: 0.4 }, scene);

box3.position = new BABYLON.Vector3(1, 0.2, 0.4);

box3.scaling = new BABYLON.Vector3(1, 1, 0.5);

box3.rotation = new BABYLON.Vector3(-Math.PI/4,0,0);

在线地址:https://yjmyzz.github.io/babylon_js_study/day03/02.html
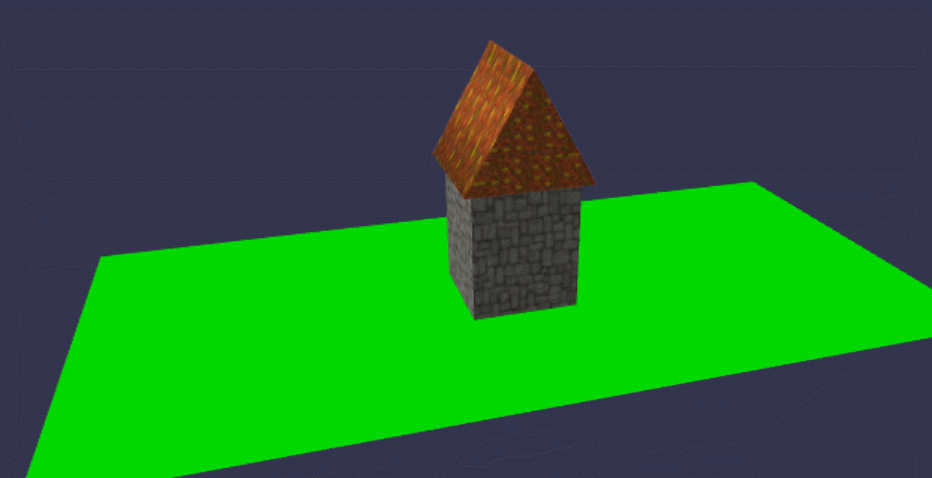
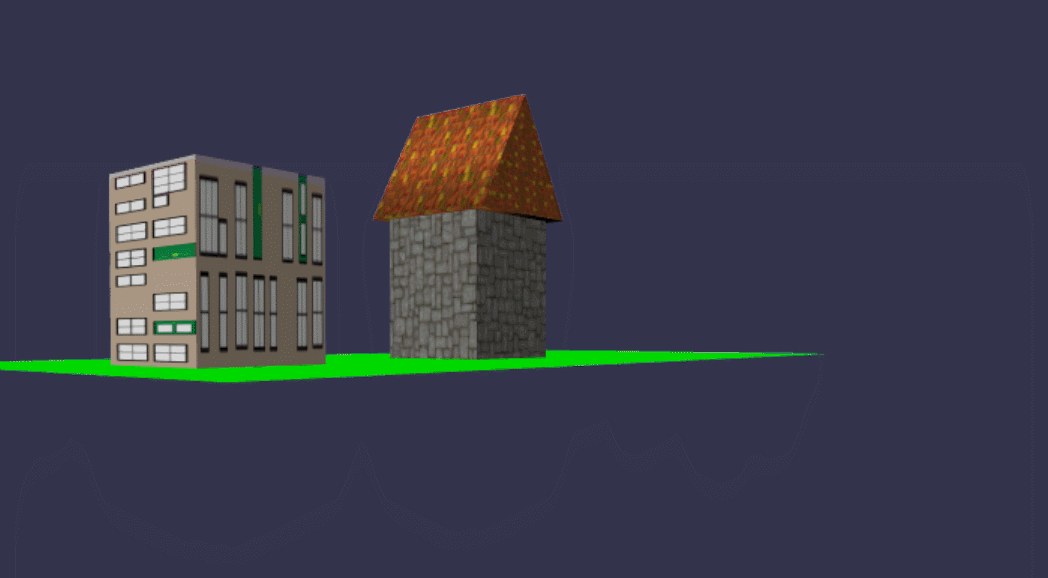
二、画1个简单的小房子

如上图,画1个三棱柱,以及1个立方体,组合起来即可。但babylon.js中并没有创建三棱柱的api,只能创建圆柱体,还记得前面学过的吗?任何复杂的对象(即mesh),都是一堆小三角形及各种切面的组合,三角形数越多,最终的对象越逼真。当圆柱体的边数设置为3时,即退化成三棱柱。
//Cylinder的边tessellation足够大时,即为圆柱形

const roof0 = BABYLON.MeshBuilder.CreateCylinder("roof0", {diameter: 1.3, height: 1.2, tessellation: 32},scene);

roof0.position = new BABYLON.Vector3(-1,0.26,0);

roof0.scaling = new BABYLON.Vector3(0.25,0.25,0.25);

const roof1 = BABYLON.MeshBuilder.CreateCylinder("roof1", {diameter: 1.3, height: 1.2, tessellation: 32},scene);

roof1.position = new BABYLON.Vector3(-0.5,0.26,0);

roof1.scaling = new BABYLON.Vector3(0.25,0.25,0.25);

//绕x轴转90度

roof1.rotation = new BABYLON.Vector3(Math.PI / 2,0,0);

//Cylinder的边tessellation=3时,即为三棱柱

const roof2 = BABYLON.MeshBuilder.CreateCylinder("roof2", {diameter: 1.3, height: 1.2, tessellation: 3},scene);

roof2.position = new BABYLON.Vector3(0,0.24,0);

roof2.scaling = new BABYLON.Vector3(0.4,0.4,0.4);

roof2.rotation = new BABYLON.Vector3(0,Math.PI / 2,Math.PI / 2);

//三棱柱+方块,组合成1个简单的房子

const roof = BABYLON.MeshBuilder.CreateCylinder("roof", {diameter: 1.3, height: 1.2, tessellation: 3},scene);

roof.position = new BABYLON.Vector3(0.9,0.6,0);

roof.scaling = new BABYLON.Vector3(0.4,0.4,0.4);

roof.rotation = new BABYLON.Vector3(0,Math.PI / 2,Math.PI / 2);

const box = BABYLON.MeshBuilder.CreateBox("box", { size: 0.4 }, scene);

box.position = new BABYLON.Vector3(0.9, 0.24, 0);

box.scaling = new BABYLON.Vector3(0.95, 1.2, 0.95);

在线地址:https://yjmyzz.github.io/babylon_js_study/day03/03.html
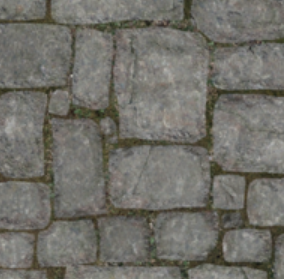
样子是有了,但是光秃秃的,比较难看,可以给它贴上壁纸,先找二张壁纸图片:

//设置屋顶及屋身的贴图材质

const roofMat = new BABYLON.StandardMaterial("roofMat");

roofMat.diffuseTexture = new BABYLON.Texture("../assets/img/roof.jpg", scene);

const boxMat = new BABYLON.StandardMaterial("boxMat");

boxMat.diffuseTexture = new BABYLON.Texture("../assets/img/floor.png");

roof.material = roofMat;

box.material = boxMat;
在线地址: https://yjmyzz.github.io/babylon_js_study/day03/04.html
房子是有窗户的,再来看看如何解决窗户的问题,答案仍然是在贴图上做文章,比如将下面这张带窗户的贴纸,在整个屋身上贴一圈即可
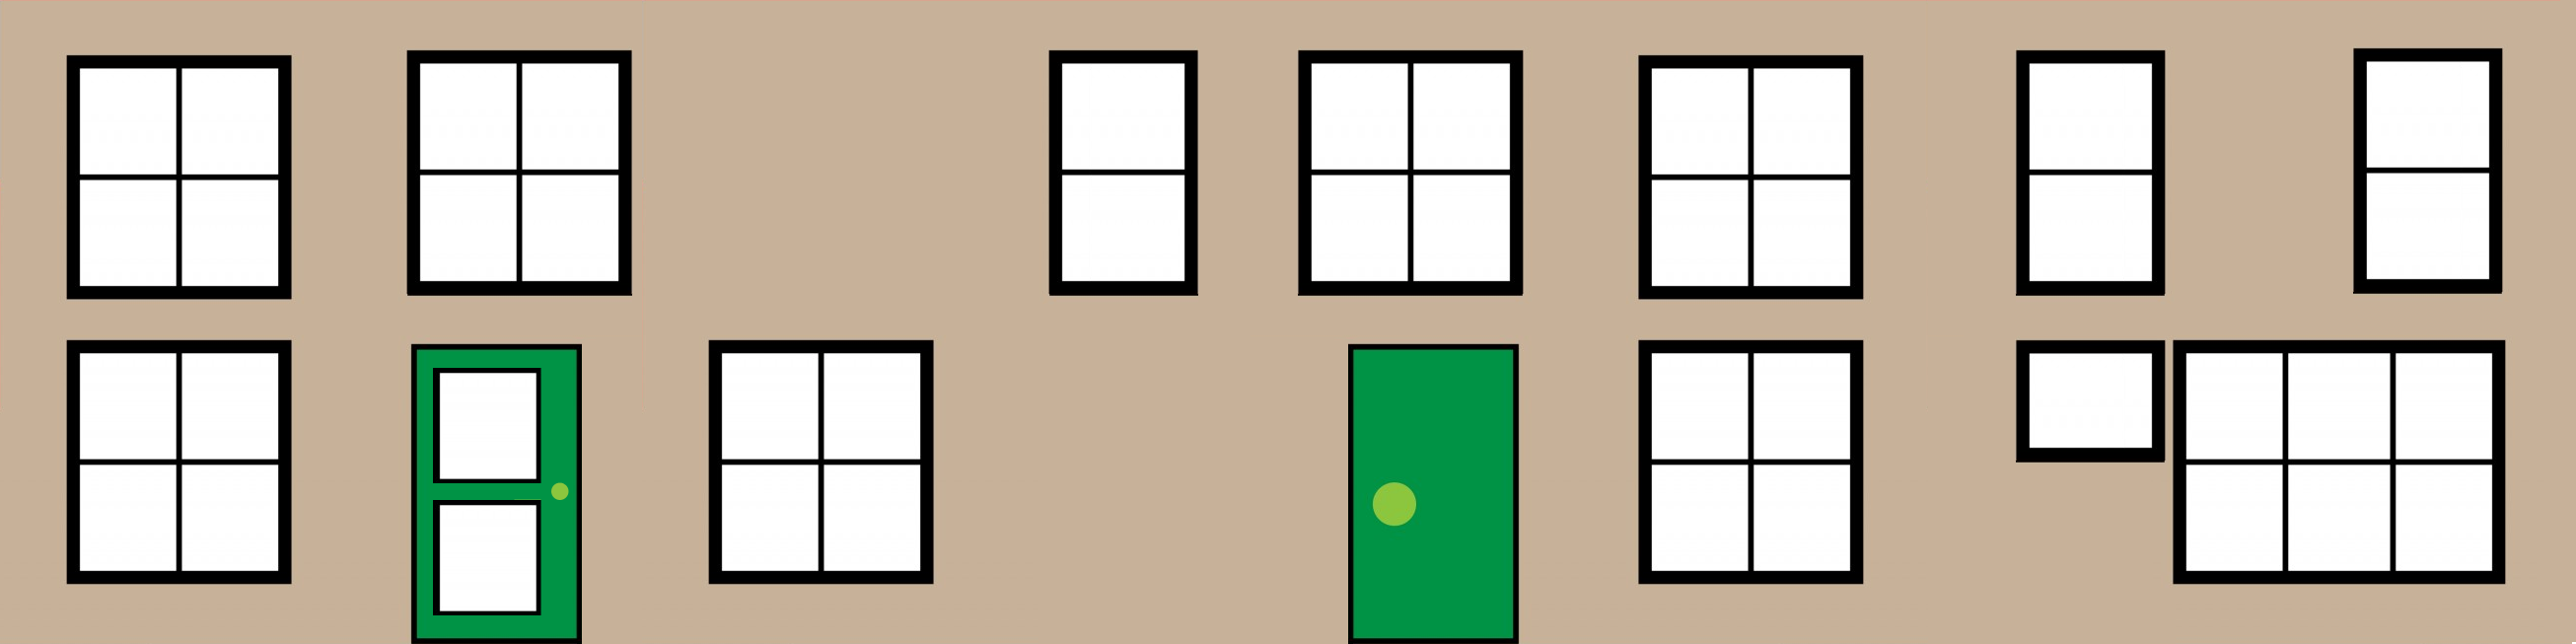
象不象某些地方的形象工程,哈

尝试用这个新贴图试一下:
//对比,画1个方块,用cubehouse贴图

const box2 = BABYLON.MeshBuilder.CreateBox("box", { size: 0.4 }, scene);

box2.position = new BABYLON.Vector3(1, 0.24, 0);

box2.scaling = new BABYLON.Vector3(0.95, 1.2, 0.95);

const boxMat2 = new BABYLON.StandardMaterial("boxMat2");

boxMat2.diffuseTexture = new BABYLON.Texture("../assets/img/cubehouse.png");

box2.material = boxMat2;
在线地址:https://yjmyzz.github.io/babylon_js_study/day03/05.html
好象有哪里不对,这看上去,象个快递包裹^_~,让我们想一想:
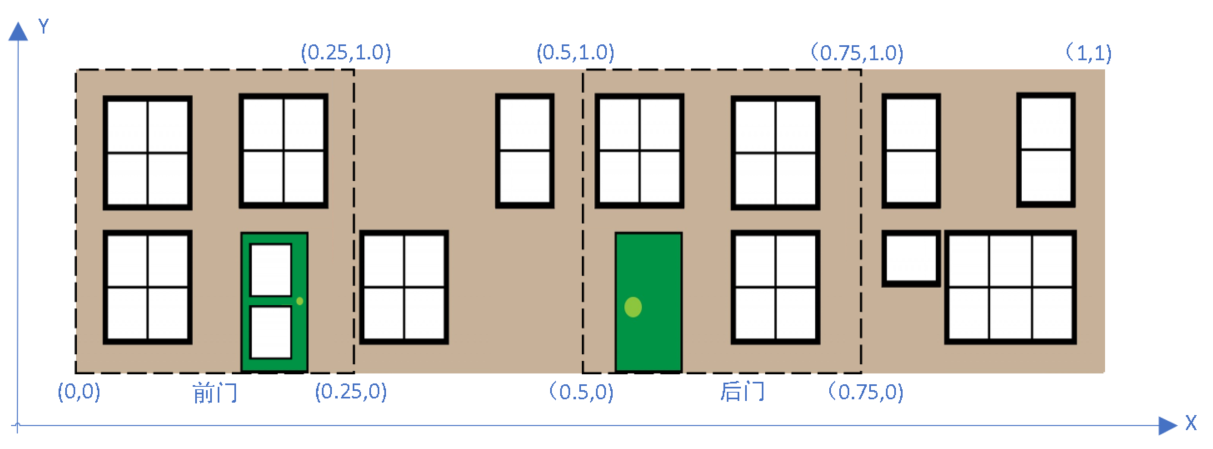
一般情况下,不用看屋身的底部和顶部(注:底部是绿色的大地,顶部被屋顶挡住了),所以可以将这张贴图切为4份,分别贴在屋身的前后左右。从CreateBox的API文档知,有1个参数faceUV可以指定box每个面的贴图:
faceUV可以使用Vector4对象做为参数:
vector (lower left x, lower left y, upper right x, upper right y)
//屋身四面的贴图坐标

const faceUV = [];

faceUV[0] = new BABYLON.Vector4(0.5, 0.0, 0.75, 1.0); //后面

faceUV[1] = new BABYLON.Vector4(0.0, 0.0, 0.25, 1.0); //前面

faceUV[2] = new BABYLON.Vector4(0.25, 0, 0.5, 1.0); //右面

faceUV[3] = new BABYLON.Vector4(0.75, 0, 1.0, 1.0); //左面

...

const box2 = BABYLON.MeshBuilder.CreateBox("box", { size: 0.4,faceUV:faceUV }, scene);

...

在线地址:https://yjmyzz.github.io/babylon_js_study/day03/06.html
为了方便后面代码复用,我们把创建地面、屋顶、屋身 这些基本逻辑,封装一下:
//调整地面/屋顶/屋身的大小及位置

const adjust = (ground, roof, box) => {

    const scaling = new BABYLON.Vector3(0.5, 0.5, 0.5);

    ground.scaling = scaling;

    roof.scaling = scaling;

    box.scaling = scaling;

    box.position.y = ground.position.y + 0.25;

    roof.position.y = box.position.y + 0.4;

    box.position.x = -1;

    roof.position.x = box.position.x;

}

//创建地面

const buildGround = () => {

    const groundMat = new BABYLON.StandardMaterial("groundMat");

    groundMat.diffuseColor = new BABYLON.Color3(0, 1, 0);

    const ground = BABYLON.MeshBuilder.CreateGround("ground", { width: 6, height: 3 });

    ground.material = groundMat;

    return ground;

}

//创建屋顶

const buildRoof = () => {

    const roofMat = new BABYLON.StandardMaterial("roofMat");

    roofMat.diffuseTexture = new BABYLON.Texture("../assets/img/roof.jpg");

    const roof = BABYLON.MeshBuilder.CreateCylinder("roof", { diameter: 1.3, height: 1.2, tessellation: 3 });

    roof.material = roofMat;

    roof.scaling.x = 0.75;

    roof.rotation.z = Math.PI / 2;

    roof.position.y = 1.22;

    return roof;

}

//创建屋身

const buildBox = () => {

    const boxMat = new BABYLON.StandardMaterial("boxMat");

    boxMat.diffuseTexture = new BABYLON.Texture("../assets/img/cubehouse.png")

    const faceUV = [];

    faceUV[0] = new BABYLON.Vector4(0.5, 0.0, 0.75, 1.0); //后面

    faceUV[1] = new BABYLON.Vector4(0.0, 0.0, 0.25, 1.0); //前面

    faceUV[2] = new BABYLON.Vector4(0.25, 0, 0.5, 1.0); //右面

    faceUV[3] = new BABYLON.Vector4(0.75, 0, 1.0, 1.0); //左面

    const box = BABYLON.MeshBuilder.CreateBox("box", { faceUV: faceUV, wrap: true });

    box.material = boxMat;

    box.position.y = 0.5;

    return box;

}

//在这里添加自己的核心代码

const createScene = function () {

    const scene = new BABYLON.Scene(engine);

    const camera = new BABYLON.ArcRotateCamera("camera", -Math.PI / 2, Math.PI / 2.5, 3, new BABYLON.Vector3(0, 0, 0));

    camera.attachControl(canvas, true);

    const light = new BABYLON.HemisphericLight("light", new BABYLON.Vector3(0.5, 0.5, 0));

    const ground = buildGround();

    const roof = buildRoof();

    const box = buildBox();

    adjust(ground, roof, box);

    return scene;

};
最后,再添加1种风格的房屋做为本篇收场:
<!DOCTYPE html>

<html xmlns="http://www.w3.org/1999/xhtml">

<head>

    <meta http-equiv="Content-Type" content="text/html; charset=utf-8" />

    <title>A Basic House</title>

    <style>

        html,

        body {

            overflow: hidden;

            width: 100%;

            height: 100%;

            margin: 0;

            padding: 0;

        }

        #renderCanvas {

            width: 50%;

            height: 50%;

            position: absolute;

            top: 0;

            left: 0;

            right: 0;

            bottom: 0;

            margin: auto;

            touch-action: none;

        }

        #canvasZone {

            width: 100%;

            height: 100%;

        }

    </style>

    <!-- 导入babylon核心功能 -->

    <script src="../js/babylon.js"></script>

    <!-- 允许scene中导入model -->

    <script src="../js/babylonjs.loaders.min.js"></script>

    <!-- 允许使用触屏 -->

    <script src="../js/pep.js"></script>

</head>

<body>

    <canvas id="renderCanvas" touch-action="none"></canvas>

    <script>

        const canvas = document.getElementById("renderCanvas");

        const engine = new BABYLON.Engine(canvas, true);

        //调整地面/屋顶/屋身的大小及位置

        const adjust = (ground, roof, box) => {

            const scaling = new BABYLON.Vector3(0.5, 0.5, 0.5);

            ground.scaling = scaling;

            roof.scaling = scaling;

            box.scaling = scaling;

            box.position.y = ground.position.y + 0.25;

            roof.position.y = box.position.y + 0.4;

            box.position.x = -0.8;

            roof.position.x = box.position.x;

        }

        //调整-联体别墅-地面/屋顶/屋身的大小及位置

        const adjustSemiHouse = (ground, roof, box) => {

            const scaling = new BABYLON.Vector3(0.5, 0.5, 0.5);

            roof.scaling = scaling;

            box.scaling = scaling;

            box.position.y = ground.position.y + 0.25;

            roof.position.y = box.position.y + 0.4;

            box.position.x = 0.5;

            roof.position.x = box.position.x;

        }

        //创建地面

        const buildGround = () => {

            const groundMat = new BABYLON.StandardMaterial("groundMat");

            groundMat.diffuseColor = new BABYLON.Color3(0, 1, 0);

            const ground = BABYLON.MeshBuilder.CreateGround("ground", { width: 6, height: 3 });

            ground.material = groundMat;

            return ground;

        }

        //创建屋顶

        const buildRoof = () => {

            const roofMat = new BABYLON.StandardMaterial("roofMat");

            roofMat.diffuseTexture = new BABYLON.Texture("../assets/img/roof.jpg");

            const roof = BABYLON.MeshBuilder.CreateCylinder("roof", { diameter: 1.3, height: 1.2, tessellation: 3 });

            roof.material = roofMat;

            roof.scaling.x = 0.75;

            roof.rotation.z = Math.PI / 2;

            roof.position.y = 1.22;

            return roof;

        }

        //创建-联体别墅-屋顶

        const buildSemiHouseRoof = () => {

            const roof = BABYLON.MeshBuilder.CreateCylinder("roof", { diameter: 1.3, height: 2.2, tessellation: 3 });

            roof.scaling.y = 0.75;

            roof.rotation.z = Math.PI / 2;

            roof.position.y = 1.22;

            const roofMat = new BABYLON.StandardMaterial("roofMat");

            roofMat.diffuseTexture = new BABYLON.Texture("../assets/img/roof.jpg");

            roof.material = roofMat;

            return roof;

        }

        //创建屋身

        const buildBox = () => {

            const boxMat = new BABYLON.StandardMaterial("boxMat");

            boxMat.diffuseTexture = new BABYLON.Texture("../assets/img/cubehouse.png")

            const faceUV = [];

            faceUV[0] = new BABYLON.Vector4(0.5, 0.0, 0.75, 1.0); //后面

            faceUV[1] = new BABYLON.Vector4(0.0, 0.0, 0.25, 1.0); //前面

            faceUV[2] = new BABYLON.Vector4(0.25, 0, 0.5, 1.0); //右面

            faceUV[3] = new BABYLON.Vector4(0.75, 0, 1.0, 1.0); //左面

            const box = BABYLON.MeshBuilder.CreateBox("box", { faceUV: faceUV, wrap: true });

            box.material = boxMat;

            box.position.y = 0.5;

            return box;

        }

        //创建-联体别墅-屋身

        const buildSemiHouseBox = () => {

            const boxMat = new BABYLON.StandardMaterial("boxMat");

            boxMat.diffuseTexture = new BABYLON.Texture("../assets/img/semihouse.png")

            const faceUV = [];

            faceUV[0] = new BABYLON.Vector4(0.6, 0.0, 1.0, 1.0); //rear face

            faceUV[1] = new BABYLON.Vector4(0.0, 0.0, 0.4, 1.0); //front face

            faceUV[2] = new BABYLON.Vector4(0.4, 0, 0.6, 1.0); //right side

            faceUV[3] = new BABYLON.Vector4(0.4, 0, 0.6, 1.0); //left side

            const box = BABYLON.MeshBuilder.CreateBox("box", { width: 2, height: 1, faceUV: faceUV, wrap: true });

            box.material = boxMat;

            box.position.y = 0.5;

            return box;

        }

        //在这里添加自己的核心代码

        const createScene = function () {

            const scene = new BABYLON.Scene(engine);

            const camera = new BABYLON.ArcRotateCamera("camera", -Math.PI / 2, Math.PI / 2.5, 3, new BABYLON.Vector3(0, 0, 0));

            camera.attachControl(canvas, true);

            const light = new BABYLON.HemisphericLight("light", new BABYLON.Vector3(0.5, 0.5, 0));

            const ground = buildGround();

            const roof = buildRoof();

            const box = buildBox();

            adjust(ground, roof, box);

            const roof2 = buildSemiHouseRoof();

            const box2 = buildSemiHouseBox();

            adjustSemiHouse(ground, roof2, box2);

            return scene;

        };

        const scene = createScene();

        engine.runRenderLoop(function () {

            scene.render();

        });

        window.addEventListener("resize", function () {

            engine.resize();

        });

    </script>

</body>

</html>
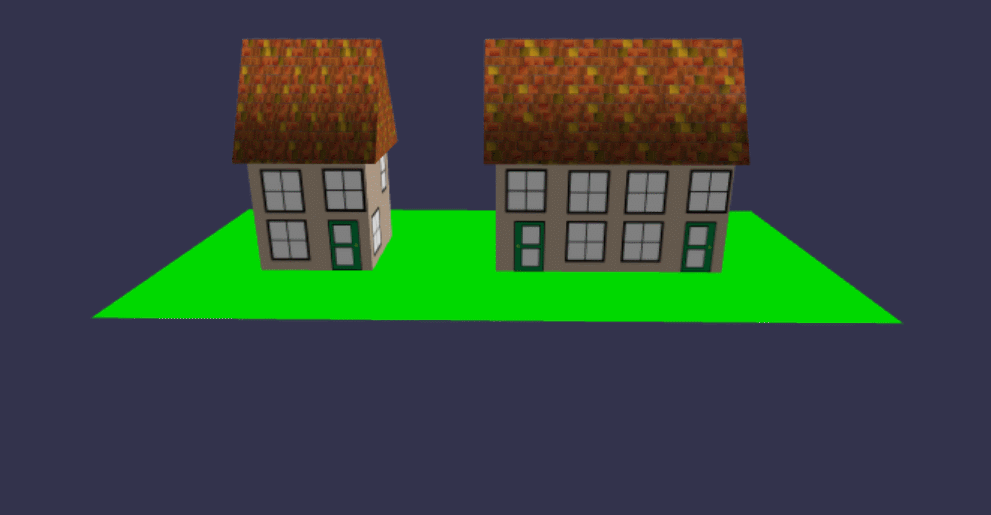
在线地址:https://yjmyzz.github.io/babylon_js_study/day03/07.html
参考文档:
https://doc.babylonjs.com/features/introductionToFeatures/chap2/variation
babylon.js 学习笔记(3)的更多相关文章
- js学习笔记:webpack基础入门(一)
之前听说过webpack,今天想正式的接触一下,先跟着webpack的官方用户指南走: 在这里有: 如何安装webpack 如何使用webpack 如何使用loader 如何使用webpack的开发者 ...
- Vue.js学习笔记(2)vue-router
vue中vue-router的使用:
- JS 学习笔记--9---变量-作用域-内存相关
JS 中变量和其它语言中变量最大的区别就是,JS 是松散型语言,决定了它只是在某一个特定时间保存某一特定的值的一个名字而已.由于在定义变量的时候不需要显示规定必须保存某种类型的值,故变量的值以及保存的 ...
- WebGL three.js学习笔记 使用粒子系统模拟时空隧道(虫洞)
WebGL three.js学习笔记 使用粒子系统模拟时空隧道 本例的运行结果如图: 时空隧道demo演示 Demo地址:https://nsytsqdtn.github.io/demo/sprite ...
- WebGL three.js学习笔记 法向量网格材质MeshNormalMaterial的介绍和创建360度全景天空盒的方法
WebGL学习----Three.js学习笔记(5) 点击查看demo演示 Demo地址:https://nsytsqdtn.github.io/demo/360/360 简单网格材质 MeshNor ...
- WebGL three.js学习笔记 创建three.js代码的基本框架
WebGL学习----Three.js学习笔记(1) webgl介绍 WebGL是一种3D绘图协议,它把JavaScript和OpenGL ES 2.0结合在一起,通过增加OpenGL ES 2.0的 ...
- vue.js 学习笔记3——TypeScript
目录 vue.js 学习笔记3--TypeScript 工具 基础类型 数组 元组 枚举 字面量 接口 类类型 类类型要素 函数 函数参数 this对象和类型 重载 迭代器 Symbol.iterat ...
- 2019-4-29 js学习笔记
js学习笔记一:js数据类型 1:基本数据类型 number类型(整数,小数) String类型 boolean类型 NaN类型其实是一个nu ...
- 一点感悟:《Node.js学习笔记》star数突破1000+
写作背景 笔者前年开始撰写的<Node.js学习笔记> github star 数突破了1000,算是个里程碑吧. 从第一次提交(2016.11.03)到现在,1年半过去了.突然有些感慨, ...
- JS学习笔记5_DOM
1.DOM节点的常用属性(所有节点都支持) nodeType:元素1,属性2,文本3 nodeName:元素标签名的大写形式 nodeValue:元素节点为null,文本节点为文本内容,属性节点为属性 ...
随机推荐
- s2-061(CVE-2020-17530)漏洞复现+利用+getshell工具。
声明 本文仅用于技术交流,请勿用于非法用途 由于传播.利用此文所提供的信息而造成的任何直接或者间接的后果及损失,均由使用者本人负责,文章作者不为此承担任何责任. 文章作者拥有对此文章的修改和解释权.如 ...
- mysql 5.7等保2.0安全配置
一.安装密码校验插件validate_password 在使用服务器插件之前,必须将它们加载到服务器中.MySQL支持在服务器启动和运行时加载插件.还可以在启动时控制加载插件的激活状态,并在运行时卸载 ...
- python打包exe自定义图标
1.生成.ico图标 https://www.aconvert.com/cn/icon/jpg-to-ico/ 2.打包 pyinstaller -F -w -i 666.ico pdfToword. ...
- WO Mic - 免费麦克风
WO Mic可以将您的手机变成电脑麦克风.您无需支付一分钱购买任何设备.如果您选择无线传输,它也是便携的.数百万用户已经安装并每天都在使用它进行通话.录音.语音遥控等活动. 三大组件协同工作以实现这一 ...
- Java8 新特性-Lambda表达式
目录 1.Lambda表达式介绍 2.Lambda表达式语法细讲 3. Lambda表达式语法精简 4. Lambda方法引用 5. 综合实例 6. @FunctionalInterface注解 7. ...
- 设计模式之“原型模式(ProtoType)”
一.原型模式(ProtoType) 作用:用原型实例指定创建对象的种类,并且通过拷贝这些原创新的对象 白话解释:用于创建重复的对象,同时有能保证性能(这种类型的设计模式属于创建型设计模式,他提供了一种 ...
- Django内置filter总结
内置过滤器 目的是对绝大多数的内置过滤器进行测试总结学习,现设置如下: urls.py中设置: urlpatterns=[ url(r'^method',views.method,name='meth ...
- minikube dashboard ImagePullBackOff 失败问题的解决方法
问题 通过minikube启动k8s集群后,我们想安装启动k8s的dashboard插件,执行minikube dashboard后,一直卡住直到提示验证失败. 查看pod状态,我们看到kuberne ...
- sass中@use 的用法
前言在上一篇中,我们深入探讨了 Sass 中 @import 语法的局限性,正是因为这些问题,Sass 在 1.80 版本 后逐步弃用 @import,推出了更现代化的 @use 语法作为替代.在本文 ...
- PostGIS栅格数据类型解析【raster】
PostGIS 栅格数据类型解析:结构.转换与应用 一.栅格数据类型概述 在 PostGIS 中,raster 是用于存储和处理栅格数据的核心类型,支持从多种格式(如 JPEG.GeoTIFF.PNG ...