Redmine 和GitBlit仓库服务器整合
运行环境:
RedMine: 4.0.4
Git 仓库: Gitbilt V1.8.0
必须:
- Redmine 安装并可运行
- Redmine运行的主机里面已经安装了
Git,因需要在命令行中运行 git 命令
我运行的是bitnami的Redmine的Virtualbox 版本。地址是: Bitnami Redmine
启动虚拟机之后,开机完成之后,会出现
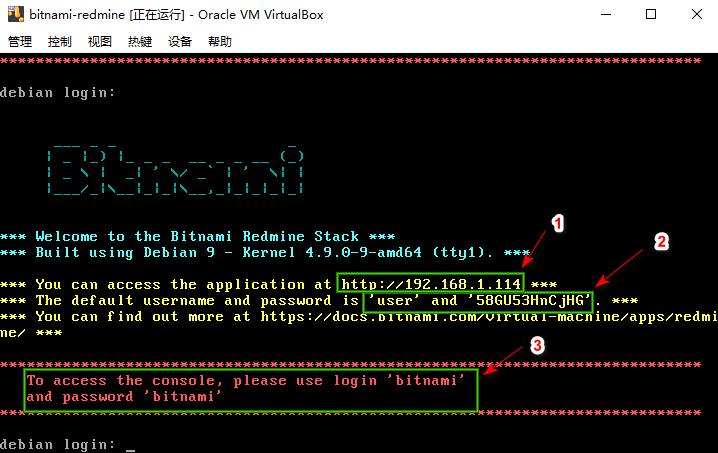
- 访问地址
- redmine 默认的登录的用户名和密码,redmine默认的登录密码也是 mysql
root用户的密码 Obtain MySQL Credentials - 访问控制台(ssh)的默认用户名和密码
注: 如果 运行ifconfig 命令,提示ifconfig命令找不到,可以尝试运行sudo ifconfig
开始以为是没有安装 net-tools,尝试命令sudo apt install net-tools去安装,提示已经安装了。
虚拟机默认是禁用ssh登录的,通过官方的教程Enable Or Disable The SSH Server
debian
sudo rm -f /etc/ssh/sshd_not_to_be_run

sudo systemctl enable ssh

sudo systemctl start ssh
将仓库拷贝到本地
bitnami@debian:~$ cd ~

bitnami@debian:~$ mkdir gitrepos

bitnami@debian:~$ sudo chown -R www-data:www-data gitrepos

bitnami@debian:~$ sudo chmod -R a+rwx gitrepos

bitnami@debian:~$ cd gitrepos

bitnami@debian:~/gitrepos$ sudo -u www-data -H git clone --mirror git://192.168.1.142/test.git test
是将对应项目的git镜像到本地(不是源码下载到本地哦)
Readmine 配置
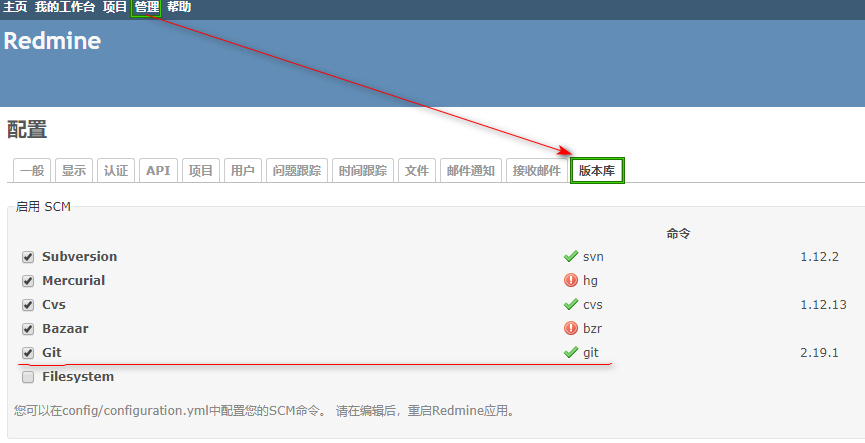
- 查看 Git 是否可用
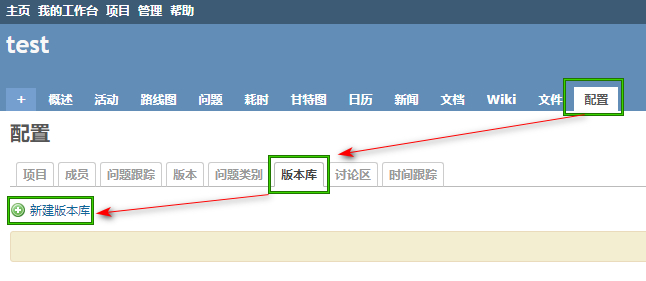
- 给项目新建版本库
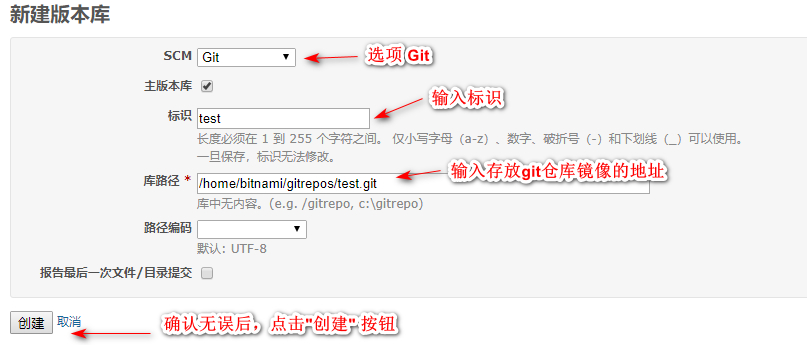
修正: 库路径结尾没有.git ,因为上面已经取了别名是test
查看是否能正常显示源码
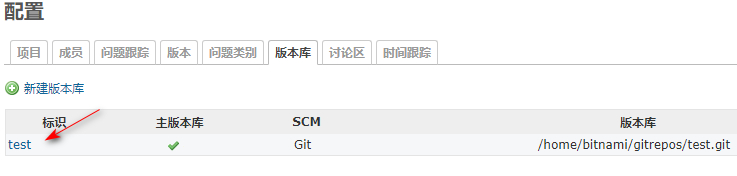

从上图可以看到,成功显示源码和提交历史。如果开始是一个空仓库,可能会提示类似"该目录下没有条目或者文件"
- 使用 Linux的定时任务定时拉取仓库
创建一个 shell 文件,如: git_repo_test.sh,内容
#!/bin/bash

cd /home/bitnami/gitrepos/test && sudo -u www-data -H git fetch
保存之后,尝试运行脚本,运行成功,
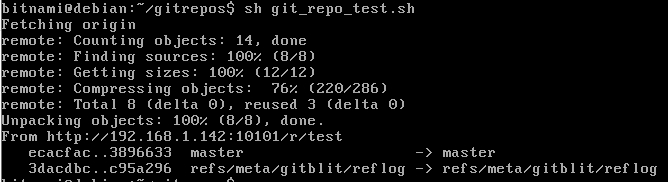
下一步将定时每5分钟运行这个脚本
crontab -e
在打开的crontab 编辑文件中添加
*/5 * * * * cd /home/bitnami/gitrepos/test && sudo -u www-data -H git fetch
编辑完之后,重启 cron 服务
sudo service cron restart
最后在 Redmine中,看到 仓库的更新记录,如果有新提到远程仓库,5分钟之后,会通过定时任务自动拉取提交的记录
其它 Redmine和GitBilt 集成
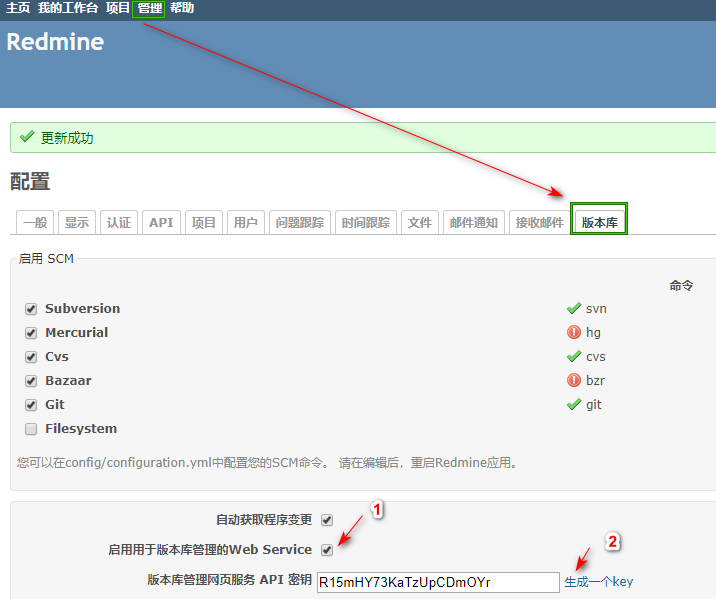
- 在管理,版本库,开启 Web Service,并生成key 和 对Readmine的通知
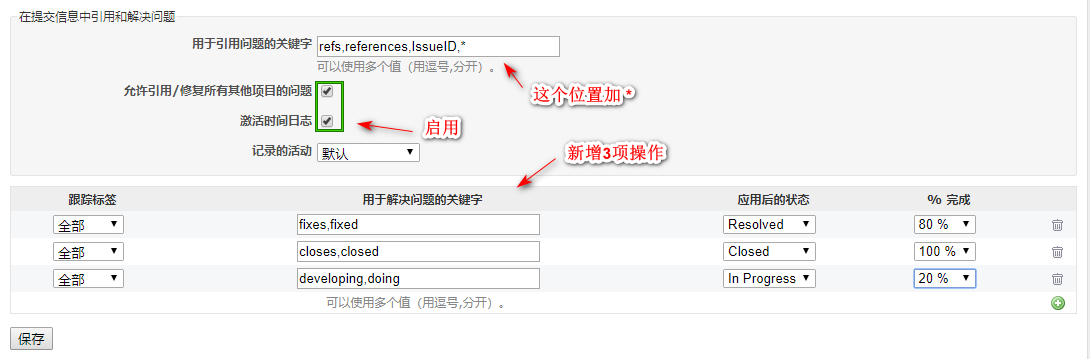
| 跟踪标签 | 用于解决问题的关键字 | 应用后的状态 | % 完成 |
|---|---|---|---|
| 全部 | fixes,fixed | Resolved | 80% |
| 全部 | closes,closed | Closed | 100% |
| 全部 | developing,doing | In Progress | 20% |
开启 Readmine的API
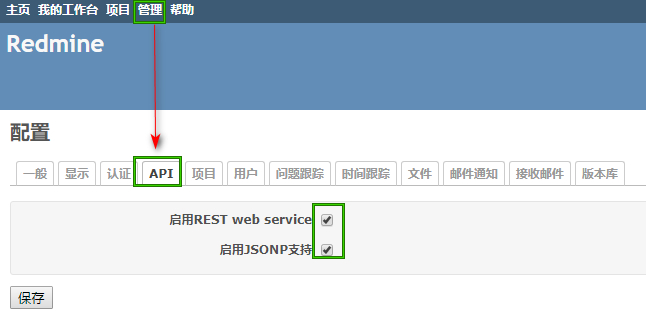
API选项卡 里面的两个都勾选修改Gitbilt 配置文件
修改 Gitbilt 文件夹下data 的 gitblit.properties 文件
在文件夹中,添加
groovy.customFields = "redmineProject=Redmine Project Identifier"
最后我的gitblit.properties的内容是:
#

# GITBLIT.PROPERTIES

#

# Define your custom settings in this file and/or include settings defined in

# other properties files.

#

# Include Gitblit's 'defaults.properties' within your configuration.

#

# NOTE: Gitblit will not automatically reload "included" properties.  Gitblit

# only watches the 'gitblit.properties' file for modifications.

#

# Paths may be relative to the ${baseFolder} or they may be absolute.

#

# COMMA-DELIMITED

# SINCE 1.7.0

include = defaults.properties

groovy.customFields = "redmineProject=Redmine Project Identifier"

#

# Define your overrides or custom settings below

#

#git.repositoriesFolder=E:\devops\gitblit\repos

server.httpPort=10101

server.httpBindInterface=0.0.0.0

#tickets.service = com.gitblit.tickets.FileTicketService

#tickets.acceptNewTickets = true
- 修改 GitBilt 的
redmine-fetch.groovy文件
修改 GitBilt 安装文件夹下,修改data/groovy 文件夹下的 redmine-fetch.groovy 文件,修改 redmineURL和apiKey 2个变量的值,修改的值如下:
/*

 * This script triggers automatic repo fetches in Redmine upon pushes.

 * It won't work out-of-box, you need to configure a few things.

 *

 * Redmine

 *  - Go to Administration / Settings / Repositories, and make sure that the

 *    "Enable WS for repository management" option is checked. Also generate an

 *    API key and take note of it.

 *  - Open a project page, go to Settings / Repositories and add a repo. Take

 *    note of the Identifier.

 *

 * Gitblit

 *  - Set the redmineProject custom field in gitblit.properties, e.g.

 *    groovy.customFields = "redmineProject=Redmine Project Identifier"

 *  - Edit the repo you added to Redmine, go to hook scripts and add this script

 *    to the post-receive hooks. Also specify the Redmine project's identifier

 *    under custom fields.

 *

 * Troubleshooting

 *  - run Gitblit interactively and check its console output

 *  - on the Redmine server, tail -f log/access.log

 *

 * If you want your repos to work with multiple Redmine projects, you don't need

 * to add the repos to all of them. Instead, add the repo to a single project,

 * then go to Administration / Settings / Repositories and enable the "Allow

 * issues of all the other projects to be referenced and fixed" option.

 */

/* specify the URL of your Redmine instance here */

def redmineURL = "http://192.168.1.114/"

/* specify the API key you generated in Redmine Administration here */

def apiKey = "R15mHY73KaTzUpCDmOYr"

/*

 * construct the URL from global and repo properties, for more info refer to

 * http://www.redmine.org/projects/redmine/wiki/RedmineSettings#Fetch-commits-automatically

 */

def triggerURL = redmineURL + "sys/fetch_changesets?id=" + repository.customFields.redmineProject + "&key=" + apiKey

/* log the action */

logger.info("Redmine Fetch hook triggered by ${user.username} for ${repository.name}: GET ${triggerURL}")

/* send the HTTP GET query */

new URL(triggerURL).getContent()
修改完之后,重启启动GitBilt
下一步,在 版本库列表,进入仓库 test详情页,点击右上角的 "编辑"按钮

进入编辑页面之后,选择receive 选项卡,进入Receive 设置页面
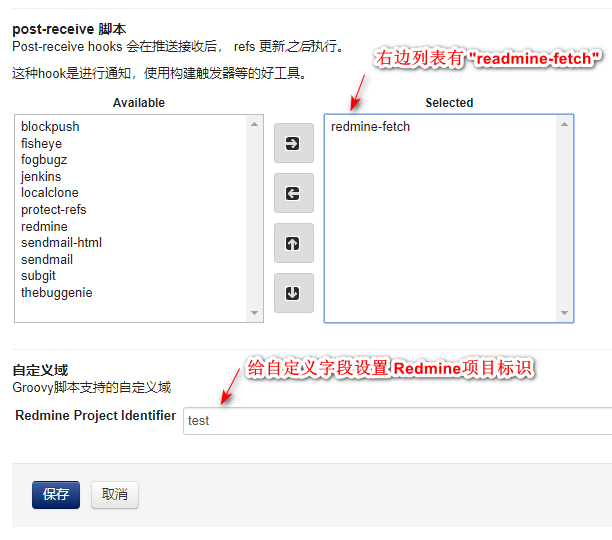
最后 给 test仓库推送提交,GitBilt的命令窗口显示,请求Redmine的Api地址成功

bitnami redmine 程序的命令备忘
sh /opt/redmine-3.4.4-1/ctlscript.sh restart

sh /opt/redmine-3.4.4-1/ctlscript.sh restart mysql

/opt/redmine-3.4.4-1/ruby/bin/bundle install --path vendor/bundle

sudo /opt/redmine-3.4.4-1/mysql/bin/mysqld_safe --pid-file=/opt/redmine-3.4.4-1/mysql/data/mysqld.pid --datadir=/opt/redmine-3.4.4-1/mysql/data --init-file=/home/test/mysql-init 2> /dev/null &

/opt/redmine-3.4.4-1/mysql/bin/mysqldump -A -u root -p > backup.sql
References
- Debian9 ifconfig命令找不到解决办法 学习到
ifconfig命令是属于nettools软件的 - redmine集成git
- redmine整合gitlab版本库 学习到给仓库存放文件夹的拥有者为apache用户和分配权限,最后 定时任务 更新仓库成功啦
- Hook redmine git repository via gitblit 我安装使用的Redmine已经有自带
redmine-fetch.groovy文件,所以不需要按文章中介绍的编辑 groovy文件 - RedmineとGitLabの連携。PushでチケットのStatusを変更 gitlab 和 redmine 整合
- redmine edit issue description
- redmine roles wiki
- redmine gitlab 整合
- Visibility level visibilitylevel|public is not allowed in a visibilitylevel|private group.
- GitLabとRedmineを連携してみるの巻
- Create And Restore Application Backups redmine创建和还原应用程序备份
Redmine 和GitBlit仓库服务器整合的更多相关文章
- Python第十三天 django 1.6 导入模板 定义数据模型 访问数据库 GET和POST方法 SimpleCMDB项目 urllib模块 urllib2模块 httplib模块 django和web服务器整合 wsgi模块 gunicorn模块
Python第十三天 django 1.6 导入模板 定义数据模型 访问数据库 GET和POST方法 SimpleCMDB项目 urllib模块 urllib2模块 ...
- Gitblit版本服务器环境部署记录
Gitblit介绍Gitblit 是一个纯 Java 库用来管理.查看和处理 Git 资料库.相当于 Git 的 Java 管理工具,支持linux系统.Git是分布式版本控制系统,它强调速度.数据一 ...
- Windows下Apache+Tomcat+jsp+php的服务器整合配置经验总结
对于Apache+Tomcat+jsp+php的整合,针对不同的Tomcat和apache的版本,稍微有些区别. 一.所需软件 (1)JDK: jdk-7u15-windows-x64.exejdk的 ...
- mac 布置 git仓库服务器
创建管理员账户 例如:git 使用git账户登录 开启git账户的远程登陆 创建仓库文件夹 sudo git --bare init 更改配置文件 cd /Users/userName/project ...
- 创建Gitblit本地服务器(For windows )01
1.先下载gitblit 貌似需要FQ,百度云链接https://pan.baidu.com/s/1WUtBswj5TkFFcd_hiFFCcw,提取码: xr9n .因为gitblit是基于jav ...
- linux 搭建局域网YUM源仓库服务器
yum简介 Yum(全称为 Yellow dog Updater, Modified)是一个在Fedora和RedHat以及CentOS中的Shell前端软件包管理器.基于RPM包管理,能够从指定的服 ...
- 97、配置yum源仓库服务器
(服务端(双(外,内)网卡)--客户端(内网)) YUM主要用于自动安装.升级rpm软件包,它能自动查找并解决rpm包之间的依赖关系.要成功的使用YUM工具安装更新软件或系统, 就需要有一个包含各种r ...
- docker-registry 搭建私有仓库服务器
我使用了两个虚拟机: 1)Ubuntu是服务器ip:192.168.84.128 2)centos是客户端ip:192.168.84.129 1.在服务端下载registry镜像 docker pu ...
- 关于RabbitMQ服务器整合(二)
准备工作 15min IDEA maven 3.0 在开始构建项目之前,机器需要安装rabbitmq,你可以去官网下载,http://www.rabbitmq.com/download.html ,如 ...
随机推荐
- linux系统物理cpu信息查询
1.查看CPU型号 cat /proc/cpuinfo | grep name | cut -f2 -d: | uniq -c 2.查看物理CPU的个数 ca ...
- 【Muduo库】【base】基本类
一.Timestamp类 1.类图如下: 2. 知识点 (1) 这个类继承了 muduo::copyable, 以及 boost::less_than_comparable. (2) ...
- Fatal error compiling: invalid target release: 11 -> [Help 1]
<plugin> <groupId>org.apache.maven.plugins</groupId> <artifactId>maven-compi ...
- Office VBA 参考
Office VBA 参考:https://docs.microsoft.com/zh-CN/office/vba/api/overview/
- Yii2-rbac
下面介绍一个 yii2.0 的 Rbac 权限设置,闲话少说,直接上代码, 1.首先我们要在组件里面配置一下 Rbac ,如下所示(common/config/main-local.php或者ma ...
- PHP FILTER_VALIDATE_REGEXP 过滤器
定义和用法 FILTER_VALIDATE_REGEXP 过滤器根据兼容 Perl 的正则表达式来验证值. Name: "validate_regexp" ID-number: 2 ...
- J2EE学习篇之--Struts2技术详解
前面说到了Struts1的相关知识,下面来说一下Struts2的相关知识,我们知道现在Struts2使用的比Struts1多,Struts2已经替代Struts1成为主流的框架了... 摘要 Stru ...
- Html加水印和禁用复制和右键(jquery.watermark.js)
近期遇到一个需求,需要在页面背景加上自己的水印和禁止用户在页面复制粘贴 解决: 水印使用的是jquery.watermark.js插件,这个插件可以在html背景上加水印,同时可以设置相关属性值. 相 ...
- FM算法组合估计
#include <stdio.h> #include <math.h> #include <stdlib.h> #include <time.h> # ...
- monkeyrunner 进行多设备UI测试
monkeyrunner进行多设备UI测试 首先你要连接好多个手机设置好已经连接好的手机的ip列表ipp = ['192xxx','192xxx']杀掉之前所有appium进程subprocess. ...