ANT task之Junit、JunitReport
一、ANT任务之Junit:
学习ANT其实主要是学习ANT的task,ANT众多task中有一个Testing Tasks,它下面有两个任务:Junit和JunitReport,主要用来进行单元测试及生成单元测试报告。
| Testing Tasks |
|---|
| Task Name | Description |
|---|---|
| Junit |
Runs tests from the Junit testing framework. This task has been tested with JUnit 3.0 up to JUnit 3.7; it won't work with versions prior to JUnit 3.0. |
| JunitReport |
Merges the individual XML files generated by the Junit task and applies a stylesheet on the resulting merged document to provide a browsable report of the testcases results. |
官方网址:http://ant.apache.org/manual/index.html
<junit>下面可以包含其它元素,例如:
1、<test>:运行单个TestCase
2、<batchtest>:运行多个TestCase
3、<formatter>:定义测试结果输出格式
还有很多,详细可以参考官方文档。
二、项目实例:
由于ant安装比较得简单,网上一搜一大把且现在ecplise基本都带ant,所以本文并未说明如何搭建ant环境。
另外,在eclipse中可以通过:window->show view 来调出Ant视图
1、目录结构如下:
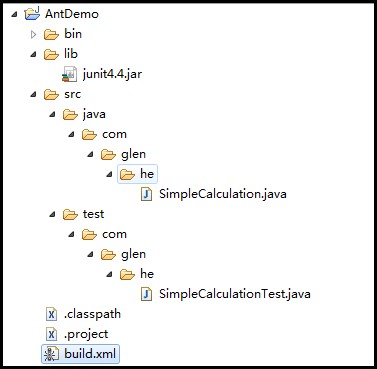
2、SimpleCalculation类代码如下:
 package com.glen.he;

 public class SimpleCalculation {

     public int Add(int a,int b){

         return (a+b);

     }

 }
SimpleCalculation
3、测试类SimpleCalculationTest代码如下:
 package com.glen.he;

 import com.glen.he.SimpleCalculation;

 import static org.junit.Assert.*;

 import org.junit.Test;

 public class SimpleCalculationTest {

     SimpleCalculation sc = new SimpleCalculation();

     @Test

     public void AddTest() {

         int c = sc.Add(3, 5);

         assertEquals(8, c);

     }

 }
SimpleCalculationTest
4、在项目要目录下添加build.xml(执行一个测试)文件,内容如下:
 <?xml version="1.0" encoding="UTF-8"?>

 <project name="AntDemo" default="junit" basedir=".">

     <!-- =================================================================== -->

     <!-- 变量设置  -->

     <!-- =================================================================== -->

     <!-- 源代码src路径 -->

     <property name="src.path" value="src/java"/>

     <!-- 编译文件class路径 -->

     <property name="build.path" value="build"/>

     <!-- 单元测试代码路径 -->

     <property name="test.path" value="src/test"/>

     <!-- lib包路径 -->

     <property name="lib.path" value="lib"/>

     <!-- =================================================================== -->

     <!-- 设置classpath -->

     <!-- =================================================================== -->

     <path id="compile.path">

         <fileset dir="${lib.path}">

             <include name="**/*.jar"/>

         </fileset>

         <pathelement path="${build.path}"/>

     </path>

     <!-- =================================================================== -->

     <!-- 清除历史编译class -->

     <!-- =================================================================== -->

     <target name="clean" description="clean">

         <delete dir="${build.path}"/>

     </target>

     <!-- =================================================================== -->

     <!-- 编译测试文件,初始化目录 -->

     <!-- =================================================================== -->

     <target name="compile" description="compile">

         <mkdir dir="${build.path}"/>

         <javac srcdir="${src.path}" destdir="${build.path}"  classpathref="compile.path"/>

         <javac srcdir="${test.path}" destdir="${build.path}"  classpathref="compile.path"/>

     </target>

     <!-- =================================================================== -->

     <!-- 执行测试案例 -->

     <!-- =================================================================== -->

     <target name="junit" depends="clean,compile">

         <junit printsummary="true">

              <classpath refid="compile.path"/>

              <test name="com.glen.he.SimpleCalculationTest"/>

          </junit>

      </target>

 </project>
说明:
<junit printsummary="true">
<classpath refid="compile.path"/>
<test name="com.glen.he.SimpleCalculationTest"/>
</junit>
<path id="compile.path">
<fileset dir="${lib.path}">
<include name="**/*.jar"/>
</fileset>
<pathelement path="${build.path}"/>
</path
我们在<junit〉任务下,使用了编译后的.class文件的目录,还有编译所需的jar包所在的目录。 因为,JUnit任务实际就是为我们运行Test类,而不仅仅是像我们发布Ant文件那样只是javac编译,只需要编译所需的Jar包。我们还需要像java任务那样运.class文件,所以必须包括编译后的.class文件。
5、然后把build.xml文件拖到Ant视图中,如下图,双击junit执行即可。

6、执行结果:
 1 Buildfile: D:\AntTest\build.xml

 2 clean:

 3    [delete] Deleting directory D:\AntTest\build

 4 compile:

 5     [mkdir] Created dir: D:\AntTest\build

 6     [javac] Compiling 1 source file to D:\AntTest\build

 7

 8     [javac] Compiling 1 source file to D:\AntTest\build

 9 junit:

10     [junit] Running com.glen.he.SimpleCalculationTest

11     [junit] Tests run: 1, Failures: 0, Errors: 0, Time elapsed: 0.016 sec

12 BUILD SUCCESSFUL

13 Total time: 1 second
三、增强版build.xml
通过上面第二步,基本可以达到使用ant和junit来进行单元测试,但还远远不够,比如需要批量运行案例,生成报告等,下面会介绍这些内容
1、使用formatter属性输出junit信息:
- 修改build.xml文件,增加第16,49,51,57,58,59行代码
- 修改build.xml文件,修改53行代码,增加了todir属性,指定xml的输出路径。
 <?xml version="1.0" encoding="UTF-8"?>

 <project name="AntDemo" default="junit" basedir=".">

     <!-- =================================================================== -->

     <!-- 变量设置  -->

     <!-- =================================================================== -->

     <!-- 源代码src路径 -->

     <property name="src.path" value="src/java"/>

     <!-- 编译文件class路径 -->

     <property name="build.path" value="build"/>

     <!-- 单元测试代码路径 -->

     <property name="test.path" value="src/test"/>

     <!-- lib包路径 -->

     <property name="lib.path" value="lib"/>

     <!-- 生成报告junit4.xml路径 -->

     <property name="report.path" value="report"/>

     <!-- =================================================================== -->

     <!-- 设置classpath -->

     <!-- =================================================================== -->

     <path id="compile.path">

         <fileset dir="${lib.path}">

             <include name="**/*.jar"/>

         </fileset>

         <pathelement path="${build.path}"/>

     </path>

     <!-- =================================================================== -->

     <!-- 清除历史编译class -->

     <!-- =================================================================== -->

     <target name="clean" description="clean">

         <delete dir="${build.path}"/>

     </target>

     <!-- =================================================================== -->

     <!-- 编译测试文件,初始化目录 -->

     <!-- =================================================================== -->

     <target name="compile" description="compile">

         <mkdir dir="${build.path}"/>

         <javac srcdir="${src.path}" destdir="${build.path}"  classpathref="compile.path"/>

         <javac srcdir="${test.path}" destdir="${build.path}"  classpathref="compile.path"/>

     </target>

     <!-- =================================================================== -->

     <!-- 执行测试案例 -->

     <!-- =================================================================== -->

     <target name="junit" depends="clean,compile">

         <mkdir dir="${report.path}"/>

         <junit printsummary="true" fork="true">

              <formatter type="xml" usefile="true"/>

              <classpath refid="compile.path"/>

              <test name="com.glen.he.SimpleCalculationTest" todir="${report.path}" fork="true"/>

          </junit>

      </target>

     <target name="delete">

         <delete dir="${report.path}"/>

     </target>

 </project>
执行junit的task后,在项目report目录下生成了一个名为TEST-com.glen.he.SimpleCalculationTest.xml的xml文件。
另外:
<formatter type="xml" usefile="true"/>中type属性值还有plain、brief
这时会输出一个文本文件,提供测试失败时的详细内容以及每个测试的运行统计。
2、批量运行单元测试案例:
- 修改build.xml文件,把步骤7中的第53行代码替换成下面的58~62行代码;
 <?xml version="1.0" encoding="UTF-8"?>

 <project name="AntDemo" default="junit" basedir=".">

     <!-- =================================================================== -->

     <!-- 变量设置  -->

     <!-- =================================================================== -->

     <!-- 源代码src路径 -->

     <property name="src.path" value="src/java"/>

     <!-- 编译文件class路径 -->

     <property name="build.path" value="build"/>

     <!-- 单元测试代码路径 -->

     <property name="test.path" value="src/test"/>

     <!-- lib包路径 -->

     <property name="lib.path" value="lib"/>

     <!-- 生成报告junit4.xml路径 -->

     <property name="report.path" value="report"/>

     <!-- =================================================================== -->

     <!-- 设置classpath -->

     <!-- =================================================================== -->

     <path id="compile.path">

         <fileset dir="${lib.path}">

             <include name="**/*.jar"/>

         </fileset>

         <pathelement path="${build.path}"/>

     </path>

     <target name="init">

         <mkdir dir="${build.path}"/>

         <mkdir dir="${report.path}"/>

     </target>

     <!-- =================================================================== -->

     <!-- 清除历史编译class -->

     <!-- =================================================================== -->

     <target name="clean" description="clean">

         <delete dir="${build.path}"/>

     </target>

     <!-- =================================================================== -->

     <!-- 编译测试文件,初始化目录 -->

     <!-- =================================================================== -->

     <target name="compile" depends="init" description="compile">

         <javac srcdir="${src.path}" destdir="${build.path}"  classpathref="compile.path"/>

         <javac srcdir="${test.path}" destdir="${build.path}"  classpathref="compile.path"/>

     </target>

     <!-- =================================================================== -->

     <!-- 执行测试案例 -->

     <!-- =================================================================== -->

     <target name="junit" depends="compile">

         <junit printsummary="true" fork="true">

              <formatter type="xml" usefile="true"/>

              <classpath refid="compile.path"/>

             <batchtest fork="on" todir="${report.path}" haltonfailure="no">

                 <fileset dir="${build.path}">

                     <include name="**/*Test.class"/>

                 </fileset>

             </batchtest>

          </junit>

      </target>

     <!-- 清除Junit生成的报表文档 -->

     <target name="delete">

         <delete dir="${report.path}"/>

     </target>

 </project>
3、使用<JunitReport>生成测试报告:
在上面我们已经知道,通过formatter(type=“xml”)输出junit信息时会在指定目录下生成一个Test-类路径名.xml的xml文件,但是这个xml文件看起来很不方便。Ant提供了<junitreport>任务使用XSLT将xml文件转换为HTML报告,该任务首先将生成的XML文件整合成单一的XML文件,然后再对他进行转换,这个整合的文件默认情况下被命名为:TESTS-TestSuites.xml.
- 修改上面的build.xml文件,增加65~71行,如下:
 <?xml version="1.0" encoding="UTF-8"?>

 <project name="AntDemo" default="junit" basedir=".">

     <!-- =================================================================== -->

     <!-- 变量设置  -->

     <!-- =================================================================== -->

     <!-- 源代码src路径 -->

     <property name="src.path" value="src/java"/>

     <!-- 编译文件class路径 -->

     <property name="build.path" value="build"/>

     <!-- 单元测试代码路径 -->

     <property name="test.path" value="src/test"/>

     <!-- lib包路径 -->

     <property name="lib.path" value="lib"/>

     <!-- 生成报告junit4.xml路径 -->

     <property name="report.path" value="report"/>

     <!-- =================================================================== -->

     <!-- 设置classpath -->

     <!-- =================================================================== -->

     <path id="compile.path">

         <fileset dir="${lib.path}">

             <include name="**/*.jar"/>

         </fileset>

         <pathelement path="${build.path}"/>

     </path>

     <target name="init">

         <mkdir dir="${build.path}"/>

         <mkdir dir="${report.path}"/>

     </target>

     <!-- =================================================================== -->

     <!-- 清除历史编译class -->

     <!-- =================================================================== -->

     <target name="clean" description="clean">

         <delete dir="${build.path}"/>

     </target>

     <!-- =================================================================== -->

     <!-- 编译测试文件,初始化目录 -->

     <!-- =================================================================== -->

     <target name="compile" depends="init" description="compile">

         <javac srcdir="${src.path}" destdir="${build.path}"  classpathref="compile.path"/>

         <javac srcdir="${test.path}" destdir="${build.path}"  classpathref="compile.path"/>

     </target>

     <!-- =================================================================== -->

     <!-- 执行测试案例 -->

     <!-- =================================================================== -->

     <target name="junit" depends="compile">

         <junit printsummary="true" fork="true">

              <formatter type="xml" usefile="true"/>

              <classpath refid="compile.path"/>

             <batchtest fork="on" todir="${report.path}" haltonfailure="no">

                 <fileset dir="${build.path}">

                     <include name="**/*Test.class"/>

                 </fileset>

             </batchtest>

          </junit>

         <!-- 产生单元测试报表文档 -->

         <junitreport todir="${report.path}">

             <fileset dir="${report.path}">

                 <include name="TEST-*.xml" />

             </fileset>

             <report format="frames" todir="${report.path}" />

         </junitreport>

      </target>

     <!-- 清除Junit生成的报表文档 -->

     <target name="delete">

         <delete dir="${report.path}"/>

     </target>

 </project>
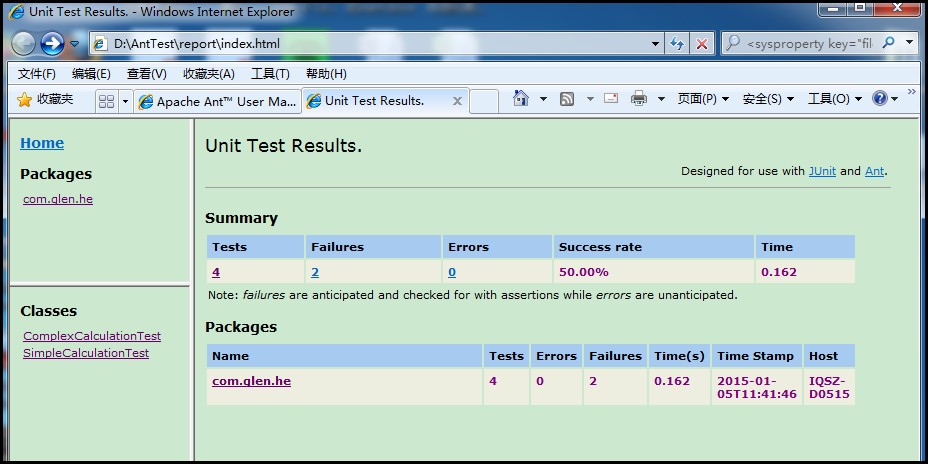
执行后会在指定目录下生成报告文档,打开index.html可以很方便的看到执行的结果。
1、如下图所示(我又补充了3个案例,并且故意让两个案例失败),显示执行的统计结果:
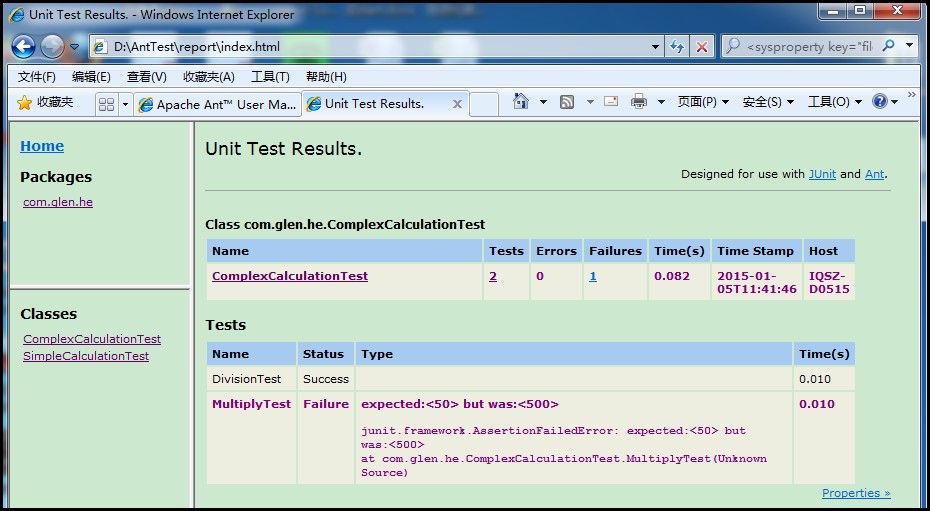
2、点击classes下面的ComplexCalculationTest,可以看到具体某个类里面的单元测试案例执行统计情况以及失败案例的错误信息提示。
OVER!
参考:
http://blog.csdn.net/shendl/article/details/532587
http://blog.csdn.net/tochal/article/details/12560151
ANT task之Junit、JunitReport的更多相关文章
- Gradle Goodness: Rename Ant Task Names When Importing Ant Build File
Migrating from Ant to Gradle is very easy with the importBuild method from AntBuilder. We only have ...
- JMeter Ant Task 生成的*.jtl打开之后request和response data是空的,怎样让其不是空的呢?
JMeter Ant Task 生成的*.jtl打开之后request和response data是空的,怎样让其不是空的呢?修改JMeter.properties,将jmeter.save.save ...
- 传统项目目录结构下maven+junit+junitReport
<build> <defaultGoal>compile</defaultGoal> <sourceDirectory>${basedir}/src&l ...
- [Groovy]Groovy with Ant Task
平时经常会用Ant来写一写脚本,但最近跨入到Groovy的时代,试着做一些改变.Groovy里集成了AntBuilder能非常方便的调用到Ant的对象模型. 现考察如下 1. Groovy里定义的属性 ...
- Jmeter Ant Task如果报告中有错误,在邮件内容里面直接显示出来 系列2
由于部门有多个项目,将自动化测试框架运用于多个项目时,希望针对每个项目修改的东西越少越好,为此,做如下修改: D:\apache-jmeter-2.7\extras\jmeter-results-de ...
- Jmeter Ant Task如何让beanshell断言失败的详细信息展示在report里面
首先必须给beanshell断言添加FailureMessage if(${TotalClient_SS}+2!=${TotalClient_SS2}){Failure=true; Fai ...
- 搭建持续集成单元测试平台(Jenkins+Ant+Java+Junit+SVN)
一.环境准备 Jenkins: 到官网下载jenkins.war包:http://jenkins-ci.org/ 安装方法有两种: 把下载下来的jenkins.war包放到文件夹下,如C:\jenki ...
- Ant junitreport with Maven
大家可能都知道在Ant里可以使用junit和junitreport两个task来完成对测试结果生成HTML格式的报告. Maven里的Surefire-report的插件只能对Java测试报告支持的比 ...
- 利用ant 和 Junit 生成测试报告
我们除了使用java来直接运行junit之外,我们还可以使用junit提供的junit task与ant结合来运行. 涉及的几个主要的ant task如下: <junit>,定义一个jun ...
随机推荐
- 利用进程ID获取主线程ID
利用进程ID获取主线程ID,仅适用于单线程.多线程应区分哪个是主线程,区分方法待验证 (1)好像可以用StartTime最早的,不过通过线程执行时间不一定可靠,要是在最开始就CreateThread了 ...
- 利用mvn deploy命令上传包(转)
本文转自https://blog.csdn.net/chenaini119/article/details/52764543 mvn安装 下载maven的bin,在apache官方网站可以下载. ht ...
- redis实现秒杀demo
代码 package com.prosay.redis; import java.util.List; import redis.clients.jedis.Jedis; import redis.c ...
- 《成神之路-基础篇》JVM——Java内存模型(已完结)
Java内存模型 本文是<成神之路系列文章>的第一篇,主要是关于JVM的一些介绍. 持续更新中 Java内存模型 JVM内存结构 VS Java内存模型 VS Java对象模型(Holli ...
- 图像质量评估(IQA)
图像质量评估函数的分类曾是一个比较有争议的话题,在2l世纪以前曾经有过 比较多的讨论.但是随着研究的深入和技术的广泛应用,研究人员对于图像质量 评估函数的分类有了统一的认识,即从实际应用中参考信息供给 ...
- Java NIO ServerSocketChannel
A Java NIO ServerSocketChannel is a channel that can listen for incoming TCP connections, just like ...
- Mockito 中被 Mocked 的对象属性及方法的默认值
在 Java 测试中使用 Mockito 有段时日了,以前只是想当然的认为 Mock 的对象属性值和方法返回值都是依据同样的规则.基本类型是 0, 0.0, 或 false, 对象类型都是 null, ...
- macOS Sierra10.12.5 显示允许任何来源
在终端输入:sudo spctl --master-disable即可.
- [leetcode]Merge Intervals @ Python
原题地址:https://oj.leetcode.com/problems/merge-intervals/ 题意: Given a collection of intervals, merge al ...
- LeakCanary 内存泄漏 监测 性能优化 简介 原理 MD
Markdown版本笔记 我的GitHub首页 我的博客 我的微信 我的邮箱 MyAndroidBlogs baiqiantao baiqiantao bqt20094 baiqiantao@sina ...