[转]SSIS: By coding
本文转自:http://www.codeproject.com/Articles/604197/SSIS-By-coding
Introduction
SSIS better known as “SQL Server Integration Services (SSIS)”, is a component of SQL Server. According to Wikipedia:-
“SSIS is a platform for data integration and workflow applications. It features a fast and flexible data warehousing tool used for data extraction, transformation, and loading (ETL). The tool may also be used to automate maintenance of SQL Server databases and updates to multidimensional cube data.”
In this write-up, I will demonstrate data transfer between two tables on same server using C#, creating package entirely through coding in step by step process. Though it very easy to create SSIS package through GUI (you just need to set few properties and your package is ready to execute), here I am demonstrating coding way to create SSIS package.
You Going to Learn (Index)
- Create two table in Database (Source and Destination)
- Setup Initial task for SSIS project
- Create SSIS Package
- Create Source And Destination Connection Manager object
- Create DATA Flow Task (Pipeline) – Heart of package
- Create Source Data source and assign Source Connection Manager
- Create Destination Data source and assign Destination Connection Manager
- Create Path between Source Output and Destination
- Input Map source output column to destination input column
- Save package and execute Actual Code
Step by Step
1. Create two table in Database (Source and Destination)
Create two dummy table by name SourceTable and DestinationTable1, with same fields like this:-
 Collapse | Copy Code
CREATE TABLE [dbo].[SourceTable](

    [ID] [int] NOT NULL,

    [Name] [varchar](20) NULL,

    [Age] [int] NULL

) ON [PRIMARY]

GO

SET ANSI_PADDING OFF

GO

CREATE TABLE [dbo].[DestinationTable1](

    [ID] [int] NOT NULL,

    [Name] [varchar](20) NULL,

    [Age] [int] NULL

) ON [PRIMARY]
Also I have filled some dummy data into the source table
| ID | Name | Age |
| 1 | Alok | 30 |
| 2 | Ashish | 30 |
| 3 | Jasdeep | 30 |
| 4 | Ritesh | 35 |
2. Setup Initial task for SSIS project
- Create
C# window form based project. Nothing fancy - Add button on the form and include
OnClickevent handler, we will do all the programming in the event handler - Now include supporting SSIS DotNet Assemblies into the project, for that right click on the References in Solution Explorer Browse to %Program Files%\Microsoft SQL Server\100\SDK\Assemblies Include following files
- Microsoft.SQLServer.DTSPipelineWrap
- Microsoft.SqlServer.DTSRuntimeWrap
- Microsoft.SqlServer.ManagedDTS
- Close add assemblies dialog and save the solution.
3. Create SSIS Package
Following code will create will create the package object
Collapse | Copy CodePackage objPackage = new Package();
objPackage.Name = "SSISExample";
objPackage.PackageType = DTSPackageType.DTSDesigner100;
objPackage.VersionBuild = 1;
Above, we have created SSIS Package object and given its name “SSISExample” and defined package type as DTSPackageType.DTSDesigner100, there are lot of other option too,Have a look here (here we meant to say we are creating Designer oriented package)
4. Create Source And Destination Connection Manager object
Before we move forward, its good to have over connection manager up and running, here I am creating two Oledb connections to same database, this connection will be used byOleDB Source and OleDB Destination.
Collapse | Copy Codevar connectingString =
@"Data Source=localhost;Integrated Security=SSPI;Initial Catalog=TestDB;Provider=SQLNCLI10.1;Persist Security Info=True;"; ConnectionManager oleDBConnSrc = objPackage.Connections.Add("OLEDB");
oleDBConnSrc.ConnectionString = connectingString;
oleDBConnSrc.Name = "SourceConnection"; ConnectionManager oleDBDestination = objPackage.Connections.Add("OLEDB");
oleDBDestination.ConnectionString = connectingString;
oleDBDestination.Name = "DestinationConnection";
Here I have provided connectingString contain the connection string of SQL Database I am connecting to. One thing you should take care, the user from which you are loggingTo Database should have write access right on it. oleDBConnSrc and oleDBDestination are two ConnectionManager object.
5. Create DATA Flow Task (Pipeline) – Heart of package
Now we come to most important part of the package, the actual battleground where all the import/export is done. Though it backend name is Pipeline, how on designer screen it known by name “Data Flow Task”, all the coding of our source and destination will done inside this Data Flow Task, and it’s pretty simple to create.
Collapse | Copy Code//Create DataFlowTask in the package
TaskHost dataFlowTaskHost = (TaskHost)objPackage.Executables.Add("SSIS.Pipeline.2");
dataFlowTaskHost.Name = @"SSISPipeline";
dataFlowTaskHost.FailPackageOnFailure = true;
dataFlowTaskHost.FailParentOnFailure = true;
dataFlowTaskHost.DelayValidation = false;
dataFlowTaskHost.Description = @"Data Flow Task"; //-----------Data Flow Inner component starts----------------
MainPipe dataFlowTask = dataFlowTaskHost.InnerObject as MainPipe;
From our package object we will add Pipeline object using objPackage.Executables.Add() method and passing "SSIS.Pipeline.2" as object name to create,' and provide default properties to task object. Now we get MainPipe of created dataFlowTaskHost, and rest of the component is attached to this MainPipe (dataFlowTask).
6. Create Source Data source and assign Source Connection Manager
Our pipeline has been successfully created in step 5, now using its mainpipe we will add the source oledb connection
Collapse | Copy Code// Create and configure an OLE DB source component.
IDTSComponentMetaData100 sourceOleDB = dataFlowTask.ComponentMetaDataCollection.New();
sourceOleDB.ComponentClassID = "DTSAdapter.OLEDBSource.2";
CManagedComponentWrapper srcDesignTime = sourceOleDB.Instantiate(); // The ProvideComponentProperties method creates a default output.
srcDesignTime.ProvideComponentProperties();
sourceOleDB.Name = "TestDB DATA Source";
Here, we create object in the dataFlowTask object, and assign ComponentClassID = "DTSAdapter.OLEDBSource.2", to tell package that we are adding OLEDBSource adapter.After that we instantiate it design time component, and get’s it properties which we will assign subsequently
Collapse | Copy Code// Assign the connection manager.
sourceOleDB.RuntimeConnectionCollection[0].ConnectionManagerID = oleDBConnSrc.ID;
sourceOleDB.RuntimeConnectionCollection[0].ConnectionManager =
DtsConvert.GetExtendedInterface(oleDBConnSrc);
Now assign Source DB adapter with source connection manager, above code do that bit, now we will set property for table to open in read mode
Collapse | Copy Code// Set the custom properties of the source.
srcDesignTime.SetComponentProperty("AccessMode", 0); // Mode 0 : OpenRowset / Table - View
srcDesignTime.SetComponentProperty("OpenRowset", "[dbo].[SourceTable]"); // Connect to the data source, and then update the metadata for the source.
srcDesignTime.AcquireConnections(null);
srcDesignTime.ReinitializeMetaData();
srcDesignTime.ReleaseConnections();
Here AccessMode=0 denote we are opening database in view mode and OpenRowSet property denote the table we want to open
7. Create Destination Data source and assign Destination Connection Manager
Code is similar to that’s of Source Adapter, except we will pass ComponentClassID as "DTSAdapter.OleDbDestination", AccessMode = 3 and OpenRowSet Propertly contain the Destination Table
Collapse | Copy CodeIDTSComponentMetaData100 destinationOleDb =
dataFlowTask.ComponentMetaDataCollection.New();
destinationOleDb.ComponentClassID = "DTSAdapter.OleDbDestination"; CManagedComponentWrapper destDesignTime = destinationOleDb.Instantiate();
destDesignTime.ProvideComponentProperties(); // Assign the connection manager.
destinationOleDb.RuntimeConnectionCollection[0].ConnectionManagerID = oleDBDestination.ID;
destinationOleDb.RuntimeConnectionCollection[0].ConnectionManager =
DtsConvert.GetExtendedInterface(oleDBDestination);
// Set the custom properties of the source. destDesignTime.SetComponentProperty("AccessMode", 3);
destDesignTime.SetComponentProperty("OpenRowset",
"[dbo].[DestinationTable1]");
// Connect to the data source, and then update the metadata for the source.
destDesignTime.AcquireConnections(null);
destDesignTime.ReinitializeMetaData();
destDesignTime.ReleaseConnections();
8. Create Path between Source Output and Destination Input
Now our source and destination adapter are ready. Also Source output column is ready, now we connection source output column with destination input column, so that destination become aware what comings its way. For that we will add path between them
Collapse | Copy Code// Create the path from source to destination
IDTSPath100 pathDestination = dataFlowTask.PathCollection.New();
pathDestination.AttachPathAndPropagateNotifications(sourceOleDB.OutputCollection[0],
destinationOleDb.InputCollection[0]);
Here AttachPathAndPropagateNotifications method of initialize destination input from sourceoledb output, since we have only one output from the source db, we safely assume its array position at 0, similarly for destination
9. Map source output column to destination input column
Collapse | Copy Code// Get the destination's default input and virtual input.
IDTSInput100 destinationinput = destinationOleDb.InputCollection[0];
IDTSVirtualInput100 vdestinationinput = destinationinput.GetVirtualInput(); // Iterate through the virtual input column collection.
foreach (IDTSVirtualInputColumn100 vColumn in
vdestinationinput.VirtualInputColumnCollection)
{
IDTSInputColumn100 vCol = destDesignTime.SetUsageType(destinationinput.ID, vdestinationinput, vColumn.LineageID, DTSUsageType.UT_READWRITE); // check if the column exist in the destination table
string cinputColumnName = vColumn.Name;
var columnExist = (from item in destinationinput.ExternalMetadataColumnCollection.Cast<IDTSExternalMetadataColumn100>()
where item.Name == cinputColumnName
select item).Count();
// if yes map it
if (columnExist > 0)
destDesignTime.MapInputColumn(destinationinput.ID, vCol.ID,
destinationinput.ExternalMetadataColumnCollection[vColumn.Name].ID);
}
Here we get destination input column, mark them available in design view, then search for matching column name is destination table, if we found match, we map the column using MapInputColumn method
10. Save package and Execute Package
SSIS file is actually XML file, if you rename the dtsx file to xml, you can view all the property set by us, we will save it, and view it in the Business Intelligence studio
Collapse | Copy CodeMicrosoft.SqlServer.Dts.Runtime.Application app = new Microsoft.SqlServer.Dts.Runtime.Application();
app.SaveToXml(string.Format(@"c:\workSamplePackage\SamplePackage{0}.dtsx",
DateTime.Now.ToString("hhmmss")),
objPackage, null);
objPackage.Execute();
objPackage.Dispose();
app = null;
ScreenShot
If we open the above created package file in Business Intelligence studio, it would look like this :-
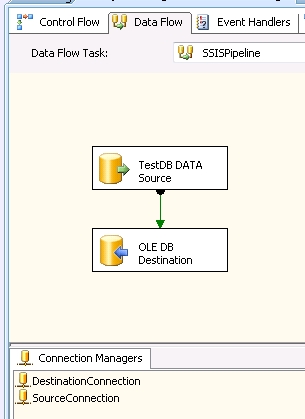
You could clearly see the two Connection manager, which we have added. Also source and Destination connection we have created., now if you run this, its show something like this :-

It say 4 rows has been transferred from source database to destination database, here have look at the destination table

[转]SSIS: By coding的更多相关文章
- 如何优化coding
如何优化coding 前言 最近一直在做修改bug工作,修改bug花费时间最多的不是如何解决问题而是怎样快速读懂代码.如果代码写的好的,不用debug就可以一眼看出来哪里出了问题.实际上,我都要deb ...
- SSIS 包部署 Package Store 后,在 IS 中可以执行,AGENT 执行却报错
可以执行 SSIS Package ,证明用 SSIS Package 的账户是可以执行成功的.SQL Server Agent 默认指定账号是 Network Service. 那么可以尝试一下将 ...
- 使用 Code Snippet 简化 Coding
在开发的项目的时候,你是否经常遇到需要重复编写一些类似的代码,比如是否经常会使用 for.foreach ? 在编写这两个循环语句的时候,你是一个字符一个字符敲还是使用 Visual Studio 提 ...
- SSIS 属性:ExecValueVariable
有些Task组件执行完成之后,会产生输出结果,称作Execution Value,例如,Execute SQL Task在执行完成之后,会返回受影响的数据行数.Task组件的Execution Val ...
- SSIS 实例——将SQL获取的信息传递到Email中
最近在为公司财务开发一个邮件通知时遇到了一个技术问题.原来我设计SSIS的是每天将ERP系统支付数据导出到财务支付平台后 Email 通知财务,然后财务到支付平台上进行支付操作.由于那个时候开发时间很 ...
- 介绍几种SSIS部署方式
介绍 如果你已经开发完一个不错的SSIS包并且能够在你的本地完美的运行,每个任务都亮起绿色的通过标志.这时为了能够让这个包处理能够在指定时间运行,你需要将其发布到一个服务器上,并做好相关配置.作为开发 ...
- 如何将本地项目与coding.net/github上的项目绑定
得到coding.net/github项目的ssh协议地址 形如:·git@git.coding.net:wzw/leave-a-message.git· 在本地生成公钥 输入 ssh-keyge ...
- 将本地项目提交到coding上托管
1: 注册coding并新建项目test2:在终端 cd 到要提交的项目 使用git init创建.git文件夹3:使用git pull <项目地址>https的那个4:git a ...
- Block Markov Coding & Decoding
Block Markov coding在一系列block上进行.在除了第一个和最后一个block上,都发送一个新消息.但是,每个block上发送的码字不仅取决于新的信息,也跟之前的一个或多个block ...
随机推荐
- ORM数据库查询操作之基于双下划线的跨表查询
创建表结构 from django.db import models class Book(models.Model): title=models.CharField(max_length=32) ...
- C# Merge into的使用详解
Merge是一个非常有用的功能,类似于Mysql里的insert into on duplicate key. Oracle在9i引入了merge命令, 通过这个merge你能够在一个SQL语句中对一 ...
- idea中使用FindBugs-IDEA插件
下载 - 安装 - 重启idea即可: 项目右键或者文件右键即可看到 FindBugs 选项. 选择某个选项直接检测即可.检测结果如下图: 这里的Correctness是重点关注对象.这里面的错误往 ...
- 543. Diameter of Binary Tree【Easy】【二叉树的直径】
Given a binary tree, you need to compute the length of the diameter of the tree. The diameter of a b ...
- 洛谷——P1890 gcd区间
P1890 gcd区间 题目描述 给定一行n个正整数a[1]..a[n]. m次询问,每次询问给定一个区间[L,R],输出a[L]..a[R]的最大公因数. 输入输出格式 输入格式: 第一行两个整数n ...
- 解决cordova命令行方式下build或者run的时候报错问题
phonegap3.0之后就将项目的生成方式做了很大的更改,原来是在eclipse里面修改生成并编译运行,但是3.0之后它的目录结构发生了很大变化,只修改主目录下面的index.html如果不buil ...
- 【BZOJ 2803】【POI 2012】Prefixuffix
http://www.lydsy.com/JudgeOnline/problem.php?id=2803 核心思想是利用单调性. 因为长度为L的前缀和后缀循环同构是AB和BA的形式,我们设\(f(i) ...
- response (响应对象)
一.response响应过程 在去发送一个请求时, 会找到tomcat引擎 引擎会找到对应的web应用,并且会创建request对象和response对象 找到应用后, 会执行应用的web.xml再去 ...
- 【随机化】Petrozavodsk Summer Training Camp 2016 Day 5: Petr Mitrichev Contest 14, Saturday, August 27, 2016 Problem I. Vier
给你一个1~n的排列,让你找出4个下标a b c d,满足 (a+b)%n=(c+d)%n (w(a)+w(b))%n=(w(c)+w(d))%n,并且是非平凡解. 发现对于每个数i,找出两个数和为其 ...
- ContOS下部署javaweb项目
1.jdk安装 下载jdk jdk-7u79-linux-x64.rpm # rpm -ivh jdk-7u79-linux-x64.rpm安装 # rpm -e jdk-7u79-linux-x6 ...