Ansible批量远程管理Windows主机(部署与配置)
一、测试环境介绍
Ansible管理主机:
系统: CentOS6.8
IP Addr: 172.16.10.22
Linux管理服务器需安装pip、pywinrm插件
Windows客户端主机:
系统: Server2008R2 SP1
IP Addr: 172.16.10.23
Windows机器需要安装或升级powershell4.0以上版本,Server2008R2默认的版本是2.0,因此必须升级至4.0版本。对于Server2012及以上的版本默认是4.0版本,不需要升级。
(经测试安装powershell3.0版本并不能正常支持Ansible,因此选择升级至4.0版本)
注意:升级powershell需要重新服务器才能生效。
二、Windows Server 2008R2客户端升级至powershell4.0
配置winrm之前检查系统版本,以及powershell版本,如果是Server2008R2版本,则需要升级powershell至4.0版本。Server2012R2以上的版本不需要升级powershell。
升级powershell4.0步骤:
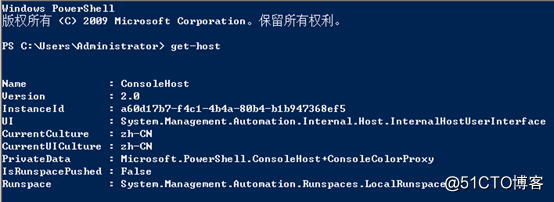
1.检查powershell版本
未升级前显示的是2.0版本
2.下载并安装Microsoft .NET Framework 4.5
下载地址:
https://download.microsoft.com/download/B/A/4/BA4A7E71-2906-4B2D-A0E1-80CF16844F5F/dotNetFx45_Full_setup.exe
3.下载并安装powershell4.0(Windows Management Framework 4.0 )
下载地址:
https://download.microsoft.com/download/3/D/6/3D61D262-8549-4769-A660-230B67E15B25/Windows6.1-KB2819745-x64-MultiPkg.msu
注意: 先安装.NET Framework 4.5 ,然后安装powershell4.0,安装完成之后重启windows服务器
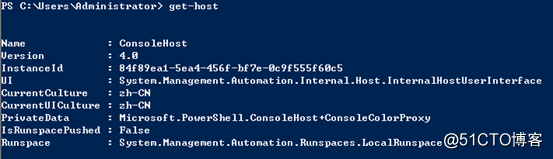
4.升级完powershell4.0后检查
查看powershell版本
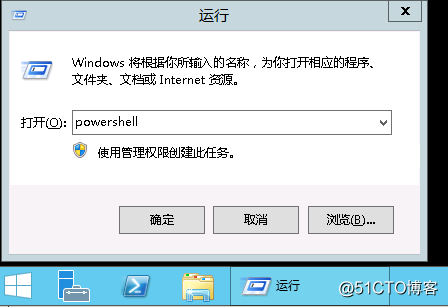
打开运行--->输入powershell启动powershell
在powershell终端上执行get-host命令可以查看powershell版本
三、Windows客户端配置winrm,启用powershell远程管理
打开powershell终端,按以下步骤执行命令(正常情况不会报错,如果有报错,请检查输入的命令是否正确,或者手动输入命令进行配置)
1.查看powershell执行策略
get-executionpolicy
2.更改powershell执行策略为remotesigned
set-executionpolicy remotesigned

3.配置winrm service并启动服务
winrm quickconfig
4.查看winrm service启动监听状态
winrm enumerate winrm/config/listener
5.修改winrm配置,启用远程连接认证
winrm set winrm/config/service/auth '@{Basic="true"}'
winrm set winrm/config/service '@{AllowUnencrypted="true"}'
四、Windows客户端防火墙配置
通过命令winrm enumerate winrm/config/listener检查winrm服务正确启动之后
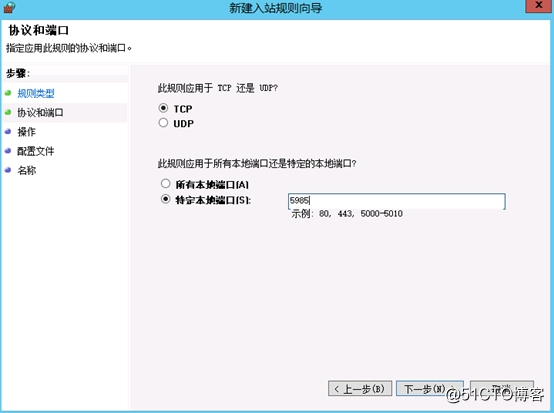
添加防火墙信任规则,允许5985端口通过
打开防火墙高级配置,选择入站规则,在点击新建规则
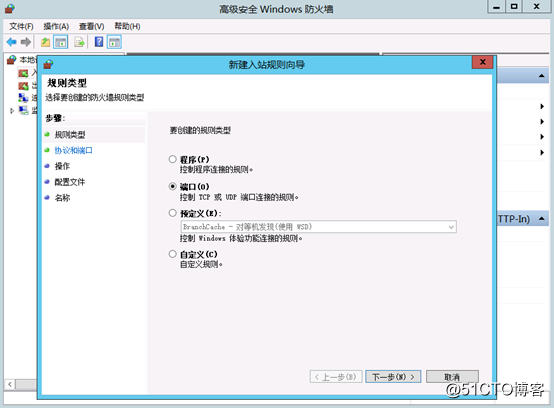
填写信任端口5985
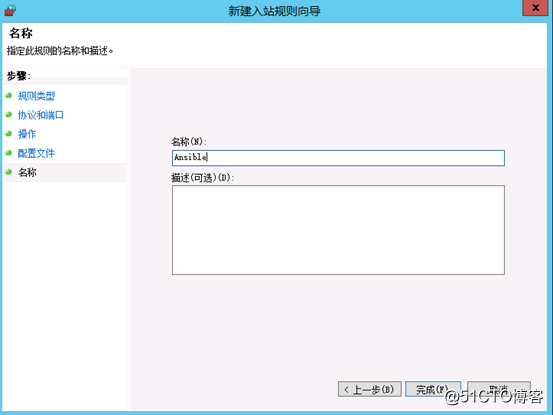
填写新建规则名称
五、Ansible服务端配置和测试管理Windows服务器(服务端操作)
1.添加windows客户端连接信息
编辑/etc/ansible/hosts,添加客户端主机信息(ansible服务端的配置)
[windows]
172.16.10.23 ansible_ssh_user="Administrator" ansible_ssh_pass="zteict123" ansible_ssh_port=5985 ansible_connection="winrm" ansible_winrm_server_cert_validation=ignore
2.测试ping探测windows客户主机是否存活
执行命令
# ansible 172.16.10.23 -m win_ping

3. 测试文件管理
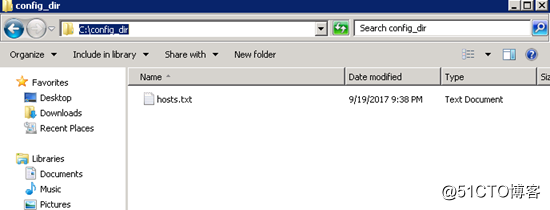
测试在windows主机执行远程创建目录
# ansible 172.16.10.23 -m win_file -a 'dest=c:\config_dir state=directory'

测试将ansible主机上的/etc/hosts文件同步到windows主机的指定目录下
# ansible 172.16.10.23 -m win_copy -a 'src=/etc/hosts dest=c:\config_dir\hosts.txt'

删除文件
# ansible 172.16.10.23 -m win_file -a 'dest=c:\config_dir\hosts.txt state=absent'
删除目录
# ansible 172.16.10.23 -m win_file -a 'dest=c:\config_dir2 state=absent'
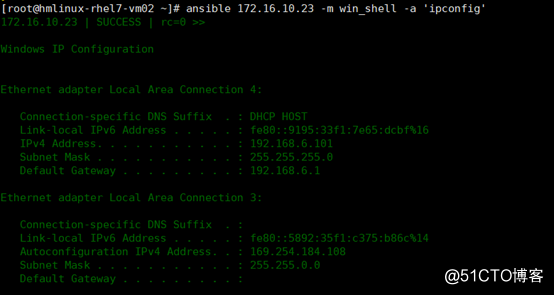
3.测试远程执行cmd命令
# ansible 172.16.10.23 -m win_shell -a 'ipconfig'
4.远程重启windows服务器
# ansible 172.16.10.23 -m win_reboot
# ansible 172.16.10.23 -m win_shell -a 'shutdown -r -t 0'
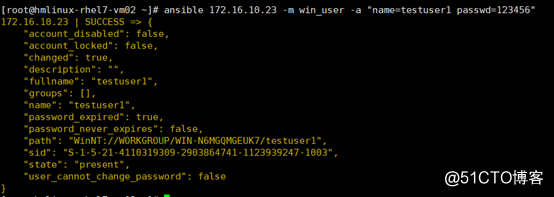
5. 测试创建用户(远程在windows客户端上创建用户)
# ansible 172.16.10.23 -m win_user -a "name=testuser1 passwd=123456"
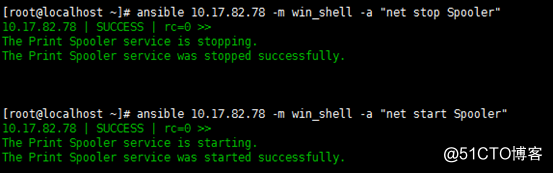
6. Windows服务管理
Ansible命令格式:
ansible [远程主机IP地址] -m win_shell -a “net stop|start 服务名”
示例:启动与停止Windows服务器的Spooler服务
此外,Ansible还可以远程管理Windows的IIS服务、Apache等Web服务,利用Ansible实现批量更新Web应用,如代码发布、版本更新等。
Ansible批量远程管理Windows主机(部署与配置)的更多相关文章
- [转帖]Ansible批量远程管理Windows主机(部署与配置)
2018-09-12 12:04:42 https://blog.51cto.com/7424593/2174156 一.测试环境介绍 Ansible管理主机: 系统: CentOS6.8 IP ...
- Ansible批量自动化管理工具(二)
Ansible批量自动化管理工具(二) 链接:https://pan.baidu.com/s/1A3Iq3gGkGS27L_Gt37_I0g 提取码:ncy2 复制这段内容后打开百度网盘手机App,操 ...
- Cacti监控Windows主机,Windows主机的正确配置
使用cacti监控Windows主机的时候经常遇到无法获取Windows主机的snmp信息和Windows主机的硬件信息,主要原因是Windows主机没有正确配置snmp,以下是正确的配置步骤:1.安 ...
- ansible管理windows主机
1. 在windows开启winrm winrm service 默认都是未启用的状态,先查看状态:如无返回信息,则是没有启动: winrm enumerate winrm/config/listen ...
- Ansible批量自动化管理工具
一,工具与环境介绍 1.1 ansible简介 批量管理服务器的工具 无需部署agent,通过ssh进行管理 流行的自动化运维工具:https://github.com/ansible/ansible ...
- Ansible批量自动化管理工具 roles标准化
批量管理服务器的工具,无需部署代理,通过ssh进行管理,是python写的 ansible 常用模块 : (1)shell命令模块执行命令 (2)copy模块批量下发文件或文件夹 (3)script模 ...
- Windows 上的 SSH?使用 PowerShell Remoting 远程管理 Windows 服务器
作者:陈计节 个人博客:https://blog.jijiechen.com/post/powershell-remoting/ 在 Linux/Unix 世界里 SSH 是个好东西,SSH 是 Se ...
- Windows 8.1 IIS 8.5 远程管理 Windows 2008 R2 IIS 7.0
案例: Windows 8.1 x64 IIS 8.5 inetmgr_amd64_v1.1_en-US.msi Windows 2008 R2 x64 IIS 7.0 在Win8.1 通过IIS ...
- putty怎么用?如何使用Putty远程管理Linux主机
Putty是一个免费的Windows 32平台下用于telnet.rlogin和ssh客户端的远程客户端工具,可以通过PUTTY快速的实现SSH连接linux等主机,下面小编就给大家演示一下如何使用P ...
随机推荐
- 行为验证码的asp.net MVC实现方式 qq521877626
界面http://localhost:你的服务器/Code/index 实现步骤: 注册账号https://www.geetest.com 新增验证 下载demo (url:http://docs ...
- 【TypeScript】学习笔记 把一些需要记的记录一下
安装typescript: npm install -g typescript 启动typesctipt自动编译: tsc 文件名.ts --watch 函数参数默认值: 1.有默认值参数的,声明在最 ...
- docker 入门 命令
docker 命令 docker images 镜像列表 docker ps 服务列表 docker 隐藏打包文件 .dockerignore .git node_modules npm-debug. ...
- python matplotlib 多图像排列显示
用OpenCV和matplotlib实现多图排列,代码如下: import cv2 import matplotlib.pyplot as plt img = cv2.imread('C:\\User ...
- idea退出提醒 打开
有时候会误点下面的勾选框,导致以后直接退出,没有提示,很不方便,经常误点关闭,再次打开又要等很久 如何设置回来? File-Setting-Appearance&Beha-System Set ...
- 使用URLOS在linux系统中极速部署NFS共享存储服务
如何在linux系统里搭建NFS服务?其实我们只需要安装一个URLOS面板,然后就能在3分钟内将NFS服务部署完成.近日,URLOS在应用市场中上架了一款NFS应用,它可以让我们的节点主机在3分钟内极 ...
- Leetcode之广度优先搜索(BFS)专题-994. 腐烂的橘子(Rotting Oranges)
Leetcode之广度优先搜索(BFS)专题-994. 腐烂的橘子(Rotting Oranges) BFS入门详解:Leetcode之广度优先搜索(BFS)专题-429. N叉树的层序遍历(N-ar ...
- 闲记Windows 取证艺术
是不是很好奇,别人能够在你电脑上查看你运行程序历史,文档使用痕迹,浏览器浏览历史种种历史痕迹,没错,通过简单的系统了解以及配合相对应的工具,这一切就是这么的简单,看起来很高大上的操作,其实是 ...
- eclipse -------导出war包
1.右键工程名--Export----- WAR file 2.输入war包名,选择导出路径,finish完成
- 搭建本地parcel仓库
参考:https://www.cloudera.com/documentation/enterprise/6/6.2/topics/cm_ig_create_local_parcel_repo.htm ...