一、小程序内嵌Html示例
小程序内嵌Html
1、下载wxParse:https://github.com/icindy/wxParse
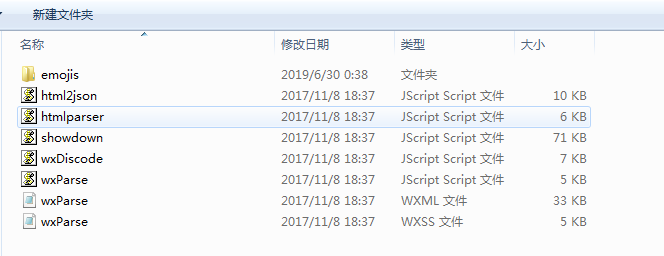
2、下载完成后将插件目录下的wxParse文件夹拷贝到项目目录下

(文件夹明细)
3、全局配置文件app.wxss中导入wxParse的样式表
@import "/wxParse/wxParse.wxss";

(以上只是仅在app.wxss引入配置,其他页面布局未动)
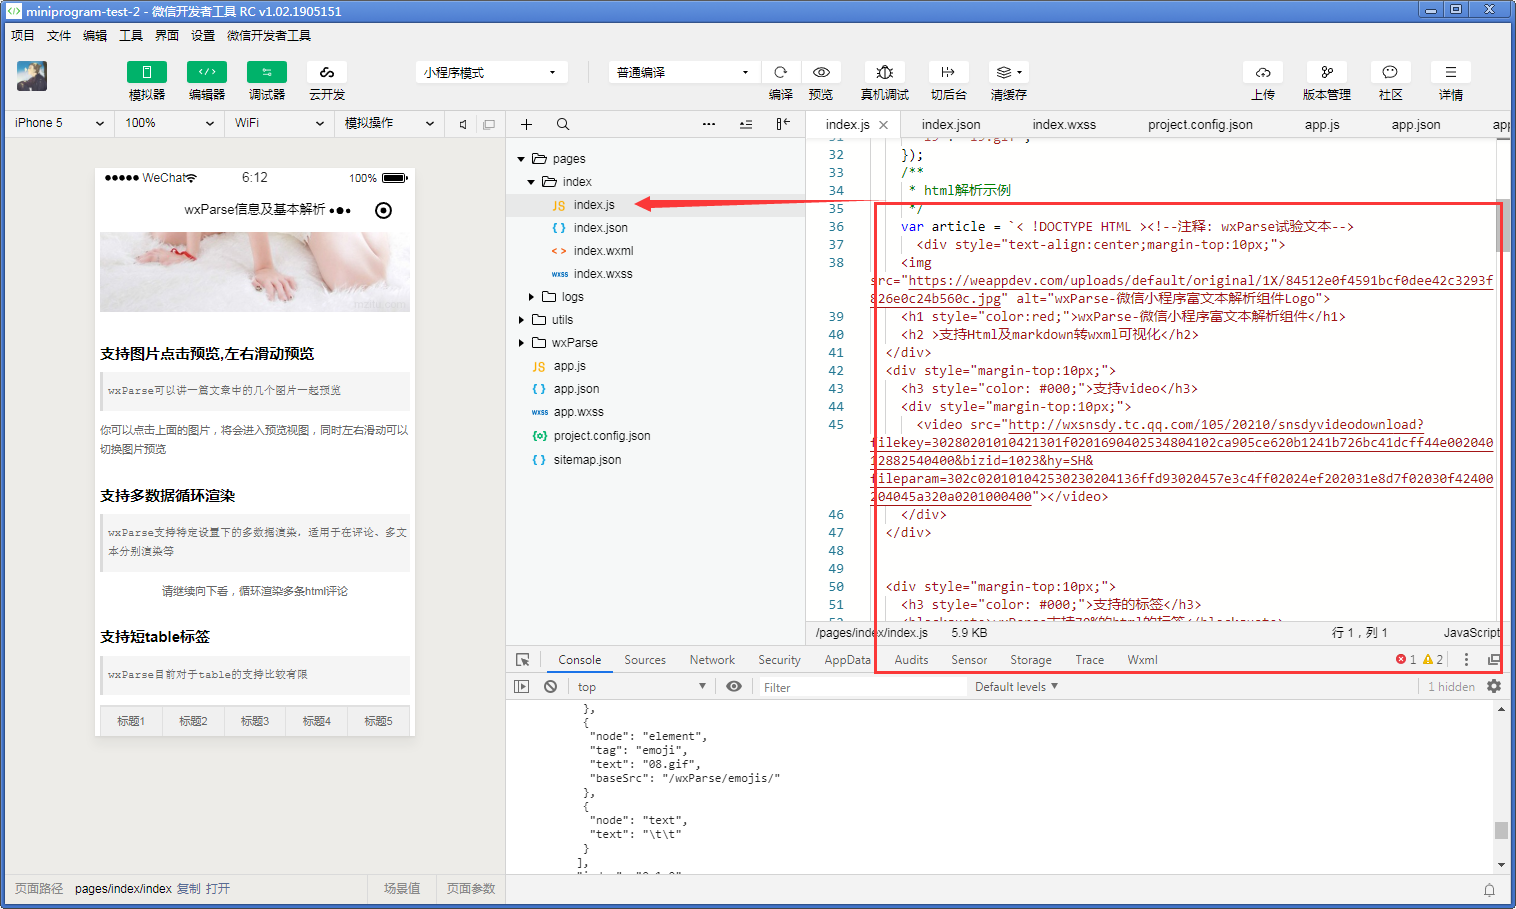
4、下面是在我们自己需要写的页面操作
在需要加载html代码的页面js文件中引用wxParse.js文件并通过WxParse.wxParse的方法来设置html内容
var WxParse = require('../../wxParse/wxParse.js');

Page({

  data: {

  },

  onLoad: function () {

    var that = this;

    /**

     * 初始化emoji设置

     */

    WxParse.emojisInit('[]', "/wxParse/emojis/", {

      "00": "00.gif",

      "01": "01.gif",

      "02": "02.gif",

      "03": "03.gif",

      "04": "04.gif",

      "05": "05.gif",

      "06": "06.gif",

      "07": "07.gif",

      "08": "08.gif",

      "09": "09.gif",

      "09": "09.gif",

      "10": "10.gif",

      "11": "11.gif",

      "12": "12.gif",

      "13": "13.gif",

      "14": "14.gif",

      "15": "15.gif",

      "16": "16.gif",

      "17": "17.gif",

      "18": "18.gif",

      "19": "19.gif",

    });

    /**

     * html解析示例

     */

    var article = `< !DOCTYPE HTML ><!--注释: wxParse试验文本-->

      <div style="text-align:center;margin-top:10px;">

        <img src="https://weappdev.com/uploads/default/original/1X/84512e0f4591bcf0dee42c3293f826e0c24b560c.jpg" alt="wxParse-微信小程序富文本解析组件Logo">

        <h1 style="color:red;">wxParse-微信小程序富文本解析组件</h1>

        <h2 >支持Html及markdown转wxml可视化</h2>

    </div>

    <div style="margin-top:10px;">

        <h3 style="color: #000;">支持video</h3>

        <div style="margin-top:10px;">

            <video src="http://wxsnsdy.tc.qq.com/105/20210/snsdyvideodownload?filekey=30280201010421301f0201690402534804102ca905ce620b1241b726bc41dcff44e00204012882540400&bizid=1023&hy=SH&fileparam=302c020101042530230204136ffd93020457e3c4ff02024ef202031e8d7f02030f42400204045a320a0201000400"></video>

        </div>

    </div>

    <div style="margin-top:10px;">

        <h3 style="color: #000;">支持的标签</h3>

        <blockquote>wxParse支持70%的html的标签</blockquote>

        <div style="margin-top:10px;">

            <span>span标签</span>

            <strong style="color: red;">strong标签</strong>

        </div>

    </div>

    <div style="margin-top:10px;">

        <h3 style="color: #000;">支持的标签ul/li</h3>

        <blockquote>带有内联的li</blockquote>

        <div style="margin-top:10px;">

            <ul>

                <li style="color: red;">我是li 红色</li>

                <li style="color: blue;">我是li 蓝色</li>

                <li style="color: yelloe;">我是li 黄色</li>

            </ul>

        </div>

    </div>

    <div style="margin-top:10px;">

        <h3 style="color: #000;">支持内联样式style</h3>

        <blockquote>wxParse可以渲染原html带有的style样式</blockquote>

        <div style="margin-top:10px;">

            <span>span标签</span>

            <strong>strong标签</strong>

        </div>

    </div>

    <div style="margin-top:10px;">

        <h3 style="color: #000;">支持class潜入</h3>

        <blockquote>wxParse可以注入html带有的class属性</blockquote>

    </div>

    <div style="margin-top:10px;">

        <h3 style="color: #000;">支持emojis小表情</h3>

        <blockquote>wxParse可以解析固定格式的小表情标签</blockquote>

        <div style="margin-top:10px;">

            <p>这里可以解析出emoji的表情[00][01][02][03][04][05][06][07][08][09]</p>

        </div>

    </div>

    <div style="margin-top:10px;">

        <h3 style="color: #000;">支持图片自适应</h3>

        <blockquote>wxParse可以动态计算图片大小并进行自适应适配</blockquote>

        <div style="margin-top:10px;">

            <img src="http://a.hiphotos.baidu.com/image/pic/item/9a504fc2d5628535959cf4cf94ef76c6a6ef63db.jpg" alt="">

            <img src="http://e.hiphotos.baidu.com/image/pic/item/48540923dd54564e1e1ac2d7b7de9c82d0584fe4.jpg" alt="">

        </div>

    </div>

    <div style="margin-top:10px;">

        <h3 style="color: #000;">支持图片点击预览,左右滑动预览</h3>

        <blockquote>wxParse可以讲一篇文章中的几个图片一起预览</blockquote>

        <div style="margin-top:10px;">

            你可以点击上面的图片,将会进入预览视图,同时左右滑动可以切换图片预览

        </div>

    </div>

    <div style="margin-top:10px;">

        <h3 style="color: #000;">支持多数据循环渲染</h3>

        <blockquote>wxParse支持特定设置下的多数据渲染,适用于在评论、多文本分别渲染等</blockquote>

        <div style="margin-top:10px; text-align:center;">

            请继续向下看,循环渲染多条html评论

        </div>

    </div>

    <div style="margin-top:10px;">

        <h3 style="color: #000;">支持短table标签</h3>

        <blockquote>wxParse目前对于table的支持比较有限</blockquote>

        <div style="margin-top:10px; text-align:center;">

            <table>

      <tr>

            <th>标题1</th>

            <th>标题2</th>

            <th>标题3</th>

            <th>标题4</th>

            <th>标题5</th>

        </tr>

      <tr>

          <td>cell1</td>

            <td>cell2</td>

            <td>cell3</td>

            <td>cell4</td>

            <td>cell5</td>

        </tr>

        <tr>

          <td>cell1</td>

            <td>cell2</td>

            <td>cell3</td>

            <td>cell4</td>

            <td>cell5</td>

        </tr>

    </table>

        </div>

    </div>

    <!--ap-->

    `;

    WxParse.wxParse('article', 'html', article, that, 5);

    /**

     * 多数据解析示例

     */

    var replyHtml0 = `<div style="margin-top:10px;height:50px;">

        <p class="reply">

            wxParse回复0:不错,喜欢[03][04]

        </p>

    </div>`;

    var replyHtml1 = `<div style="margin-top:10px;height:50px;">

        <p class="reply">

            wxParse回复1:不错,喜欢[03][04]

        </p>

    </div>`;

    var replyHtml2 = `<div style="margin-top:10px;height:50px;">

        <p class="reply">

            wxParse回复2:不错,喜欢[05][07]

        </p>

    </div>`;

    var replyHtml3 = `<div style="margin-top:10px;height:50px;">

        <p class="reply">

            wxParse回复3:不错,喜欢[06][08]

        </p>

    </div>`;

    var replyHtml4 = `<div style="margin-top:10px; height:50px;">

        <p class="reply">

            wxParse回复4:不错,喜欢[09][08]

        </p>

    </div>`;

    var replyHtml5 = `<div style="margin-top:10px;height:50px;">

        <p class="reply">

            wxParse回复5:不错,喜欢[07][08]

        </p>

    </div>`;

    var replyArr = [];

    replyArr.push(replyHtml0);

    replyArr.push(replyHtml1);

    replyArr.push(replyHtml2);

    replyArr.push(replyHtml3);

    replyArr.push(replyHtml4);

    replyArr.push(replyHtml5);

    for (let i = 0; i < replyArr.length; i++) {

      WxParse.wxParse('reply' + i, 'html', replyArr[i], that);

      if (i === replyArr.length - 1) {

        WxParse.wxParseTemArray("replyTemArray", 'reply', replyArr.length, that)

      }

    }

  }

})
5、页面中引用模
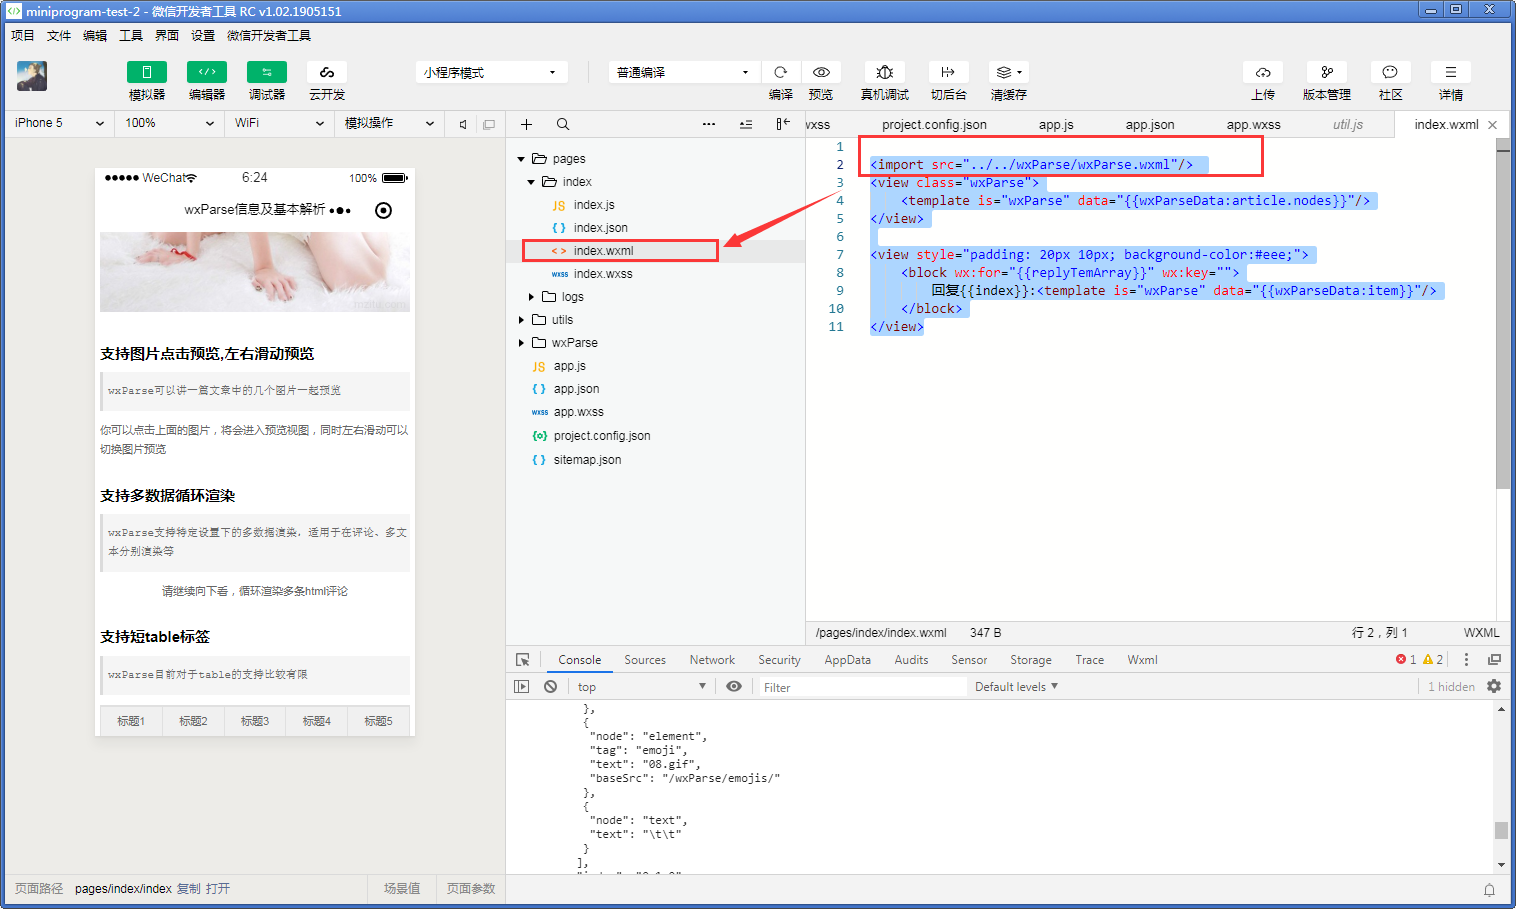
<import src="../../wxParse/wxParse.wxml"/>

<view class="wxParse">

    <template is="wxParse" data="{{wxParseData:article.nodes}}"/>

</view>

<view style="padding: 20px 10px; background-color:#eee;">

    <block wx:for="{{replyTemArray}}" wx:key="">

        回复{{index}}:<template is="wxParse" data="{{wxParseData:item}}"/>

    </block>

</view>
一、小程序内嵌Html示例的更多相关文章
- [小程序开发] 微信小程序内嵌网页web-view开发教程
为了便于开发者灵活配置小程序,微信小程序开放了内嵌网页能力.这意味着小程序的内容不再局限于pages和large,我们可以借助内嵌网页丰富小程序的内容.下面附上详细的开发教程(含视频操作以及注意事项) ...
- 微信小程序内嵌网页的一些(最佳)实践
前言 3 个月前,微信小程序推出了 web-view 组件引发了一波小高潮,笔者所在的大前端团队写过一篇浅析,详情可见:浅谈微信小程序前端生态. 我们曾大胆猜想,这一功能,可能直接导致小程序数量增长迎 ...
- 微信小程序内嵌业务域名内的网页
微信小程序在2017年11月左右开放了内嵌网页的功能,即新组件<web-view>.官方文档链接:https://mp.weixin.qq.com/debug/wxadoc/dev/com ...
- 微信小程序内嵌网页能力开放 小程序支持内嵌网页文档说明
为了方便开发者灵活配置微信小程序,张小龙现在开放了小程序的内嵌网页功能,这是一个非常大的惊喜啊,以后意味着你只要开放一个手机端网站,就可以制作一个小程序了哦.操作方法1.开发者登录微信小程序后台,选择 ...
- 小程序内嵌H5——判断小程序环境的坑
现在各种小程序风靡,这边H5的需求还没有搞定,产品又要求做小程序版本,做可以,关键是618前上线,我-- whatever,618要做推广,日期订了,剩下的就只能是排期,定方案,尽可能完成. 最后和产 ...
- 微信小程序内嵌网页 网站生成小程序
1. 进入小程序后台 - 设置 - 开发设置 2. 添加业务域名(小程序只支持https) 3. 小程序代码 <web-view src="网址"></web-v ...
- 【干货】小程序内嵌 H5 代码详解
自从微信小程序发布了 web-view 组件,使得之前的 H5 网站移植到小程序成为可能.现在,很多项目在迁移的过程中遇到了许多问题,本文通过实例代码,为你讲解迁移过程中的几个典型场景. 1.小程序和 ...
- 小程序内嵌H5页面判断微信及小程序环境
判断微信及小程序环境 1.H5页面引入jweixin-1.3.2.js 2. var ua = window.navigator.userAgent.toLowerCase(); if(ua.matc ...
- 二、小程序内嵌Html基础格式说明
1.index.js文件更改 var WxParse = require('../../wxParse/wxParse.js'); Page({ data: { }, onLoad: function ...
随机推荐
- 如何修改Pspice元件库中元件的模型参数?
比如下面是我取出的一个稳压管参数....* created using Parts release 7.1p on 11/03/98 * per Microsemi estimate: Trr(est ...
- RMQ Fanout
原创转载请注明出处:https://www.cnblogs.com/agilestyle/p/11795256.html RMQ Fanout Project Directory Maven Depe ...
- 对Proxy的研究
概述 Proxy 用于修改某些操作的默认行为,等同于在语言层面做出修改,所以属于一种“元编程”(meta programming),即对编程语言进行编程. Proxy 可以理解成,在目标对象之前架设一 ...
- iText导出PDF(图片,水印,页眉,页脚)
项目需要导出PDF,导出的内容包含图片和文本,而且图片的数量不确定,在网上百度发现大家都在用iText,在官网发现可以把html转换为PDF,但是需要收费,那就只能自己写了. 在开始之前先在网上百度了 ...
- go入门收集(转)
go mod 使用 原文地址: https://juejin.im/post/5c8e503a6fb9a070d878184a
- Feign调用远程服务报错:Caused by: java.lang.IllegalStateException: Method getMemberInfo not annotated with HTTP method type (ex. GET, POST)
org.springframework.beans.factory.UnsatisfiedDependencyException: Error creating bean with name 'ord ...
- Jenkins slave-agent.jnlp运行无反应
在配置Jenkins的Windows节点时候,点击slave-agent.jnlp选择javaws.exe运行无反应,cmd命令执行javaws slave-agent.jnlp也不行,slave-a ...
- html+js(swiper.js)+css左右滑动切换页面效果,适配移动端
demo: 截图: 结构:1.swiper-progress.html2.css文件夹 -swiper.css -swiper.min.css 3.js文件夹 -swiper.min.js -swip ...
- /usr/bin/ld: cannot find -lgcc_s 问题解决小记
/usr/bin/ld: cannot find -lgcc_s 问题解决小记 博客分类: Linux/Ubuntu 由于之前用wubi装的ubuntu并且只给了它10G的硬盘空间,随着学习的深入这种 ...
- ceph-性能调优
Ceph 参数性能调优https://blog.csdn.net/changtao381/article/details/49907115这篇文章对我的环境有较大帮助 ceph优化记录 ceph.co ...