python+selenium下拉列表option对象操作方法一
参考官方文档:https://selenium.dev/selenium/docs/api/py/webdriver_support/selenium.webdriver.support.select.html?highlight=all_selected_options#selenium.webdriver.support.select.Select.all_selected_options
一、导入(import)
from selenium.webdriver.support.select import Select
二、选择(select)
Select类提供了三种选择某一选项的方法:
               select_by_index(index)

               select_by_value(value)

               select_by_visible_text(text)
注意:
- index从 0 开始
- value是option标签的一个属性值,并不是显示在下拉框中的值
- visible_text是在option标签中间的值,是显示在下拉框的值
三、反选(deselect)
有选择必然有反选,即取消选择。Select提供了四个方法给我们取消原来的选择:
           deselect_by_index(index)


           deselect_by_value(value)


           deselect_by_visible_text(text)

           deselect_all()
前三种分别于select相对应,第四种是全部取消选择,是的,你没看错,是全部取消。
有一种特殊的select标签,即设置了multiple=”multiple”属性的select,这种select框是可以多选的,
可以通过多次select,选择多项选项,而通过deselect_all()来将他们全部取消。
注意:下面两个,表示的意思一样
#返回第一个或者当前 被选中 的子项
print(Select(driver.find_element_by_xpath("//select[@id='nr']")).first_selected_option.text)
                                                            # 输出当前选择的第一项,即显示第二个
now = Select(driver.find_element_by_css_selector("body > form > select")).first_selected_option
print(now.text)
================================================================================
from selenium import webdriver
from selenium.webdriver.common.action_chains import ActionChains
#from selenium.webdriver.support.select import Select
from selenium.webdriver.support.ui import Select
from time import sleep
driver = webdriver.Firefox()
driver.implicitly_wait(10)
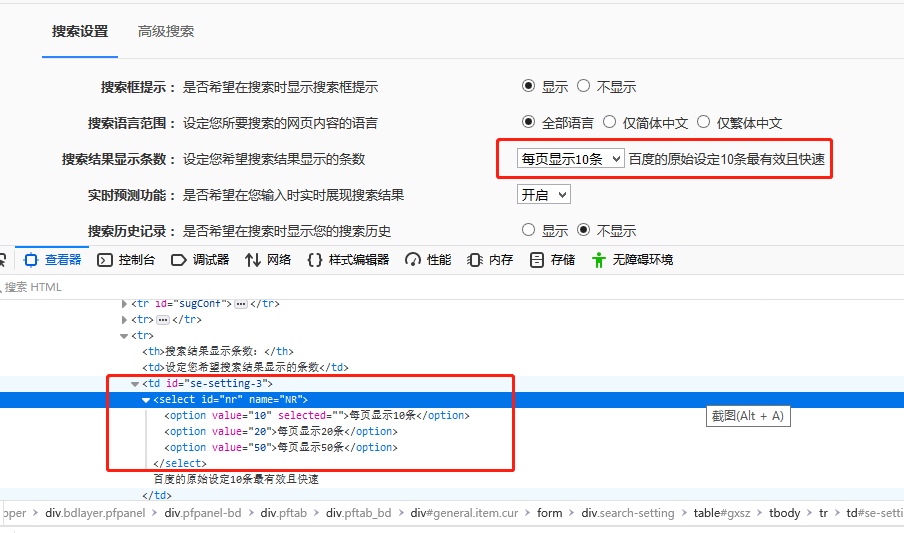
driver.get('http://www.baidu.com') #-------------------------------------------------------------------------------- link = driver.find_element_by_link_text("设置")
ActionChains(driver).move_to_element(link).perform() #鼠标悬停在上面
sleep(5) driver.find_element_by_class_name("setpref").click() # 打开搜索设置
sleep(2) #------------------------------------------------------------------------- sleep(3)
print('显示第二个子项(2):')
Select(driver.find_element_by_xpath("//select[@id='nr']")).select_by_index(1) #选择第二个options子项 ,每页显示20条
print(Select(driver.find_element_by_xpath("//select[@id='nr']")).first_selected_option.text) #返回第一个或者当前 被选中 的子项 sleep(3)
print('显示第三个子项(50):')
Select(driver.find_element_by_xpath("//select[@id='nr']")).select_by_value('50') #选择value为'每页显示50条'的子项,即选择第三个子项
print(Select(driver.find_element_by_xpath("//select[@id='nr']")).first_selected_option.text) #返回第一个或者当前 被选中 的子项 sleep(3)
print('显示第二个子项(20):')
Select(driver.find_element_by_xpath("//select[@id='nr']")).select_by_visible_text('每页显示20条') #选择text值为'每页显示20条'的子项
print(Select(driver.find_element_by_xpath("//select[@id='nr']")).first_selected_option.text) #返回第一个或者当前 被选中 的子项 sleep(3)
print('显示当前被选中的子项(第二个子项20):')
print(Select(driver.find_element_by_xpath("//select[@id='nr']")).first_selected_option.text) #返回第一个或者当前 被选中 的子项 #每页显示20条 #-------------------------------------------------------------------------------------
options = driver.find_elements_by_xpath('//*[@id="nr"]/option')

options[1].click()             #第二个子项被选中
sleep(2)

options[2].click()             #第三个子项被选中
sleep(2)

options[0].click()            #第一个子项被选中
sleep(2)

#-----------------------------------------------------------------------

print(options[0].text)
print(options[1].text)
print(options[2].text)
#-----------------------------------------------------------------------

driver.quit()
显示第二个子项(2):
每页显示20条
显示第三个子项(50):
每页显示50条
显示第二个子项(20):
每页显示20条
显示当前被选中的子项(第二个子项20):
每页显示20条
每页显示10条
每页显示20条
每页显示50条
+++++++++++++++++++++++++++++++++++++++++++++++++++++++++++++++++++++++++

===============================================================================================================
from selenium import webdriver
from selenium.webdriver.support.ui import Select
from time import sleep driver = webdriver.Firefox()
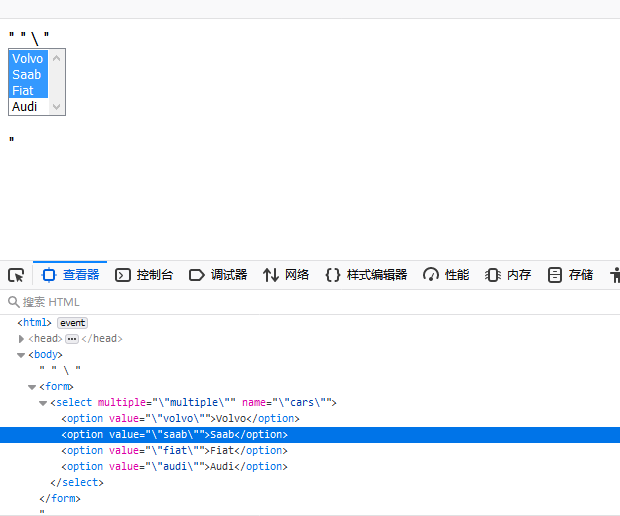
driver.get("https://www.runoob.com/runcode") # 打开浏览器,进入演示页面 driver.find_element_by_css_selector("#codeinp").clear() # 定位输入框文本域 # 清空文本域 # 输入多选下拉框的演示源码 (multiple="multiple\")
texts = "<html> " \
"<body><form><select multiple=\"multiple\" name=\"cars\"><option value=\"volvo\">Volvo</option>" \
"<option value=\"saab\">Saab</option><option value=\"fiat\">Fiat</option>\" \
\"<option value=\"audi\">Audi</option></select></form></body></html>" driver.find_element_by_css_selector("#codeinp").send_keys(texts) driver.find_element_by_css_selector("#btrun").click() # 点击提交代码
sleep(2) #-------------------------------------------------------------------------------------------------------- all_handles = driver.window_handles
driver.switch_to.window(all_handles[1]) #切换到新的打开的运行页面 #-------------------------------------------------------------------------------------------------------
# 选择全部的选项(多选),一个接着一个选择,直到全部选择 Select(driver.find_element_by_css_selector("body > form > select")).select_by_index(0)
sleep(1) Select(driver.find_element_by_css_selector("body > form > select")).select_by_index(1)
sleep(1) Select(driver.find_element_by_css_selector("body > form > select")).select_by_index(2)
sleep(1) Select(driver.find_element_by_css_selector("body > form > select")).select_by_index(3)
sleep(1) #---------------------------------------------------------------------------------------------------------------- # 取消选择第一项选项(页面上可以观察到变化)
Select(driver.find_element_by_css_selector("body > form > select")).deselect_by_index(0)
sleep(1)
# 输出当前选择的第一项,即显示第二个
now = Select(driver.find_element_by_css_selector("body > form > select")).first_selected_option
print(now.text) #取消第二个选项
#Select(driver.find_element_by_css_selector("body > form > select")).deselect_by_value('\"saab\"')
Select(driver.find_element_by_css_selector("body > form > select")).deselect_by_visible_text('Saab')
sleep(3) #即取消三、四选项
Select(driver.find_element_by_css_selector("body > form > select")).deselect_all() #取消所有选项
sleep(3) #--------------------------------------------------------------------------------------------------------- driver.close()
python+selenium下拉列表option对象操作方法一的更多相关文章
- python+selenium下拉列表option对象操作方法二
options = driver.find_elements_by_tag_name('option') #获取所有的option子元素 o ...
- python+selenium的WebElement对象操作
webelement对象操作 webelement对象是selenium中所有元素的父类,也就是webelement对象拥有的方法,其它元素对象都会有: 只是不同的对象在调用特定方法时,效果是不一样的 ...
- python+selenium之字符串切割操作
python+selenium之字符串切割操作 在Python中自带的一个切割方法split(),这个方法不带参数,就默认按照空格去切割字段,如果带参数,就按照参数去切割. 新建一个python文件, ...
- Python+Selenium自动化-模拟键盘操作
Python+Selenium自动化-模拟键盘操作 0.导入键盘类Keys() selenium中的Keys()类提供了大部分的键盘操作方法:通过send_keys()方法来模拟键盘上的按键. # ...
- Python+Selenium自动化 模拟鼠标操作
Python+Selenium自动化 模拟鼠标操作 在webdriver中,鼠标的一些操作如:双击.右击.悬停.拖动等都被封装在ActionChains类中,我们只用在需要使用的时候,导入这个类就 ...
- python+selenium文本框对象以及按钮对象操作
文本框对象 from selenium import webdriverfrom time import sleep driver = webdriver.Firefox() # 指定和打开浏览器ur ...
- Python+Selenium学习--操作测试对象
场景 前面已经讲解了如果定位对象,定位之后需要对这个对象进行操作.是鼠标点击还是键盘输入,取决于我们定位的对象缩支持的操作. webdriver中比较常用的操作元素的方法有下面几个: clear ...
- python+selenium 滑动滚动条的操作
工作中碰到一种情况就是,要定位的元素需要滚动条滑到下方后才可以显示出来. 这种情况下,就要先滑动滚动条,再定位元素. 那么滑动滚动条我以前记录了appium中的操作,那么,selenium中该如何操作 ...
- python+selenium:浏览器webdriver操作(1)--基本对象定位
1.简单对象的定位-----自动化测试的核心 对象的定位应该是自动化测试的核心,要想操作一个对象,首先应该识别这个对象.一个对象就是一个人一样,他会有各种的特征(属性),如比我们可以通过一个人的身份证 ...
随机推荐
- 【转】交换分区SWAP
SWAP就是LINUX下的虚拟内存分区,它的作用是在物理内存使用完之后,将磁盘空间(也就是SWAP分区)虚拟成内存来使用. 它和Windows系统的交换文件作用类似,但是它是一段连续的磁盘空间,并且对 ...
- Python 快排
def quick_sort(array,left,right): if left>=right: return low=left high=right key=array[low]#设置基准数 ...
- 手写与copy
m_Font.CreateFont( 14, // 字体高度 0 , // 宽度由系统确定 0 , // 文本不倾斜 0 , // 字体不倾斜 FW_NORMAL, // 字体粗度 0 , // 非斜 ...
- RetentionPolicy.SOURCE注解应用
Lombok原理分析: https://www.jianshu.com/p/fc06578e805a
- 数列前n项和
等差数列 等比数列 常见的前n项和
- 【hackerrank】Placements
题目如下: You are given three tables: Students, Friends and Packages. Students contains two columns: ID ...
- SQL Server2008收缩日志文件
查询状态语句: SELECT name,log_reuse_wait_desc FROM sys.databases where name='hrsystem'; 收缩日志文件: USE [maste ...
- 字典树模板( 指针版 && 数组版 )
模板 : #include<string.h> #include<stdio.h> #include<malloc.h> #include<iostream ...
- docker安装禅道
一.下载地址 禅道开源版: http://dl.cnezsoft.com/zentao/docker/docker_zentao.zip 数据库用户名: root,默认密码: 123456.运行时 ...
- SpringBoot拦截器和 Servlet3.0自定义Filter、Listener
官方文档译文 Spring Boot 包括对嵌入式Tomcat,Jetty和Undertow服务器的支持.大多数开发人员使用适当的“Starter”来获取完全配置的实例.默认情况下,嵌入式服务器在 p ...