webService之helloword(java)
webservice 远程数据交互技术
1.导入jar包(如果是 maven项目导入项目坐标)
2.创建服务
3.测试服务
我们使用maven来做测试服务
pom.xml文件
<project xmlns="http://maven.apache.org/POM/4.0.0" xmlns:xsi="http://www.w3.org/2001/XMLSchema-instance"

	xsi:schemaLocation="http://maven.apache.org/POM/4.0.0 http://maven.apache.org/xsd/maven-4.0.0.xsd">

	<modelVersion>4.0.0</modelVersion>

	<groupId>com.baidu.webservicetest01</groupId>

	<artifactId>webservicetest01</artifactId>

	<version>0.0.1-SNAPSHOT</version>

	<!-- jdk版本1.7 -->

	<build>

		<plugins>

			<plugin>

				<groupId>org.apache.maven.plugins</groupId>

				<artifactId>maven-compiler-plugin</artifactId>

				<version>2.3.2</version>

				<configuration>

					<source>1.7</source>

					<target>1.7</target>

				</configuration>

			</plugin>

		</plugins>

	</build>

	<dependencies>

		<!-- cxf  ws开发包 -->

		<dependency>

			<groupId>org.apache.cxf</groupId>

			<artifactId>cxf-rt-frontend-jaxws</artifactId>

			<version>3.0.1</version>

		</dependency>

			<!-- jetty  服务器包 -->

		<dependency>

			<groupId>org.apache.cxf</groupId>

			<artifactId>cxf-rt-transports-http-jetty</artifactId>

			<version>3.0.1</version>

		</dependency>

		<!-- 使用log4j日志实现 -->

		<dependency>

			<groupId>org.slf4j</groupId>

			<artifactId>slf4j-log4j12</artifactId>

			<version>1.7.12</version>

		</dependency>

		<!-- 使用rs客户端 -->

		<dependency>

			<groupId>org.apache.cxf</groupId>

			<artifactId>cxf-rt-rs-client</artifactId>

			<version>3.0.1</version>

		</dependency>

	</dependencies>

</project>
服务接口
package com.baidu.test;

import javax.jws.WebMethod;

import javax.jws.WebService;

@WebService

public interface TestInterf {

	@WebMethod

	public void eat();

}
服务实现类
package com.baidu.test;

import javax.jws.WebService;

@WebService

public class TestImp implements TestInterf {

	public void eat() {

		System.out.println("该吃饭了");

	}

}
开启服务:
package com.baidu.test;

import javax.xml.ws.Endpoint;

public class PublishTest {

	public static void main(String[] args) {

		TestInterf tt=new TestImp();

		String address="http://localhost:9991/TestInterf";

		Endpoint.publish(address, tt);

		System.out.println("服务启动了");

	}

}
新建项目 和服务器的包结构必须相同
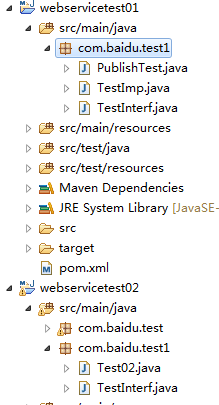
测试项目的 测试接口和服务器的接口必须一致
package com.baidu.test1;

import javax.jws.WebMethod;

import javax.jws.WebService;

@WebService  //标识可以连接服务

public interface TestInterf {

	@WebMethod

	public void eat();

}
测试服务
package com.baidu.test1;

import org.apache.cxf.jaxws.JaxWsProxyFactoryBean;

public class Test02 {

	public static void main(String[] args) {

		// 编写客户端 调用发布WebService服务

		JaxWsProxyFactoryBean jaxWsProxyFactoryBean = new JaxWsProxyFactoryBean();

		jaxWsProxyFactoryBean.setServiceClass(TestInterf.class);

		jaxWsProxyFactoryBean.setAddress("http://localhost:9991/TestInterf");

		// 创建调用远程服务代理对象

		TestInterf proxy = (TestInterf) jaxWsProxyFactoryBean.create();

		proxy.eat();

	}

}
pom.xml 客户pom.xml
<project xmlns="http://maven.apache.org/POM/4.0.0" xmlns:xsi="http://www.w3.org/2001/XMLSchema-instance"

	xsi:schemaLocation="http://maven.apache.org/POM/4.0.0 http://maven.apache.org/xsd/maven-4.0.0.xsd">

	<modelVersion>4.0.0</modelVersion>

	<groupId>com.baidu.webservicetest02</groupId>

	<artifactId>webservicetest02</artifactId>

	<version>0.0.1-SNAPSHOT</version>

	<build>

        <plugins>

            <plugin>

                <groupId>org.apache.maven.plugins</groupId>

                <artifactId>maven-compiler-plugin</artifactId>

                <version>2.3.2</version>

                <configuration>

                    <source>1.7</source>

                    <target>1.7</target>

                </configuration>

            </plugin>

        </plugins>

    </build>

	<dependencies>

		<!-- 要进行jaxws 服务开发 -->

  		<dependency>

			<groupId>org.apache.cxf</groupId>

			<artifactId>cxf-rt-frontend-jaxws</artifactId>

			<version>3.0.1</version>

		</dependency>

		<!-- 内置jetty web服务器  -->

		<dependency>

			<groupId>org.apache.cxf</groupId>

			<artifactId>cxf-rt-transports-http-jetty</artifactId>

			<version>3.0.1</version>

		</dependency>

		<!-- 日志实现 -->

		<dependency>

			<groupId>org.slf4j</groupId>

			<artifactId>slf4j-log4j12</artifactId>

			<version>1.7.12</version>

		</dependency>

	</dependencies>

</project>
webService之helloword(java)的更多相关文章
- webService之helloword(java)rs
webservice之rs(helloworld) 1.pom.xml文件 <dependencies> <!-- 使用CXF RS开发 --> <dependency& ...
- struts1+spring+myeclipse +cxf 开发webservice以及普通java应用调用webservice的实例
Cxf + Spring+ myeclipse+ cxf 进行 Webservice服务端开发 使用Cxf开发webservice的服务端项目结构 Spring配置文件applicationCont ...
- C#动态webservice调用接口 (JAVA,C#)
C#动态webservice调用接口 using System; using System.Collections; using System.IO; using System.Net; using ...
- Axis2 webservice 之使用java调用webservice
在上一篇中写了一个简单了webservice,实现了一个sayHello功能.那么webservice写好之后我们如何使用Java程序来调用webservice呢? 一.java调用的webservi ...
- webservice之helloword(web)rs
spring整合webservice 1.pom.xml文件 <dependencies> <!-- cxf 进行rs开发 必须导入 --> <dependency> ...
- php调用webservice接口,java代码接收不到参数
前段时间做了一个项目的二次开发,有个功能是需要php调用java实现的webservice接口,并传递一些参数给接口,然后按照对方提供的接口说明文档进行传参调用,java那边有接收到请求,但是参数总是 ...
- WebService应用--使用java开发WebService程序
使用Eclipse开发第一个WebService程序,本示例采用的工具为Spring-Tool-Suite,和Eclipse没有本质的区别,开发环境jdk1.7 一.开发步骤: 1.新建名为WebSe ...
- webService之helloword(web)
spring 整合webservice pom.xml文件 <dependencies> <!-- CXF WS开发 --> <dependency> <gr ...
- 做Webservice时报错java.util.List是接口, 而 JAXB 无法处理接口。
Caused by: com.sun.xml.bind.v2.runtime.IllegalAnnotationsException: 1 counts of IllegalAnnotationExc ...
随机推荐
- [z]protobuf实现c++与java之间的数据传递,beancopy数据到前台
[z]http://blog.csdn.net/xhyzdai/article/details/46684335 定义proto文件 option java_package = "com.w ...
- angular 1.x 控制器之间互相传递参数
我们要向前方看齐,基于js引用类型的对象就不记了,所以使用基于事件的方式: angular 中 $on,$emit,$boardcast来实现父控制器和子控制器互相通讯, 其中$on表示事件监听, $ ...
- XHR的对象及用法
function createXHR(){ //检测原生XHR对象是否存在,如果存在刚返回它的新实例: //如果不存在,则检测ActiveX对象; //如果两个都不存 ...
- Redhat Linux网卡配置与绑定
Redhat Linux的网络配置,基本上是通过修改几个配置文件来实现的,虽然也可以用ifconfig来设置IP,用route来配置默认网关,用hostname来配置主机名,但是重启后会丢失. 相关的 ...
- CH6202 黑暗城堡
一道最短路+生成树 原题链接 实际上就是生成树的中每个点到节点\(1\)的距离等于原图中这个点到节点\(1\)的最短距离,求这样的生成树的棵数. 先用\(SPFA\)或\(Dijkstra\)求出所有 ...
- Delphi、Lazarus保留字、关键字详解
Delphi.Lazarus保留字.关键字详解 来自橙子,万一的博客以及其他地方 保留字:变量等标识符可以再使用: 关键字:有特定含义,不能再次重新定义: 修饰字:类似保留字的功能,也就是说可以重用 ...
- 在 Ubuntu 上使用微信客户端
原文地址: http://www.myzaker.com/article/5979115d1bc8e08c30000071/ 在这个快速信息交互时代,无论是工作还是生活,都需要频繁的网络社交,而在中国 ...
- python文件读取操作、序列化
1.对文件进行读写操作时,先建立文件句柄 f = open("test.txt","r",encoding="UTF-8") 其中,r为文件 ...
- XSS绕过速查表
0x00 目录 0x01 常规插入及其绕过 1 Script 标签 绕过进行一次移除操作: <scr<script>ipt>alert("XSS")< ...
- jmeter脚本录制的两种方式
完成一次完整的性能测试: 1.创建用户: 2.选择协议(HTTP) 3.使用工具去模拟协议操作(1.手工编写(抓包工具):2.工具自带录制) 4.运行工具进行压力测试