ZYNQ. Interrupt(2)SPI.AXI TIMER
Shared Peripheral Interrupts (SPI)
SPI 可以接收来自PL的中断,这里使用PL模块 AXI Timer 的中断模式,并连接到CPU。
AXI TIMER
定时器,内部有两个完全相同的TIMER模块。
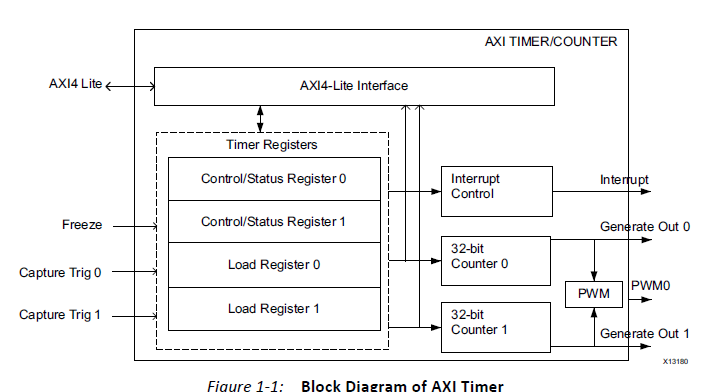
特性:
在手册里可以找到详细的参数和寄存器信息。

硬件系统
需要zynq核和一个AXI Timer,PL的clock可以在zynq核内部设置。
软件部分
这里会使用到xilinx提供的函数库
- 中断 xscugic.h
- 定时器 xtmrctr.h
因为使用了PS端的GPIO,所以还需要另一个库
- GPIO xgpiops.h
大致流程与私有定时器相似:
- 定义定时器、中断控制器和GPIO的结构体
- 初始化定时器、终端控制器和GPIO,以及私有定时器自检
- ARM异常处理初始化,连接系统中断处理程序
- 连接定时器中断程序
- 使能GIC、使能定时器中断、使能ARM中断
- 配置重载、计数器初值,然后开始定时器,等中断
- 废弃这个定时器,通知处理器、通知GIC废弃
code:
//*****************2018/11/27 封装******************
 #include <stdio.h>

 #include "xil_printf.h"

 #include "xparameters.h"

 #include "xgpiops.h"

 #include "sleep.h"

 #include "xtmrctr.h"

 #include "xil_exception.h"

 #include "xscugic.h"

 #define GpioPsDeviceId         XPAR_PS7_GPIO_0_DEVICE_ID

 #define AxiTmrCtrDeviceId     XPAR_TMRCTR_0_DEVICE_ID

 #define XScuGic_DEVICE_ID      XPAR_PS7_SCUGIC_0_DEVICE_ID

 #define TMRCTR_INTERRUPT_ID    XPAR_FABRIC_AXI_TIMER_0_INTERRUPT_INTR

 #define pinLed1 0

 #define pinLed2 9

 #define TIMER_CNTR_0         0

 #define RESET_VALUE             0xFFFFFFFF-(0x5F5E100-1) //1s

 int XGpioPsInit(XGpioPs *XGpioPsPtr);

 int XIntrSysInit(XTmrCtr *XTmrCtrInstancePtr,

         XScuGic *IntcInstancePtr,

         u16 DeviceId,

         u16 IntrId);

 void XTmrCtrIntrHandler(void *CallBackRef, u8 TmrCtrNumber);

 void TmrCtrDisableIntr(XScuGic *IntcInstancePtr, u16 IntrId);

 static XGpioPs GpioPs;

 static XTmrCtr XTmrCtrInstance;

 static XScuGic IntcInstance;

 int valueWriteLed2 = 0x01;

 int valueWriteLed1 = 0x00;

 int main()

 {

     int Status;

     xil_printf("\n\r Hello,world! \n\r"

             "AXI Timer Test\n\r");

     /* Initialize the Gpio driver */

     Status = XGpioPsInit(&GpioPs);

     if (Status != XST_SUCCESS) {

         xil_printf("GPIOPS Initial Failed\r\n");

         return XST_FAILURE;

     }

     /* initialize & connect & enable interrupt system  */

     Status = XIntrSysInit(&XTmrCtrInstance,

                 &IntcInstance,

                 AxiTmrCtrDeviceId,

                 TMRCTR_INTERRUPT_ID);

     if (Status != XST_SUCCESS) {

         xil_printf("Interrupt System Initial Failed\r\n");

         return XST_FAILURE;

     }

     /* set interrupt handler */

     XTmrCtr_SetHandler(&XTmrCtrInstance,

             XTmrCtrIntrHandler,&XTmrCtrInstance);

     /* Setting the timer counter option

      * interrupt Mode and Auto Reload And Up Counter*/

     XTmrCtr_SetOptions(&XTmrCtrInstance, TIMER_CNTR_0,

             XTC_INT_MODE_OPTION );//| XTC_AUTO_RELOAD_OPTION);

     /* Set a reset value */

     XTmrCtr_SetResetValue(&XTmrCtrInstance,

             TIMER_CNTR_0, //

             RESET_VALUE); //

     /* Start the timer counter */

     XTmrCtr_Start(&XTmrCtrInstance, TIMER_CNTR_0);

     while(){

         XGpioPs_WritePin(&GpioPs, pinLed1, valueWriteLed1);

 //        XGpioPs_WritePin(&Gpio, pinLed2, valueWriteLed2);

         sleep();

         xil_printf("--Write Led1: %d--\n",valueWriteLed1);

 //        xil_printf("--Write Led2: %d--\n",valueWriteLed2);

         valueWriteLed1 = valueWriteLed1 & (0x01) ?

                 0x00 :0x01;//~valueWriteLed1;

 //        valueWriteLed2 = valueWriteLed2 & (0x01) ?

 //                0x00 :0x01;//~valueWriteLed2;

         xil_printf("\n-- Do Again --\n");

     }

     /* never reached */

     xil_printf("\n test end\n\r");

     /* Disconnect the interrupt */

     TmrCtrDisableIntr(&IntcInstance, TMRCTR_INTERRUPT_ID);

     return ;

 }

 /* Initialize the timer And GIC device driver ,

  * Connect the Interrupt to GIC And Enable the Interrupt */

 int XIntrSysInit(XTmrCtr *XTmrCtrInstancePtr,XScuGic *IntcInstancePtr,

         u16 DeviceId, u16 IntrId)

 {

     XScuGic_Config *IntcConfig;

     int Status;

     /* Initialize the timer counter*/

     Status = XTmrCtr_Initialize(XTmrCtrInstancePtr, DeviceId);

     if (Status != XST_SUCCESS) {

         xil_printf("AXI TIMER INITIAL FAILED! \n\r");

         return XST_FAILURE;

     }

     /* Initialize the interrupt controller driver */

     IntcConfig = XScuGic_LookupConfig(XScuGic_DEVICE_ID);

     if (NULL == IntcConfig) {

         return XST_FAILURE;

     }

     Status = XScuGic_CfgInitialize(IntcInstancePtr, IntcConfig,

                     IntcConfig->CpuBaseAddress);

     if (Status != XST_SUCCESS) {

         return XST_FAILURE;

     }

     /* Sets the interrupt priority & trigger type

      * for the specified IRQ source */

     XScuGic_SetPriorityTriggerType(IntcInstancePtr, IntrId,

                         0xA0, 0x3);

     /* Initialize the exception table. */

     Xil_ExceptionInit();

     /* Register the interrupt controller handler with the exception table.     */

     Xil_ExceptionRegisterHandler(XIL_EXCEPTION_ID_INT,

                     (Xil_ExceptionHandler)

                     XScuGic_InterruptHandler,

                     IntcInstancePtr);

     /* Connect the interrupt handler  */

     Status = XScuGic_Connect(&IntcInstance, IntrId,

                  (Xil_ExceptionHandler)XTmrCtr_InterruptHandler,

                  XTmrCtrInstancePtr);

     if (Status != XST_SUCCESS) {

         return Status;

     }

     /* Enable the interrupt for the Timer device. */

     XScuGic_Enable(IntcInstancePtr, IntrId);

     /* Enable non-critical exceptions. */

     Xil_ExceptionEnable();

     return XST_SUCCESS;

 }

 void XTmrCtrIntrHandler(void *CallBackRef, u8 TmrCtrNumber)

 {

 //    XTmrCtr *InstancePtr = (XTmrCtr *)CallBackRef;

     XGpioPs_WritePin(&GpioPs, pinLed2, valueWriteLed2);

     xil_printf("--Write Led2: %d--\n",valueWriteLed2);

     valueWriteLed2 = valueWriteLed2 & (0x01) ?

             0x00 :0x01;//~valueWriteLed2;

     return;

 }

 int XGpioPsInit(XGpioPs *GpioPsPtr)

 {

     XGpioPs_Config *ConfigPtr;

     int Status;

     /* Initialize the Gpio driver. */

     ConfigPtr = XGpioPs_LookupConfig(GpioPsDeviceId);

     if (ConfigPtr == NULL) {

         xil_printf("ERROR\n");

         return XST_FAILURE;

     }

     Status = XGpioPs_CfgInitialize(GpioPsPtr,ConfigPtr,

                                     ConfigPtr->BaseAddr);

     if (Status != XST_SUCCESS) {

             print("cfg init err\n");

             return XST_FAILURE;

     }

     //set pin direction

     //value 0 -> input  1 -> output

     XGpioPs_SetDirectionPin(GpioPsPtr, pinLed1, );

     XGpioPs_SetDirectionPin(GpioPsPtr, pinLed2, );

     //value 0 -> disable   1 -> enable

     XGpioPs_SetOutputEnablePin(GpioPsPtr, pinLed1, );

     XGpioPs_SetOutputEnablePin(GpioPsPtr, pinLed2, );

     return XST_SUCCESS;

 }

 void TmrCtrDisableIntr(XScuGic* IntcInstancePtr, u16 IntrId)

 {

     /* Disconnect the interrupt */

     XScuGic_Disable(IntcInstancePtr, IntrId);

     XScuGic_Disconnect(IntcInstancePtr, IntrId);

     return;

 }
via
https://blog.csdn.net/u014485485/article/details/79069445
ZYNQ. Interrupt(2)SPI.AXI TIMER的更多相关文章
- ZYNQ. Interrupt(1)Private Timer
Interrupt zynq的中断. The PS is based on ARM architecture, utilizing two Cortex-A9 processors(CPUs) and ...
- 一步一步学ZedBoard & Zynq(四):基于AXI Lite 总线的从设备IP设计
本帖最后由 xinxincaijq 于 2013-1-9 10:27 编辑 一步一步学ZedBoard & Zynq(四):基于AXI Lite 总线的从设备IP设计 转自博客:http:// ...
- 关于IP核中中断信号的使用---以zynq系统为例
关于IP核中中断信号的使用---以zynq系统为例 1.使能设备的中断输出信号 2.使能处理器的中断接收信号 3.连接IP核到处理器之间的中断 此处只是硬件的搭建,软件系统的编写需要进一步研究. 搭建 ...
- PIC32MZ tutorial -- 32-bit Timer
The microcontroller is PIC32MZ2048ECH144 on the PIC32MZ EC Starter Kit. This microcontroller has fou ...
- Intel 80x86 Linux Kernel Interrupt(中断)、Interrupt Priority、Interrupt nesting、Prohibit Things Whthin CPU In The Interrupt Off State
目录 . 引言 . Linux 中断的概念 . 中断处理流程 . Linux 中断相关的源代码分析 . Linux 硬件中断 . Linux 软中断 . 中断优先级 . CPU在关中断状态下编程要注意 ...
- AXI总线简介
AXI全称Advanced eXtensible Interface,是Xilinx从6系列的FPGA开始引入的一个接口协议,主要描述了主设备和从设备之间的数据传输方式.在ZYNQ中继续使用,版本是A ...
- Make a DAC with a microcontroller's PWM timer
http://www.edn.com/design/analog/4337128/Make-a-DAC-with-a-microcontroller-s-PWM-timer Many embedded ...
- Arduino 与 SPI 结合使用 以及SPI 深层理解
本文主要讲解两部分内容,不做任何转发,仅个人学习记录: 一. Arduino 与 SPI 结合使用 : 二. SPI 深层理解 有价值的几个好的参考: 1. 中文版: https://blog.cs ...
- ARM Linux 3.x的设备树(Device Tree)
1. ARM Device Tree起源 Linus Torvalds在2011年3月17日的ARM Linux邮件列表宣称“this whole ARM thing is a f*cking pai ...
随机推荐
- PAT甲题题解-1114. Family Property (25)-(并查集模板题)
题意:给出每个人的家庭成员信息和自己的房产个数与房产总面积,让你统计出每个家庭的人口数.人均房产个数和人均房产面积.第一行输出家庭个数,随后每行输出家庭成员的最小编号.家庭人口数.人均房产个数.人均房 ...
- Linux第三周学习总结——构造一个简单的Linux系统MenuOS
第三周学习总结--构造一个简单的Linux系统MenuOS 作者:刘浩晨 [原创作品转载请注明出处] <Linux内核分析>MOOC课程http://mooc.study.163.com/ ...
- C语言版本:循环单链表的实现
SClist.h #ifndef __SCLIST_H__ #define __SCLIST_H__ #include<cstdio> #include<malloc.h> # ...
- nginx安装(转发)
Nginx("engine x")是一款轻量级的HTTP和反向代理服务器.相比于Apache.lighttpd等,它具有占有内存少.并发能力强.稳定性高等优势.它最常见的用途就是提 ...
- RYU 的选择以及安装
RYU 的选择以及安装 由于近期的项目需求,不得已得了解一下控制器内部发现拓扑原理,由于某某应用中的控制器介绍中使用的RYU,所以打算把RYU装一下试试.出乎意料的是,RYU竟是我之前装过最最轻便的控 ...
- Linux搭建好apache后,只有本地能访问,局域或外网不能访问
由于防火墙的访问控制导致本地端口不能被访问. 解决方法: 1,直接关闭防火墙 systemctl stop firewalld.service #停止防火墙服务 systemctl disable ...
- C++学习记录(留坑)
#include <iostream> #include <ctime> #include <fstream> ///文件打开有o.i权限 #include < ...
- 2019 front-end web trending
2019 front-end web trending https://github.com/kamranahmedse/developer-roadmap https://raw.githubuse ...
- c#public、private、protected、internal、protected internal
public 公有访问.不受任何限制.private 私有访问.只限于本类成员访问,子类,实例都不能访问.protected 保护访问.只限于本类和子类访问,实例不能访问.internal 内部访问. ...
- Django从入门到放弃
第一篇: web应用 HTTP协议 web框架 第二篇:Djangon简介 第三篇:路由控制 第四篇:视图层 第五篇:模版层 第六篇:模型层:单表操作,多表操作,常用(非常用)字段和参数,Django ...