
Netty4.x 源码实战系列(一): 深入理解ServerBootstrap 与 Bootstrap
转载自:https://www.cnblogs.com/itdriver/p/8149913.html
从Java1.4开始, Java引入了non-blocking IO,简称NIO。NIO与传统socket最大的不同就是引入了Channel和多路复用selector的概念。传统的socket是基于stream的,它是单向的,有InputStream表示read和OutputStream表示写。而Channel是双工的,既支持读也支持写,channel的读/写都是面向Buffer。 NIO中引入的多路复用Selector机制(如果是linux系统,则应用的epoll事件通知机制)可使一个线程同时监听多个Channel上发生的事件。 虽然Java NIO相比于以往确实是一个大的突破,但是如果要真正上手进行开发,且想要开发出好的一个服务端网络程序,那么你得要花费一点功夫了,毕竟Java NIO只是提供了一大堆的API而已,对于一般的软件开发人员来说只能呵呵了。因此,社区中就涌现了很多基于Java NIO的网络应用框架,其中以Apache的Mina,以及Netty最为出名,从本篇开始我们将深入的分析一下Netty的内部实现细节 。
本系列是基于Netty4.1.18这个版本。
在分析源码之前,我们还是先看看Netty官方的样例代码,了解一下Netty一般是如何进行服务端及客户端开发的。
Netty服务端示例:

EventLoopGroup bossGroup = new NioEventLoopGroup(); // (1)
EventLoopGroup workerGroup = new NioEventLoopGroup();
try {

    ServerBootstrap b = new ServerBootstrap(); // (2)

    b.group(bossGroup, workerGroup)  // (3)

     .channel(NioServerSocketChannel.class) // (4)
     .handler(new LoggingHandler())    // (5)

     .childHandler(new ChannelInitializer<SocketChannel>() { // (6)

         @Override

         public void initChannel(SocketChannel ch) throws Exception {

             ch.pipeline().addLast(new DiscardServerHandler());

         }

     })

     .option(ChannelOption.SO_BACKLOG, 128)          // (7)

     .childOption(ChannelOption.SO_KEEPALIVE, true); // (8)

     // Bind and start to accept incoming connections.

     ChannelFuture f = b.bind(port).sync(); // (9)

     // Wait until the server socket is closed.

     // In this example, this does not happen, but you can do that to gracefully

     // shut down your server.

     f.channel().closeFuture().sync();

} finally {

    workerGroup.shutdownGracefully();

    bossGroup.shutdownGracefully();

}
上面这段代码展示了服务端的一个基本步骤:
(1)、 初始化用于Acceptor的主"线程池"以及用于I/O工作的从"线程池";
(2)、 初始化ServerBootstrap实例, 此实例是netty服务端应用开发的入口,也是本篇介绍的重点, 下面我们会深入分析;
(3)、 通过ServerBootstrap的group方法,设置(1)中初始化的主从"线程池";
(4)、 指定通道channel的类型,由于是服务端,故而是NioServerSocketChannel;
(5)、 设置ServerSocketChannel的处理器(此处不详述,后面的系列会进行深入分析)
(6)、 设置子通道也就是SocketChannel的处理器, 其内部是实际业务开发的"主战场"(此处不详述,后面的系列会进行深入分析)
(7)、 配置ServerSocketChannel的选项
(8)、 配置子通道也就是SocketChannel的选项
(9)、 绑定并侦听某个端口

接着,我们再看看客户端是如何开发的:
Netty客户端示例:
public class TimeClient {

    public static void main(String[] args) throws Exception {

        String host = args[0];

        int port = Integer.parseInt(args[1]);

        EventLoopGroup workerGroup = new NioEventLoopGroup(); // (1)

        try {

            Bootstrap b = new Bootstrap(); // (2)

            b.group(workerGroup); // (3)

            b.channel(NioSocketChannel.class); // (4)

            b.option(ChannelOption.SO_KEEPALIVE, true); // (5)

            b.handler(new ChannelInitializer<SocketChannel>() { // (6)

                @Override

                public void initChannel(SocketChannel ch) throws Exception {

                    ch.pipeline().addLast(new TimeClientHandler());

                }

            });

            // Start the client.

            ChannelFuture f = b.connect(host, port).sync(); // (7)

            // Wait until the connection is closed.

            f.channel().closeFuture().sync();

        } finally {

            workerGroup.shutdownGracefully();

        }

    }

}
客户端的开发步骤和服务端都差不多:
(1)、 初始化用于连接及I/O工作的"线程池";
(2)、 初始化Bootstrap实例, 此实例是netty客户端应用开发的入口,也是本篇介绍的重点, 下面我们会深入分析;
(3)、 通过Bootstrap的group方法,设置(1)中初始化的"线程池";
(4)、 指定通道channel的类型,由于是客户端,故而是NioSocketChannel;
(5)、 设置SocketChannel的选项(此处不详述,后面的系列会进行深入分析);
(6)、 设置SocketChannel的处理器, 其内部是实际业务开发的"主战场"(此处不详述,后面的系列会进行深入分析);
(7)、 连接指定的服务地址;

通过对上面服务端及客户端代码分析,Bootstrap是Netty应用开发的入口,如果想要理解Netty内部的实现细节,那么有必要先了解一下Bootstrap内部的实现机制。

首先我们先看一下ServerBootstrap及Bootstrap的类继承结构图:
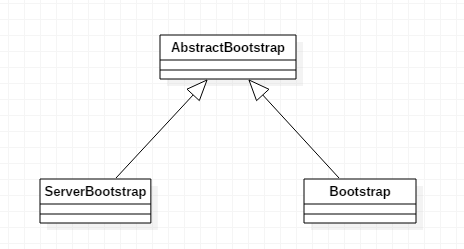
通过类图我们知道AbstractBootstrap类是ServerBootstrap及Bootstrap的基类,我们先看一下AbstractBootstrap类的主要代码:
public abstract class AbstractBootstrap<B extends AbstractBootstrap<B, C>, C extends Channel> implements Cloneable {

    volatile EventLoopGroup group;

    private volatile ChannelFactory<? extends C> channelFactory;

    private final Map<ChannelOption<?>, Object> options = new LinkedHashMap<ChannelOption<?>, Object>();

    private final Map<AttributeKey<?>, Object> attrs = new LinkedHashMap<AttributeKey<?>, Object>();

    private volatile ChannelHandler handler;

    public B group(EventLoopGroup group) {

        if (group == null) {

            throw new NullPointerException("group");

        }

        if (this.group != null) {

            throw new IllegalStateException("group set already");

        }

        this.group = group;

        return self();

    }

    private B self() {

        return (B) this;

    }

    public B channel(Class<? extends C> channelClass) {

        if (channelClass == null) {

            throw new NullPointerException("channelClass");

        }

        return channelFactory(new ReflectiveChannelFactory<C>(channelClass));

    }

    @Deprecated

    public B channelFactory(ChannelFactory<? extends C> channelFactory) {

        if (channelFactory == null) {

            throw new NullPointerException("channelFactory");

        }

        if (this.channelFactory != null) {

            throw new IllegalStateException("channelFactory set already");

        }

        this.channelFactory = channelFactory;

        return self();

    }

    public B channelFactory(io.netty.channel.ChannelFactory<? extends C> channelFactory) {

        return channelFactory((ChannelFactory<C>) channelFactory);

    }

    public <T> B option(ChannelOption<T> option, T value) {

        if (option == null) {

            throw new NullPointerException("option");

        }

        if (value == null) {

            synchronized (options) {

                options.remove(option);

            }

        } else {

            synchronized (options) {

                options.put(option, value);

            }

        }

        return self();

    }

    public <T> B attr(AttributeKey<T> key, T value) {

        if (key == null) {

            throw new NullPointerException("key");

        }

        if (value == null) {

            synchronized (attrs) {

                attrs.remove(key);

            }

        } else {

            synchronized (attrs) {

                attrs.put(key, value);

            }

        }

        return self();

    }

    public B validate() {

        if (group == null) {

            throw new IllegalStateException("group not set");

        }

        if (channelFactory == null) {

            throw new IllegalStateException("channel or channelFactory not set");

        }

        return self();

    }

    public ChannelFuture bind(int inetPort) {

        return bind(new InetSocketAddress(inetPort));

    }

    public ChannelFuture bind(SocketAddress localAddress) {

        validate();

        if (localAddress == null) {

            throw new NullPointerException("localAddress");

        }

        return doBind(localAddress);

    }

    private ChannelFuture doBind(final SocketAddress localAddress) {

        final ChannelFuture regFuture = initAndRegister();

        final Channel channel = regFuture.channel();

        if (regFuture.cause() != null) {

            return regFuture;

        }

        if (regFuture.isDone()) {

            // At this point we know that the registration was complete and successful.

            ChannelPromise promise = channel.newPromise();

            doBind0(regFuture, channel, localAddress, promise);

            return promise;

        } else {

            // Registration future is almost always fulfilled already, but just in case it's not.

            final PendingRegistrationPromise promise = new PendingRegistrationPromise(channel);

            regFuture.addListener(new ChannelFutureListener() {

                @Override

                public void operationComplete(ChannelFuture future) throws Exception {

                    Throwable cause = future.cause();

                    if (cause != null) {

                        // Registration on the EventLoop failed so fail the ChannelPromise directly to not cause an

                        // IllegalStateException once we try to access the EventLoop of the Channel.

                        promise.setFailure(cause);

                    } else {

                        // Registration was successful, so set the correct executor to use.

                        // See https://github.com/netty/netty/issues/2586

                        promise.registered();

                        doBind0(regFuture, channel, localAddress, promise);

                    }

                }

            });

            return promise;

        }

    }

    final ChannelFuture initAndRegister() {

        Channel channel = null;

        try {

            channel = channelFactory.newChannel();

            init(channel);

        } catch (Throwable t) {

            if (channel != null) {

                // channel can be null if newChannel crashed (eg SocketException("too many open files"))

                channel.unsafe().closeForcibly();

            }

            // as the Channel is not registered yet we need to force the usage of the GlobalEventExecutor

            return new DefaultChannelPromise(channel, GlobalEventExecutor.INSTANCE).setFailure(t);

        }

        ChannelFuture regFuture = config().group().register(channel);

        if (regFuture.cause() != null) {

            if (channel.isRegistered()) {

                channel.close();

            } else {

                channel.unsafe().closeForcibly();

            }

        }

        return regFuture;

    }

    abstract void init(Channel channel) throws Exception;

    private static void doBind0(

            final ChannelFuture regFuture, final Channel channel,

            final SocketAddress localAddress, final ChannelPromise promise) {

        // This method is invoked before channelRegistered() is triggered.  Give user handlers a chance to set up

        // the pipeline in its channelRegistered() implementation.

        channel.eventLoop().execute(new Runnable() {

            @Override

            public void run() {

                if (regFuture.isSuccess()) {

                    channel.bind(localAddress, promise).addListener(ChannelFutureListener.CLOSE_ON_FAILURE);

                } else {

                    promise.setFailure(regFuture.cause());

                }

            }

        });

    }

    public B handler(ChannelHandler handler) {

        if (handler == null) {

            throw new NullPointerException("handler");

        }

        this.handler = handler;

        return self();

    }public abstract AbstractBootstrapConfig<B, C> config();

}
现在我们以示例代码为出发点,来详细分析一下引导类内部实现细节:
1、 首先看看服务端的b.group(bossGroup, workerGroup):
调用ServerBootstrap的group方法,设置react模式的主线程池 以及 IO 操作线程池,ServerBootstrap中的group代码如下:
public ServerBootstrap group(EventLoopGroup parentGroup, EventLoopGroup childGroup) {

        super.group(parentGroup);

        if (childGroup == null) {

            throw new NullPointerException("childGroup");

        }

        if (this.childGroup != null) {

            throw new IllegalStateException("childGroup set already");

        }

        this.childGroup = childGroup;

        return this;

    }
在group方法中,会继续调用父类的group方法,而通过类继承图我们知道,super.group(parentGroup)其实调用的就是AbstractBootstrap的group方法。AbstractBootstrap中group代码如下:
public B group(EventLoopGroup group) {

        if (group == null) {

            throw new NullPointerException("group");

        }

        if (this.group != null) {

            throw new IllegalStateException("group set already");

        }

        this.group = group;

        return self();

    }
通过以上分析,我们知道了AbstractBootstrap中定义了主线程池group的引用,而子线程池childGroup的引用是定义在ServerBootstrap中。
当我们查看客户端Bootstrap的group方法时,我们发现,其是直接调用的父类AbstractBoostrap的group方法。
2、示例代码中的 channel()方法
无论是服务端还是客户端,channel调用的都是基类的channel方法,其实现细节如下:
public B channel(Class<? extends C> channelClass) {

        if (channelClass == null) {

            throw new NullPointerException("channelClass");

        }

        return channelFactory(new ReflectiveChannelFactory<C>(channelClass));

    }
public B channelFactory(ChannelFactory<? extends C> channelFactory) {

        if (channelFactory == null) {

            throw new NullPointerException("channelFactory");

        }

        if (this.channelFactory != null) {

            throw new IllegalStateException("channelFactory set already");

        }

        this.channelFactory = channelFactory;

        return self();

    }
我们发现,其实channel方法内部,只是初始化了一个用于生产指定channel类型的工厂实例。
3、option / handler / attr 方法
option: 设置通道的选项参数, 对于服务端而言就是ServerSocketChannel, 客户端而言就是SocketChannel;
handler: 设置主通道的处理器, 对于服务端而言就是ServerSocketChannel,也就是用来处理Acceptor的操作;
对于客户端的SocketChannel,主要是用来处理 业务操作;
attr: 设置通道的属性;
option / handler / attr方法都定义在AbstractBootstrap中, 所以服务端和客户端的引导类方法调用都是调用的父类的对应方法。
4、childHandler / childOption / childAttr 方法(只有服务端ServerBootstrap才有child类型的方法)
对于服务端而言,有两种通道需要处理, 一种是ServerSocketChannel:用于处理用户连接的accept操作, 另一种是SocketChannel,表示对应客户端连接。而对于客户端,一般都只有一种channel,也就是SocketChannel。
因此以child开头的方法,都定义在ServerBootstrap中,表示处理或配置服务端接收到的对应客户端连接的SocketChannel通道。
childHandler / childOption / childAttr 在ServerBootstrap中的对应代码如下:
public ServerBootstrap childHandler(ChannelHandler childHandler) {

        if (childHandler == null) {

            throw new NullPointerException("childHandler");

        }

        this.childHandler = childHandler;

        return this;

    }
public <T> ServerBootstrap childOption(ChannelOption<T> childOption, T value) {

        if (childOption == null) {

            throw new NullPointerException("childOption");

        }

        if (value == null) {

            synchronized (childOptions) {

                childOptions.remove(childOption);

            }

        } else {

            synchronized (childOptions) {

                childOptions.put(childOption, value);

            }

        }

        return this;

    }
public <T> ServerBootstrap childAttr(AttributeKey<T> childKey, T value) {

        if (childKey == null) {

            throw new NullPointerException("childKey");

        }

        if (value == null) {

            childAttrs.remove(childKey);

        } else {

            childAttrs.put(childKey, value);

        }

        return this;

    }
至此,引导类的属性配置都设置完毕了。
本篇总结:
1、服务端由两种线程池,用于Acceptor的React主线程和用于I/O操作的React从线程池; 客户端只有用于连接及IO操作的React的主线程池;
2、ServerBootstrap中定义了服务端React的"从线程池"对应的相关配置,都是以child开头的属性。 而用于"主线程池"channel的属性都定义在AbstractBootstrap中;
本篇只是简单介绍了一下引导类的配置属性, 下一篇我将详细介绍服务端引导类的Bind过程分析。
Netty4.x 源码实战系列(一): 深入理解ServerBootstrap 与 Bootstrap的更多相关文章
- Netty4.x 源码实战系列(一): 深入理解ServerBootstrap 与 Bootstrap (1)
从Java1.4开始, Java引入了non-blocking IO,简称NIO.NIO与传统socket最大的不同就是引入了Channel和多路复用selector的概念.传统的socket是基于s ...
- Spring AOP 源码分析系列文章导读
1. 简介 前一段时间,我学习了 Spring IOC 容器方面的源码,并写了数篇文章对此进行讲解.在写完 Spring IOC 容器源码分析系列文章中的最后一篇后,没敢懈怠,趁热打铁,花了3天时间阅 ...
- netty源码分析系列文章
netty源码分析系列文章 nettynetty源码阅读netty源码分析 想在年终之际将对netty研究的笔记记录下来,先看netty3,然后有时间了再写netty4的,希望对大家有所帮助,这个是 ...
- Java并发包源码学习系列:AQS共享式与独占式获取与释放资源的区别
目录 Java并发包源码学习系列:AQS共享模式获取与释放资源 独占式获取资源 void acquire(int arg) boolean acquireQueued(Node, int) 独占式释放 ...
- Java并发包源码学习系列:ReentrantReadWriteLock读写锁解析
目录 ReadWriteLock读写锁概述 读写锁案例 ReentrantReadWriteLock架构总览 Sync重要字段及内部类表示 写锁的获取 void lock() boolean writ ...
- Java并发包源码学习系列:详解Condition条件队列、signal和await
目录 Condition接口 AQS条件变量的支持之ConditionObject内部类 回顾AQS中的Node void await() 添加到条件队列 Node addConditionWaite ...
- Spring Ioc源码分析系列--前言
Spring Ioc源码分析系列--前言 为什么要写这个系列文章 首先这是我个人很久之前的一个计划,拖了很久没有实施,现在算是填坑了.其次,作为一个Java开发者,Spring是绕不开的课题.在Spr ...
- 【原】Android热更新开源项目Tinker源码解析系列之三:so热更新
本系列将从以下三个方面对Tinker进行源码解析: Android热更新开源项目Tinker源码解析系列之一:Dex热更新 Android热更新开源项目Tinker源码解析系列之二:资源文件热更新 A ...
- 【原】Android热更新开源项目Tinker源码解析系列之一:Dex热更新
[原]Android热更新开源项目Tinker源码解析系列之一:Dex热更新 Tinker是微信的第一个开源项目,主要用于安卓应用bug的热修复和功能的迭代. Tinker github地址:http ...
随机推荐
- Number & Maths类
Java Number & Math 类 一般地,当需要使用数字的时候,我们通常使用内置数据类型,如:byte.int.long.double 等. 实例 int a = 5000;float ...
- tar.gz和.rpm包的区别与使用(转)
一.Linux软件的二进制分发 Linux软件的二进制分发是指事先已经编译好二进制形式的软件包的发布形式,其优点是安装使用容易,缺点则是缺乏灵活性,如果该软件包是为特定的硬件/操作系统平台编译的,那它 ...
- mysql导入慢解决方法
[mysqldump]max_allowed_packet = 512M [mysqld] interactive_timeout = 120 innodb_change_buffering=alli ...
- Django 导入css文件,样式不起作用。Resource interpreted as Stylesheet but transferred with MIME type application/x-css
笔者今天在模板中加载css文件时,发现 css样式能够下载再来却无法起作用,而且,图片.js都能够正常使用. 并且 浏览器提示: Resource interpreted as Stylesheet ...
- SQL查询有两门以上不及格的学生及查询出全部及格的学生
1.表结构: /*学生*/ create table student( sno int not null primary key, sname ) ); /*课程*/ create table cen ...
- andorid 网格视图GridView
.xml <?xml version="1.0" encoding="utf-8"?> <GridView xmlns:android=&qu ...
- grep如何进行正则表达式查找
字符类 字符类的搜索:如果我想要搜寻 test 或 taste 这两个单字时,可以发现到,其实她们有共通的 't?st' 存在-这个时候,我可以这样来搜寻: [root@www ~]# grep -n ...
- 转:百度MySql5.7安装配置
原文地址:http://jingyan.baidu.com/article/8cdccae946133f315513cd6a.html MySQL 5.7以上版本的配置和以前有所不同,在这里与大家分享 ...
- Python之路(第五篇) Python基本数据类型集合、格式化、函数
一.变量总结 1.1 变量定义 记录某种状态或者数值,并用某个名称代表这个数值或状态. 1.2 变量在内存中的表现形式 Python 中一切皆为对象,数字是对象,列表是对象,函数也是对象,任何东西都是 ...
- Spring整合jedis 集群模式
引入jedis依赖 <dependency> <groupId>redis.clients</groupId> <artifactId>jedis< ...