
How to resolve unassigned shards in Elasticsearch——写得非常好
How to resolve unassigned shards in Elasticsearch
In Elasticsearch, a healthy cluster is a balanced cluster: primary and replica shards are distributed across all nodes for durable reliability in case of node failure.
But what should you do when you see shards lingering in an UNASSIGNEDstate?
Before we dive into some solutions, let’s verify that the unassigned shards contain data that we need to preserve (if not, deleting these shards is the most straightforward way to resolve the issue). If you already know the data’s worth saving, jump to the solutions:
- Shard allocation is purposefully delayed
- Too many shards, not enough nodes
- You need to re-enable shard allocation
- Shard data no longer exists in the cluster
- Low disk watermark
- Multiple Elasticsearch versions
The commands in this post are formatted under the assumption that you are running each Elasticsearch instance’s HTTP service on the default port (9200). They are also directed to localhost, which assumes that you are submitting the request locally; otherwise, replace localhost with your node’s IP address.
Pinpointing problematic shards
Elasticsearch’s cat API will tell you which shards are unassigned, and why:
curl -XGET localhost:9200/_cat/shards?h=index,shard,prirep,state,unassigned.reason| grep UNASSIGNED
Each row lists the name of the index, the shard number, whether it is a primary (p) or replica ® shard, and the reason it is unassigned:
constant-updates 0 p UNASSIGNED NODE_LEFT node_left[NODE_NAME]
If the unassigned shards belong to an index you thought you deleted already, or an outdated index that you don’t need anymore, then you can delete the index to restore your cluster status to green:
curl -XDELETE 'localhost:9200/index_name/'
If that didn’t solve the issue, read on to try other solutions.
Reason 1: Shard allocation is purposefully delayed
When a node leaves the cluster, the master node temporarily delays shard reallocation to avoid needlessly wasting resources on rebalancing shards, in the event the original node is able to recover within a certain period of time (one minute, by default). If this is the case, your logs should look something like this:
[TIMESTAMP][INFO][cluster.routing] [MASTER NODE NAME] delaying allocation for [54] unassigned shards, next check in [1m]
You can dynamically modify the delay period like so:
curl -XPUT 'localhost:9200/<INDEX_NAME>/_settings' -d '

{

    "settings": {

      "index.unassigned.node_left.delayed_timeout": "30s"

    }

}'
Replacing <INDEX_NAME> with _all will update the threshold for all indices in your cluster.
After the delay period is over, you should start seeing the master assigning those shards. If not, keep reading to explore solutions to other potential causes.
Reason 2: Too many shards, not enough nodes
As nodes join and leave the cluster, the master node reassigns shards automatically, ensuring that multiple copies of a shard aren’t assigned to the same node. In other words, the master node will not assign a primary shard to the same node as its replica, nor will it assign two replicas of the same shard to the same node. A shard may linger in an unassigned state if there are not enough nodes to distribute the shards accordingly.
To avoid this issue, make sure that every index in your cluster is initialized with fewer replicas per primary shard than the number of nodes in your cluster by following the formula below:
N >= R + 1
Where N is the number of nodes in your cluster, and R is the largest shard replication factor across all indices in your cluster.
In the screenshot below, the many-shards index is stored on four primary shards and each primary has four replicas. Eight of the index’s 20 shards are unassigned because our cluster only contains three nodes. Two replicas of each primary shard haven’t been assigned because each of the three nodes already contains a copy of that shard.
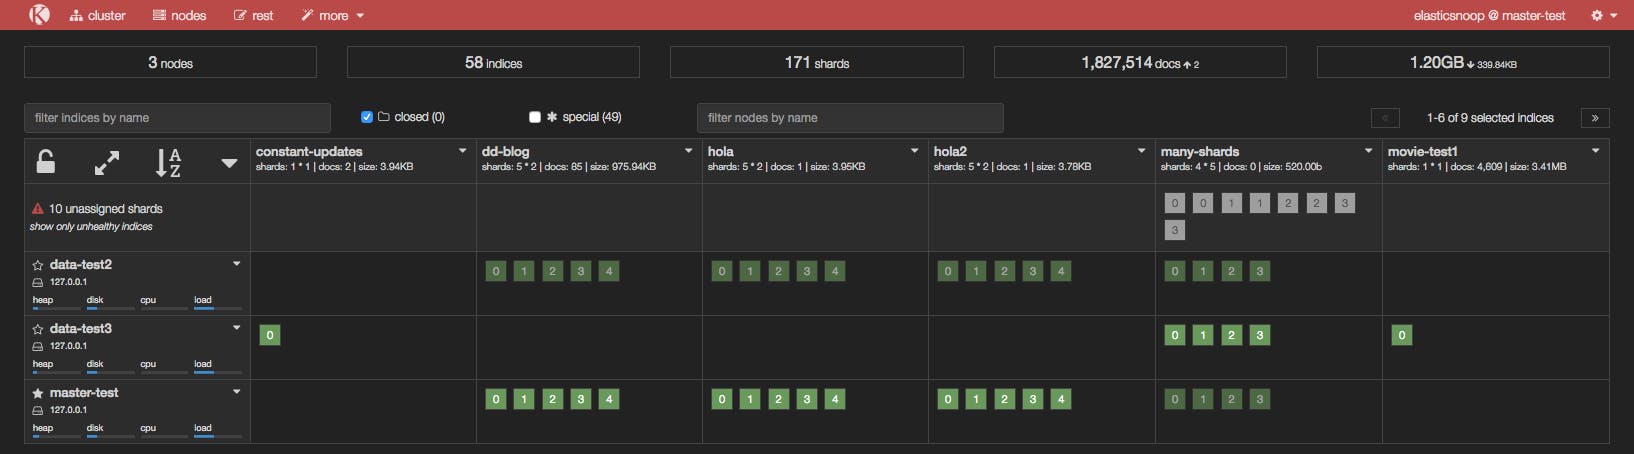
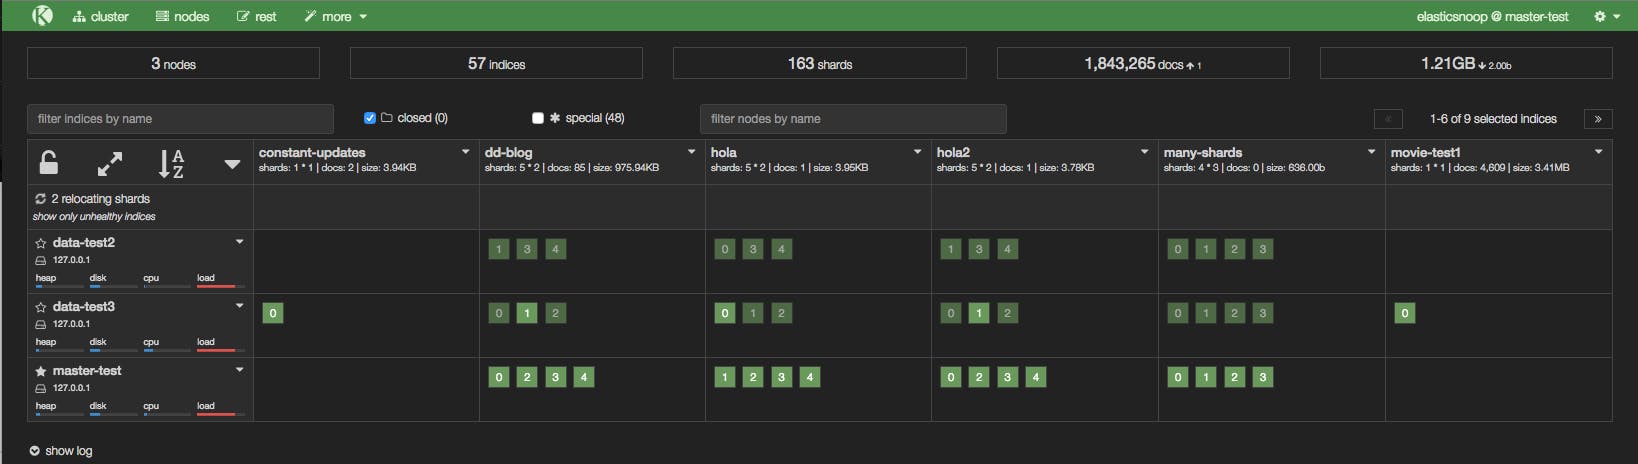
To resolve this issue, you can either add more data nodes to the cluster or reduce the number of replicas. In our example, we either need to add at least two more nodes in the cluster or reduce the replication factor to two, like so:
curl -XPUT 'localhost:9200/<INDEX_NAME>/_settings' -d '{"number_of_replicas": 2}'
After reducing the number of replicas, take a peek at Kopf to see if all shards have been assigned.
Reason 3: You need to re-enable shard allocation
In the Kopf screenshot below, a node has just joined the cluster, but it hasn’t been assigned any shards.
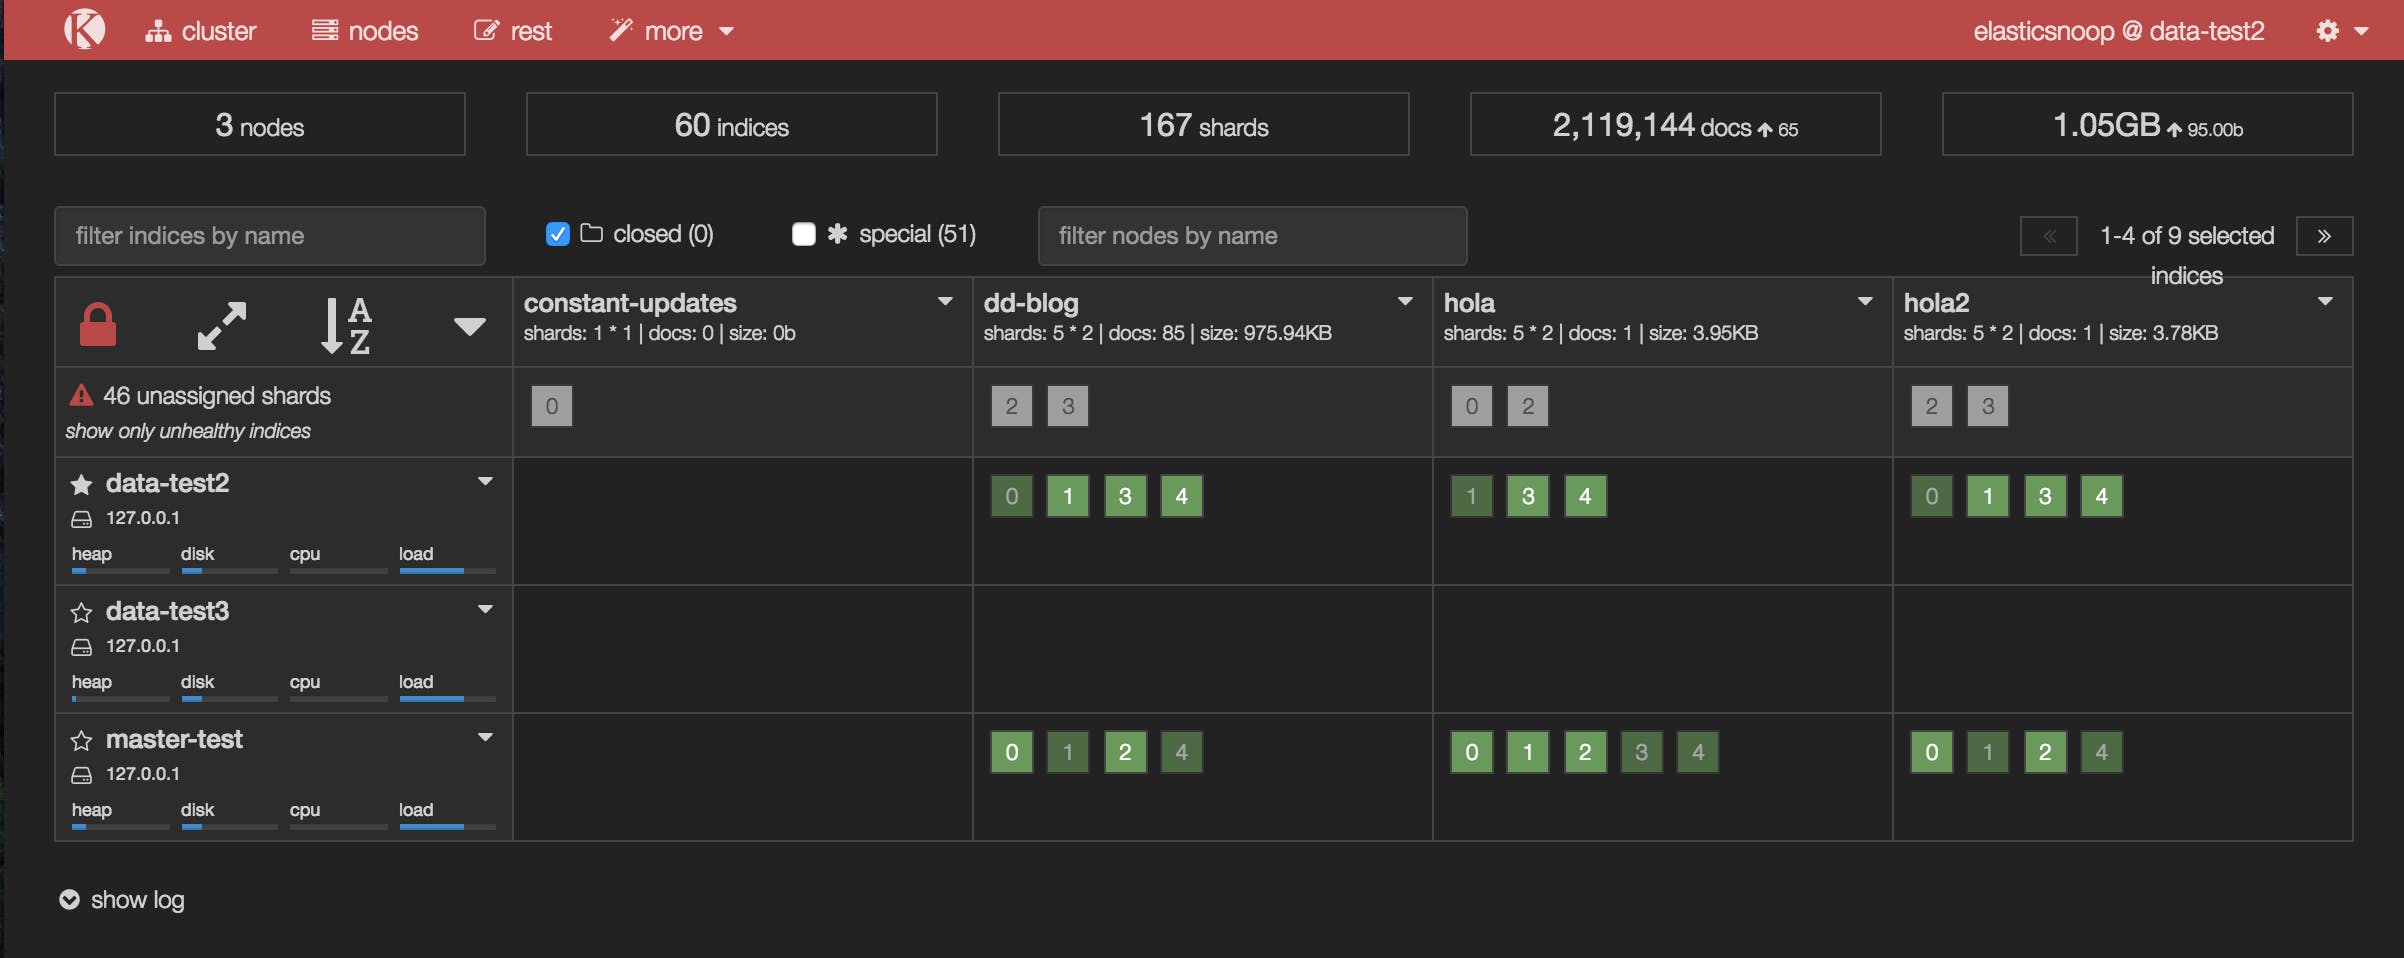
Shard allocation is enabled by default on all nodes, but you may have disabled shard allocation at some point (for example, in order to perform a rolling restart), and forgotten to re-enable it.
To enable shard allocation, update the Cluster Settings API:
curl -XPUT 'localhost:9200/_cluster/settings' -d

'{ "transient":

  { "cluster.routing.allocation.enable" : "all"

  }

}'
If this solved the problem, your Kopf or Datadog dashboard should show the number of unassigned shards decreasing as they are successfully assigned to nodes.
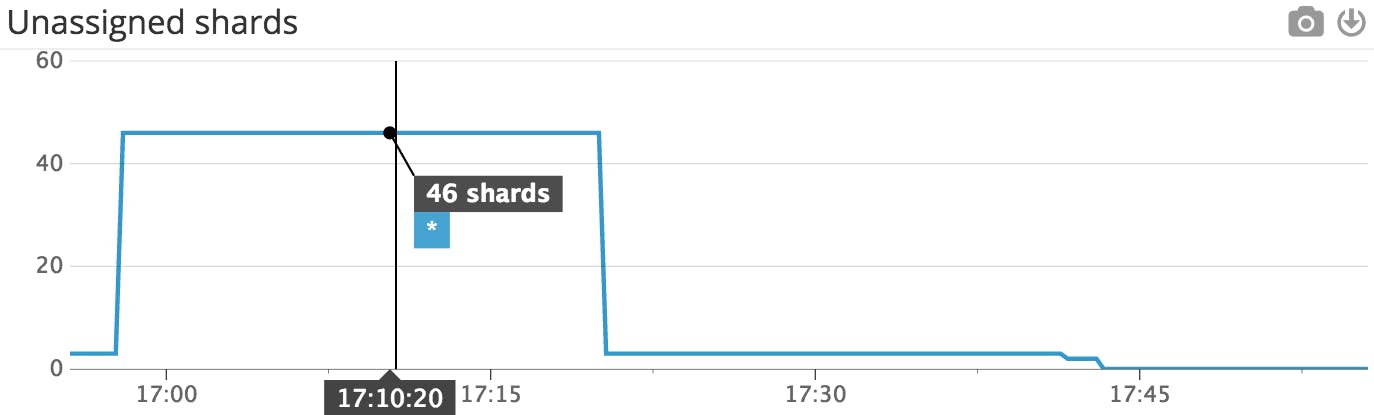 This Datadog timeseries graph shows that the number of unassigned shards decreased after shard allocation was re-enabled.
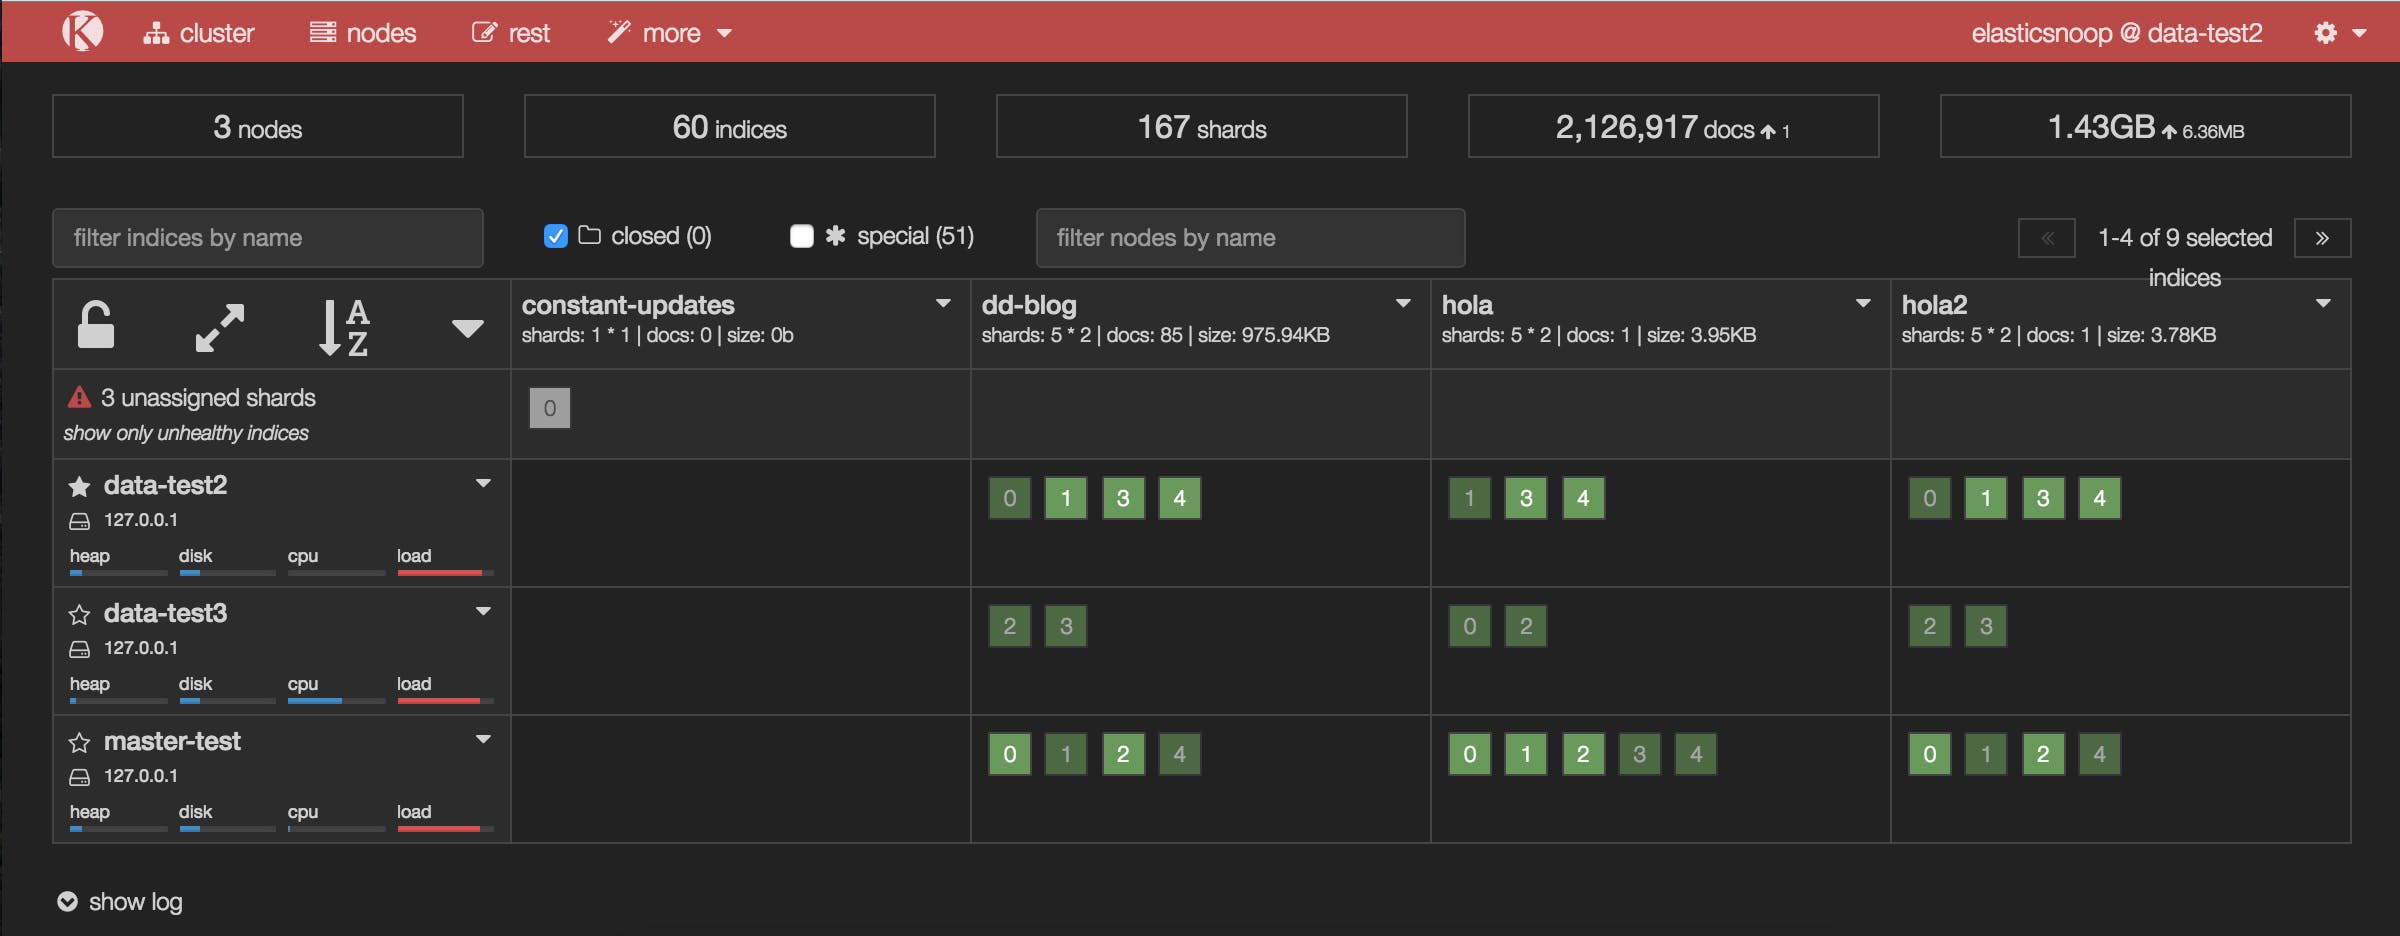 The updated Kopf dashboard shows that many of the previously unassigned shards have been assigned after shard allocation was re-enabled.
It looks like this solved the issue for all of our unassigned shards, with one exception: shard 0 of the constant-updates index. Let’s explore other possible reasons why the shard remains unassigned.
Reason 4: Shard data no longer exists in the cluster
In this case, primary shard 0 of the constant-updates index is unassigned. It may have been created on a node without any replicas (a technique used to speed up the initial indexing process), and the node left the cluster before the data could be replicated. The master detects the shard in its global cluster state file, but can’t locate the shard’s data in the cluster.
Another possibility is that a node may have encountered an issue while rebooting. Normally, when a node resumes its connection to the cluster, it relays information about its on-disk shards to the master, which then transitions those shards from “unassigned” to “assigned/started”. When this process fails for some reason (e.g. the node’s storage has been damaged in some way), the shards may remain unassigned.
In this scenario, you have to decide how to proceed: try to get the original node to recover and rejoin the cluster (and do not force allocate the primary shard), or force allocate the shard using the Reroute API and reindex the missing data using the original data source, or from a backup.
If you decide to allocate an unassigned primary shard, make sure to add the "allow_primary": "true" flag to the request:
curl -XPOST 'localhost:9200/_cluster/reroute' -d '{ "commands" :

  [ { "allocate" :

      { "index" : "constant-updates", "shard" : 0, "node": "<NODE_NAME>", "allow_primary": "true" }

  }]

}'
Without the "allow_primary": "true" flag, we would have encountered the following error:
{"error":{"root_cause":[{"type":"remote_transport_exception","reason":"[NODE_NAME][127.0.0.1:9301][cluster:admin/reroute]"}],"type":"illegal_argument_exception","reason":"[allocate] trying to allocate a primary shard [constant-updates][0], which is disabled"},"status":400}
The caveat with forcing allocation of a primary shard is that you will be assigning an “empty” shard. If the node that contained the original primary shard data were to rejoin the cluster later, its data would be overwritten by the newly created (empty) primary shard, because it would be considered a “newer” version of the data.
You will now need to reindex the missing data, or restore as much as you can from a backup snapshot using the Snapshot and Restore API.
How to resolve unassigned shards in Elasticsearch——写得非常好的更多相关文章
- Recovering unassigned shards on elasticsearch 2.x——副本shard可以设置replica为0在设置回来
Recovering unassigned shards on elasticsearch 2.x 摘自:https://z0z0.me/recovering-unassigned-shards-on ...
- 如何在Elasticsearch中解析未分配的分片(unassigned shards)
一.精确定位到有问题的shards 1.查看哪些分片未被分配 curl -XGET localhost:9200/_cat/shards?h=index,shard,prirep,state,unas ...
- Reroute Unassigned Shards——遇到主shard 出现的解决方法就是重新路由
Red Cluster! 摘自:http://blog.kiyanpro.com/2016/03/06/elasticsearch/reroute-unassigned-shards/ There a ...
- Elasticsearch节点下线(退役)and unassigned shards
一.节点退役当集群中个别节点出现故障预警等情况,需要进行退役工作,即让所有位于该退役节点上的分片的数据分配到其他节点上后,再将此节点关闭并从集群中移除. 1.ES提供了让某个节点上所有数据都移走的功能 ...
- 单节点 Elasticsearch 出现 unassigned shards 原因及解决办法
根本原因: 是因为集群存在没有启用的副本分片,我们先来看一下官网给出的副本分片的介绍: 副本分片的主要目的就是为了故障转移,正如在 集群内的原理 中讨论的:如果持有主分片的节点挂掉了,一个副本分片就会 ...
- elasticsearch unassigned shards 导致RED解决
先通过命令查看节点的shard分配整体情况 curl -X GET "ip:9200/_cat/allocation?v" 说明:有16个索引未分片 2.查看未分片的索引 curl ...
- Elasticsearch cluster health: yellow unassigned shards
查看ES各个分片的状态 $ curl -XGET http://127.0.0.1:9200/_cluster/health?pretty { "cluster_name" : & ...
- .Net Core 实践 - 使用log4net记录日志(3)— log4net向ElasticSearch写日志
demo地址:https://github.com/PuzzledAlien/log4net_demo/tree/master/DotNetCoreConsole_V3 Windows 10 安装部署 ...
- ELK从5.6.3升级到6.3.0总结
ELK从5.6.3升级到6.3.0总结 由于6.3.0默认有es的监控功能,并且我们现在es总是有各种问题,原有的es开源插件head和HQ的监控都不够详细,所以决定升级es集群.我们目前es有5个n ...
随机推荐
- React中多行文本省略不生效原因
在普通的前端项目中,在不考虑兼容问题的时候,可以用以下代码实现: overflow : hidden; text-overflow: ellipsis; display: -webkit-box; - ...
- 运算符 and or ont
运算符 逻辑运算: and 并且的意思. 左右两端的值必须都是真. 运算结果才是真 or 或者的意思. 左右两端有一个是真的. 结果就是真. 全部是假. 结果才能是假 not 非的意思. 原来是假. ...
- QT-简介
前言:Qt是一款强大的跨平台gui(图形界面开发)开发工具. 一.安装说明 Qt安装包: qt-opensource-windows-x86-mingw492-5.6.1-1.exe -------- ...
- centOS 7安装mysql5.6
方法二:官网下载安装mysql-server # wget http://dev.mysql.com/get/mysql-community-release-el7-5.noarch.rpm # rp ...
- 通过配置host,自定义域名让本地访问
最近服务器这块一直由我来维护,我们开发的项目很多域名根本没有解析,而是仅仅配置了host,就可以本地访问服务器了.感觉很有意思,于是乎,打算试一试.结果弄了许久,最后第二天才解决了.把这个艰辛的旅程记 ...
- struts2学习之基础笔记7
第十二章 Struts 2的标记库 1 OGNL简介 Object-Grephic Navigtor Language 图对象导航语言 作用:图对象导航语言是Struts 2标记库中为其相应标记属性进 ...
- 服务端 | Nodejs 学习笔记(一)
Node.js 前言: 2009年面世 nodejs.org 官网 https://www.npmjs.com/ 模块社区 github.com 仓库 stackoverflow.com 问答社区 ...
- child和childNodes的区别
child和childNodes区别: childNodes是标准属性, child是非标准属性 childNodes: 获取节点,不同浏览器表现不同 IE 只获取元素节点 非IE 获取元素节点和文本 ...
- java ScriptEngine 使用 (java运行脚本文件)
转自:http://www.tuicool.com/articles/imEbQbA Java SE 6最引人注目的新功能之一就是内嵌了脚本支持.在默认情况下,Java SE 6只支持JavaScri ...
- webpack 参数1、context: path.resolve 2、path.join('', '..', 'aa') 3、 path.posix.join('static','/aa')
1.context: path.resolve 项目入口路径 2. 3.