
莫烦大大keras的Mnist手写识别(5)----自编码
一、步骤:
导入包和读取数据
数据预处理
编码层和解码层的建立 + 构建模型
编译模型
训练模型
测试模型【只用编码层来画图】
二、代码:
1、导入包和读取数据
#导入相关的包

import numpy as np

np.random.seed(1337)  # for reproducibility

from keras.datasets import mnist

from keras.models import Model #采用通用模型

from keras.layers import Dense, Input #只用到全连接层

import matplotlib.pyplot as plt

#读取数据

(X_train, _), (X_test, y_test) = mnist.load_data()
2、数据预处理:将28*28维度的数据拉成一个向量784,原数据X_train的shape为(60000,28,28),转成x_train(60000,784)。
x_train = X_train.astype('float32') / 255. - 0.5       # minmax_normalized

x_test = X_test.astype('float32') / 255. - 0.5         # minmax_normalized

x_train = X_train.reshape((x_train.shape[0], -1))

x_test = X_test.reshape((x_test.shape[0], -1))

print(x_train.shape) #(60000, 784)

print(x_test.shape) #(10000, 784)

print(X_train.shape)  # (60000, 28, 28)
3、编码层和解码层的建立+构建模型
# in order to plot in a 2D figure

encoding_dim = 2

# this is our input placeholder

input_img = Input(shape=(784,))

# encoder layers编码层

encoded = Dense(128, activation='relu')(input_img)

encoded = Dense(64, activation='relu')(encoded)

encoded = Dense(10, activation='relu')(encoded)

encoder_output = Dense(encoding_dim)(encoded)

# decoder layers解码层

decoded = Dense(10, activation='relu')(encoder_output)

decoded = Dense(64, activation='relu')(decoded)

decoded = Dense(128, activation='relu')(decoded)

decoded = Dense(784, activation='tanh')(decoded)

#构建模型

#包括编码层也包括解码层

autoencoder = Model(input = input_img,output = decoded)

#只包括编码层

encoder = Model(input = input_img,output = encoder_output)
4、编译模型
#编译模型
autoencoder.compile(optimizer='adam', loss='mse')
5、训练模型【编码和解码一起训练】
autoencoder.fit(x_train, x_train,

                epochs=20,

                batch_size=256,

                shuffle=True)
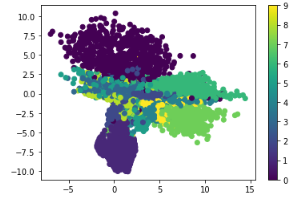
6、测试模型并画图显示【仅用编码来预测2维的特征空间】
encoded_imgs = encoder.predict(x_test)

plt.scatter(encoded_imgs[:, 0], encoded_imgs[:, 1], c=y_test) #c表示颜色维度

plt.colorbar()

plt.show()
莫烦大大keras的Mnist手写识别(5)----自编码的更多相关文章
- tensorflow笔记(四)之MNIST手写识别系列一
tensorflow笔记(四)之MNIST手写识别系列一 版权声明:本文为博主原创文章,转载请指明转载地址 http://www.cnblogs.com/fydeblog/p/7436310.html ...
- tensorflow笔记(五)之MNIST手写识别系列二
tensorflow笔记(五)之MNIST手写识别系列二 版权声明:本文为博主原创文章,转载请指明转载地址 http://www.cnblogs.com/fydeblog/p/7455233.html ...
- win10下通过Anaconda安装TensorFlow-GPU1.3版本,并配置pycharm运行Mnist手写识别程序
折腾了一天半终于装好了win10下的TensorFlow-GPU版,在这里做个记录. 准备安装包: visual studio 2015: Anaconda3-4.2.0-Windows-x86_64 ...
- Tensorflow之基于MNIST手写识别的入门介绍
Tensorflow是当下AI热潮下,最为受欢迎的开源框架.无论是从Github上的fork数量还是star数量,还是从支持的语音,开发资料,社区活跃度等多方面,他当之为superstar. 在前面介 ...
- 使用tensorflow实现mnist手写识别(单层神经网络实现)
import tensorflow as tf import tensorflow.examples.tutorials.mnist.input_data as input_data import n ...
- Tensorflow编程基础之Mnist手写识别实验+关于cross_entropy的理解
好久没有静下心来写点东西了,最近好像又回到了高中时候的状态,休息不好,无法全心学习,恶性循环,现在终于调整的好一点了,听着纯音乐突然非常伤感,那些曾经快乐的大学时光啊,突然又慢慢的一下子出现在了眼前, ...
- Haskell手撸Softmax回归实现MNIST手写识别
Haskell手撸Softmax回归实现MNIST手写识别 前言 初学Haskell,看的书是Learn You a Haskell for Great Good, 才刚看到Making Our Ow ...
- [机器学习] keras:MNIST手写数字体识别(DeepLearning 的 HelloWord程序)
深度学习界的Hello Word程序:MNIST手写数字体识别 learn from(仍然是李宏毅老师<机器学习>课程):http://speech.ee.ntu.edu.tw/~tlka ...
- 基于tensorflow的MNIST手写识别
这个例子,是学习tensorflow的人员通常会用到的,也是基本的学习曲线中的一环.我也是! 这个例子很简单,这里,就是简单的说下,不同的tensorflow版本,相关的接口函数,可能会有不一样哟.在 ...
随机推荐
- ERROR: mount point </.alt.rootd3_EISMar14/opt/oracle/product/10.2> is already in use
在给solaris系统升级的时候,用lu方法遇到下面的错误. -bash-3.2# lumount rootd3_EISMar14 ERROR: mount point </.alt.rootd ...
- /usr/bin/ld: cannot find -lltdl collect2: ld returned 1 exit status make: *** [sapi/cgi/php-cgi] Err
/usr/bin/ld: cannot find -lltdl collect2: ld returned 1 exit status make: *** [sapi/cgi/php-cgi] Err ...
- clCreateCommandQueue': was declared deprecated
今天在配置opencl的开发环境.測试用例时,用的是intel的sdk开发包.遇到了这个问题: clCreateCommandQueue': was declared deprecated 也就是说这 ...
- C# WINFORM 局域网PING 工具(技术改变世界-cnblog)
WINFORM 局域网PING 工具(技术改变世界-cnblog) 需求: 1.实时更新 日期时间 2.可以ping多个IP 地址,必须判断 IP地址的正确性,不能为广播地址 3.对ping结果的显示 ...
- Codeforces--630J--Divisibility(公倍数)
J - Divisibility Crawling in process... Crawling failed Time Limit:500MS Memory Limit:65536KB ...
- SQL 导出表数据存储过程
SET ANSI_NULLS ON GO SET QUOTED_IDENTIFIER ON GO -- ============================================= -- ...
- bzoj 1053 [ HAOI 2007 ] 反素数ant ——暴搜
题目:https://www.lydsy.com/JudgeOnline/problem.php?id=1053 试图打表找规律,但无果... 看TJ了,暴搜: 注意参数 w 是 long long. ...
- C语言程序创建文件
#include <stdio.h>#include <stdlib.h>int main() { FILE *fp;if((fp=fopen("g:\\a.txt& ...
- thinkphp session db配置
这篇文章主要介绍了ThinkPHP实现将SESSION存入MYSQL的方法,需要的朋友可以参考下 本文以实例讲解了ThinkPHP实现将SESSION存入MYSQL的方法,所采用的运行环境是Thi ...
- Docker容器的使用和连接
在上一篇文章<Docker从安装部署到Hello World>介绍了如何在CentOS7上安装Docker.这篇文章主要介绍一下Docker容器的使用和连接. vDocker 容器使用 1 ...