
iOS密码框的实现方式
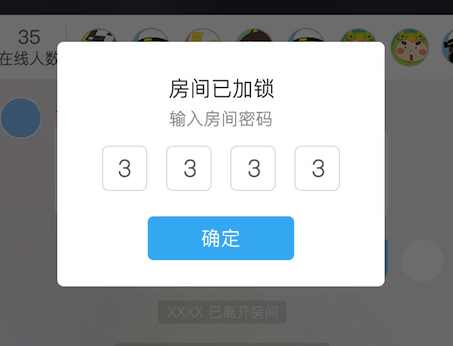
// IDSGameRoomSecretView.h
//
// Created by levi.duan on 2017/7/18.
// Copyright © 2017年 Near. All rights reserved.
//
#import <UIKit/UIKit.h>
#import "BaseViewController.h"
typedefvoid(^handleInputPasswordBlock)(NSString *password);
@interface IDSGameRoomSecretView : UIView
- (instancetype)initWithPasswordCallBack:(handleInputPasswordBlock)passwordCallback;
/**
弹出说明视图
*/
- (void)showInputSecretView;
@end
// IDSGameRoomSecretView.m
// Near
//
// Created by levi.duan on 2017/7/18.
// Copyright © 2017年 Near. All rights reserved.
//
#import "IDSGameRoomSecretView.h"
#import "PZXVerificationTextField.h"
@interfaceIDSGameRoomSecretView()<UIGestureRecognizerDelegate,UITextFieldDelegate,PZXTextFieldDelegate>
@property (nonatomic,strong) UILabel *titleLabel;
@property (nonatomic,strong) UILabel *subtitleLabel;
@property (nonatomic,strong) UITextField *secretTextField;
@property (nonatomic,strong) UIButton *gameRoomBtn;
@property (nonatomic, strong) UIView *secretRoomView;
@property (nonatomic, strong) NSMutableArray *textFieldArray;
@property (nonatomic , copy) handleInputPasswordBlock onHandlePasswordCallBack;
@end
@implementation IDSGameRoomSecretView
- (instancetype)initWithPasswordCallBack:(handleInputPasswordBlock)passwordCallback
{
if (self = [superinit]) {
self.onHandlePasswordCallBack = passwordCallback;
}
returnself;
}
- (void)showInputSecretView
{
self.backgroundColor = [UIColorcolorWithRed:0green:0blue:0alpha:0.7];
[[AppDelegatemainWindow] addSubview:self];
[self.inputViewbecomeFirstResponder];
self.frame = CGRectMake(0, 0, SCREEN_WIDTH, SCREEN_HEIGHT);
UITapGestureRecognizer *selfRecognizer = [[UITapGestureRecognizeralloc] initWithTarget:selfaction:@selector(removeView)];
self.userInteractionEnabled = YES;
[selfaddGestureRecognizer:selfRecognizer];
selfRecognizer.delegate = self;
self.secretRoomView = [[UIViewalloc] initWithFrame:CGRectMake(0, 0, 510/2, 380/2)];
self.secretRoomView.centerY = SCREEN_HEIGHT/2;
self.secretRoomView.centerX = SCREEN_WIDTH/2;
self.secretRoomView.backgroundColor = [UIColorwhiteColor];
self.secretRoomView.centerY = SCREEN_HEIGHT/2-50;
_titleLabel = [[UILabelalloc] initWithFrame:CGRectMake(0, 50/2, 0, 0)];
_titleLabel.text = @"房间已加锁";
_titleLabel.textColor = NF_Color_C3;
_titleLabel.font = [UIFontsystemFontOfSize:Near_Final_Font_T6];
[_titleLabelsizeToFit];
_titleLabel.centerX = self.secretRoomView.frame.size.width/2;
[self.secretRoomViewaddSubview:_titleLabel];
_subtitleLabel = [[UILabelalloc] initWithFrame:CGRectMake(0,CGRectGetMaxY(self.titleLabel.frame)+10, 0, 0)];
_subtitleLabel.text = @"输入房间密码";
_subtitleLabel.textColor = NF_Color_C10;
_subtitleLabel.font = [UIFontsystemFontOfSize:Near_Final_Font_T9];
[_subtitleLabelsizeToFit];
_subtitleLabel.centerX = self.secretRoomView.frame.size.width/2;
[self.secretRoomViewaddSubview:_subtitleLabel];
self.textFieldArray = [NSMutableArrayarray];
NSArray *views = [selfsubviews];
for (UITextField *tf in views) {
[tf removeFromSuperview];
}
for (int i=0;i<4;++i) {
PZXVerificationTextField *tf = [[PZXVerificationTextFieldalloc] initWithFrame:CGRectMake(70/2+i*70/2+15*i, CGRectGetMaxY(self.subtitleLabel.frame)+15, 70/2, 70/2)];
[tf setFont:[UIFontsystemFontOfSize:Near_Final_Font_T5]];
[tf setTextColor:NF_Color_C4];
tf.backgroundColor = [UIColorclearColor];
tf.layer.borderWidth = 0.5;
tf.layer.borderColor = NF_Color_C9.CGColor;
tf.layer.cornerRadius = 5.f;
tf.layer.masksToBounds = YES;
tf.tintColor =[UIColorclearColor];
tf.tag = 100+i;
tf.keyboardType = UIKeyboardTypeNumberPad;
tf.textAlignment = NSTextAlignmentCenter;
tf.delegate = self;
tf.pzx_delegate = self;
[self.secretRoomViewaddSubview:tf];
[self.textFieldArraycl_addObject:tf];
[tf becomeFirstResponder];
}
self.gameRoomBtn = [[UIButtonalloc] initWithFrame:CGRectMake(0, 270/2, 228/2, 68/2)];
self.gameRoomBtn.centerX = self.secretRoomView.frame.size.width/2;
[self.gameRoomBtnsetTitle:@"确定"forState:UIControlStateNormal];
[self.gameRoomBtn.titleLabelsetFont:[UIFontsystemFontOfSize:Near_Final_Font_T5]];
[self.gameRoomBtn.titleLabelsetTextColor:NF_Color_C1];
self.gameRoomBtn.backgroundColor = NF_Color_C27;
[self.gameRoomBtnaddTarget:selfaction:@selector(interRoomVoid) forControlEvents:UIControlEventTouchUpInside];
self.gameRoomBtn.layer.cornerRadius = 5.0f;
self.gameRoomBtn.layer.masksToBounds = YES;
[self.secretRoomViewaddSubview:self.gameRoomBtn];
[selfaddSubview:self.secretRoomView];
self.secretRoomView.layer.cornerRadius = 10.f;
self.secretRoomView.layer.masksToBounds = YES;
}
#pragma mark - Public Methods
/*
- (void)showDalog
{
[[AppDelegate mainWindow] addSubview:self];
[self.inputView becomeFirstResponder];
}
*/
- (void)removeView
{
[selfremoveFromSuperview];
}
-(BOOL)textField:(UITextField *)textField shouldChangeCharactersInRange:(NSRange)range replacementString:(NSString *)string{
textField.text = string;
if (textField.text.length > 0) {//防止退格第一个的时候往后跳一格
if (textField.tag< [[_textFieldArraylastObject] tag]) {
UITextField *newTF = (UITextField *)[selfviewWithTag:textField.tag+1];
[newTF becomeFirstResponder];
}
}
returnNO;
}
//点击退格键的代理
#pragma mark - PZXTextFieldDelegate
-(void)PZXTextFieldDeleteBackward:(PZXVerificationTextField *)textField{
if (textField.tag > [[_textFieldArrayfirstObject] tag]) {
UITextField *newTF = (UITextField *)[selfviewWithTag:textField.tag-1];
newTF.text = @"";
[newTF becomeFirstResponder];
}
}
- (void)interRoomVoid
{
[selfgetVertificationCode];
}
-(void)getVertificationCode{ //获取验证码方法
NSString *str = [NSStringstring];
for (int i = 0; i<_textFieldArray.count; i++) {
str = [str stringByAppendingString:[NSStringstringWithFormat:@"%@",(UITextField *)[_textFieldArray[i] text]]];
}
if (self.onHandlePasswordCallBack) {
self.onHandlePasswordCallBack(str);
}
[selfremoveView];
}
-(void)touchesBegan:(NSSet<UITouch *> *)touches withEvent:(UIEvent *)event{
for (UITextField *tf inself.textFieldArray) {
[tf resignFirstResponder];
}
}
- (BOOL)gestureRecognizer:(UIGestureRecognizer *)gestureRecognizer shouldReceiveTouch:(UITouch *)touch
{
if ([touch.viewisDescendantOfView:self.secretRoomView]) {
returnNO;
}
returnYES;
}
@end
// PZXVerificationTextField.h
// Near
//
// Created by levi.duan on 2017/7/19.
// Copyright © 2017年 Near. All rights reserved.
//
#import <UIKit/UIKit.h>
@classPZXVerificationTextField;//要class一下不然代理里面无法识别
@protocol PZXTextFieldDelegate <NSObject>
- (void)PZXTextFieldDeleteBackward:(PZXVerificationTextField *)textField;
@end
@interface PZXVerificationTextField : UITextField
@property (nonatomic, assign)id<PZXTextFieldDelegate> pzx_delegate;
@end
// PZXVerificationTextField.m
// Near
//
// Created by levi.duan on 2017/7/19.
// Copyright © 2017年 Near. All rights reserved.
//
#import "PZXVerificationTextField.h"
@implementation PZXVerificationTextField
-(void)deleteBackward{
[superdeleteBackward];
if ([self.pzx_delegaterespondsToSelector:@selector(PZXTextFieldDeleteBackward:)]) {
[self.pzx_delegatePZXTextFieldDeleteBackward:self];
}
}
@end
iOS密码框的实现方式的更多相关文章
- iOS密码框实现(二)取消确定按钮
由于将确定按钮去掉了,所以需要重新修改下代码,当输入第四个数字时,自动进入房间. iOS 密码框效果图: 实现方式: 首先声明一个block初始化方法,因为这只是个框框,并不需要处理网 ...
- 表单form的属性,单行文本框、密码框、单选多选按钮
基础表单结构: <body> <h1> <hr /> <form action="" name="myFrom" en ...
- iOS弹框
IOS 弹框 如果直接弹出一个自定义的视图 可以选用第三方: MJPopup 弹出: if(!bandview) { bandview=[[[NSBundle mainBundle]loadNibNa ...
- WPF文本框密码框添加水印效果
WPF文本框密码框添加水印效果 来源: 阅读:559 时间:2014-12-31 分享: 0 按照惯例,先看下效果 文本框水印 文本框水印相对简单,不需要重写模板,仅仅需要一个VisualBrush ...
- [Asp.net]说说密码框和只读框
作者:Wolfy出处:http://www.cnblogs.com/wolf-sun/ 引言 最近负责了一个公司的小项目,从前台到后代,都是自己搞的,为一个客户弄一个信息管理的小系统,虽然对界面什么的 ...
- Qt之密码框不可选中、复制、粘贴、无右键菜单等
简述 在做用户登录.修改密码的时候,往往会用到密码框,其中一些功能要求与普通的输入框不同,例如:不能选中.复制.粘贴.无右键菜单等功能,当然设置密码不可见是必须的! 下面介绍两种方式来实现相同的效果. ...
- WPF 之 文本框及密码框添加水印效果
1.文本框添加水印效果 文本框水印相对简单,不需要重写模板,仅仅需要一个 VisualBrush 和触发器验证一下Text是否为空即可. <TextBox Name="txtSerac ...
- 【Qt】Qt之密码框不可选中、复制、粘贴、无右键菜单等【转】
简述 在做用户登录.修改密码的时候,往往会用到密码框,其中一些功能要求与普通的输入框不同,例如:不能选中.复制.粘贴.无右键菜单等功能,当然设置密码不可见是必须的! 下面介绍两种方式来实现相同的效果. ...
- Ios 弹框 MJPopup,KxMenu
IOS 弹框 如果直接弹出一个自定义的视图 可以选用第三方: MJPopup 弹出: if(!bandview) { bandview=[[[NSBundle mainBundle]loadNibNa ...
随机推荐
- 深入浅出MFC:对话框消息路由
[appmodul.cpp] extern "C" int WINAPI _tWinMain(HINSTANCE hInstance, HINSTANCE hPrevInstanc ...
- Objective-C的基础数据结构
类的数据结构 Class(指针) ? 1 2 3 4 5 6 7 8 9 10 11 12 13 14 15 16 17 18 19 20 21 22 23 typedef struct objc_c ...
- Mac下cocos2dx3.1用Cocos IDE写的Lua binding篇01
本人Lua新手,写着玩玩. 新建一个模版project. 一.改动main.lua require "Cocos2d" require "Cocos2dConstants ...
- 在.net core的web项目中使用kindeditor
本项目是一个.net core的mvc项目 1.下载kindeditor 4.1.11 解压后将文件夹置于 wwwroot目录下,如图: 2.在HomeController的Index控制器对应的in ...
- uwp - 解决使用EntityFramework时报错“unable to load dll 'sqlite3':the specified module could not be found”
在使用uwp的ef过程中碰到一万个问题快折腾死我了,好在最后终于解决掉所有问题,但愿如此,因为在这之前先后发生不同的报错,不知道后面还会碰到新的问题不. 其中一个问题是这样的,生成能正常生成,但是启动 ...
- c#调api串口通讯
原文:c#调api串口通讯 在调试ICU通信设备的时候,由于串口通信老出现故障,所以就怀疑CF实现的SerialPort类是否有问题,所以最后决定用纯API函数实现串口读写. 先从网上搜索相关代码(关 ...
- Monthly Expense
Problem Description Farmer John is an astounding accounting wizard and has realized he might run out ...
- 知乎C++问题整理
如何平衡性能,合理选择C++STL集装箱? ANSER: 首先要搞清楚,假设STL问题,那么问题出在哪里? STL能够简单地觉得就是算法+数据结构,全部容器的算法选择和实现都是经过精心设计和严格測试的 ...
- <PC>HP网络共享并创建一个热点问题
郁闷了一年多 你不能使用本地连接的开放热点 网上说的网卡驱动程序,系统设置等.,我们解决不了 原本BIOS节能设置错误 导致在连续主动对自己的有线无线功能被禁用 该LAN\WLAN Switchin ...
- Node.js && Angular && TypeScript 环境安装与更新
安装 Node.js 下载并安装Node.js Angular 执行命令 npm install -g @angular/cli 参考资料: angular quickstart TypeScript ...