使用TensorFlow v2.0构建多层感知器
使用TensorFlow v2.0构建一个两层隐藏层完全连接的神经网络(多层感知器)。
这个例子使用低级方法来更好地理解构建神经网络和训练过程背后的所有机制。
神经网络概述

MNIST 数据集概述
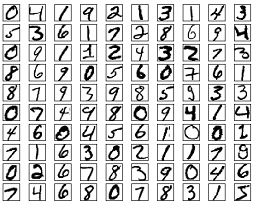
此示例使用手写数字的MNIST数据集。该数据集包含60,000个用于训练的示例和10,000个用于测试的示例。这些数字已经过尺寸标准化并位于图像中心,图像是固定大小(28x28像素),值为0到255。
在此示例中,每个图像将转换为float32并归一化为[0,1],并展平为784个特征的一维数组(28 * 28)
更多信息请查看链接: http://yann.lecun.com/exdb/mnist/
from __future__ import absolute_import, division, print_function

import tensorflow as tf

import numpy as np
# MNIST 数据集参数

num_classes = 10 # 所有类别(数字 0-9)

num_features = 784 # 数据特征数目 (图像形状: 28*28)

# 训练参数

learning_rate = 0.001

training_steps = 3000

batch_size = 256

display_step = 100

# 网络参数

n_hidden_1 = 128 # 第一层隐含层神经元的数目

n_hidden_2 = 256 # 第二层隐含层神经元的数目
# 准备MNIST数据

from tensorflow.keras.datasets import mnist

(x_train, y_train), (x_test, y_test) = mnist.load_data()

# 转化为float32

x_train, x_test = np.array(x_train, np.float32), np.array(x_test, np.float32)

# 将每张图像展平为具有784个特征的一维向量(28 * 28)

x_train, x_test = x_train.reshape([-1, num_features]), x_test.reshape([-1, num_features])

# 将图像值从[0,255]归一化到[0,1]

x_train, x_test = x_train / 255., x_test / 255.
# 使用tf.data API对数据进行随机排序和批处理

train_data = tf.data.Dataset.from_tensor_slices((x_train, y_train))

train_data = train_data.repeat().shuffle(5000).batch(batch_size).prefetch(1)
# 存储层的权重和偏置

# 随机值生成器初始化权重

random_normal = tf.initializers.RandomNormal()

weights = {

    'h1': tf.Variable(random_normal([num_features, n_hidden_1])),

    'h2': tf.Variable(random_normal([n_hidden_1, n_hidden_2])),

    'out': tf.Variable(random_normal([n_hidden_2, num_classes]))

}

biases = {

    'b1': tf.Variable(tf.zeros([n_hidden_1])),

    'b2': tf.Variable(tf.zeros([n_hidden_2])),

    'out': tf.Variable(tf.zeros([num_classes]))

}
# 创建模型

def neural_net(x):

    # Hidden fully connected layer with 128 neurons.

    # 具有128个神经元的隐含完全连接层

    layer_1 = tf.add(tf.matmul(x, weights['h1']), biases['b1'])

    # Apply sigmoid to layer_1 output for non-linearity.

    # 将sigmoid用于layer_1输出以获得非线性

    layer_1 = tf.nn.sigmoid(layer_1)

    # 具有128个神经元的隐含完全连接层

    layer_2 = tf.add(tf.matmul(layer_1, weights['h2']), biases['b2'])

    # 将sigmoid用于layer_2输出以获得非线性

    layer_2 = tf.nn.sigmoid(layer_2)

    # 输出完全连接层,每一个神经元代表一个类别

    out_layer = tf.matmul(layer_2, weights['out'])   biases['out']

    # 应用softmax将输出标准化为概率分布

    return tf.nn.softmax(out_layer)
# 交叉熵损失函数

def cross_entropy(y_pred, y_true):

    # 将标签编码为独热向量

    y_true = tf.one_hot(y_true, depth=num_classes)

    # 将预测值限制在一个范围之内以避免log(0)错误

    y_pred = tf.clip_by_value(y_pred, 1e-9, 1.)

    # 计算交叉熵

    return tf.reduce_mean(-tf.reduce_sum(y_true * tf.math.log(y_pred)))

#  准确率评估

def accuracy(y_pred, y_true):

     # 预测类是预测向量中最高分的索引(即argmax)

    correct_prediction = tf.equal(tf.argmax(y_pred, 1), tf.cast(y_true, tf.int64))

    return tf.reduce_mean(tf.cast(correct_prediction, tf.float32), axis=-1)

# 随机梯度下降优化器

optimizer = tf.optimizers.SGD(learning_rate)
# 优化过程

def run_optimization(x, y):

    # 将计算封装在GradientTape中以实现自动微分

    with tf.GradientTape() as g:

        pred = neural_net(x)

        loss = cross_entropy(pred, y)

    # 要更新的变量,即可训练的变量

    trainable_variables = weights.values()   biases.values()

    # 计算梯度

    gradients = g.gradient(loss, trainable_variables)

    # 按gradients更新 W 和 b

    optimizer.apply_gradients(zip(gradients, trainable_variables))
# 针对给定步骤数进行训练

for step, (batch_x, batch_y) in enumerate(train_data.take(training_steps), 1):

    # 运行优化以更新W和b值

    run_optimization(batch_x, batch_y)

    if step % display_step == 0:

        pred = neural_net(batch_x)

        loss = cross_entropy(pred, batch_y)

        acc = accuracy(pred, batch_y)

        print("step: %i, loss: %f, accuracy: %f" % (step, loss, acc))
output:
step: 100, loss: 567.292969, accuracy: 0.136719

step: 200, loss: 398.614929, accuracy: 0.562500

step: 300, loss: 226.743774, accuracy: 0.753906

step: 400, loss: 193.384521, accuracy: 0.777344

step: 500, loss: 138.649963, accuracy: 0.886719

step: 600, loss: 109.713669, accuracy: 0.898438

step: 700, loss: 90.397217, accuracy: 0.906250

step: 800, loss: 104.545380, accuracy: 0.894531

step: 900, loss: 94.204697, accuracy: 0.890625

step: 1000, loss: 81.660645, accuracy: 0.906250

step: 1100, loss: 81.237137, accuracy: 0.902344

step: 1200, loss: 65.776703, accuracy: 0.925781

step: 1300, loss: 94.195862, accuracy: 0.910156

step: 1400, loss: 79.425507, accuracy: 0.917969

step: 1500, loss: 93.508163, accuracy: 0.914062

step: 1600, loss: 88.912506, accuracy: 0.917969

step: 1700, loss: 79.033607, accuracy: 0.929688

step: 1800, loss: 65.788315, accuracy: 0.898438

step: 1900, loss: 73.462387, accuracy: 0.937500

step: 2000, loss: 59.309540, accuracy: 0.917969

step: 2100, loss: 67.014008, accuracy: 0.917969

step: 2200, loss: 48.297115, accuracy: 0.949219

step: 2300, loss: 64.523148, accuracy: 0.910156

step: 2400, loss: 72.989517, accuracy: 0.925781

step: 2500, loss: 57.588585, accuracy: 0.929688

step: 2600, loss: 44.957100, accuracy: 0.960938

step: 2700, loss: 59.788242, accuracy: 0.937500

step: 2800, loss: 63.581337, accuracy: 0.937500

step: 2900, loss: 53.471252, accuracy: 0.941406

step: 3000, loss: 43.869728, accuracy: 0.949219
# 在验证集上测试模型

pred = neural_net(x_test)

print("Test Accuracy: %f" % accuracy(pred, y_test))
# 可视化预测

import matplotlib.pyplot as plt

# 从验证集中预测5张图像

n_images = 5

test_images = x_test[:n_images]

predictions = neural_net(test_images)

# 显示图片和模型预测结果

for i in range(n_images):

    plt.imshow(np.reshape(test_images[i], [28, 28]), cmap='gray')

    plt.show()

    print("Model prediction: %i" % np.argmax(predictions.numpy()[i]))
output:
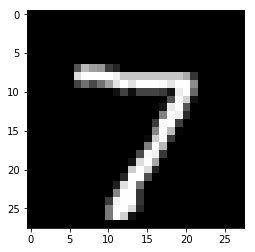
Model prediction: 7
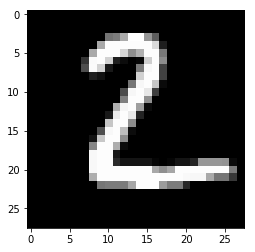
Model prediction:2
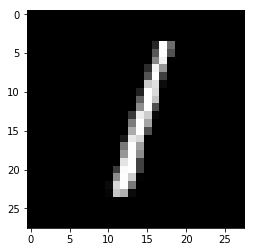
Model prediction: 1
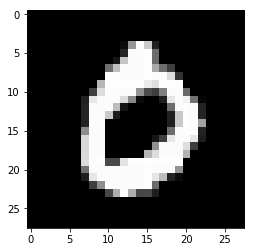
Model prediction: 0
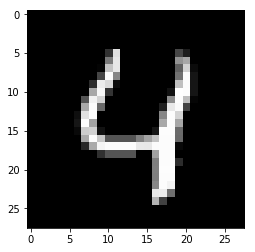
Model prediction: 4
欢迎关注磐创博客资源汇总站:
http://docs.panchuang.net/
欢迎关注PyTorch官方中文教程站:
http://pytorch.panchuang.net/
使用TensorFlow v2.0构建多层感知器的更多相关文章
- 使用TensorFlow v2.0构建卷积神经网络
使用TensorFlow v2.0构建卷积神经网络. 这个例子使用低级方法来更好地理解构建卷积神经网络和训练过程背后的所有机制. CNN 概述 MNIST 数据集概述 此示例使用手写数字的MNIST数 ...
- TensorFlow—多层感知器—MNIST手写数字识别
1 import tensorflow as tf import tensorflow.examples.tutorials.mnist.input_data as input_data import ...
- tensorflow学习笔记——自编码器及多层感知器
1,自编码器简介 传统机器学习任务很大程度上依赖于好的特征工程,比如对数值型,日期时间型,种类型等特征的提取.特征工程往往是非常耗时耗力的,在图像,语音和视频中提取到有效的特征就更难了,工程师必须在这 ...
- TFboy养成记 多层感知器 MLP
内容总结与莫烦的视频. 这里多层感知器代码写的是一个简单的三层神经网络,输入层,隐藏层,输出层.代码的目的是你和一个二次曲线.同时,为了保证数据的自然,添加了mean为0,steddv为0.05的噪声 ...
- 【TensorFlow-windows】(三) 多层感知器进行手写数字识别(mnist)
主要内容: 1.基于多层感知器的mnist手写数字识别(代码注释) 2.该实现中的函数总结 平台: 1.windows 10 64位 2.Anaconda3-4.2.0-Windows-x86_64. ...
- "多层感知器"--MLP神经网络算法
提到人工智能(Artificial Intelligence,AI),大家都不会陌生,在现今行业领起风潮,各行各业无不趋之若鹜,作为技术使用者,到底什么是AI,我们要有自己的理解. 目前,在人工智能中 ...
- TensorFlow v2.0实现Word2Vec算法
使用TensorFlow v2.0实现Word2Vec算法计算单词的向量表示,这个例子是使用一小部分维基百科文章来训练的. 更多信息请查看论文: Mikolov, Tomas et al. " ...
- 4.2tensorflow多层感知器MLP识别手写数字最易懂实例代码
自己开发了一个股票智能分析软件,功能很强大,需要的点击下面的链接获取: https://www.cnblogs.com/bclshuai/p/11380657.html 1.1 多层感知器MLP(m ...
- Spark Multilayer perceptron classifier (MLPC)多层感知器分类器
多层感知器分类器(MLPC)是基于前馈人工神经网络(ANN)的分类器. MLPC由多个节点层组成. 每个层完全连接到网络中的下一层. 输入层中的节点表示输入数据. 所有其他节点,通过输入与节点的权重w ...
随机推荐
- Leetcode 206题 反转链表(Reverse Linked List)Java语言求解
题目描述: 反转一个单链表. 示例: 输入: 1->2->3->4->5->NULL 输出: 5->4->3->2->1->NULL 迭代解 ...
- Mac 常见命令行
1. unrar解压rar文件 1.1 安装命令:brew install unrar 1.2 解压文件:unrar x test.rar 2. 创建文件夹:mkdir 文件夹名 3. 删除文件夹: ...
- 我的webpack学习笔记(二)
前言 上一篇文章我们讲了多页面js的打包,本篇文章我们继续scss的打包. 多页面css单独打包 首先,我们css编写采用的是sass,所以我们先来安装sass-loader以及可以用到的依赖 $ n ...
- 【Python3】HTML基础
[web前端]HTML基础 一.BS模式 BS(Browser-Server)模式:顾名思义为浏览器-服务器的意思,对比的话类似我们PC上面浏览器使用的产品即为BS模式产品,例如google doc. ...
- JS基础入门篇(二十)—事件对象以及案例(二)
案例一.点击按钮,选中input中的全部内容 select()方法:选中全部. 点击按钮选中输入框中的内容!!!! <!DOCTYPE html> <html lang=" ...
- 前端每日实战:31# 视频演示如何利用 CSS 的动画原理,创作一个乒乓球对打动画
效果预览 按下右侧的"点击预览"按钮可以在当前页面预览,点击链接可以全屏预览. https://codepen.io/comehope/pen/rvgLzK 可交互视频教程 此视频 ...
- 2020年,大厂常问iOS面试题汇总!
Runloop & KVO runloop app如何接收到触摸事件的 为什么只有主线程的runloop是开启的 为什么只在主线程刷新UI PerformSelector和runloop的关系 ...
- linux 安装 memcached
1.Linux系统安装memcached,首先要先安装libevent库. yum install libevent libevent-deve 2.安装memcached yum install - ...
- 05 mapreduce快速入门
统计HDFS的/wordcount/input/a.txt文件中的每个单词出现的次数——wordcount package cn.oracle.core; import java.io.IOExcep ...
- 1,Linux(CentOS)中的基本配置
1,hostname(主机名) 查看主机名:hostname 临时修改主机名:hostname hadoop1 永久修改主机名:vi etc/sysconfig/network : [NETWORK ...