Android手机令牌教程
Android手机令牌教程
"沉下心,你不再是小孩子了.多看书,学做人"-JeffLi告诉自己
Written In The Font
花了一个天一夜,搞了这个小东西-安卓手机令牌.事实上,我这边分享,看网上东西也没多少.这就分享了.由于这个会给公司用.有些东西就不方便透露了.希望大家体谅.还有假设须要找我沟通,加群吧!在页面中会有三处出现.
Android手机令牌
- 界面
- java 与 C#服务端交互
- 倒计时和顺计时技术
- 口令生成
Content
android 也不难学,承认花了时间1/2 花在界面上.界面须要经验的积累.和大哥有说有笑搞着界面,我们浩二有木有.要吐槽的能够吐槽,要啥的说啥.
界面
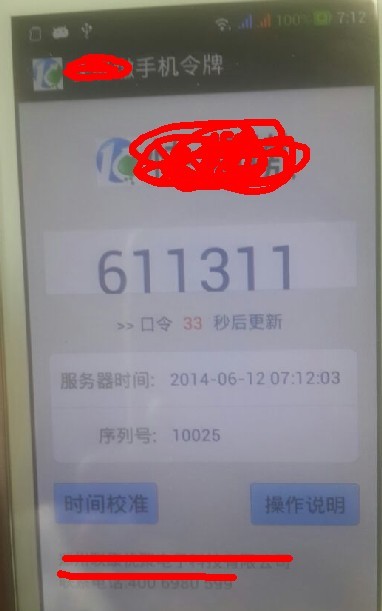
代码:

<RelativeLayout xmlns:android="http://schemas.android.com/apk/res/android"

    xmlns:tools="http://schemas.android.com/tools"

    android:layout_width="match_parent"

    android:layout_height="match_parent"

    android:background="@drawable/my_bg"

    android:gravity="center_horizontal"

    android:paddingBottom="@dimen/activity_vertical_margin"

    android:paddingLeft="@dimen/activity_horizontal_margin"

    android:paddingRight="@dimen/activity_horizontal_margin"

    android:paddingTop="@dimen/activity_vertical_margin"

    tools:context=".MainActivity" >

    <LinearLayout

        android:id="@+id/activity_contact_li_title"

        android:layout_width="fill_parent"

        android:layout_height="wrap_content"

        android:focusable="true"

        android:layout_marginTop="10dp"

        android:gravity="center">

        <ImageView

            android:id="@+id/imageView1"

            android:layout_width="wrap_content"

            android:layout_height="wrap_content"

            android:src="@drawable/ic_launcher" />

        <TextView

            android:id="@+id/textView3"

            android:layout_width="wrap_content"

            android:layout_height="wrap_content"

            android:text="***"

            android:textAppearance="?android:attr/textAppearanceMedium"

            android:textSize="40sp" />

    </LinearLayout>

    <TextView

        android:id="@+id/textView5"

        android:layout_width="wrap_content"

        android:layout_height="wrap_content"

        android:layout_alignParentBottom="true"

        android:layout_marginBottom="14dp"

        android:text="联系电话:" />

    <TextView

        android:id="@+id/textView1"

        android:layout_width="wrap_content"

        android:layout_height="wrap_content"

        android:layout_above="@+id/textView5"

        android:layout_alignLeft="@+id/textView5"

        android:text="***有限公司 " />

    <RelativeLayout

        android:id="@+id/activity_contact_li_editphone"

        android:layout_width="fill_parent"

        android:layout_height="wrap_content"

        android:layout_above="@+id/btnOperatorRemark"

        android:layout_alignLeft="@+id/btnTime"

        android:layout_marginBottom="19dp"

        android:background="@drawable/table_below_bg"

        android:focusable="true"

        android:gravity="center_vertical" >

        <LinearLayout

            android:id="@+id/LinearLayout01"

            android:layout_width="fill_parent"

            android:layout_height="wrap_content"

            android:layout_alignParentLeft="true"

            android:layout_alignParentTop="true"

            android:background="@drawable/table_below_bg"

            android:focusable="true"

            android:gravity="center_vertical" >

            <TextView

                android:layout_width="wrap_content"

                android:layout_height="wrap_content"

                android:layout_centerVertical="true"

                android:layout_marginLeft="10.0dip"

                android:duplicateParentState="true"

                android:text="  序列号:"

                android:textColor="@color/listitem_gray"

                android:textSize="15sp"

                android:textStyle="bold" />

            <TextView

                android:id="@+id/textView4"

                android:layout_width="wrap_content"

                android:layout_height="wrap_content"

                android:layout_marginLeft="14dip"

                android:layout_marginRight="10.0dip"

                android:layout_weight="1"

                android:duplicateParentState="true"

                android:textColor="@color/author_text"

                android:textSize="14sp" />

        </LinearLayout>

    </RelativeLayout>

    <LinearLayout

        android:id="@+id/activity_contact_li_mobilephone"

        android:layout_width="fill_parent"

        android:layout_height="wrap_content"

        android:layout_above="@+id/activity_contact_li_editphone"

        android:layout_alignLeft="@+id/activity_contact_li_editphone"

        android:background="@drawable/table_above_bg"

        android:focusable="true"

        android:gravity="center_vertical" >

        <TextView

            android:layout_width="wrap_content"

            android:layout_height="wrap_content"

            android:layout_centerVertical="true"

            android:layout_marginLeft="10.0dip"

            android:duplicateParentState="true"

            android:text="server时间:"

            android:textColor="@color/listitem_gray"

            android:textSize="15sp"

            android:textStyle="bold" />

        <TextView

            android:id="@+id/textView2"

            android:layout_width="wrap_content"

            android:layout_height="wrap_content"

            android:layout_marginLeft="14dip"

            android:layout_marginRight="10.0dip"

            android:layout_weight="1"

            android:duplicateParentState="true"

            android:text=""

            android:textColor="@color/author_text"

            android:textSize="14sp" />

    </LinearLayout>

    <Button

        android:id="@+id/btnOperatorRemark"

        android:layout_width="100dp"

        android:layout_height="40dp"

        android:layout_alignRight="@+id/activity_contact_li_editphone"

        android:layout_alignTop="@+id/btnTime"

        android:background="@drawable/login_btn_selector"

        android:text="操作说明" />

    <Button

        android:id="@+id/btnTime"

        android:layout_width="100dp"

        android:layout_height="40dp"

        android:layout_above="@+id/textView1"

        android:layout_alignLeft="@+id/textView1"

        android:layout_marginBottom="24dp"

        android:background="@drawable/login_btn_selector"

        android:text="时间校准"

        android:textSize="18sp" />

    <LinearLayout

        android:id="@+id/activity_contact_li_mobilephone"

        android:layout_width="fill_parent"

        android:layout_height="wrap_content"

        android:layout_marginTop="30dp"

        android:layout_below="@+id/activity_contact_li_title"

        android:background="@drawable/table_mid_bg"

        android:focusable="true"

        android:gravity="center_vertical" >

        <TextView

            android:id="@+id/number"

            android:layout_width="match_parent"

            android:layout_height="60dp"

            android:duplicateParentState="true"

            android:gravity="center"

            android:text="123456"

            android:textColor="@color/author_text"

            android:textScaleX="1.2"

            android:textSize="40sp" />

    </LinearLayout>

    <LinearLayout

        android:id="@+id/activity_contact_li_times"

        android:layout_width="fill_parent"

        android:layout_height="wrap_content"

        android:layout_alignLeft="@+id/activity_contact_li_mobilephone"

        android:layout_below="@+id/activity_contact_li_mobilephone"

        android:layout_marginTop="17dp"

        android:focusable="true"

        android:gravity="center" >

        <TextView

            android:id="@+id/textView6"

            android:layout_width="wrap_content"

            android:layout_height="wrap_content"

            android:layout_marginRight="5dp"

            android:text=">> 口令 "

            android:textColor="@color/listitem_blue" />

        <TextView

            android:id="@+id/textView7"

            android:layout_width="wrap_content"

            android:layout_height="wrap_content"

            android:layout_toLeftOf="@+id/textView8"

            android:text="22"

            android:textColor="@color/red" />

        <TextView

            android:id="@+id/textView8"

            android:layout_width="wrap_content"

            android:layout_height="wrap_content"

            android:layout_marginLeft="5dp"

            android:text=" 秒后更新"

            android:textColor="@color/listitem_blue" />

    </LinearLayout>

</RelativeLayout>
java 与 C#服务端交互
这样的东西 一抓一大把,我这边简单就用了下ksoap2-android-assembly-2.4-jar-with-dependencies.jar,发现交互非常easy,url call下然后 调用方法返回值.所以这边代码:
    private String getDateTime() throws Exception {

        // UIHelper.ToastMessage(MainActivity.this, "进去");

        SoapObject rpc = new SoapObject(NAMESPACE, GET_TIME_METHOD_NAME);

        AndroidHttpTransport ht = new AndroidHttpTransport(URL);

        ht.debug = true;

        SoapSerializationEnvelope envelope = new SoapSerializationEnvelope(

                SoapEnvelope.VER11);

        envelope.bodyOut = rpc;

        envelope.dotNet = true;

        envelope.setOutputSoapObject(rpc);

        try {

            ht.call(GET_TIME_SOAP_ACTION, envelope);

        } catch (Exception e) {

            // 校准时间网络错误

            UIHelper.ToastMessage(MainActivity.this, "未连接网络或网络异常");

        }

        SoapObject result = (SoapObject) envelope.bodyIn;

        SoapPrimitive detail = (SoapPrimitive) result

                .getProperty("GetDateTimeResult");

        System.out.println("result" + result);

        System.out.println("detail" + detail);

        // UIHelper.ToastMessage(MainActivity.this, detail.toString());

        return detail.toString();

    }
倒计时和顺计时技术
android端倒计时:
// 倒计时

    Handler handler = new Handler() {

        public void handleMessage(Message msg) { // handle message

            switch (msg.what) {

            case 1:

                recLen--;

                if (recLen < 10) {

                    txtTextTimeBack.setText("0" + recLen);

                }else{

                    txtTextTimeBack.setText("" + recLen);

                }if (recLen > 0) {

                    Message message = handler.obtainMessage(1);

                    handler.sendMessageDelayed(message, 1000); // send message

                } else {

                    // 又一次获取序列号

                    Message message = handler.obtainMessage(1);

                    handler.sendMessageDelayed(message, 1000); // send message

                    String dateTime;

                    try {

                        dateTime = DateFormate.getDateTime();

                        txtDateTime.setText(dateTime);

                    } catch (Exception e) {

                        UIHelper.ToastMessage(MainActivity.this, "未知错误");

                        e.printStackTrace();

                    }

                    turnTimeBack();

                    try {

                        showTheNumber();

                    } catch (Exception e) {

                        // TODO Auto-generated catch block

                        e.printStackTrace();

                    }

                }

            }

            super.handleMessage(msg);

        }

    };
顺时採用上面倒计时的方法里面,加起来合为60
String ss = DateFormate.getStringFromDate(DateFormate.getDateFormString(txtDateTime.getText().toString()));

                if (recLen > 50)

                {

                    ss += "0" + (60-recLen);

                }

                else {

                    ss += "" + (60-recLen);

                }

                txtDateTime.setText(ss);
口令生成
这是核心关键.所以我这边生成的算法就不方便透露了.像沟通的话,加我的群讨论.口令能够依据 序列号 时间 特定字符串生成.这边我提供下 有关算法,像MD5...等都是经常使用的
String key = String.valueOf((dateTimeLong ^ serialNumberLong));

        String result = null;

        MessageDigest mad5 =null;

        try

        {

            mad5 = MessageDigest.getInstance("MD5");

        }

        catch (Exception e)

        {

            e.printStackTrace();

        }
Editor's Note
加油 英语六级,仅仅有自己强大了,人家才会找你,更好的平台给你.
Android手机令牌教程的更多相关文章
- Android扫盲教程大全经典教程全分享
Android扫盲教程大全经典教程全分享,相当于android的简单用户手册下载路径 Android扫盲教程大全经典教程全分享.rar
- Android 游戏教程让人物动起来
在这里给大家分享Android游戏教程怎样让人物动起来,话不多说了,直接进入正题. 一. 准备工作 首先要准备好要使用的人物动作图和地形图.把它分割成16个不同的动作,循环播放同一行的4个不同 ...
- Android studio教程
Android studio教程: http://jingyan.baidu.com/season/44062
- Android开发教程大全介绍
Android是由谷歌在2007年推出的一个开放系统平台,主要针对移动设备市场,目前版本为Android 4.0.Android基于Linux,开发者可以使用Java或C/C++开发Android应用 ...
- ArcGIS Runtime for Android开发教程V2.0(4)基础篇---MapView
原文地址: ArcGIS Runtime for Android开发教程V2.0(4)基础篇---MapView - ArcGIS_Mobile的专栏 - 博客频道 - CSDN.NET http:/ ...
- ArcGIS Runtime for Android开发教程V2.0(3)基础篇---Hello World Map
原文地址: ArcGIS Runtime for Android开发教程V2.0(3)基础篇---Hello World Map - ArcGIS_Mobile的专栏 - 博客频道 - CSDN.NE ...
- ArcGIS Runtime for Android开发教程V2.0(2)开发环境配置
原文地址: ArcGIS Runtime for Android开发教程V2.0(2)开发环境配置 - ArcGIS_Mobile的专栏 - 博客频道 - CSDN.NET http://blog.c ...
- ArcGIS Runtime for Android开发教程V2.0(1)基本概念
原文地址: ArcGIS Runtime for Android开发教程V2.0(1)基本概念 - ArcGIS_Mobile的专栏 - 博客频道 - CSDN.NET http://blog.csd ...
- Android精通教程-第一节Android入门简介
前言 大家好,给大家带来Android精通教程-第一节Android入门简介的概述,希望你们喜欢 每日一句 If life were predictable it would cease to be ...
随机推荐
- C#(WinForm)上传图片保存到数据库和从数据库读取图片显示到窗体
//浏览图片 private void btnUp_Click(object sender, EventArgs e) { OpenFileDialog ofd = new OpenFileDialo ...
- PHP PDO获取结果集
一.介绍PDO获取结果集,不得不介绍一下PDO是如果执行SQL语句,一般情况下分三种, 1.query()方法 query()方法通常用于返回执行查询后的结果集.语法是这样的:PDOStatement ...
- 装饰者模式(Decorator)
首先来看一个例子: 比如,饮料可以分为很多种类,而这里我取一个咖啡,那么这个咖啡呢,有多种形式的, 比如有加糖了的咖啡,有加奶的咖啡,也有加热了的咖啡,也有加了冰块的咖啡. 而各个顾客的选择却是不同的 ...
- 面向对象设计模式之Flyweight享元模式(结构型)
动机:采用纯粹对象方案的问题在于大量细粒度的对象会很快充斥在系统中,从而带来很高的运行代价——主要指内存需求方面的代价.如何在避免大量细粒度对象问题的同 时,让外部客户程序仍然能够透明地使用面向对象的 ...
- php转化输入日期为Unix 纪元到当前时间的秒数 日期筛选
多条件筛选时 日期筛选 部分 demo http://pan.baidu.com/s/1hqGF5Ik 时间输入控件http://www.jq22.com/jquery-info332 输入控件 ...
- MYSQL管理之主从同步管理 转载
MYSQL主从同步架构是目前使用最多的数据库架构之一,尤其是负载比较大的网站,因此对于主从同步的管理也就显得非常重要,新手往往在出现主从同步错误的时候不知道如何入手,这篇文章就是根据自己的经验来详细叙 ...
- sql 批处理、获取自增长、事务、大文本处理
批处理 需要批量执行sql语句! 需求:批量保存信息! 设计: AdminDao Public void save(List<Admin list){ // 目前用这种方式 // 循环 // 保 ...
- RESTful API -备
网络应用程序,分为前端和后端两个部分.当前的发展趋势,就是前端设备层出不穷(手机.平板.桌面电脑.其他专用设备......). 因此,必须有一种统一的机制,方便不同的前端设备与后端进行通信.这导致AP ...
- html5 中常用的标签和属性
标签: <blockquote> 标签定义摘自另一个源的块引用. <blockquote> 与 </blockquote> 之间的所有文本都会从常规文本中分离出来, ...
- 转:nginx防DDOS攻击的简单配置
文章来自于: 近期由于工作需要,做了些防DDOS攻击的研究,发现nginx本身就有这方面的模块ngx_http_limit_req_module和ngx_http_limit_conn_module. ...