Android_listView_exc
listView布局:
<RelativeLayout xmlns:android="http://schemas.android.com/apk/res/android"

    xmlns:tools="http://schemas.android.com/tools"

    android:layout_width="match_parent"

    android:layout_height="match_parent"

    android:paddingBottom="@dimen/activity_vertical_margin"

    android:paddingLeft="@dimen/activity_horizontal_margin"

    android:paddingRight="@dimen/activity_horizontal_margin"

    android:paddingTop="@dimen/activity_vertical_margin"

    tools:context="com.example.homework04.MainActivity" >

    <ListView

        android:id="@+id/listview"

        android:layout_width="match_parent"

        android:layout_height="match_parent" />

</RelativeLayout>
item布局
<?xml version="1.0" encoding="utf-8"?>

<RelativeLayout xmlns:android="http://schemas.android.com/apk/res/android"

    android:layout_width="match_parent"

    android:layout_height="match_parent" >

    <!-- 图像 -->

    <ImageView

        android:id="@+id/image"

        android:layout_width="100dp"

        android:layout_height="100dp"

        android:src="@drawable/image1"

        />

    <!-- 姓名 -->

    <TextView

        android:id="@+id/text_name"

        android:layout_width="100dp"

        android:layout_height="wrap_content"

        android:layout_toRightOf="@id/image"

        android:textSize="20sp"

        android:layout_marginTop="10dp"

        android:text="名侦探柯南"/>

    <!-- 年龄 -->

    <TextView

        android:id="@+id/text_age"

        android:layout_width="wrap_content"

        android:layout_height="wrap_content"

        android:layout_toRightOf="@id/image"

        android:layout_alignBottom="@id/image"

        android:textSize="20sp"

        android:layout_marginBottom="10dp"

        android:text="17"/>

    <!-- 按钮 -->

    <Button

        android:id="@+id/button"

        android:layout_width="wrap_content"

        android:layout_height="50dp"

        android:layout_toRightOf="@id/text_name"

        android:layout_marginTop="25dp"

        android:text="更多"

        />

</RelativeLayout>
源代码:
package com.example.homework04;

import java.util.ArrayList;

import java.util.HashMap;

import java.util.List;

import java.util.Map;

import android.app.Activity;

import android.os.Bundle;

import android.view.Menu;

import android.view.MenuItem;

import android.widget.ListView;

import android.widget.SimpleAdapter;

public class MainActivity extends Activity {

    private ListView listview;

    private SimpleAdapter adapter;

    @Override

    protected void onCreate(Bundle savedInstanceState) {

        super.onCreate(savedInstanceState);

        setContentView(R.layout.activity_main);

        // 初始化adapter

        adapter = new SimpleAdapter(

                MainActivity.this, // 第一个参数:上下文

                getData(),// 第二个参数:listview中显示的数据

                R.layout.item,// 第三个参数:每行的布局

                new String[]{"image", "name", "age", "button"},// 第四个参数:字符串数组 Map中的key的值

                new int[]{R.id.image, R.id.text_name, R.id.text_age, R.id.button}); // 第五个参数:item.xml中每个控件的id

        listview = (ListView) findViewById(R.id.listview);

        listview.setAdapter(adapter);

    }

    // 生成listview显示的数据
private List<Map<String, ?>> getData() {
// TODO Auto-generated method stub
List<Map<String,?>> list = new ArrayList<Map<String,?>>();
int[] image = {R.drawable.image1,R.drawable.image2,R.drawable.image3};
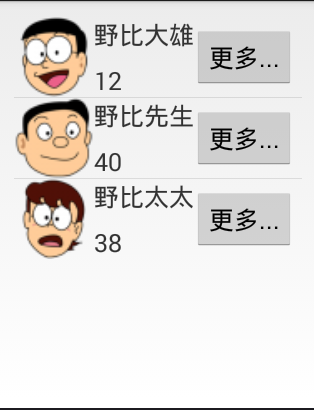
String[] name={"野比大雄","野比先生","野比太太"};
String[] age={"12","40","38"};
for (int i = 0; i < age.length; i++) {
Map<String,Object> map = new HashMap<String, Object>();
map.put("image", image[i]);
map.put("text_name", name[i] );
map.put("text_age", age[i] );
map.put("button", "更多");
list.add(map);
}
return list;
    }

}
Android_listView_exc的更多相关文章
随机推荐
- Atom 扩展离线安装
1.下载原始包 2.解压放入atom的packages文件夹中 3.通过nodejs的npm指令进行安装 运行->cmd 4.重启Atom就ok了
- bzoj2286
很明显,20%=mincut 40%=每次暴力树形dp那么正解是什么呢?不难发现∑ki<=500000,也就是每次询问的复杂度都要跟k有关从树形dp工作的角度来看,确实有很多点我们根本就没必要访 ...
- bzoj2039
还是同一类最小割问题 对于只要记住,建图是来最小化损失, 最大化收益是所有收益-最小取不到的收益 首先对于每个经理i,如果不取,必然有signma(w[i,j])收益会得不到(这里我们先不考虑额外的损 ...
- WordPress Suco Themes ‘themify-ajax.php’任意文件上传漏洞
漏洞名称: WordPress Suco Themes ‘themify-ajax.php’任意文件上传漏洞 CNNVD编号: CNNVD-201311-403 发布时间: 2013-11-28 更新 ...
- zookeeper服务器端管理工具
zookeeper基本是基于API和console进行znode的操作,并没有一个比较方便的操作界面,这里也发现了taobao 伯岩写的一个工具,可以比较方便的查询zookeeper信息. 工具的开发 ...
- How Many Tables
How Many Tables Time Limit : 2000/1000ms (Java/Other) Memory Limit : 65536/32768K (Java/Other) Tot ...
- POJ2739 - Sum of Consecutive Prime Numbers(素数问题)
题目大意 给定N,要求你计算用连续的素数的和能够组成N的种数 题解 先筛选出素数,然后暴力判断即可... 代码: #include<iostream> #include<cstrin ...
- openstack 镜像自动扩容 resize拉伸
The simplest way to support this in your image is to install the cloud-utils package (contains the g ...
- Robotium学习笔记三
以下是从网络上抄录的一些Robotium注意事项 1)有些button没有string,没有text,只能通过index来click这样很不直观,而且button的index并不是固定的,有可能随着控 ...
- Hibernate拦截器(Interceptor)与事件监听器(Listener)
拦截器(Intercept):与Struts2的拦截器机制基本一样,都是一个操作穿过一层层拦截器,每穿过一个拦截器就会触发相应拦截器的事件做预处理或善后处理. 监听器(Listener):其实功能与拦 ...