Spring Cloud Hystrix理解与实践(一):搭建简单监控集群
前言
在分布式架构中,所谓的断路器模式是指当某个服务发生故障之后,通过断路器的故障监控,向调用方返回一个错误响应,这样就不会使得线程因调用故障服务被长时间占用不释放,避免故障的继续蔓延。Spring Cloud Hystrix实现了断路器,线程隔离等一系列服务保护功能,它是基于Netflix的开源框架Hystrix实现的。
目的不是介绍Hystrix的与原理、及其使用等(有时间也要记录啊),而是通过实战搭建一个简单的监控集群,使用Hystrix Dashboard仪表盘动态监控展示以此来加深对Hystrix的认识与理解,为什么要记录呢?这是因为网上资料甚少(或版本过低,不适用),同时加之书中的Spring Cloud版本与现在Spring Boot 2.x差距明显。
本文主要参考《Spring Cloud 微服务实战》(PDF电子版,需要的朋友可以私聊或评论)
一、Hystrix 仪表盘
1、认识Hystrix仪表盘
HystrixCommand与HystrixObserableCommand实例执行过程中记录的重要信息称之为Hystrix仪表盘,以供内部或者外部进行查询使用。Spring Cloud整合仪表盘组件Hystrix Dashboard,主要用来实时监控Hystrix的各项指标信息,可以帮我们快速发现系统中存在的问题,从而及时地采取应对措施。
1)加入依赖
特别注意Spring Boot 2.x版本引入的hystrix-dashboard依赖,不然可能访问不了http://localhost:port/hystrix仪表盘页面,注解@EnableHsytrixDashboard也可能找不到
 <!-- hystrix 容错机制 -->

        <dependency>

            <groupId>org.springframework.cloud</groupId>

            <artifactId>spring-cloud-starter-hystrix</artifactId>

            <version>${spring-cloud-eureka.version}</version>

        </dependency>

        <!-- actuator监控 -->

        <dependency>

            <groupId>org.springframework.boot</groupId>

            <artifactId>spring-boot-starter-actuator</artifactId>

        </dependency>

        <!-- Spring Boot 2.x以上版本 spring-cloud-starter-netflix-hystrix-dashboard 仪表盘,

        以下版本则需要spring-cloud-starter-hystrix-dashboard-->

        <dependency>

            <groupId>org.springframework.cloud</groupId>

            <artifactId>spring-cloud-starter-netflix-hystrix-dashboard</artifactId>

            <version>${spring-cloud-eureka.version}</version>

        </dependency>
2)添加配置
# 应用实例

spring:

  application:

    name: hystrix-dashboard

server:

  port: 8000

# actuator开放所有端点,Spring Boot 2.x与1.x不同,具体请查询

management:

  endpoints:

    web:

      exposure:

        include: "*"
3)增加注解:应用主类加上@EnableHsytrixDashboard,启用Hystrix Dashboard功能。
@EnableHystrixDashboard // 开启Hystrix仪表盘

@SpringBootApplication

public class HystrixMonitorApplication {

    public static void main(String[] args) {

        SpringApplication.run(HystrixMonitorApplication.class, args);

    }

}
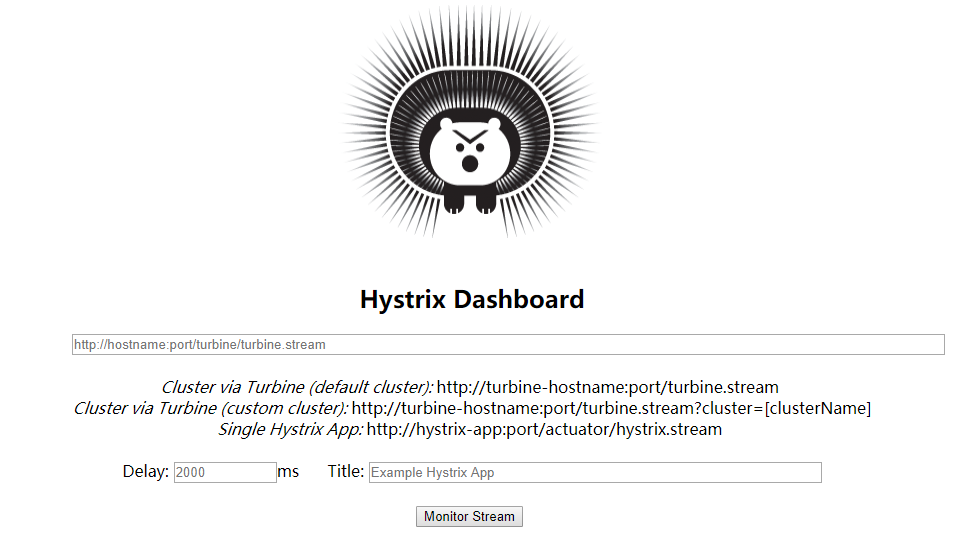
4)访问http://localhost:8000/hystrix界面如下:
2、监控页面介绍
从界面中我们就可以看到Hystrix Dashboard支持不同的三种监控方式:
1) 默认的集群监控:通过URL http://turbine-hostname:port/turbine.stream
2) 指定的集群监控:通过URL http://turbine-hostname:port/turbine.stream?cluster=[clusterName]开启
3) 单体应用的监控:URL http://hystrix-app:port/hystrix.stream开启,实现对具体某个服务实例的监控
前两者关于集群的监控需要整合turbine才能实现,而对于单体实例节点需要访问实例的/hystrix.stream接口实现,我们自然需要为服务实例添加端点。只需要添加acutator与hystrix依赖,应用主程序类开启断路器@EnableCircuitBreaker注解与@EnableHystrixDashboard注解即可。
其中的参数:
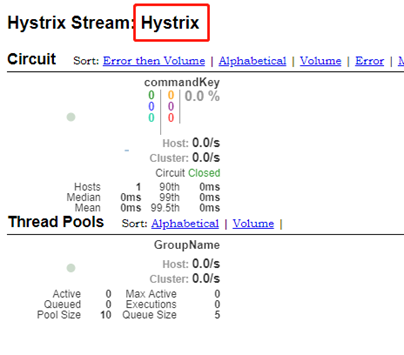
1)Delay:用来控制服务器上轮询监控信息的延迟时间,默认为2000ms。可以通过该配置该属性降低客户端的网络和CPU消耗。
2)Ttile:对应进入监控后的的标题,如Hystrix,则进入监控页面后如下图红框标题
此外,我们在URL框输入我们需要监听的某个服务实例/hystrix.stream接口,如http://localhost:8081/hystrix.stream,就可以进入监控页面
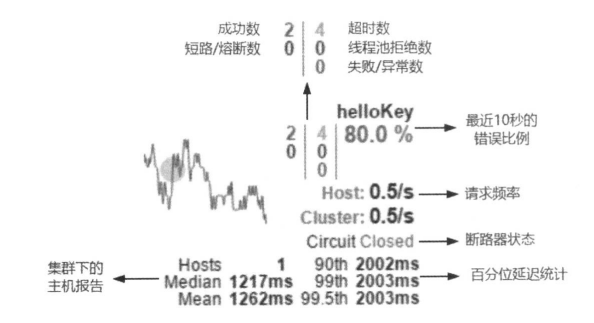
监控页面参数介绍:
1) 实心圆与曲线的含义
实心圆颜色:健康度从绿色、黄色、橙色、红色递减
实心圆大小:会根绝实例的请求流量发生变化,流量越大实心圆就越大。
曲线:用来记录2分钟内流量的相对变化,可以通过它来观察流量的上升与下降。
2) 其它的指标参数:鼠标停留会显示相应的说明
二、简单监控架构
1、监控单实例的架构
(1)架构图
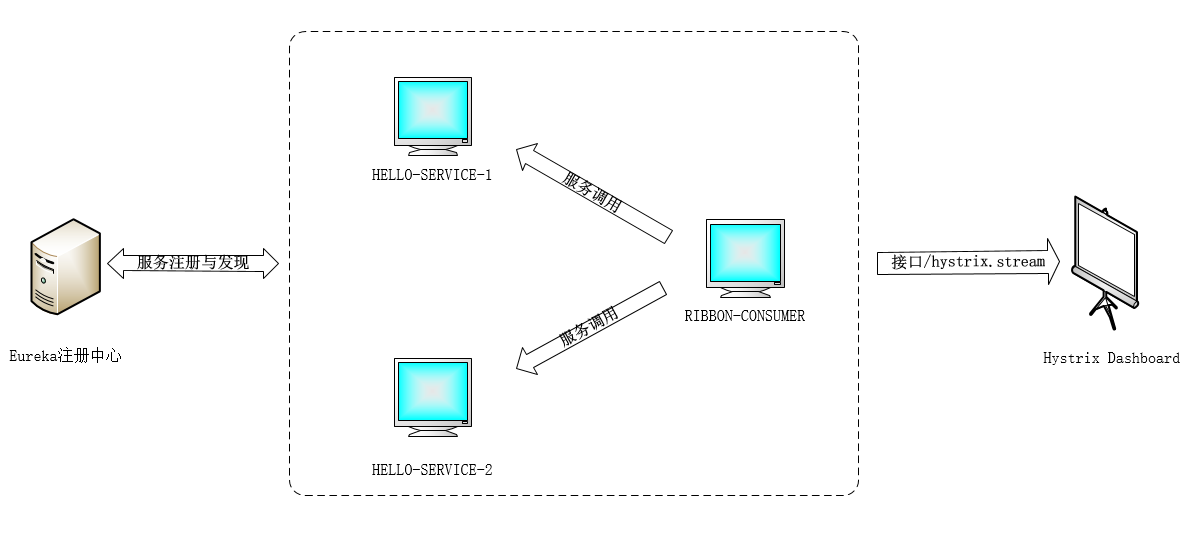
(2)过程说明
- 服务提供者:HELLO-SERVICE,提供一个接口如:http:/HELLO-SERVER/hello,让消费者通过restTemplate(封装好的HTTP)调用消费
- 服务消费者:RIBBON-CONSUMER,会有ribbon承担负载均衡的作用,分别轮询访问HELLO-SERVER-1与HELLO-SERVICE-2
- 注册中心:Spring Cloud Eureka,主要负责服务治理:服务的注册、续约、剔除(更新)等
- Hystrix仪盘表:通过/hystrix.stream接口监控某个服务实例,动态展示仪表盘数据。
然而现在只针对一个实例来监控,而分布式系统中往往有很多实例,我们就需要利用Turbine和Hystrix Dashboard配置实现对集群的监控
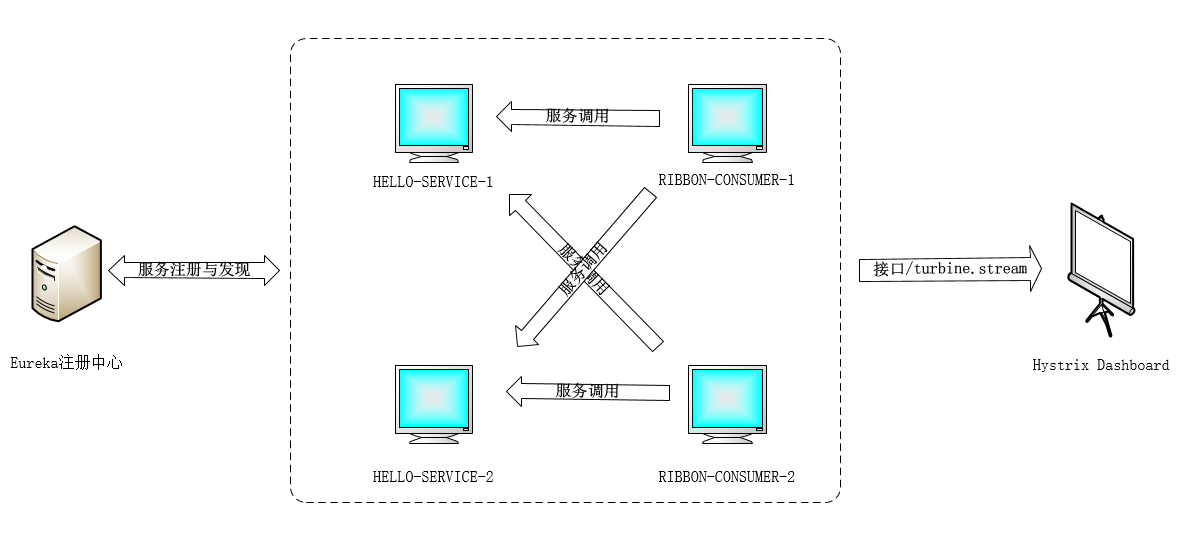
2、监控聚合服务
需要通过Turbine来聚合RIBBON-CONSUMER-1与服务RIBBON-CONSUMER-2成一个服务展示监控信息,并输出到Hystrix Dashboard中,只显示一张监控图,但是注意Hosts的数量为2
(1)架构图
(2)过程说明
同上述“单实例监控”,不同的是这次服务消费者有RIBBON-CONSUMER-1与RIBBON-CONSUMER-2两个,通过/turbine.stream接口聚合两个服务实例(实则就是同一个服务不同实例)成一个服务,共同动态展示整个集群的动态数据。对于集群来说关注的是服务集群的高可用性,所以Turbine会将相同服务作为整体看待。
三、代码实践
1、实践前的准备
首先本示例使用的是Idea+Maven构造的项目工程的,所以先熟悉下idea如何构建一个简单的Spring Boot项目
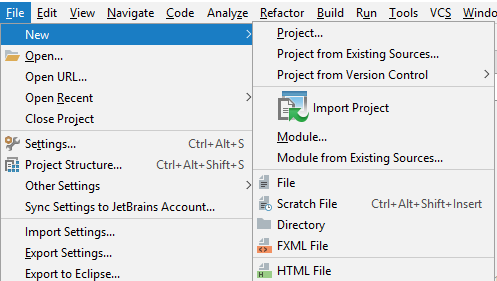
1)新建项目:File->New->Project
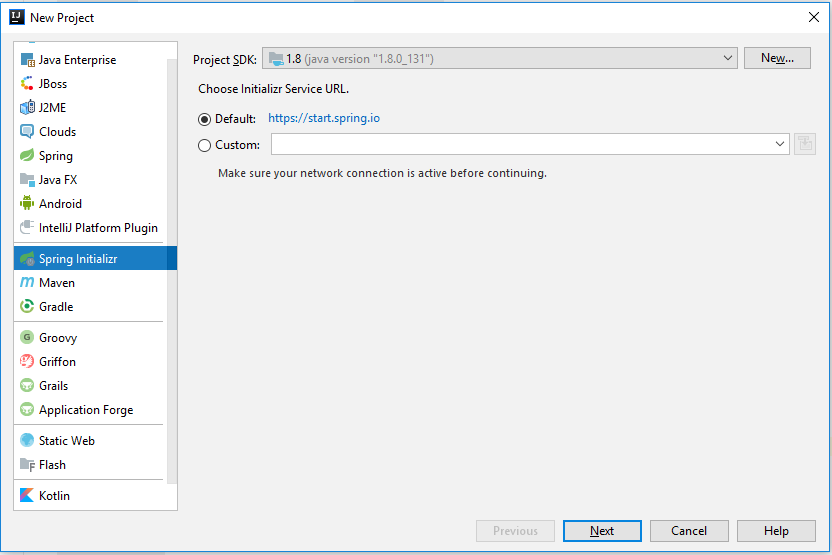
2)选择Spring Initializr,选择默认的https://start.spring.io(需要联网),点击Next
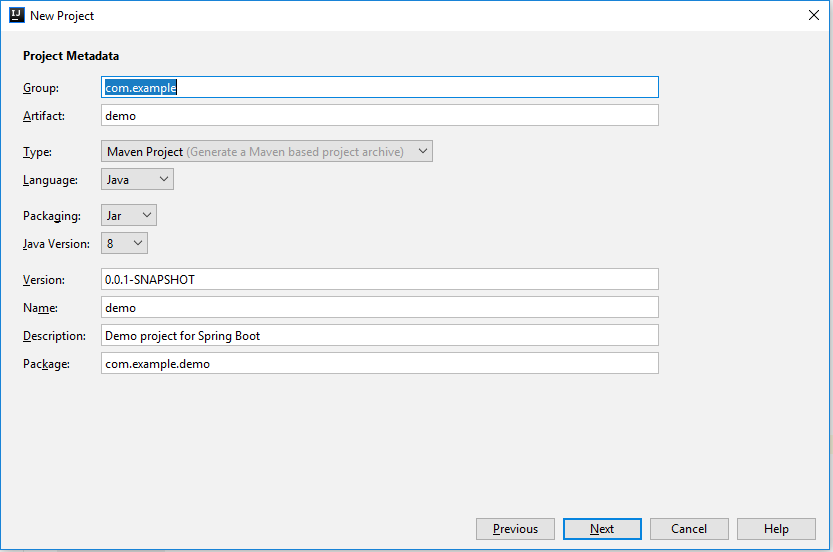
3)填写项目信息
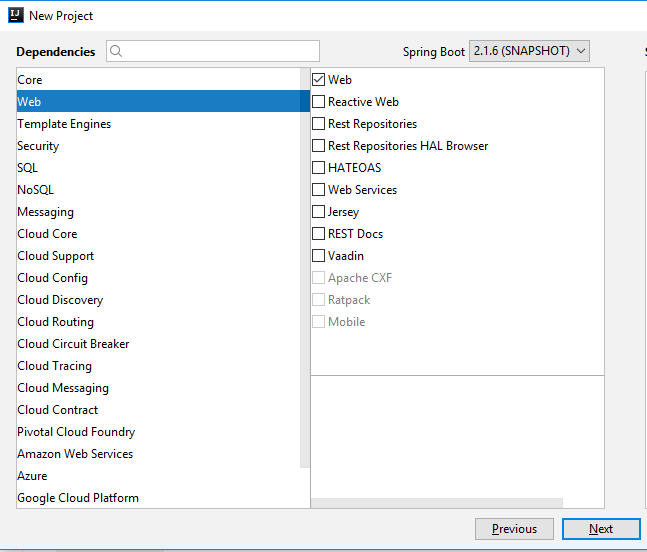
4)选择依赖,这里我们只需要选择web依赖即可,之后再加入相关Spring Cloud Hystrix的依赖,这是因为Spring Boot版本与Spring Cloud版本有相对应的关系,不然会冲突项目到处都是坑
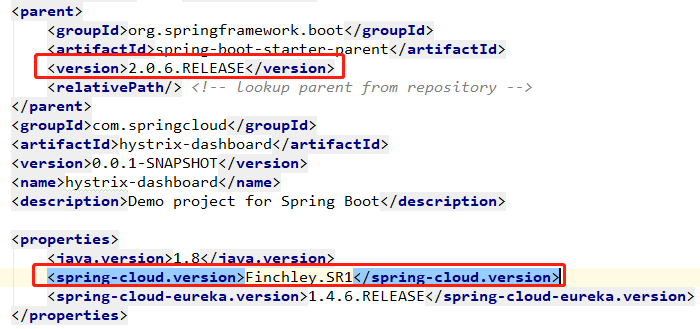
5)查看Spring Boot与Spring Cloud的版本对应关系从官网(https://spring.io/projects/spring-cloud)中查看,这里使用的是Spring Boot 2.0.6.RELEASE与Spring Cloud Fincley.SR1
6)我们需要搭建以下的架构
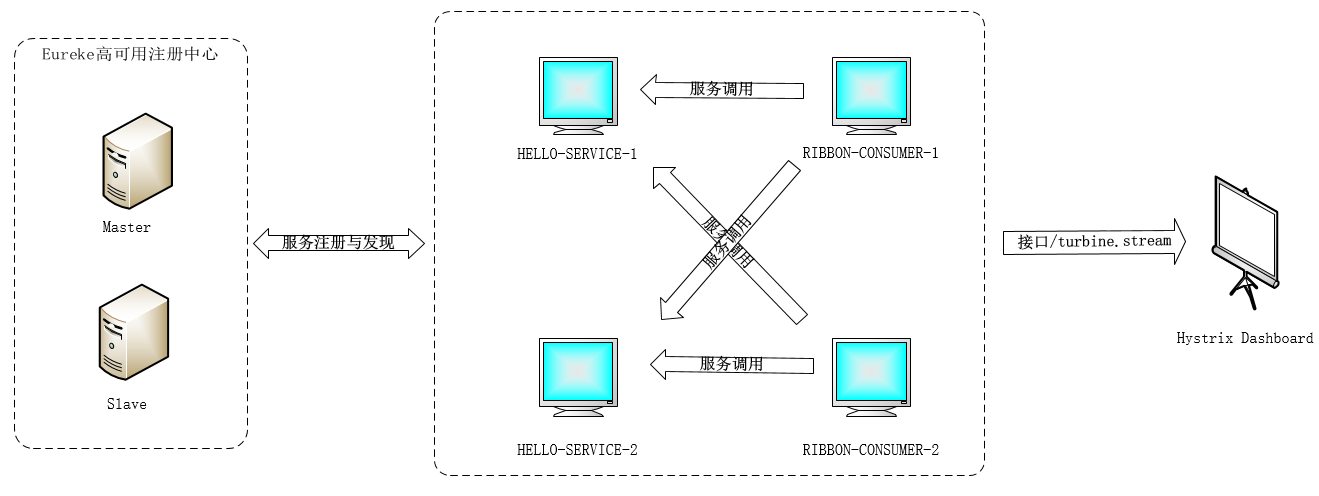
从图中我们知道我们需要:
1)两个Eureaka Server提供高可用的注册中心:
分别对应工程eureka-server与eureke-slave-server,配置文件中register-with-eureka与fetch-registry保持默认true,相互注册进行同步维护服务实例列表。
2)两个服务提供者实例提供HELLO-SERVICE/hello服务:
对应工程hello-service,打包成jar包。
通过命令 java -jar hello-service-0.0.1-SNAPSHOT.jar --server.port=8081 开启实例HELLO-SERVICE-1
通过命令 java -jar hello-service-0.0.1-SNAPSHOT.jar --server.port=8082 开启实例HELLO-SERVICE-2
3)两个服务消费者实例消费HELLO-SERVICE/hello服务
对应工程ribbon-consumer,使用ribbon开启负载均衡,使用hystrix开启断路器功能,之后打包jar包。
通过命令 java -jar ribbon-consumer-0.0.1-SNAPSHOT.jar --server.port=8083 开启实例RIBBON-CONSUMER-1
通过命令 java -jar ribbon-consumer-0.0.1-SNAPSHOT.jar --server.port=8084 开启实例RIBBON-CONSUMER-2
4)开启Spring Cloud Circuit Breaker 断路器
引入相关依赖,应用程序中开启注解即可,具体请看下面示例。
5)消费者开启负载均衡器
服务消费者直接通过调用被@LoadBalanced注解修饰过的RestTemplate来实现面向服务的接口调用
6)开启Hystrix Dashboard仪表盘
引入hystrix dashboard、turbine等相关依赖,应用程序中开启注解即可,具体请看下面示例。
2、代码示例
1)服务治理工程:eureka-service与eureka-slave-service
pom.xml文件内容:eureka-service与eureka-slave-service都相同
<properties>

        <java.version>1.8</java.version>

        <spring-cloud.version>Finchley.SR1</spring-cloud.version>

        <spring-cloud-eureka.version>1.4.6.RELEASE</spring-cloud-eureka.version>

    </properties>

    <dependencies>

        <dependency>

            <groupId>org.springframework.boot</groupId>

            <artifactId>spring-boot-starter-web</artifactId>

        </dependency>

        <!-- Spring Cloud Eureka-->

        <dependency>

            <groupId>org.springframework.cloud</groupId>

            <artifactId>spring-cloud-starter-eureka-server</artifactId>

            <version>${spring-cloud-eureka.version}</version>

        </dependency>

        <!-- 可以删除(需要同时删除Test类),但是为了不麻烦就保留了 -->

        <dependency>

            <groupId>org.springframework.boot</groupId>

            <artifactId>spring-boot-starter-test</artifactId>

            <scope>test</scope>

        </dependency>

    </dependencies>

    <dependencyManagement>

        <dependencies>

            <dependency>

                <groupId>org.springframework.cloud</groupId>

                <artifactId>spring-cloud-dependencies</artifactId>

                <version>${spring-cloud.version}</version>

                <type>pom</type>

                <scope>import</scope>

            </dependency>

        </dependencies>

    </dependencyManagement>
eureka-service的application.yml文件:
server:

  port: 5678

eureka:

  instance:

    hostname: master

  # slave注册中心url

  client:

    service-url:

      defaultZone: http://slave:5679/eureka/

  # 关闭保护模式

  server:

    enable-self-preservation: false
eureka-slave-service的application.yml文件:
server:

  port: 5679

eureka:

  instance:

    hostname: slave

  client:

    service-url:

      defaultZone: http://master:5678/eureka/

  server:

    enable-self-preservation: false
注:需要在hosts文件中添加slave/master域名解析。
应用程序类开启@EnableEurekaServer注解,表明是注册中心服务器
@EnableEurekaServer

@SpringBootApplication

public class EurekaSlaveServerApplication {

    public static void main(String[] args) {

        SpringApplication.run(EurekaSlaveServerApplication.class, args);

    }

}
2)服务提供者工程:hello-service
pom.xml文件内容:
注:这里加入的依赖是spring-cloud-starter-eureka,不是spring-cloud-starter-eureka-server
<properties>

        <java.version>1.8</java.version>

        <spring-cloud.version>Finchley.SR1</spring-cloud.version>

        <spring-cloud-eureka.version>1.4.6.RELEASE</spring-cloud-eureka.version>

    </properties>

    <dependencies>

        <dependency>

            <groupId>org.springframework.boot</groupId>

            <artifactId>spring-boot-starter-web</artifactId>

        </dependency>

        <dependency>

            <groupId>org.springframework.cloud</groupId>

            <artifactId>spring-cloud-starter-eureka</artifactId>

            <version>${spring-cloud-eureka.version}</version>

        </dependency>

        <dependency>

            <groupId>org.springframework.boot</groupId>

            <artifactId>spring-boot-starter-test</artifactId>

            <scope>test</scope>

        </dependency>

    </dependencies>

    <dependencyManagement>

        <dependencies>

            <dependency>

                <groupId>org.springframework.cloud</groupId>

                <artifactId>spring-cloud-dependencies</artifactId>

                <version>${spring-cloud.version}</version>

                <type>pom</type>

                <scope>import</scope>

            </dependency>

        </dependencies>

    </dependencyManagement>
application.yml配置文件:
spring:

  application:

    name: hello-service

# 注册中心url

eureka:

  client:

    service-url:

      defaultZone: http://master:5678/eureka/,http://slave:5679/eureka/

  instance:

    # 定义服务失效的时间,默认为90s。

    lease-expiration-duration-in-seconds: 60

    # 续约任务的调用时间间隔,默认为30s

    lease-renewal-interval-in-seconds: 10
应用程序增加注解@EnableEurekaClient
@EnableEurekaClient

@SpringBootApplication

public class EurekaClientApplication {

    public static void main(String[] args) {

        SpringApplication.run(EurekaClientApplication.class, args);

    }

}
编写/hello接口,提供消费者调用
@RestController

public class HelloController {

    @RequestMapping(value = "/index", method = RequestMethod.GET)

    public String index(){

        return "Hello World";

    }

}
3)服务消费者工程:ribbon-consumer
消费者服务工程是相对比较复杂的,需要几个步骤:
- 实现ribbon负载均衡功能:增加@LoadBalanced
- 实现hystrix断路器容错功能:增加@EnableCircuitBreaker
- 增加actuator监控:增加actuator/hystrix.stream端点,提供hystrix仪表盘monitor使用
- 编写容错降级服务:发生异常超时等情况之后,做相应容错处理
- 重新注册restTemplate:增加@LoadBalanced实现负载均衡
- 开启请求缓存:对请求数据做缓存,减少压力
- 指定groupName与commandName
pom文件:既然要监控服务实例,自然要在该服务中添加Hystrix与actuator依赖。
<properties>

        <java.version>1.8</java.version>

        <spring-cloud.version>Finchley.SR1</spring-cloud.version>

        <spring-cloud-eureka.version>1.4.6.RELEASE</spring-cloud-eureka.version>

    </properties>

    <dependencies>

        <dependency>

            <groupId>org.springframework.boot</groupId>

            <artifactId>spring-boot-starter-web</artifactId>

        </dependency>

        <dependency>

            <groupId>org.springframework.cloud</groupId>

            <artifactId>spring-cloud-starter-eureka</artifactId>

            <version>${spring-cloud-eureka.version}</version>

        </dependency>

        <!-- ribbon 负载均衡 -->

        <dependency>

            <groupId>org.springframework.cloud</groupId>

            <artifactId>spring-cloud-starter-ribbon</artifactId>

            <version>${spring-cloud-eureka.version}</version>

        </dependency>

        <!-- hystrix 容错机制 -->

        <dependency>

            <groupId>org.springframework.cloud</groupId>

            <artifactId>spring-cloud-starter-hystrix</artifactId>

            <version>${spring-cloud-eureka.version}</version>

        </dependency>

        <!-- actuator监控 -->

        <dependency>

            <groupId>org.springframework.boot</groupId>

            <artifactId>spring-boot-starter-actuator</artifactId>

        </dependency>

        <dependency>

            <groupId>org.springframework.boot</groupId>

            <artifactId>spring-boot-starter-test</artifactId>

            <scope>test</scope>

        </dependency>

    </dependencies>

    <dependencyManagement>

        <dependencies>

            <dependency>

                <groupId>org.springframework.cloud</groupId>

                <artifactId>spring-cloud-dependencies</artifactId>

                <version>${spring-cloud.version}</version>

                <type>pom</type>

                <scope>import</scope>

            </dependency>

        </dependencies>

    </dependencyManagement>
HelloService: 实现请求处理+降级服务+命令名指定+请求缓存(http://HELLO-SERVER/hello接口并没有涉及数据交互,这里只做展示)
@Service

public class HelloService {

    private final Logger logger = LoggerFactory.getLogger(HelloService.class);

    @Autowired

    private RestTemplate restTemplate;

    /**

     * 消费者调用服务,并且开启断路器指定回调函数

     * 同步执行实现

     * @return

     */

    @CacheResult // 请求命令开启缓存(可以指定缓存key)

    @HystrixCommand(fallbackMethod = "helloFallback", groupKey = "HelloGroup", commandKey = "HelloKey") // 指定熔断回调函数

    public String helloService(){

        long start = System.currentTimeMillis();

        // 模拟消息服务时间, getForEntity调用HELLO-SERVER服务的hello接口

        String result = restTemplate.getForEntity("http://HELLO-SERVICE/hello", String.class).getBody();

        long end = System.currentTimeMillis();

        logger.info("Spend time: "+(end - start));

        return result;

    }

    /**

     * 通过@CacheKey指定缓存key

     * @param id

     * @return

     */

    @CacheResult

    @HystrixCommand

    public User getUserById(@CacheKey String id){

       User user = restTemplate.getForObject("http://HELLO-SERVICE/hello", User.class);

       return user;

    }

    /**

     * 更新数据:更新缓存(删除失效缓存)

     * @param user

     */

    @CacheRemove(commandKey = "getUserById")

    @HystrixCommand

    public void update(@CacheKey("id") User user){

        restTemplate.postForObject("http://HELLO-SERVICE/hello", user, User.class);

    }

    /**

     * 获取cache key

     * @param id

     * @return

     */

    public String getUserByCacheKey(String id){

        logger.info("获取缓存key....");

        return id;

    }

    /**

     * 消费者调用服务,并且开启断路器指定回调函数

     * 异步执行实现

     * @return

     */

    @HystrixCommand(fallbackMethod = "helloFallback") // 指定熔断回调函数

    public Future<String> helloAsyncService(){

        return new AsyncResult<String>(){

            @Override

            public String invoke(){

               return restTemplate.getForEntity("http://HELLO-SERVICE/hello", String.class).getBody();

            }

        };

    }

    /**

     * 降级服务

     * @return

     */

    public String helloFallback(){

        return "error";

    }

}
ConsumerController:对外调用接口/ribbon-consumer。
@RestController

public class ConsumerController {

    @Autowired

    HelloService helloService;

    @RequestMapping(value = "/ribbon-consumer", method = RequestMethod.GET)

    public String helloConsumer(){

        return helloService.helloService();

    }

}
应用程序类RibbonConsumerApplication:开启断路器,开启服务发现,注册restTemplate,开启负载均衡
注:可以用@SpringCloudApplication代替,因为@SpringCloudApplication=@EnableCircuitBreaker+@EnableDiscoveryClient+@SpringBootApplication
@EnableCircuitBreaker // 开启断路器,也可以使用@SpringCloudApplication

@EnableDiscoveryClient // 开启服务发现,也可以使用@SpringCloudApplication

@SpringBootApplication

public class RibbonConsumerApplication {

    /**

     * 注册RestTemplate bean

     * 并开启负载均衡

     * @return

     */

    @Bean

    @LoadBalanced

    RestTemplate restTemplate(){

        return new RestTemplate();

    }

    public static void main(String[] args) {

        SpringApplication.run(RibbonConsumerApplication.class, args);

    }

}
application.yml文件:
# 服务消费者

spring:

  application:

    name: ribbon-consumer

# 注册中心地址

eureka:

  client:

    service-url:

      defaultZone: http://master:5678/eureka/,http://slave:5679/eureka/

server:

  port: 9000

# 开放所有端点,与Spring boot 1.x版本有差异

management:

  endpoints:

    web:

      exposure:

        include: "*"
4)仪盘表Hystrix Dashboard工程:hystrix-dashboard
pom文件:注意这里的hystrix-dashboard依赖于Spring boot 1.x引入的版本是不同的,具体看注释
<properties>

        <java.version>1.8</java.version>

        <spring-cloud.version>Finchley.SR1</spring-cloud.version>

        <spring-cloud-eureka.version>1.4.6.RELEASE</spring-cloud-eureka.version>

    </properties>

    <dependencies>

        <dependency>

            <groupId>org.springframework.boot</groupId>

            <artifactId>spring-boot-starter-web</artifactId>

        </dependency>

        <dependency>

            <groupId>org.springframework.boot</groupId>

            <artifactId>spring-boot-starter-test</artifactId>

            <scope>test</scope>

        </dependency>

        <!-- hystrix 容错机制 -->

        <dependency>

            <groupId>org.springframework.cloud</groupId>

            <artifactId>spring-cloud-starter-hystrix</artifactId>

            <version>${spring-cloud-eureka.version}</version>

        </dependency>

        <!-- actuator监控 -->

        <dependency>

            <groupId>org.springframework.boot</groupId>

            <artifactId>spring-boot-starter-actuator</artifactId>

        </dependency>

        <!-- Spring Boot 2.x以上版本 spring-cloud-starter-netflix-hystrix-dashboard 仪表盘,

        以下版本则需要spring-cloud-starter-hystrix-dashboard-->

        <dependency>

            <groupId>org.springframework.cloud</groupId>

            <artifactId>spring-cloud-starter-netflix-hystrix-dashboard</artifactId>

            <version>${spring-cloud-eureka.version}</version>

        </dependency>

    </dependencies>

    <dependencyManagement>

        <dependencies>

            <dependency>

                <groupId>org.springframework.cloud</groupId>

                <artifactId>spring-cloud-dependencies</artifactId>

                <version>${spring-cloud.version}</version>

                <type>pom</type>

                <scope>import</scope>

            </dependency>

        </dependencies>

    </dependencyManagement>
应用程序类:开启仪表盘注解@EnableHystrixDashboard
@EnableHystrixDashboard // 开启Hystrix仪表盘

@SpringBootApplication

public class HystrixMonitorMonitorApplication {

    public static void main(String[] args) {

        SpringApplication.run(HystrixMonitorMonitorApplication.class, args);

    }

}
application.yml:
spring:

  application:

    name: hystrix-dashboard

server:

  port: 8000

# 开放所有端点

management:

  endpoints:

    web:

      exposure:

        include: "*"
5)turbine集群监控工程:turbine-monitor
通过turbine来聚合RIBBON-CONSUMER服务的监控信息,并提供/turbine.stream接口输出给Hystrix Dashboard进行展示
pom.xml文件:增加turbine依赖+actuator依赖
 <properties>

        <java.turbineversion>1.8</java.turbineversion>

        <spring-cloud.version>Finchley.SR1</spring-cloud.version>

        <spring-cloud-eureka.version>1.4.6.RELEASE</spring-cloud-eureka.version>

    </properties>

    <dependencies>

        <dependency>

            <groupId>org.springframework.boot</groupId>

            <artifactId>spring-boot-starter-web</artifactId>

        </dependency>

        <dependency>

            <groupId>org.springframework.boot</groupId>

            <artifactId>spring-boot-devtools</artifactId>

            <scope>runtime</scope>

        </dependency>

        <!-- actuator监控 -->

        <dependency>

            <groupId>org.springframework.boot</groupId>

            <artifactId>spring-boot-starter-actuator</artifactId>

        </dependency>

        <dependency>

            <groupId>org.springframework.cloud</groupId>

            <artifactId>spring-cloud-starter-turbine</artifactId>

            <version>${spring-cloud-eureka.version}</version>

        </dependency>

    </dependencies>

    <dependencyManagement>

        <dependencies>

            <dependency>

                <groupId>org.springframework.cloud</groupId>

                <artifactId>spring-cloud-dependencies</artifactId>

                <version>${spring-cloud.version}</version>

                <type>pom</type>

                <scope>import</scope>

            </dependency>

        </dependencies>

    </dependencyManagement>
application.yml文件:
spring:

  application:

    name: turbine-monitor

server:

  port: 8001

# 注册中心地址

eureka:

  client:

    service-url:

      defaultZone: http://master:5678/eureka/,http://slave:5679/eureka/

turbine:

  # 指定需要收集监控信息的服务名(一定是大写,服务注册后都是大写)

  app-config: RIBBON-CONSUMER

  # 同一主机上的服务通过主机+端口区分(默认同一个主机上聚合成一个服务)

  combine-host-port: true

  # 当启动多个turbine服务构建不同的聚合集群,该参数可以区分不同的聚合集群

  # 同时可以在Hystrix Stream的URL中指定Cluster参数指定

  cluster-name-expression: new String("default")

  # 指定聚合哪些集群,多个使用","分割,默认为default。

  aggregator:

    cluster-config: default
应用程序类TurbineMonitorApplication :开启turbine监控
@SpringBootApplication

@EnableTurbine // 开启turbine集群监控

@EnableDiscoveryClient

public class TurbineMonitorApplication {

    public static void main(String[] args) {

        SpringApplication.run(TurbineMonitorApplication.class, args);

    }

}
至此,所有的项目已经构建完毕,我们现在可以理清整个架构图,使架构图更加具体易懂。通过端口+IP的指定,我们可以清楚集群中每个角色的信息:

启动项目:
第一步:启动高可用的注册中心,访问注册中心http://slave:5679或者http://master:5678
实例列表中两个eureka服务实例已经相互注册

并且已经相互注册为同步备份服务器,在http://slave:5679中(http://master:5678同理)

第二步:启动服务提供者实例,开启HELLO-SERVICE-1与HELLO-SERVICE-2服务
执行命令:
java -jar hello-service-0.0.1-SNAPSHOT.jar --server.port=8081 开启HELLO-SERVICE-1,保留CMD窗口
java -jar hello-service-0.0.1-SNAPSHOT.jar --server.port=8082 开启HELLO-SERVICE-2,保留CMD窗口
查看注册中心是否已经注册:

第三步:启动服务消费者实例,开启RIBBON-CONSUMER-1与RIBBON-CONSUMER-2服务
执行命令:
java -jar ribbon-consumer-0.0.1-SNAPSHOT.jar --server.port=8083 开启RIBBON-CONSUMER-1,保留CMD窗口
java -jar ribbon-consumer-0.0.1-SNAPSHOT.jar --server.port=8084 开启RIBBON-CONSUMER-2,保留CMD窗口
查看注册中心是否已经注册:

第四步:启动turbine-monitor项目,访问http://localhost:8001/turbine.stream
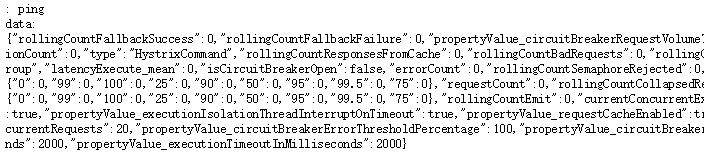
可能一开始的时候一直ping或者返回的data甚少,如下图:

这是因为我们还没有访问http://localhost:8083/ribbon-consumer或者http://localhost:8084/ribbon-consumer接口,访问后会有很多监控数据返回,如下图:
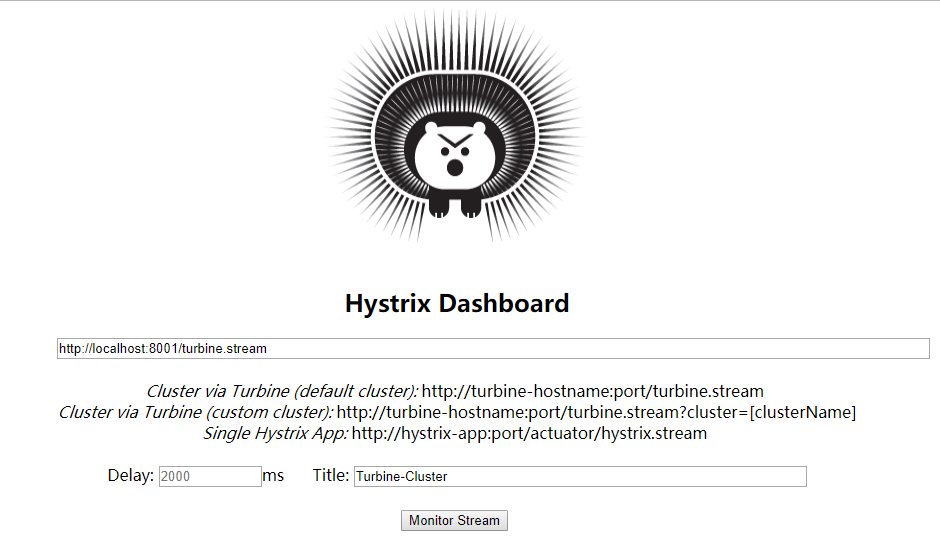
第五步:启动hystrix-dashboard项目,开启hystrix仪表盘监控,输入URL:http://localhost:8001/turbine.stream,点击Monitor Stream,进入监控页面
注:
若一开始一直显示Loading,原因同上,都是因为我们还没有访问http://localhost:8083/ribbon-consumer或者http://localhost:8084/ribbon-consumer接口
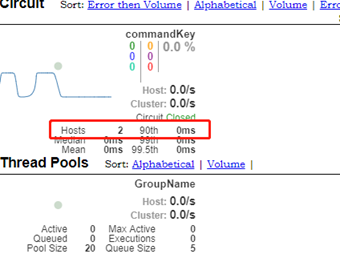
若一开始Hosts的数目只有1的话,说明我们只访问了http://localhost:8083/ribbon-consumer或者http://localhost:8084/ribbon-consumer接口其中一个,或者其中一个还没启用。同时启动并访问后就会显示Hosts数目为2
正常是这样的:
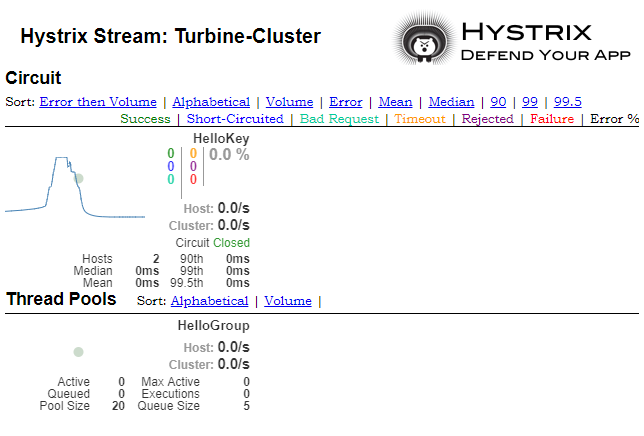
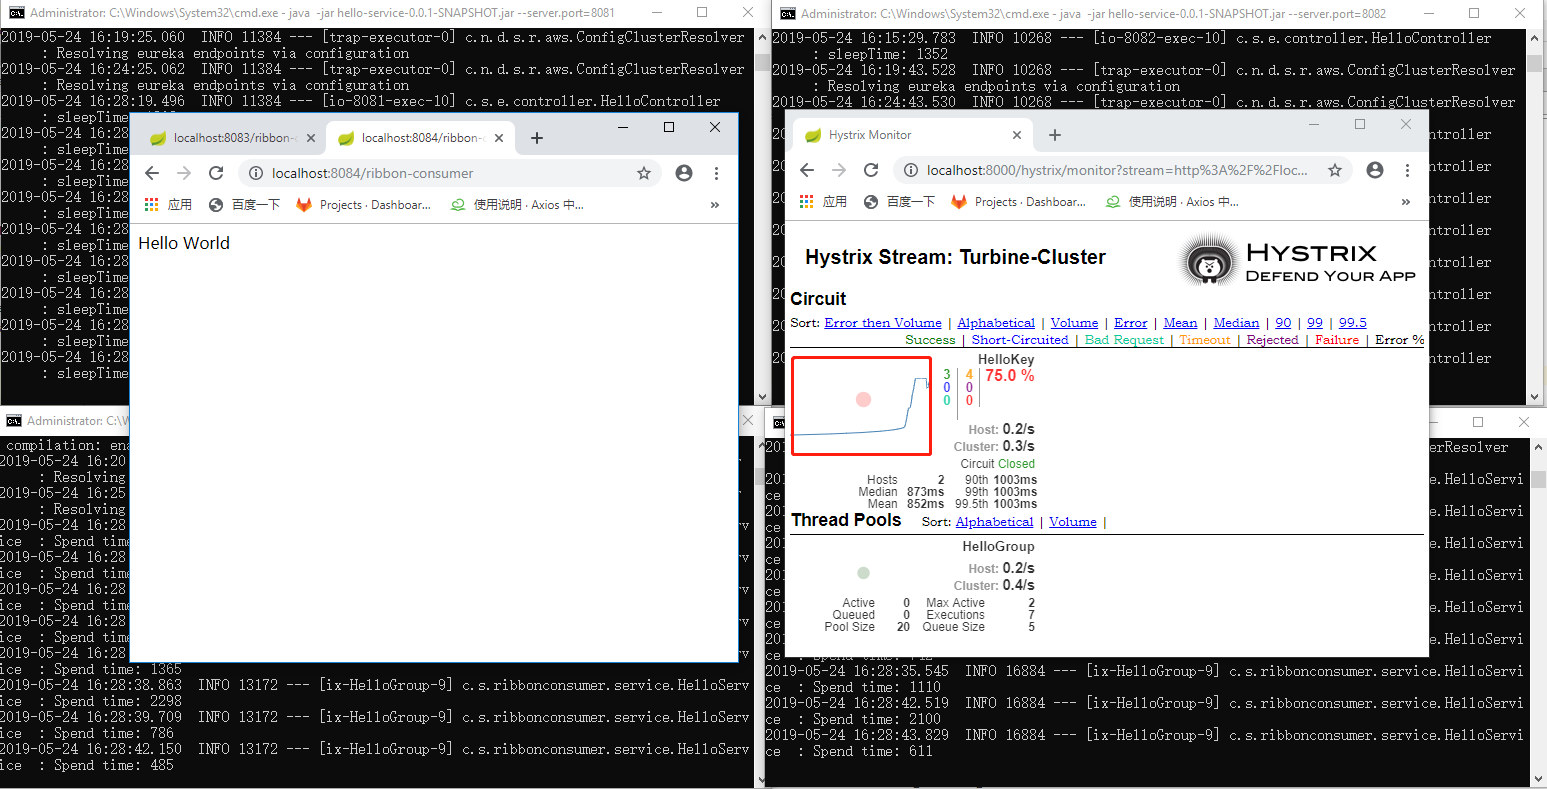
第六步:观察监控图、负载均衡。
1)观察负载均衡:
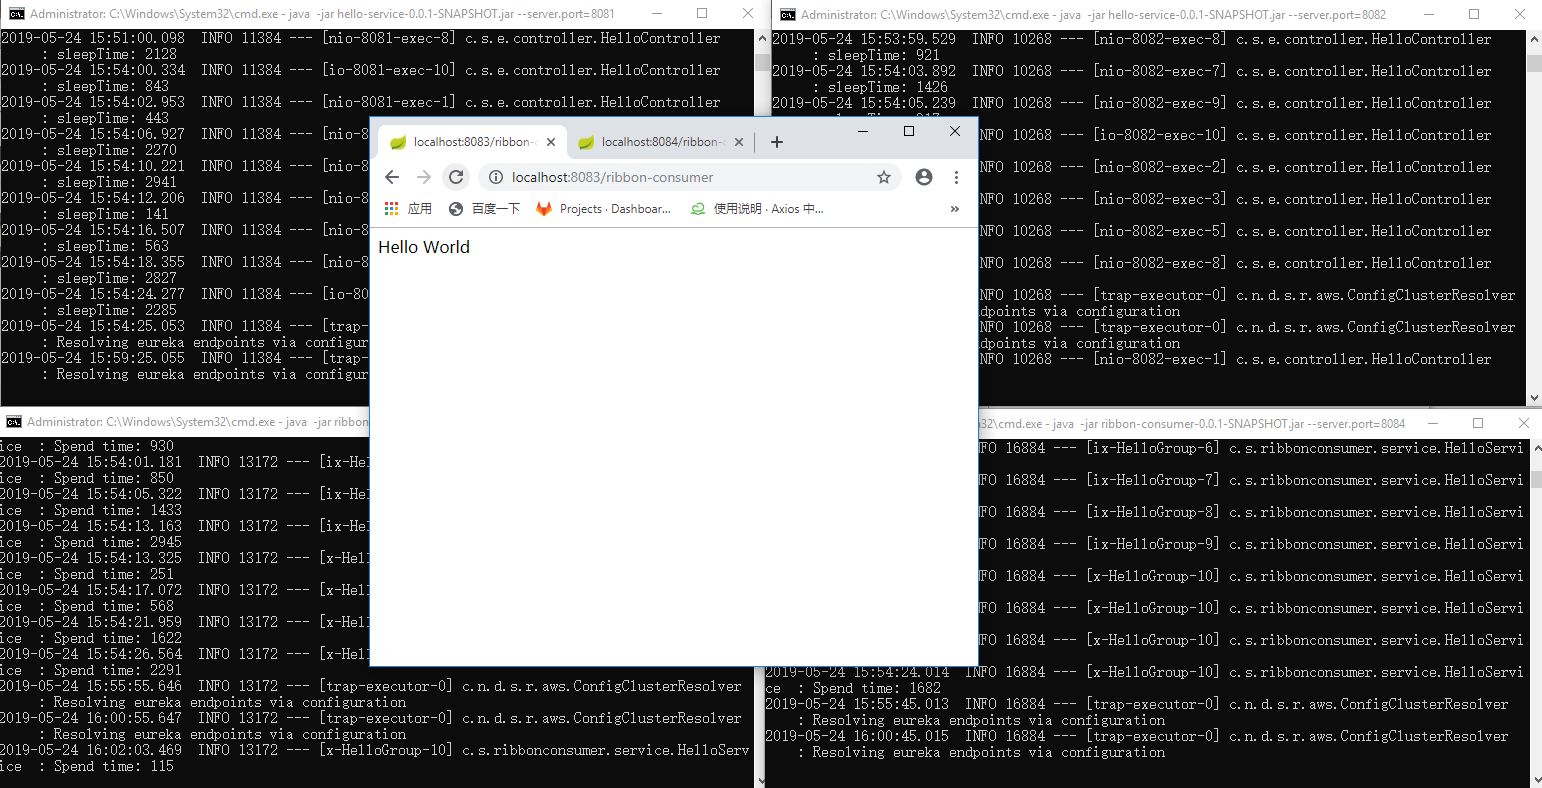
不断访问http://localhost:8083/ribbon-consumer或者http://localhost:8084/ribbon-consumer,可以看到服务提供实例不断交替打印日志,实际上就是轮询负载均衡
2)观察监控图:
代码中已经有模拟超时,如果超时(默认为2000ms)则会显示error字样,监控图中的超时数量会增加1
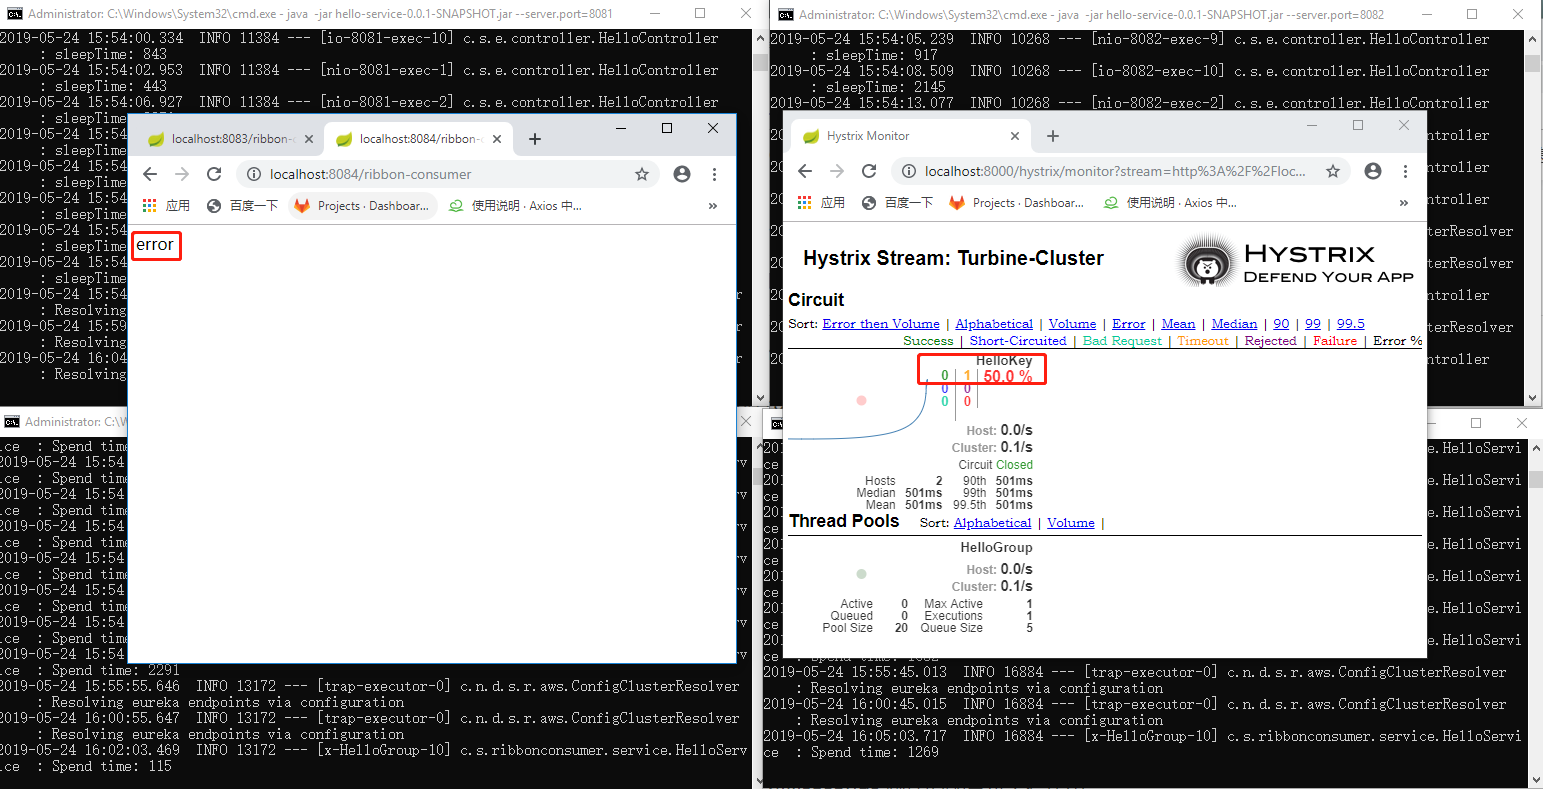
增加访问http://localhost:8083/ribbon-consumer或者http://localhost:8084/ribbon-consumer速度(不断刷新),可以看到监控图中的流量图呈上升趋势
总结
Spring Cloud的两个重要角色Spring Cloud ribbon与Spring Cloud Hystrix可以整合为Feign,Feign除了提供这两个强大的功能外,还提供了一种声明式的Web服务端定义方式。在Spring Cloud Feign的实现下,我们只需要创建一个接口并用注解的方式陪着它,即可完成对服务提供方的接口绑定,简化了在使用Spring Cloud Ribbon时自行封装服务调用客户端的开发量。同时Spring Cloud Feign扩展了Spring MVC的注解支持。
本文可能篇幅过长,但是每一步都很仔细,包括架构图都是自己理解之后所画。经过这段时间的学习,抽出差不多8小时的编写(中间浏览器崩溃几次,从头来过三次),终于写完了本篇博文,但是仍然有不足之处,敬请见谅,之后再慢慢摸索学习,希望自己能有所收获!
Spring Cloud Hystrix理解与实践(一):搭建简单监控集群的更多相关文章
- Spring Cloud简介/版本选择/ZooKeeper例子搭建简单说明
一.什么是Spring Cloud 官方的说法就是Spring Cloud 给开发者提供一套按照一定套路快速开发分布式系统的工具. 具体点就是Spring Boot实现的微服务架构开发工具.它为微服务 ...
- 笔记:Spring Cloud Hystrix 异常处理、缓存和请求合并
异常处理 在 HystrixCommand 实现的run方法中抛出异常,除了 HystrixBadRequestException之外,其他异常均会被Hystrix 认为命令执行失败并触发服务降级处理 ...
- Spring Cloud Hystrix 服务容错保护
目录 一.Hystrix 是什么 二.Hystrix断路器搭建 三.断路器优化 一.Hystrix 是什么 在微服务架构中,我们将系统拆分成了若干弱小的单元,单元与单元之间通过HTTP或者TCP等 ...
- 第五章 服务容错保护:Spring Cloud Hystrix
在微服务架构中,我们将系统拆分为很多个服务,各个服务之间通过注册与订阅的方式相互依赖,由于各个服务都是在各自的进程中运行,就有可能由于网络原因或者服务自身的问题导致调用故障或延迟,随着服务的积压,可能 ...
- spring boot 2.0.3+spring cloud (Finchley)1、搭建服务注册和发现组件Eureka 以及构建高可用Eureka Server集群
一 .搭建Eureka 编写Eureka Server 由于有多个spring boot项目,采用maven多module的结构,项目结构如下: 新建一个maven主工程,在主maven的pom文件中 ...
- spring cloud: Hystrix(二):简单使用@HystrixCommand的commandProperties配置@HistrixProperty隔离策略
spring cloud: Hystrix(二):简单使用@HystrixCommand的commandProperties配置@HistrixProperty隔离策略 某电子商务网站在一个黑色星期五 ...
- Spring Cloud Config 配置中心实践过程中,你需要了解这些细节!
本文导读: Spring Cloud Config 基本概念 Spring Cloud Config 客户端加载流程 Spring Cloud Config 基于消息总线配置 Spring Cloud ...
- 039.[转] 基于 Kubernetes 和 Spring Cloud 的微服务化实践
http://dockone.io/article/2967 基于 Kubernetes 和 Spring Cloud 的微服务化实践 写在前面 网易云容器平台期望能给实施了微服务架构的团队提供完整的 ...
- Spring Cloud Hystrix 服务容错保护 5.1
Spring Cloud Hystrix介绍 在微服务架构中,通常会存在多个服务层调用的情况,如果基础服务出现故障可能会发生级联传递,导致整个服务链上的服务不可用为了解决服务级联失败这种问题,在分布式 ...
随机推荐
- Linux--struct file结构体【转】
本文转载自:https://www.cnblogs.com/hanxiaoyu/p/5677677.html struct file(file结构体): struct file结构体定义在includ ...
- C语言实现队列(纯C)
1. [代码][C/C++]代码 #include <stdio.h>#include <stdlib.h>#define ElemType int #define Statu ...
- TP框架入门基础
ThinkPHP目录: ThinkPHP主目录文件夹: Conf文件夹: Library文件夹: Library=>Think文件夹:
- 疑难杂症:“代理 XP”组件已作为此服务器安全配置的一部分被关闭。系统管理员可以使用 sp_configure 来启用“代理 XP”。
“代理 XP”组件已作为此服务器安全配置的一部分被关闭.系统管理员可以使用 sp_configure 来启用“代理 XP”.有关启用“代理 XP”的详细信息,请参阅 SQL Server 联机丛书中的 ...
- T61
你参加了这次科学讨论会,有什么体会?What have you learned from the symposium?那墙有点斜.The wall is a little out of the per ...
- listen 69
Today Is Unlucky for People Who Have Bad Luck Today If you have Paraskevidekatriaphobia, today is no ...
- darknet YOLO 编译使用GPU
Darknet在GPU上运行可以得到500倍的提速,编译使用GPU要求显卡是Nvidia卡并且正确安装了CUDA. GPU环境下的编译配置都是在 /darknet/Makefile 文件中定义的,GP ...
- OpenCV——高斯模糊与毛玻璃特效
// define head function #ifndef PS_ALGORITHM_H_INCLUDED #define PS_ALGORITHM_H_INCLUDED #include < ...
- nginx rewrite 导致验证码不正确
配置nginx里url rewrite的时候,为了使浏览器地址栏的URL保持不变, 使用proxy_pass反向代理,但发现每次都会生成新的jsessionid 解决方法,配置中增加 proxy_co ...
- 一般项目转为Maven项目所遇到的问题
最近搞CI,准备使用Maven,但以前的项目不是Maven项目,需要把项目转换为Maven项目.这遇到几个小问题,一是jar包的依赖,二是从本地仓库取出依赖jar包. 由于没有本地仓库,要手动添加ja ...