【GLSL教程】(七)逐像素的光照 【转】
http://blog.csdn.net/racehorse/article/details/6662540
逐像素的方向光(Directional Light per Pixel)
这一节将把前面的shader代码改为逐像素计算的方向光。我们需要将工作按照两个shader拆分,以确定哪些是需要逐像素操作的。
首先看看每个顶点接收到的信息:
•法线
•半向量
•光源方向
我们需要将法线变换到视点空间然后归一化。我们还需要将半向量和光源方向也归一化,不过它们已经位于视点空间中了。这些归一化之后的向量会进行插值,然后送入片断shader,所以需要声明易变变量保存这些向量。
我们也可以在顶点shader中完成一些与光和材质相关的计算,这样可以帮助平衡顶点shader和片断shader的负载。
顶点shader代码可以写成如下形式:
- varying vec4 diffuse,ambient;
- varying vec3 normal,lightDir,halfVector;
- void main()
- {
- /* first transform the normal into eye space and
- normalize the result */
- normal = normalize(gl_NormalMatrix * gl_Normal);
- /* now normalize the light's direction. Note that
- according to the OpenGL specification, the light
- is stored in eye space. Also since we're talking about
- a directional light, the position field is actually direction */
- lightDir = normalize(vec3(gl_LightSource[0].position));
- /* Normalize the halfVector to pass it to the fragment shader */
- halfVector = normalize(gl_LightSource[0].halfVector.xyz);
- /* Compute the diffuse, ambient and globalAmbient terms */
- diffuse = gl_FrontMaterial.diffuse * gl_LightSource[0].diffuse;
- ambient = gl_FrontMaterial.ambient * gl_LightSource[0].ambient;
- ambient += gl_FrontMaterial.ambient * gl_LightModel.ambient;
- gl_Position = ftransform();
- }
接下来在片断shader中,首先要声明同样的易变变量。此外还要再次对法线进行归一化,光线向量不需要进行归一化了,因为方向光对所有顶点都是一致的,插值得到的结果自然也不会变。之后就是计算插值过的法线向量与光线向量的点积。
- varying vec4 diffuse,ambient;
- varying vec3 normal,lightDir,halfVector;
- void main()
- {
- vec3 n,halfV;
- float NdotL,NdotHV;
- /* The ambient term will always be present */
- vec4 color = ambient;
- /* a fragment shader can't write a varying variable, hence we need
- a new variable to store the normalized interpolated normal */
- n = normalize(normal);
- /* compute the dot product between normal and ldir */
- NdotL = max(dot(n,lightDir),0.0);
- ...
如果点积结果NdotL大于0,我们就必须计算散射光,也就是用顶点shader传过来的散射项乘以这个点积。我们还需要计算镜面反射光,计算时首先对接收到的半向量归一化,然后计算半向量和法线之间的点积。
- ...
- if (NdotL > 0.0)
- {
- color += diffuse * NdotL;
- halfV = normalize(halfVector);
- NdotHV = max(dot(n,halfV),0.0);
- color += gl_FrontMaterial.specular *
- gl_LightSource[0].specular *
- pow(NdotHV, gl_FrontMaterial.shininess);
- }
- gl_FragColor = color;
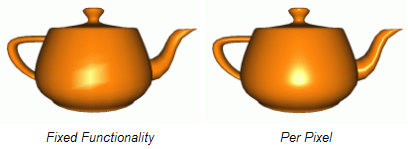
下图显示了逐像素光照和逐顶点光照效果的区别:

本节内容Shader Designer的工程下载地址:
http://www.lighthouse3d.com/wp-content/uploads/2011/03/dirpixsd.zip
逐像素的点光(Point Light Per Pixel)
本节基于前面有关方向光的内容,大部分代码都相同。本节内容主要涉及方向光和点光的不同之处。方向光一般假设光源在无限远的地方,所以到达物体时是平行光。相反,点光源有一个空间中的位置,并向四面八方辐射光线。此外,点光的强度会随到达顶点的距离而衰弱。
对于OpenGL程序来说,这两种光的区别主要有:
•光源的position域的w分量:对方向光来说它是0,表面这个position实际是一个方向(direction);对点光来说,这个分量是1。
•点光源的衰减由三个系数决定:一个常数项,一个线性项和一个二次项。
对方向光来说,光线的方向对所有顶点相同,但是对点光来说,方向是从顶点指向光源位置的向量。因此对我们来说需要修改的就是在顶点shader中加入计算光线方向的内容。
在OpenGL中衰减是按照如下公式计算的:
式中k0是常数衰减系数,k1是线性衰减系数,k2是二次衰减系数,d是光源位置到顶点的距离。
注意衰减与距离是非线性关系,所以我们不能逐顶点计算衰减再在片断shader中使用插值结果,不过我们可以在顶点shader中计算距离,然后在片断shader中使用距离的插值计算衰减。
使用点光计算颜色值的公式为:

在上面公式中,环境光部分必须分解为两项:使用光照模型的全局环境光设置和光源中的环境光设置。顶点shader也必须分别计算这两个环境光成分。新的顶点shader如下:
- varying vec4 diffuse,ambientGlobal,ambient;
- varying vec3 normal,lightDir,halfVector;
- varying float dist;
- void main()
- {
- vec4 ecPos;
- vec3 aux;
- normal = normalize(gl_NormalMatrix * gl_Normal);
- /* these are the new lines of code to compute the light's direction */
- ecPos = gl_ModelViewMatrix * gl_Vertex;
- aux = vec3(gl_LightSource[0].position-ecPos);
- lightDir = normalize(aux);
- dist = length(aux);
- halfVector = normalize(gl_LightSource[0].halfVector.xyz);
- /* Compute the diffuse, ambient and globalAmbient terms */
- diffuse = gl_FrontMaterial.diffuse * gl_LightSource[0].diffuse;
- /* The ambient terms have been separated since one of them */
- /* suffers attenuation */
- ambient = gl_FrontMaterial.ambient * gl_LightSource[0].ambient;
- ambientGlobal = gl_FrontMaterial.ambient * gl_LightModel.ambient;
- gl_Position = ftransform();
- }
在片断shader中需要计算衰减,还需要将插值得到的光线方向向量归一化,因为一般来说照到每个顶点的光线方向都不同。
- varying vec4 diffuse,ambientGlobal, ambient;
- varying vec3 normal,lightDir,halfVector;
- varying float dist;
- void main()
- {
- vec3 n,halfV,viewV,ldir;
- float NdotL,NdotHV;
- vec4 color = ambientGlobal;
- float att;
- /* a fragment shader can't write a varying variable, hence we need
- a new variable to store the normalized interpolated normal */
- n = normalize(normal);
- /* compute the dot product between normal and normalized lightdir */
- NdotL = max(dot(n,normalize(lightDir)),0.0);
- if (NdotL > 0.0)
- {
- att = 1.0 / (gl_LightSource[0].constantAttenuation +
- gl_LightSource[0].linearAttenuation * dist +
- gl_LightSource[0].quadraticAttenuation * dist * dist);
- color += att * (diffuse * NdotL + ambient);
- halfV = normalize(halfVector);
- NdotHV = max(dot(n,halfV),0.0);
- color += att * gl_FrontMaterial.specular * gl_LightSource[0].specular *
- pow(NdotHV,gl_FrontMaterial.shininess);
- }
- gl_FragColor = color;
- }
下图显示了固定功能的逐顶点与本节中逐像素计算得到的点光效果:
本节内容Shader Designer工程下载地址:
http://www.lighthouse3d.com/wp-content/uploads/2011/03/pointlightsd.zip
逐像素的聚光(Spot Light Per Pixel)
本节内容与上一节基本一致,唯一不同的就是聚光不同于点光,其发出的光线被限制在一个圆锥体中。
对于OpenGL程序来说,这两种光的区别主要有:
•聚光包含一个方向向量spotDirection,表示圆锥体的轴。
•圆锥体包含一个角度,在GLSL中可以使用应用程序设置的角度值以及对应的余弦值spotCosCutoff。
•最后还有一个衰减速率spotExponent,它表示从圆锥的中心轴向外表面变化时光强度的衰减。
聚光的顶点shader与点光完全相同,我们只需要对片断shader进行一些修改。只有当当前片断位于聚光的光锥内时,才需要对散射光、镜面反射光和环境光成分进行着色。所以我们首先要检查这个条件。
光源与某点连线向量以及聚光方向向量(spotDirection)之间夹角的余弦值必须大于spotCosCutoff,否则此点位于聚光之外,只能接收到全局环境光。
- ...
- n = normalize(normal);
- /* compute the dot product between normal and ldir */
- NdotL = max(dot(n,normalize(lightDir)),0.0);
- if (NdotL > 0.0)
- {
- spotEffect = dot(normalize(gl_LightSource[0].spotDirection),
- normalize(-lightDir));
- if (spotEffect > gl_LightSource[0].spotCosCutoff)
- {
- /* compute the illumination in here */
- }
- }
- gl_FragColor = ...
下面的光照计算与点光非常相似,唯一区别是衰减必须乘以聚光效果(spotlight effect),这个值按如下公式计算:

上式中spotDirection来自
OpenGL中设置的状态,lightDir是光源到某点的向量,spotExp是聚光衰减率,这个值也是在OpenGL程序中设置的,它用来控制从聚光
光锥中心到边缘的衰减。spotExp越大衰减越快,如果为0表示在光锥内光强是常数。
- spotEffect = pow(spotEffect, gl_LightSource[0].spotExponent);
- att = spotEffect / (gl_LightSource[0].constantAttenuation +
- gl_LightSource[0].linearAttenuation * dist +
- gl_LightSource[0].quadraticAttenuation * dist * dist);
- color += att * (diffuse * NdotL + ambient);
- halfV = normalize(halfVector);
- NdotHV = max(dot(n,halfV),0.0);
- color += att * gl_FrontMaterial.specular *
- gl_LightSource[0].specular *
- pow(NdotHV,gl_FrontMaterial.shininess);
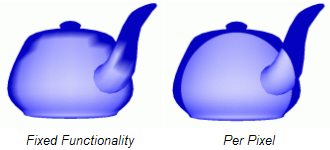
下图分别显示了使用固定功能流水线的逐顶点光照计算,以及使用本节shader的逐像素光照计算得到的聚光效果。
本节内容Shader Designer的工程下载地址:
http://www.lighthouse3d.com/wp-content/uploads/2011/03/spotlightsd.zip
【GLSL教程】(七)逐像素的光照 【转】的更多相关文章
- 【GLSL教程】(六)逐顶点的光照 【转】
引言 在OpenGL中有三种类型的光:方向光(directional).点光(point).聚光(spotlight).本教程将从方向光讲起,首先我们将使用GLSL来模仿OpenGL中的光. 我们将向 ...
- GLSL逐像素光照 【转】
转载:http://blog.csdn.net/hgl868/article/details/7872414 逐像素的方向光(Directional Light per Pixel) 这一节将把前面的 ...
- unity shader入门(三)逐像素光照,Blinn-Phong模型
与上篇逐顶点光照很像,只是改为在片元着色器中计算光照,下为逐像素光照shader Shader "study/Chapter6/PixelShader"{ Properties{ ...
- 【GLSL教程】(一)图形流水线 【转】
http://blog.csdn.net/racehorse/article/details/6593719 这是一些列来自lighthouse3d的GLSL教程,非常适合入门.我将边学习边翻译该教程 ...
- Unity shader学习之逐像素漫反射光照模型
shader如下: Shader "Custom/Diffuse Fragment-Level" { Properties { _Diffuse (,,,) } SubShader ...
- CRL快速开发框架系列教程七(使用事务)
本系列目录 CRL快速开发框架系列教程一(Code First数据表不需再关心) CRL快速开发框架系列教程二(基于Lambda表达式查询) CRL快速开发框架系列教程三(更新数据) CRL快速开发框 ...
- Laravel教程 七:表单验证 Validation
Laravel教程 七:表单验证 Validation 此文章为原创文章,未经同意,禁止转载. Laravel Form 终于要更新这个Laravel系列教程的第七篇了,期间去写了一点其他的东西. 就 ...
- 无废话ExtJs 入门教程七[登陆窗体Demo:Login]
无废话ExtJs 入门教程七[登陆窗体Demo:Login] extjs技术交流,欢迎加群(201926085) 在这节我们通过前几节讲的内容做一个登陆页面,把前几节讲的内容贯穿一下. 1.代码如下: ...
- ASP.NET 5系列教程(七)完结篇-解读代码
在本文中,我们将一起查看TodoController 类代码. [Route] 属性定义了Controller的URL 模板: [Route("api/[controller]") ...
随机推荐
- UVALive 5983 MAGRID DP
题意:在一个n*m的网格上,从(0,0)走到(n-1,m-1),每次只能向右或者向下走一格.一个人最初有一个生命值x,走到每一个格生命值会 变为x + s[i][j],(s[i][j]可为负,0,正) ...
- EPEL 安装源
EPEL 安装源 EPEL 是 Extra Packages for Enterprise Linux 的缩写(EPEL),是用于 Fedora-based Red Hat Enterprise Li ...
- [NOI2011][bzoj2434] 阿狸的打字机 [AC自动机+dfs序+fail树+树状数组]
题面 传送门 正文 最暴力的 最暴力的方法:把所有询问代表的字符串跑一遍kmp然后输出 稍微优化一下:把所有询问保存起来,把模板串相同的合并,求出next然后匹配 但是这两种方法本质没有区别,都是暴力 ...
- [暑假集训--数论]poj2909 Goldbach's Conjecture
For any even number n greater than or equal to 4, there exists at least one pair of prime numbers p1 ...
- 弱题(bzoj 2510)
Description 有M个球,一开始每个球均有一个初始标号,标号范围为1-N且为整数,标号为i的球有ai个,并保证Σai = M. 每次操作等概率取出一个球(即取出每个球的概率均为1/M),若这个 ...
- 【原创】datalist repeater 控件的行鼠标单击 以及 滑过特效
原文发布时间为:2009-05-06 -- 来源于本人的百度文章 [由搬家工具导入] 调用方法如:<tr id="<%# Container.ItemIndex+1 %>& ...
- Web安全-XSS-SQL注入-CSRF
一.XSS 跨站脚本攻击(Cross Site Scripting): 1.指攻击者在网页中嵌入客户端脚本(例如JavaScript), 当用户浏览此网页时,脚本就会在用户的浏览器上执行,从而达到攻击 ...
- cobbler一键部署centos7.4(脚本)
执行脚本之前你需要做四件事 1. 关闭防火墙 2.关闭selinux 3.配置163或者阿里云的 yum源 4.上传centos7.4的镜像如下图 [root@cobbler ~]# cat auto ...
- hdu 4994(博弈)
Revenge of Nim Time Limit: 2000/1000 MS (Java/Others) Memory Limit: 32768/32768 K (Java/Others)To ...
- 关于centos防火墙
Centos升级到7之后,内置的防火墙已经从iptables变成了firewalld Centos7默认安装了firewalld,如果没有安装的话,可以使用 yum install firewalld ...