
Part 21 to 22 AngularJS anchorscroll
Part 21 AngularJS anchorscroll example
- $anchorscroll service is used to jump to a specified element on the page
- $location service hash method appends hash fragments to the URL
- $anchorscroll() method reads the hash fragment in the URL and jumps to that element on the page
- yOffset property specifies the vertical scroll-offset
<!DOCTYPE html>

<html xmlns="http://www.w3.org/1999/xhtml" ng-app="demoApp">

<head>

    <title></title>

    <script src="Scripts/angular.js"></script>

    <script src="Scripts/Script.js"></script>

    <link href="Styles.css" rel="stylesheet" />

</head>

<body ng-controller="demoController">

    <button id="top" ng-click="scrollTo('bottom')">

        Go to bottom of the page

    </button>

    <br /><br />

    <div>

        <b>What is AngularJS</b>

        <br />

        AngularJS is a JavaScript framework that helps build applications that run in a web browser.

        <br /><br />

        <b>Who developed AngularJS</b>

        <br />

        Google is the company that developed AngularJS. AngularJS is an open source project, which means it can be be freely used, changed, and shared by anyone.

        <br /><br />

        AngularJS is an excellent framework for building both Single Page Applications (SPA) and Line of Business Applications. Many companies are using Angular today, and there are many public facing web sites that are built with angular.

        <br /><br />

        There is a website, https://www.madewithangular.com, that has the list of web sites that are built using AngularJS. Within this list you can find many popular websites.

        <br /><br />

        <b>What are the benefits of using AngularJS</b>

        <br />

        <b>1. Dependency Injection : </b>Dependency Injection is something AngularJS does quite well. If you are new to Dependency Injection, don't worry, we will discuss it in detail with examples in a later video.

        <br /><br />

        <b>2. Two Way Data-Binding : </b>One of the most useful feature in AngularJS is the Two Way Data-Binding. The Two Way Data-Binding, keeps the model and the view in sync at all times, that is a change in the model updates the view and a change in the view updates the model.

        <br /><br />

        <b>3. Testing : </b>Testing is an area where Angular really shines. Angular is designed with testing in mind right from the start. Angular makes it very easy to test any of it's components through both unit testing and end to end testing. So there's really no excuse for not testing any of your angular application code.

        <br /><br />

        <b>4. Model View Controller : </b>With angular it is very easy to develop applications in a clean MVC way. All you have to do is split your application code into MVC components. The rest, that is managing those components and connecting them together is done by angular.

        <br /><br />

        <b>5. Many more benefits like controlling the behaviour of DOM elements using directives and the flexibility that angular filters provide.</b>

        <br /><br />

        We will discuss directives, filters, Modules, Routes etc with examples in our upcoming videos in this series.

        <br /><br />

        To build angular applications you only need one script file and that is angular.js.

        <br /><br />

        <b>To get the script file visit https://angularjs.org. From here</b>

        <br />

        1. You can download the angular script file<br />

        2. CDN link - We discussed the benefits of using CDN in Part 3 of jQuery tutorial.<br/>

        3. Various resources to learn angular - Here you will find videos, Free courses, Tutorials and Case Studies. You will also find API reference which is extremeley useful.<br/>

        <br /><br />

        <b>To get started with angular</b>

        <br />

        1. Add a reference to the angular script

        <br />

        2. Include ng-app attribute

        <br /><br />

        <b>What is ng-app</b>

        <br />

        In angular, ng-app is called a directive. There are many directives in angular. You can find the complete list of directives on https://angularjs.org. The ng prefix in the directive stands for angular. The ng-app directive is a starting point of AngularJS Application. Angular framework will first check for ng-app directive in an HTML page after the entire page is loaded. If ng-app directive is found, angular bootstraps itself and starts to manage the section of the page that has the ng-app directive.

        <br /><br />

        <b>So the obvious next question is, where to place the ng-app directive on the page</b>

        <br /><br />

        It should be placed at the root of the HTML document, that is at the html tag level or at the body tag level, so that angular can control the entire page.

        <br /><br />

        However, there is nothing stopping you from placing it on any other HTML element with in the page. When you do this only that element and it's children are managed by angular.

        <br /><br />

        <span>Double curly braces are called binding expressions in angular.</span>

    </div>

    <br />

    <button id="bottom" ng-click="scrollTo('top')">

        Go to top of the page

    </button>

</body>

</html>
/// <reference path="angular.js" />

var demoApp = angular.module("demoApp", [])

                     .controller("demoController", function

                         ($scope, $location, $anchorScroll) {

                         $scope.scrollTo = function (scrollLocation) {

                             $location.hash(scrollLocation);

                             $anchorScroll.yOffset = 20;

                             $anchorScroll();

                         }

                     });
div {

    width: 400px;

    border: 1px solid black;

    font-family: Arial;

    font-size: large;

    padding: 5px;

}
Part 22 Angular anchorscroll with database data
In Part 21 we discussed using anchorscroll service with hardcoded data. In this video we will discuss using angular anchorscroll service with database data.
So here is what we want to do. Retrieve the countries and cities data from respective tables in the SQL server database and display it on the web page. When we click on a country button, the page should automatically scroll to the respective country and it's cities. 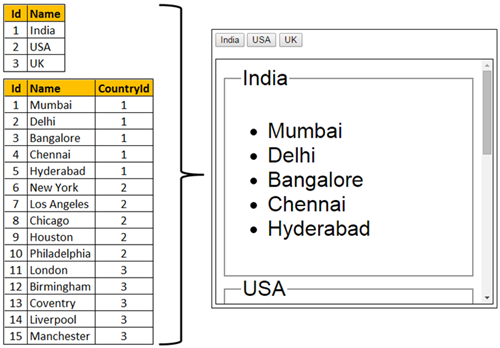
Step 1 : Create SQL Server tables and insert data
Create Table tblCountry

(

    Id int primary key identity,

    Name nvarchar(50)

)

Go

Insert into tblCountry values ('India')

Insert into tblCountry values ('USA')

Insert into tblCountry values ('UK')

Go

Create Table tblCity

(

    Id int primary key identity,

    Name nvarchar(50),

    CountryId int foreign key references tblCountry(Id)

)

Go

Insert into tblCity values ('Mumbai', 1)

Insert into tblCity values ('Delhi', 1)

Insert into tblCity values ('Bangalore', 1)

Insert into tblCity values ('Chennai', 1)

Insert into tblCity values ('Hyderabad', 1)

Insert into tblCity values ('New York', 2)

Insert into tblCity values ('Los Angeles', 2)

Insert into tblCity values ('Chicago', 2)

Insert into tblCity values ('Houston', 2)

Insert into tblCity values ('Philadelphia', 2)

Insert into tblCity values ('London', 3)

Insert into tblCity values ('Birmingham', 3)

Insert into tblCity values ('Coventry', 3)

Insert into tblCity values ('Liverpool', 3)

Insert into tblCity values ('Manchester', 3)

Go
create data
Step 2 : Create new empty asp.net web application project. Name it Demo.
Step 3 : Include the following settings in web.config file.
<?xml version="1.0" encoding="utf-8"?>

<configuration>

  <connectionStrings>

    <add name="DBCS"

         connectionString="server=.;database=SampleDB; integrated security=SSPI"/>

  </connectionStrings>

  <system.web>

    <webServices>

      <protocols>

        <add name="HttpGet"/>

      </protocols>

    </webServices>

  </system.web>

</configuration>
Step 4 : Add a class file to the project. Name it City.cs. Copy and paste the following code.
namespace Demo

{

    public class City

    {

        public int Id { get; set; }

        public string Name { get; set; }

        public int CountryId { get; set; }

    }

}
Step 5 : Add a class file to the project. Name it Country.cs. Copy and paste the following code.
using System.Collections.Generic;

namespace Demo

{

    public class Country

    {

        public int Id { get; set; }

        public string Name { get; set; }

        public List<City> Cities { get; set; }

    }

}
Step 6 : Add a new WebService (ASMX). Name it CountryService.asmx. Copy and paste the following code.
using System;

using System.Collections.Generic;

using System.Configuration;

using System.Data;

using System.Data.SqlClient;

using System.Web.Script.Serialization;

using System.Web.Services;

namespace Demo

{

    [WebService(Namespace = "http://tempuri.org/")]

    [WebServiceBinding(ConformsTo = WsiProfiles.BasicProfile1_1)]

    [System.ComponentModel.ToolboxItem(false)]

    [System.Web.Script.Services.ScriptService]

    public class CountryService : System.Web.Services.WebService

    {

        [WebMethod]

        public void GetData()

        {

            List<Country> listCountries = new List<Country>();

            string cs = ConfigurationManager.ConnectionStrings["DBCS"].ConnectionString;

            using (SqlConnection con = new SqlConnection(cs))

            {

                SqlCommand cmd = new SqlCommand("Select * from tblCountry;Select * from tblCity", con);

                SqlDataAdapter da = new SqlDataAdapter(cmd);

                DataSet ds = new DataSet();

                da.Fill(ds);

                DataView dataView = new DataView(ds.Tables[1]);

                foreach (DataRow countryDataRow in ds.Tables[0].Rows)

                {

                    Country country = new Country();

                    country.Id = Convert.ToInt32(countryDataRow["Id"]);

                    country.Name = countryDataRow["Name"].ToString();

                    dataView.RowFilter = "CountryId = '" + country.Id + "'";

                    List<City> listCities = new List<City>();

                    foreach (DataRowView cityDataRowView in dataView)

                    {

                        DataRow cityDataRow = cityDataRowView.Row;

                        City city = new City();

                        city.Id = Convert.ToInt32(cityDataRow["Id"]);

                        city.Name = cityDataRow["Name"].ToString();

                        city.CountryId = Convert.ToInt32(cityDataRow["CountryId"]);

                        listCities.Add(city);

                    }

                    country.Cities = listCities;

                    listCountries.Add(country);

                }

            }

            JavaScriptSerializer js = new JavaScriptSerializer();

            Context.Response.Write(js.Serialize(listCountries));

        }

    }

}
WebService code
Step 7 : Add a new folder to the project. Name it Scripts. Add a new JavaScript file to the Scripts folder. Name it Script.js. Copy and paste the following code.
/// <reference path="angular.js" />

var demoApp = angular.module("demoApp", [])

                     .controller("countryController",

                        function ($scope, $location, $anchorScroll, $http) {

                         $http.get("CountryService.asmx/GetData")

                              .then(function (response) {

                                  $scope.countries = response.data;

                              });

                         $scope.scrollTo = function (countryName) {

                             $location.hash(countryName);

                             $anchorScroll();

                         }

                     });
Step 8 : Add a new stylesheet to the project. Name it Styles.css. Copy and paste the following styles in it.
body {

    font-family: Arial;

}

div {

    display: block;

    font-size: xx-large;

    height: 350px;

    width: 400px;

    border: 1px solid black;

    padding: 10px;

    overflow-y: scroll;

}
Step 9 : Add an HTML page to the ASP.NET project. Copy and paste the following HTML and Angular code
<!DOCTYPE html>

<html xmlns="http://www.w3.org/1999/xhtml" ng-app="demoApp">

<head>

    <title></title>

    <script src="Scripts/angular.js"></script>

    <script src="Scripts/Script.js"></script>

    <link href="Styles.css" rel="stylesheet" />

</head>

<body ng-controller="countryController">

    <span ng-repeat="country in countries">

        <button ng-click="scrollTo(country.Name)">{{country.Name}}</button>

    </span>

    <br /><br />

    <div class="containerDiv">

        <fieldset ng-repeat="country in countries" id="{{country.Name}}">

            <legend>{{country.Name}}</legend>

            <ul>

                <li ng-repeat="city in country.Cities">

                    {{city.Name}}

                </li>

            </ul>

        </fieldset>

    </div>

</body>

</html>
Part 21 to 22 AngularJS anchorscroll的更多相关文章
- 记一次metasploitable2内网渗透之21,22,23,25端口爆破
Hydra是一款非常强大的暴力破解工具,它是由著名的黑客组织THC开发的一款开源暴力破解工具.Hydra是一个验证性质的工具,主要目的是:展示安全研究人员从远程获取一个系统认证权限. 目前该工具支持以 ...
- SICP 1.21 1.22 体会
1.21 简单的将书上代码敲了一遍. 非常顺利就过了. 1.22 就悲剧了. 先按书本的意思.代码非常快就写完了.但计算的时间在机子上漂浮不定. 3-5倍之间. 代码例如以下: (define (se ...
- 2-1赋值运算符 & 2-2自增自减运算符 &2-3
2-1赋值运算符 先定义一个变量,把定义好的变量在赋值给另外一个变量.变向之间的互相赋值 2-2自增自减运算符 元素符,放在变量前和变量后的区别 先进行自增运算,再进行赋值运算.这里先进行num1的+ ...
- 端口渗透·网站渗透过程 --21 ,22,873,3306,6379,8080(8080端口是针对CMS的渗透)
声明:文章渗透网站为模拟环境,文章只为利用过程 文章为信息收集和端口渗透两部分,21端口为ftp版本漏洞 8080端口为CMS的渗透 信息收集: ·使用扫描工具nmap ,PortScan 对整个网段 ...
- 例题 2-1 aabb 2-2 3n+1问题
例题2-1 aabb 输出全部形如aabb的四位全然平方数(即前两位数字相等,后两位数字也相等) #include <stdio.h> #include <stdlib.h> ...
- AngularJs $anchorScroll、$controller、$document
$anchorScroll 根据HTML5的规则,当调用这个函数时,它检查当前的url的hash值并且滚动到相应的元素. 监听$location.hash()并且滚动到url指定的锚点的地方.可以通过 ...
- Python之旅.第二章数据类型 3.19/3.20/3.21/3.22/3.23
一.数字类型 1.int类型: 基本使用: 用途:用于年龄,手机号,身份证号: 定义: age=18: 常用操作+内置方法: 正常的运算赋值: 进制转换: print(bin(3)); 把十进制3转换 ...
- 记录21.07.22 —— Vue.js基础(一)
VUE基础 语雀课件地址 Vue.js框架 Vue中文文档 Vue.js 创建vue项目 ①在一个空项目中引入vue的js文件 <script src="https://cdn.jsd ...
- AngularJS 模态对话框
本文内容 项目结构 运行结果 index.html mymodal.js 参考资料 本文讲解 Angular JS 实现模式对话框.基于 AngularJS v1.5.3.Bootstrap v3.3 ...
随机推荐
- Linux文件系统与inode、Block笔记
Linux文件系统与inode.Block笔记 在Linux下一切都是文件,无论是设备还是接口,亦或是网卡等均被抽象成了文件,并且有相关的内核代码进行调度.然而,在一切都是文件的前提下,最需要进行探讨 ...
- Javascript深入之作用域与闭包
相信绝大多数同学都听过闭包这个概念,但闭包具体是什么估计很少有人能够说的很详细.说实话闭包在我们平时开发中应该是很常见的,并且在前端面试中闭包也是常见的重要考点,在学习闭包之前我们先来看看作用域与作用 ...
- 四、Implementation: The Building Blocks 实现:构件
四.Implementation: The Building Blocks 实现:构件 This is the essential part of this guide. We will introd ...
- cookie和session和localStorage的区别
这三个都是保存在浏览器端,而且都是同源的. Session仅在当前浏览器窗口关闭有效,不能持久保存 Localstorage始终有效,窗口或浏览器关闭也一直保存,因此用作持久数据 Cookie只在设置 ...
- Netty学习笔记(1)NIO三大组件
1. Channel channel 有一点类似于 stream,它就是读写数据的双向通道,可以从 channel 将数据读入 buffer,也可以将 buffer 的数据写入 channel,而之前 ...
- airtest常用指令
airtest 操作adb命令 常用adb 1)对特定设备执行adb指令 dev = connect_device("Android:///device1") dev.shel ...
- [no_code]团队贡献分分配规则
项目 内容 2020春季计算机学院软件工程(罗杰 任健) 2020春季计算机学院软件工程(罗杰 任健) 作业要求 团队贡献分分配规则 我们在这个课程的目标是 远程协同工作,采用最新技术开发软件 这个作 ...
- VUE调用子窗口弹窗或组件弹窗,关闭弹窗刷新父级页面主页面,通过this.$emit来实现
this.$emit是父级向自己传值 第一步在父级页面创建自己页面的引用 <template> <div> <edit ref="edit" @ref ...
- Noip模拟74 2021.10.11
T1 自然数 考场上当我发现我的做法可能要打线段树的时候,以为自己百分之百是考虑麻烦了 但还是打了,还过掉了所有的样例,于是十分自信的就交了 正解还真是线段树,真就第一题数据结构 但是包括自己造的小样 ...
- 关于stm32串口必须要学的5个串口以及串口应用和注意事项
串口是我们常用的一个数据传输接口,STM32F103系列单片机共有5个串口. 其中1-3是通用同步/异步串行接口USART(Universal Synchronous/Asynchronous Rec ...