
pod生命周期
Pod生命周期
我们一般将pod对象从创建至终这段时间范围成为pod的生命周期,它主要包含以下的过程:
- pod创建过程
- 运行初始化容器(init container)过程
- 运行主容器(main container)
- 容器启动后钩子(post start)、容器终止前钩子(pre stop)
- 容器的存活性检测(liveness probe)、就绪性检测(readiness probe)
- pod终止过程
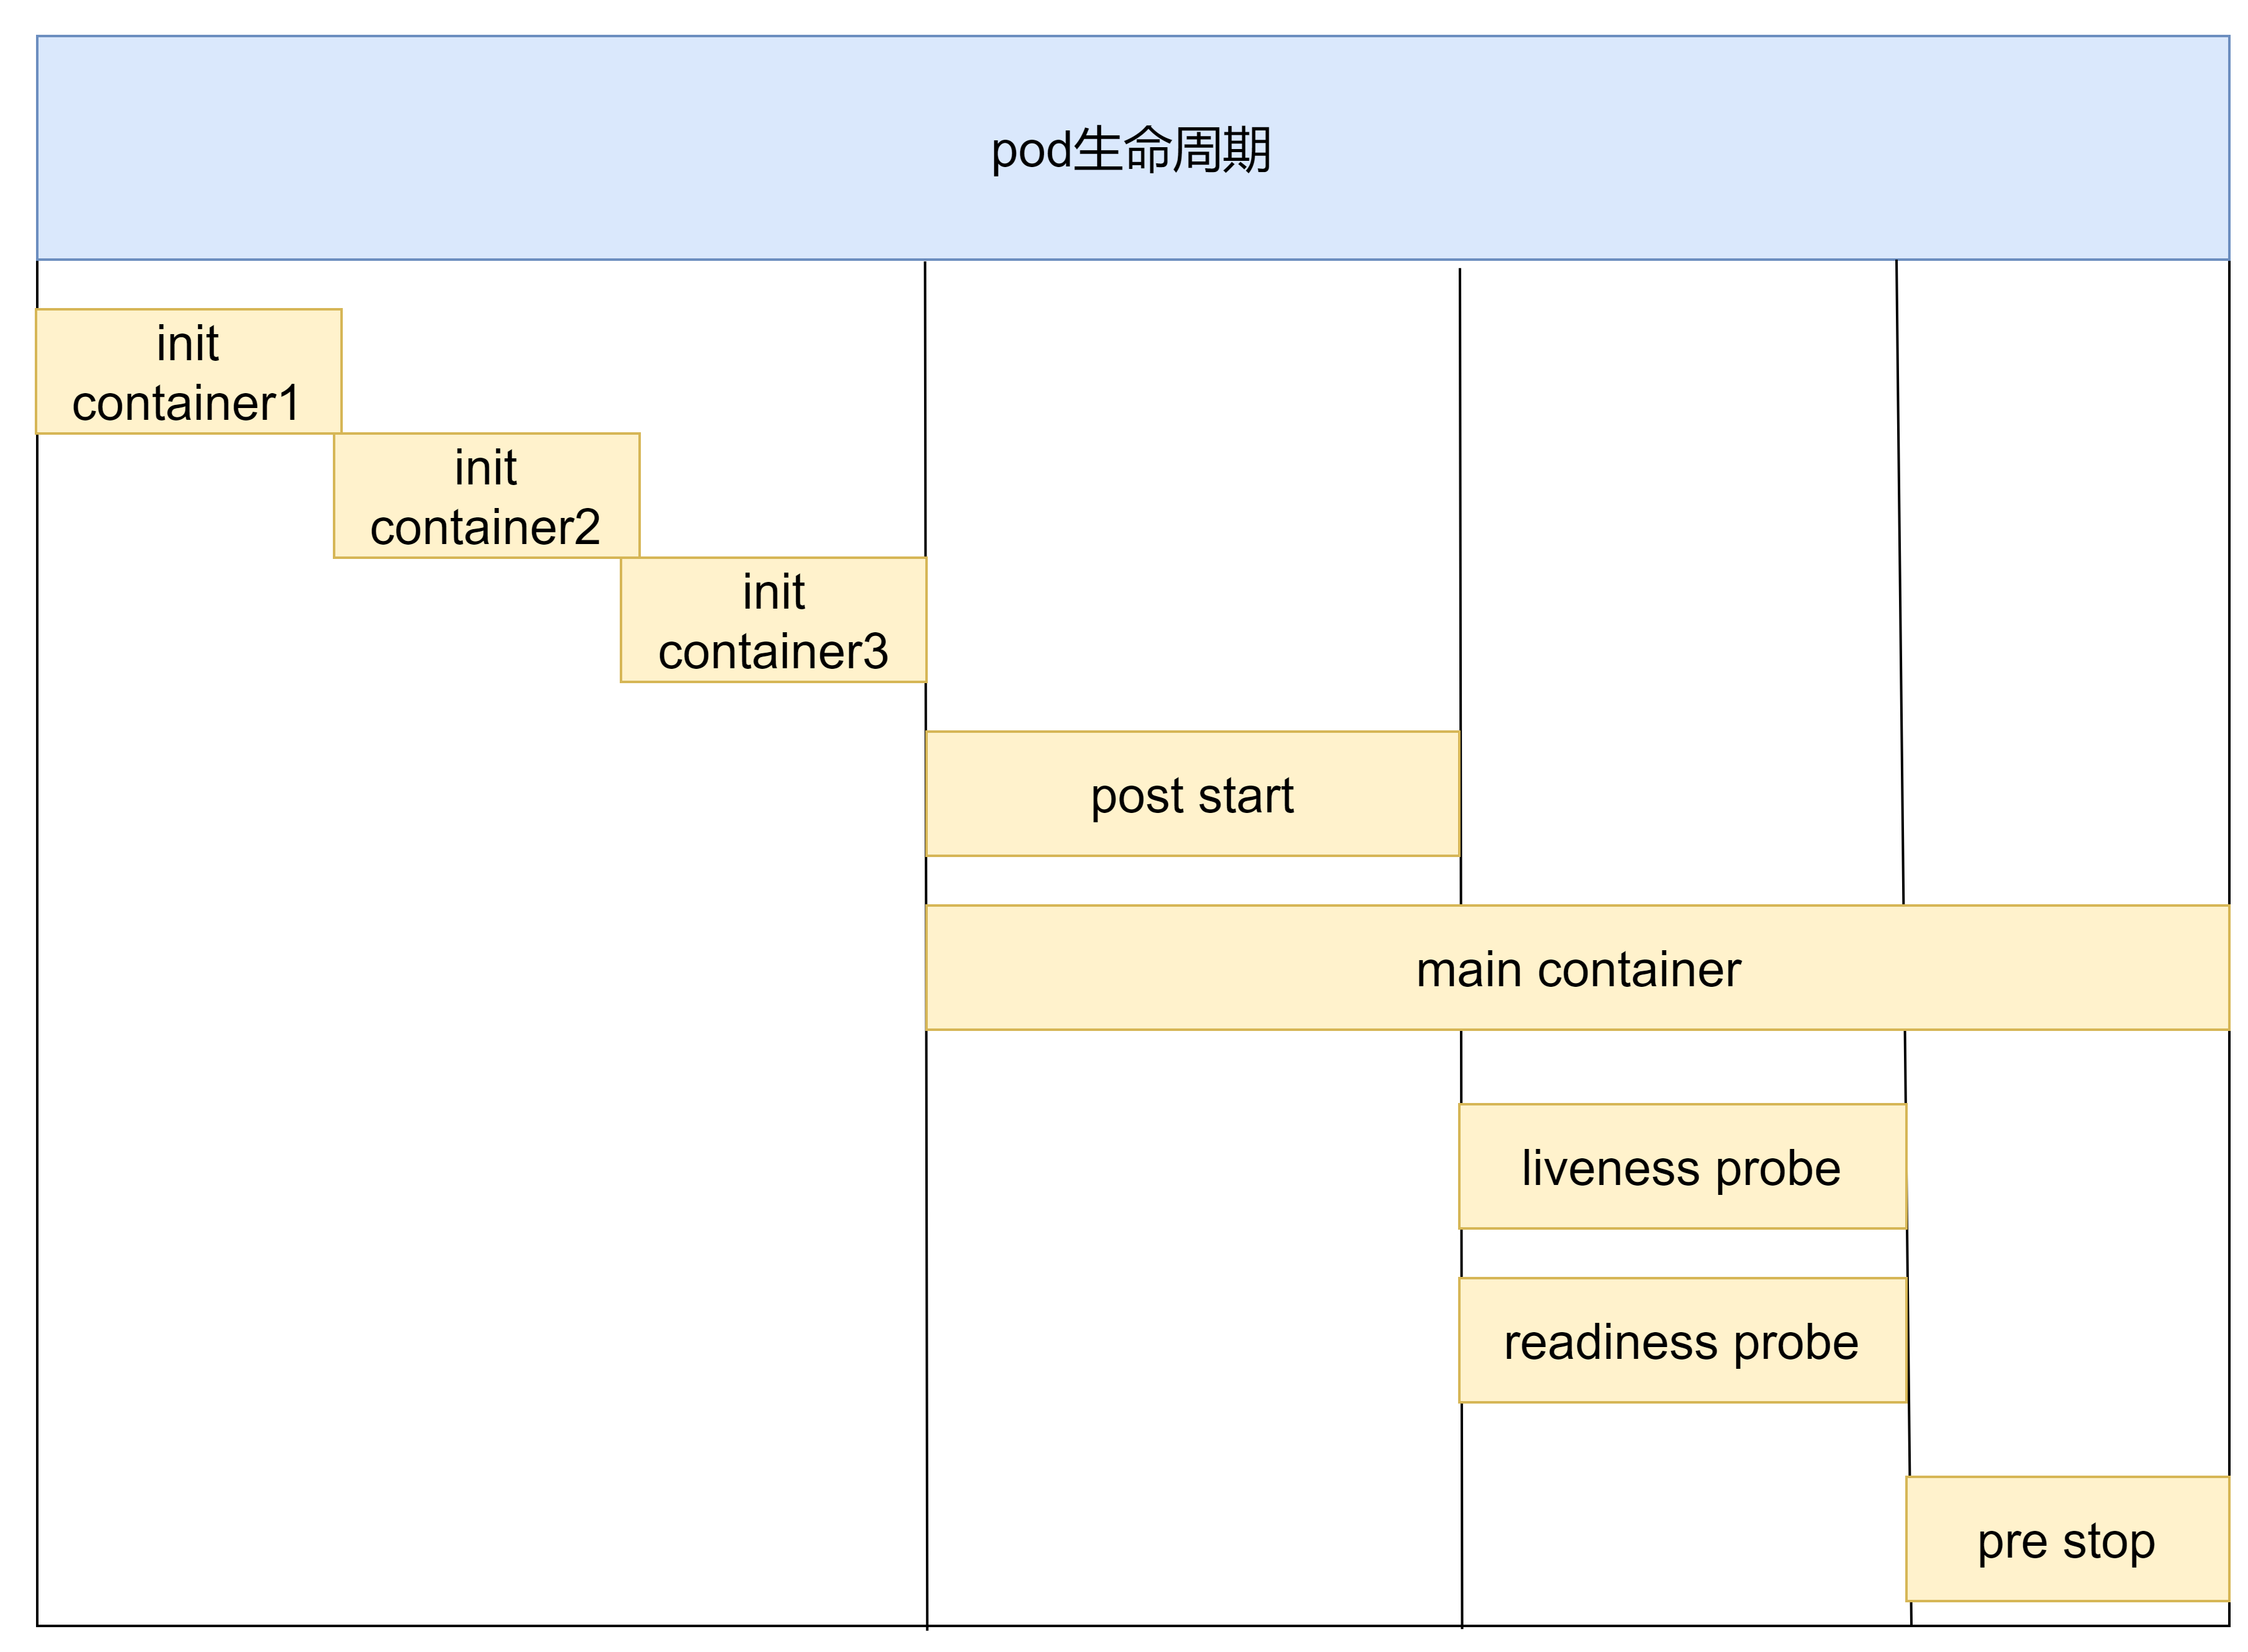
pod的创建和终止
pod的创建过程
- 用户通过kubectl或其他api客户端提交需要创建的pod信息给apiserver
- apiserver开始生成pod对象的信息,并将信息存入etcd,然后返回确认信息至客户端
- apiserver开始反映etcd中pod对象的变化,其他组件使用watch机制来跟踪检查apiserver上的变动
- scheduler发现有新的pod对象要创建,开始为pod分配主机并将结果信息更新至apiserver
- node节点上的kubectl发现有pod调度过来,尝试调用docker启动容器,并将结果返回送至apiserver
- apiserver将接收到的pod状态信息存入etcd中
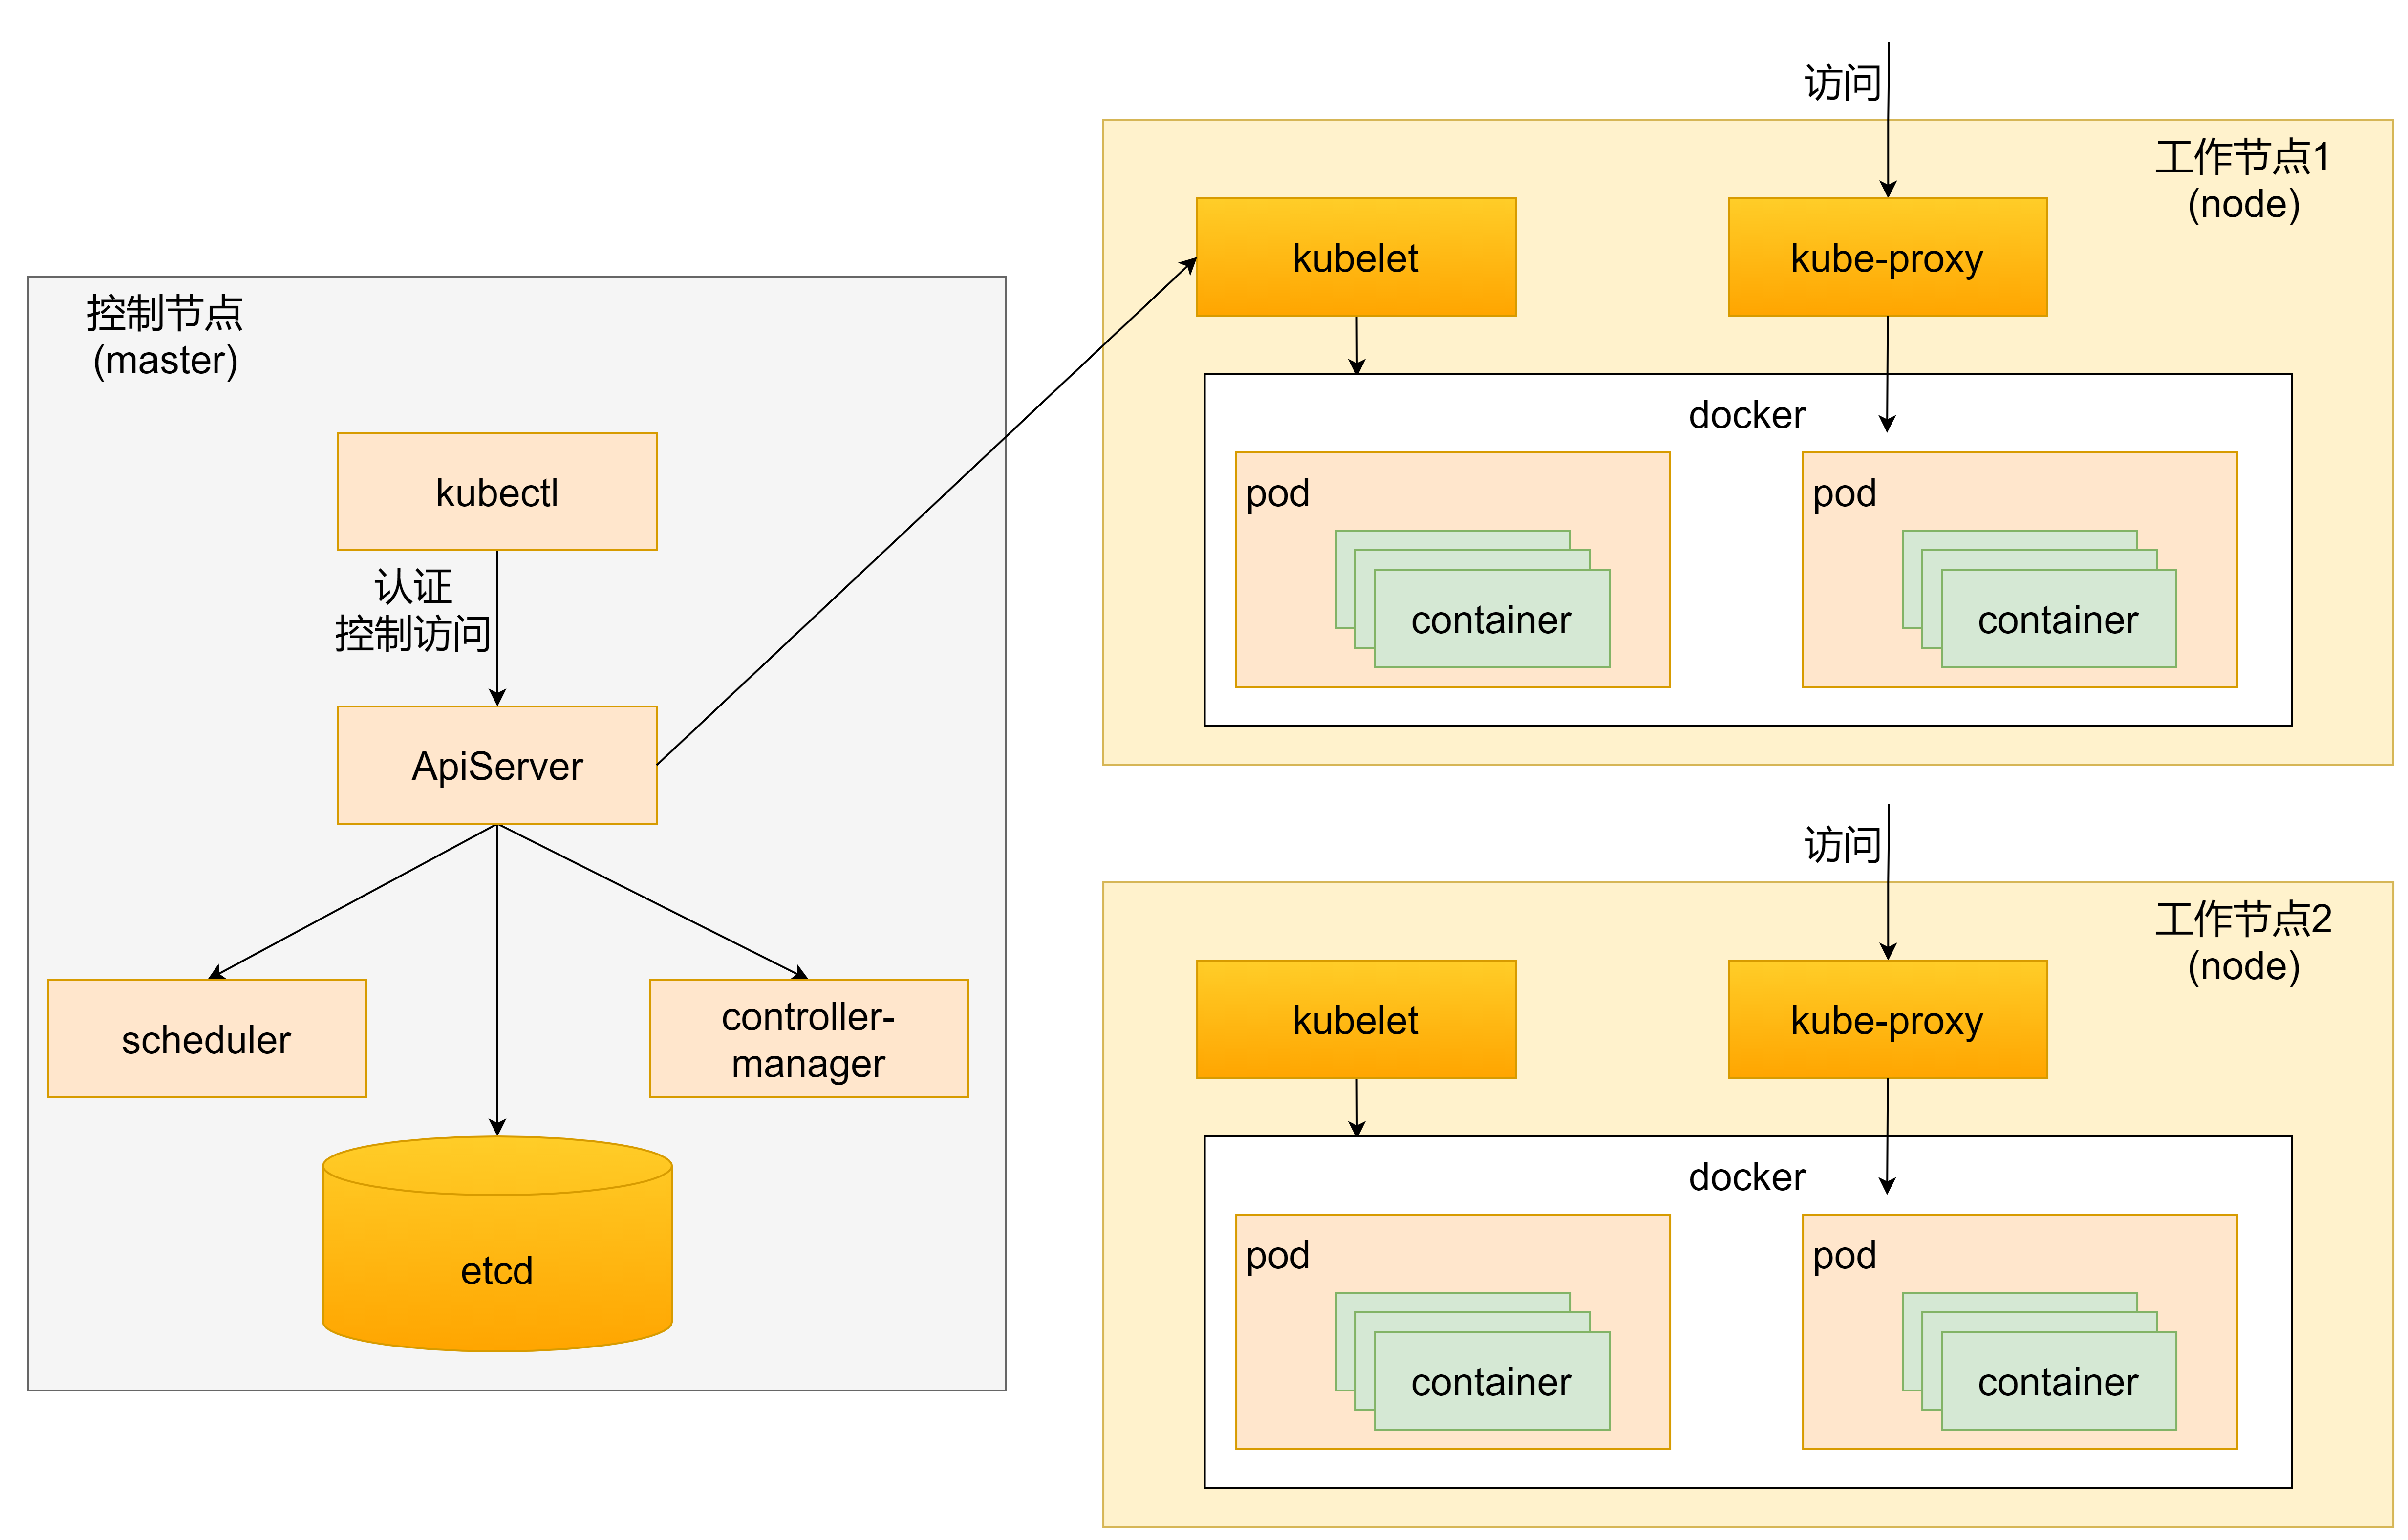
pod的终止过程
- 用户向apiserver发送删除pod对象的命令
- apiserver中的pod对象信息会随着时间的推移而更新,在宽限期内(默认30s),pod被视为dead
- 将pod标记为terminating状态
- kubelet在监控到pod对象转为terminating状态的同时启动pod关闭进程
- 端点控制器监控到pod对象的关闭行为时将其从所有匹配到此端点的service资源的端点列表移除
- 如果当前pod对象定义了prestop钩子处理器,则在其标记为terminating后即会以同步的方式启动执行
- pod对象中的容器进程收到停止信号
- 宽限期结束后,若pod中还存在仍在运行的进程,那么pod对象会收到立即终止的信号
- kubelet请求apiserver将此pod资源的宽限期设置为0从而完成删除操作,此时pod对于用户已不可见
初始化容器
初始化容器是在pod的主容器启动之前要运行的容器,主要是做一些主容器的前置工作,它具有两大特征
- 初始化容器必须运行完成直至结束,若某初始化容器运行失败,那么k8s需要重启它直到成功完成
- 初始化容器必须按照定义的顺序执行,当仅当前一个执行成功之后,后面的一个才能运行
初始化容器有很多的应用场景,下面列出的是最常见的几个
- 提供主容器镜像中不具备的工具程序或自定义代码
- 初始化容器要先于应用容器串行启动并运行完成,因此可用于延后应用容器的启动直至其依赖的条件得到满足
接下来做一个案例,模拟下面这个需求
假设要以主容器来运行nginx,但是要求在运行nginx之前要能够连接上mysql和redis所在服务器
为了简化测试,事先规定好mysql和redis服务器的地址
创建pod-initcontainer.yaml,内容如下:
apiVersion: v1

kind: Pod

metadata:

  name: pod-initcontainer

  namespace: dev

  labels:

    user: ayanami

spec:

  containers:

  - name: main-container

    image: nginx:1.17.1

    ports:

    - name: nginx-port

      containerPort: 80

  initContainers:

  - name: test-mysql

    image: busybox:1.30

    command: ['sh','-c','until ping 192.168.145.231 -c 1; do echo waiting for mysql...;sleep 2; done']

  - name: test-redis

    image: busybox:1.30

    command: ['sh','-c','until ping 192.168.145.232 -c 1; do echo waiting for redis...;sleep 2; done']
运行配置文件
[root@master ~]# vim pod-initcontainer.yaml

[root@master ~]# kubectl create -f pod-initcontainer.yaml

pod/pod-initcontainer created

[root@master ~]# kubectl get pod pod-initcontainer -n dev

NAME                READY   STATUS     RESTARTS   AGE

pod-initcontainer   0/1     Init:0/2   0          20s
发现container一直处于初始化状态
此时添加ip地址(注:ens32是你的网卡的名字,不同机器可能不同,可以用ifconfig查看)
[root@master ~]# ifconfig ens32:1 192.168.145.231 netmask 255.255.255.0 up

[root@master ~]# ifconfig ens32:2 192.168.145.232 netmask 255.255.255.0 up

[root@master ~]# kubectl get pod pod-initcontainer -n dev

NAME                READY   STATUS    RESTARTS   AGE

pod-initcontainer   1/1     Running   0          19m
发现pod跑起来了
钩子函数
钩子函数能够感知自身生命周期中的事件,并在相应的时刻到来时运行用户指定的程序代码
k8s在主容器的启动之后和停止之前提供了两个钩子函数
- post start:容器创建之后执行,如果失败了会重启容器
- pre stop:容器终止之前执行,执行完成之后容器将成功终止,在其完成之前会阻塞删除容器的操作
钩子处理器支持使用下面三种方式定义动作:
- Exec命令:在容器内执行一次命令
......

  lifecycle:

    postStart:

      exec:

        command:

        - cat

        - /tmp/healthy

......
- TCPSocket:在当前容器尝试访问指定的socket
......

  lifecycle:

    postStart:

      tcpSocket:

        port: 8080

......
- HttpGet:在当前容器中向某url发起http请求
......

  lifecycle:

    postStart:

      httpGet:

        path: #uri地址

        port:

        host:

        scheme: HTTP  #支持的协议,http或者https

......
下面演示钩子函数的使用
创建pod-hook-exec.yaml文件,内容如下:
apiVersion: v1

kind: Pod

metadata:

  name: pod-hook-exec

  namespace: dev

spec:

  containers:

  - name: main-container

    image: nginx:1.17.1

    ports:

    - name: nginx-port

      containerPort: 80

    lifecycle:

      postStart:

        exec: #在容器启动的时候执行一个命令,修改掉nginx的默认首页内容

          command: ["/bin/sh","-c","echo postStart... > /usr/share/nginx/html/index.html"]

      preStop: #在容器停止之前停止nginx服务

        exec:

          command: ["/usr/sbin/nginx","-s","quit"]
使用配置文件
[root@master ~]# vim pod-hook-exec.yaml

[root@master ~]# kubectl create -f pod-hook-exec.yaml

pod/pod-hook-exec created

[root@master ~]# kubectl get pod pod-hook-exec -n dev -o wide

NAME            READY   STATUS    RESTARTS   AGE   IP            NODE    NOMINATED NODE   READINESS GATES

pod-hook-exec   1/1     Running   0          43s   10.244.2.22   node1   <none>           <none>

[root@master ~]# curl 10.244.2.22:80

postStart...
容器探测
容器探测用于检测容器中的应用实例是否能正常工作,是保障业务可用性的一种传统机制。如果经过探测,实例的状态不符合预期
,那么K8S就会把该问题实例“摘除”,不承担业务流量,k8s提供了两种探针来实现容器探测,分别是:
- liveness probes:存活性探针,用于检测应用实例当前是否处于正常运行状态,如果不是,k8s会重启容器
- readiness probes:就绪性探针,用于检测应用实例当前是否可以接受请求,如果不能,k8s不会转发流量
即livenessProbe决定是否重启容器,readinesProbe决定是否将请求转发给容器
上面两种探针目前均支持三种探测方式:
- Exec命令:在容器内执行一次命令,如果命令执行的退出码为0,则认为程序正常,否则不正常
......

  livenessProbe:

      exec:

        command:

        - cat

        - /tmp/healthy

......
- TCPSocket:将会尝试访问同一个用户容器的端口,如果能够建立这条连接,则认为程序正常,否则不正常
......

  livenessProbe:

      tcpSocket:

        port: 8080

......
- HTTPGet:调用容器内Web应用的URL,如果返回的状态码在200和399之间,则认为程序正常,否则不正常
......

  lifecycle:

    postStart:

      httpGet:

        path: #uri地址

        port:

        host:

        scheme: HTTP  #支持的协议,http或者https

......
下面以liveness probes为例,做几个演示:
方式一:EXEC
创建pod-liveness-exec.yaml
apiVersion: v1

kind: Pod

metadata:

  name: pod-liveness-exec

  namespace: dev

spec:

  containers:

  - name: main-container

    image: nginx:1.17.1

    ports:

    - name: nginx-port

      containerPort: 80

    livenessProbe:

      exec:

        command: ["/bin/cat","/tmp/hello.txt"] #执行一个查看文件的命令
使用配置文件
[root@master ~]# vim pod-liveness-exec.yaml

[root@master ~]# kubectl create -f pod-liveness-exec.yaml

pod/pod-liveness-exec created

[root@master ~]# kubectl get pod pod-liveness-exec -n dev

NAME                READY   STATUS    RESTARTS   AGE

pod-liveness-exec   1/1     Running   1          102s
发现pod重启了一次,查看错误信息
[root@master ~]# kubectl describe pod pod-liveness-exec -n dev

  Type     Reason     Age                  From               Message

  ----     ------     ----                 ----               -------

  Normal   Scheduled  <unknown>            default-scheduler  Successfully assigned dev/pod-liveness-exec to node1

  Normal   Pulled     49s (x4 over 2m20s)  kubelet, node1     Container image "nginx:1.17.1" already present on machine

  Normal   Created    49s (x4 over 2m20s)  kubelet, node1     Created container main-container

  Normal   Started    49s (x4 over 2m20s)  kubelet, node1     Started container main-container

  Normal   Killing    49s (x3 over 109s)   kubelet, node1     Container main-container failed liveness probe, will be restarted

  Warning  Unhealthy  39s (x10 over 2m9s)  kubelet, node1     Liveness probe failed: /bin/cat: /tmp/hello.txt: No such file or directory
修改文件内容
apiVersion: v1

kind: Pod

metadata:

  name: pod-liveness-exec

  namespace: dev

spec:

  containers:

  - name: main-container

    image: nginx:1.17.1

    ports:

    - name: nginx-port

      containerPort: 80

    livenessProbe:

      exec:

        command: ["/bin/ls","/tmp/"] #执行一个查看文件的命令
使用配置文件
[root@master ~]# vim pod-liveness-exec.yaml

[root@master ~]# kubectl delete -f pod-liveness-exec.yaml

[root@master ~]# kubectl create -f pod-liveness-exec.yaml

pod/pod-liveness-exec created

[root@master ~]# kubectl get pod pod-liveness-exec -n dev

NAME                READY   STATUS    RESTARTS   AGE

pod-liveness-exec   1/1     Running   0          84s
说明没有重启
方式二:TCPSocket
创建pod-liveness-tcpsocket.yaml
apiVersion: v1

kind: Pod

metadata:

  name: pod-liveness-tcpsocket

  namespace: dev

spec:

  containers:

  - name: main-container

    image: nginx:1.17.1

    ports:

    - name: nginx-port

      containerPort: 80

    livenessProbe:

      tcpSocket:

        port: 8080  #尝试访问8080端口
使用配置文件
[root@master ~]# vim pod-liveness-tcpsocket.yaml

[root@master ~]# kubectl create -f pod-liveness-tcpsocket.yaml

pod/pod-liveness-tcpsocket created

[root@master ~]# kubectl get pod pod-liveness-tcpsocket -n dev

NAME                     READY   STATUS    RESTARTS   AGE

pod-liveness-tcpsocket   1/1     Running   1          29s
[root@master ~]# kubectl describe pod pod-liveness-tcpsocket -n dev

Events:

  Type     Reason     Age                  From               Message

  ----     ------     ----                 ----               -------

  Normal   Scheduled  <unknown>            default-scheduler  Successfully assigned dev/pod-liveness-tcpsocket to node1

  Normal   Pulled     43s (x4 over 2m10s)  kubelet, node1     Container image "nginx:1.17.1" already present on machine

  Normal   Created    43s (x4 over 2m10s)  kubelet, node1     Created container main-container

  Normal   Started    43s (x4 over 2m10s)  kubelet, node1     Started container main-container

  Normal   Killing    43s (x3 over 103s)   kubelet, node1     Container main-container failed liveness probe, will be restarted

  Warning  Unhealthy  33s (x10 over 2m3s)  kubelet, node1     Liveness probe failed: dial tcp 10.244.2.25:8080: connect: connection refused
更改文件内容
apiVersion: v1

kind: Pod

metadata:

  name: pod-liveness-tcpsocket

  namespace: dev

spec:

  containers:

  - name: main-container

    image: nginx:1.17.1

    ports:

    - name: nginx-port

      containerPort: 80

    livenessProbe:

      tcpSocket:

        port: 80  #尝试访问80端口
重新使用配置文件
[root@master ~]# vim pod-liveness-tcpsocket.yaml

[root@master ~]# kubectl delete -f pod-liveness-tcpsocket.yaml

pod "pod-liveness-tcpsocket" deleted

[root@master ~]# kubectl create -f pod-liveness-tcpsocket.yaml

pod/pod-liveness-tcpsocket created

[root@master ~]# kubectl get pod pod-liveness-tcpsocket -n dev

NAME                     READY   STATUS    RESTARTS   AGE

pod-liveness-tcpsocket   1/1     Running   0          18s
表明没有问题
方式三:HTTPGet
创建pod-liveness-httpget.yaml
apiVersion: v1

kind: Pod

metadata:

  name: pod-liveness-httpget

  namespace: dev

spec:

  containers:

  - name: main-container

    image: nginx:1.17.1

    ports:

    - name: nginx-port

      containerPort: 80

    livenessProbe:

      httpGet: #其实就是访问http://127.0.0.1:80/hello

        scheme: HTTP #支持的协议,http或https

        port: 80

        path: /hello #uri地址
使用配置文件
[root@master ~]# vim pod-liveness-httpget.yaml

[root@master ~]# kubectl create -f pod-liveness-httpget.yaml

pod/pod-liveness-httpget created

[root@master ~]# kubectl get pod pod-liveness-httpget -n dev

NAME                   READY   STATUS    RESTARTS   AGE

pod-liveness-httpget   1/1     Running   1          75s

[root@master ~]# kubectl describe pod pod-liveness-httpget -n dev

Events:

  Type     Reason     Age                From               Message

  ----     ------     ----               ----               -------

  Normal   Scheduled  <unknown>          default-scheduler  Successfully assigned dev/pod-liveness-httpget to node2

  Normal   Pulled     18s (x3 over 74s)  kubelet, node2     Container image "nginx:1.17.1" already present on machine

  Normal   Created    18s (x3 over 74s)  kubelet, node2     Created container main-container

  Normal   Killing    18s (x2 over 48s)  kubelet, node2     Container main-container failed liveness probe, will be restarted

  Normal   Started    17s (x3 over 73s)  kubelet, node2     Started container main-container

  Warning  Unhealthy  8s (x7 over 68s)   kubelet, node2     Liveness probe failed: HTTP probe failed with statuscode: 404
可以看见pod在重启,详细描述说明没找到这个网址
修改配置文件
apiVersion: v1

kind: Pod

metadata:

  name: pod-liveness-httpget

  namespace: dev

spec:

  containers:

  - name: main-container

    image: nginx:1.17.1

    ports:

    - name: nginx-port

      containerPort: 80

    livenessProbe:

      httpGet: #其实就是访问http://127.0.0.1:80/

        scheme: HTTP #支持的协议,http或https

        port: 80

        path: / #uri地址
重新使用配置文件
[root@master ~]# kubectl delete -f pod-liveness-httpget.yaml

pod "pod-liveness-httpget" deleted

[root@master ~]# kubectl create -f pod-liveness-httpget.yaml

pod/pod-liveness-httpget created

[root@master ~]# kubectl get pod pod-liveness-httpget -n dev

NAME                   READY   STATUS    RESTARTS   AGE

pod-liveness-httpget   1/1     Running   0          24s

Events:

  Type    Reason     Age        From               Message

  ----    ------     ----       ----               -------

  Normal  Scheduled  <unknown>  default-scheduler  Successfully assigned dev/pod-liveness-httpget to node2

  Normal  Pulled     27s        kubelet, node2     Container image "nginx:1.17.1" already present on machine

  Normal  Created    27s        kubelet, node2     Created container main-container

  Normal  Started    27s        kubelet, node2     Started container main-container
表明配置没有问题
其他配置
至此,已经使用liveness probe演示了三种探测方式,但是查看livenessProbe的子属性,会发现除了这三种方式,还有一些其他的配置,在这里一并解释下
[root@master ~]# kubectl explain pod.spec.containers.livenessProbe

KIND:     Pod

VERSION:  v1

RESOURCE: livenessProbe <Object>

DESCRIPTION:

     Periodic probe of container liveness. Container will be restarted if the

     probe fails. Cannot be updated. More info:

     https://kubernetes.io/docs/concepts/workloads/pods/pod-lifecycle#container-probes

     Probe describes a health check to be performed against a container to

     determine whether it is alive or ready to receive traffic.

FIELDS:

   exec    <Object>

     One and only one of the following should be specified. Exec specifies the

     action to take.

   failureThreshold    <integer>

     Minimum consecutive failures for the probe to be considered failed after

     having succeeded. Defaults to 3. Minimum value is 1.

   httpGet    <Object>

     HTTPGet specifies the http request to perform.

   initialDelaySeconds    <integer>

     Number of seconds after the container has started before liveness probes

     are initiated. More info:

     https://kubernetes.io/docs/concepts/workloads/pods/pod-lifecycle#container-probes

   periodSeconds    <integer>

     How often (in seconds) to perform the probe. Default to 10 seconds. Minimum

     value is 1.

   successThreshold    <integer>

     Minimum consecutive successes for the probe to be considered successful

     after having failed. Defaults to 1. Must be 1 for liveness and startup.

     Minimum value is 1.

   tcpSocket    <Object>

     TCPSocket specifies an action involving a TCP port. TCP hooks not yet

     supported

   timeoutSeconds    <integer>

     Number of seconds after which the probe times out. Defaults to 1 second.

     Minimum value is 1. More info:

     https://kubernetes.io/docs/concepts/workloads/pods/pod-lifecycle#container-probes
pod生命周期的更多相关文章
- Kubernetes1.3:POD生命周期管理
转:http://blog.csdn.net/horsefoot/article/details/52324830 (一) 核心概念 Pod是kubernetes中的核心概念,kubernetes对 ...
- Pod生命周期和健康检查
Pod生命周期和健康检查 Pod的生命周期涵盖了前面所说的PostStart 和 PreStop在内 Pod phase Pod的status定义在 PodStatus对象中,其中有一个phase字段 ...
- Kubernetes Pod 生命周期
一. Pod Hook Kubernetes 为我们提供了生命周期钩子,就是我们所说的Pod Hook,Pod Hook是由kubelet发起的,当容器中的进程启动前或者容器中的进程终止之前运行.这是 ...
- 2.k8s.Pod生命周期,健康检查
#Pod生命周期,健康检查 pod创建过程 Init容器 就绪探测 存活探测 生命周期钩子 #Pod创建过程 master节点:kubectl -> kube-api -> kubenle ...
- k8s学习-pod生命周期
4.2.pod生命周期 创建一个pod的时候过程如下: 1.容器环境初始化: 2.pause执行网络.容器卷等初始化工作: 3.所有的InitC按顺序执行,每个InitC执行完后才能执行下一个,且必须 ...
- 容器编排系统之Pod生命周期、健康/就绪状态探测以及资源限制
前文我们了解了在k8s上的资源标签.标签选择器以及资源注解相关话题,回顾请参考https://www.cnblogs.com/qiuhom-1874/p/14141080.html:今天我们来聊下k8 ...
- 【三】Kubernetes学习笔记-Pod 生命周期与 Init C 介绍
一.容器生命周期 Init C(初始化容器)只是用于 Pod 初始化的,不会一直随着 Pod 生命周期存在,Init C 在初始化完成之后就会死亡. 一个 Pod 可以有多个 Init C,也可以不需 ...
- k8s的pod生命周期
pod的生命周期: 1.init container 2.main contianer (1) post start hook :容器启动后做什么操作(可以命令查看kubectl explain po ...
- Pod 生命周期和重启策略
Pod 在整个生命周期中被系统定义为各种状态,熟悉 Pod 的各种状态对于理解如何设置 Pod 的调度策略.重启策略是很有必要的. Pod 的状态 状态值 描述 Pending API Server ...
随机推荐
- [BD] Flume
什么是Flume 采集日志,存在HDFS上 分布式.高可用.高可靠的海量日志采集.聚合和传输系统 支持在日志系统中定制各类数据发送方,用于收集数据 支持对数据进行简单处理,写到数据接收方 组件 sou ...
- stressapptest测试用例testcase方法aarch64
### https://github.com/stressapptest/stressapptest aarch64 To build from source, the build/installat ...
- vipivp常用linux命令
基础安装 # CentOS sudo yum install epel-release 命令行Tips 进程及端口 # 查看端口占用情况 netstat -ap | grep 端口号 # 查看某一 ...
- 查阅日志文件:有时候报错信息只是给出了问题的表面现象,要想更深入的了解问题,必须查看相应的日志文件,而日志文件又分为系统日志文件(/var/log)和应用的日志文件,结合这两个日志文件,一般就能定位问题所在。
作为一名合格的 Linux 运维工程师,一定要有一套清晰.明确的解决故障思路,当问题出现时,才能迅速定位.解决问题,这里给出一个处理问题的一般思路: 重视报错提示信息:每个错误的出现,都是给出错误提示 ...
- ipmitool -I lanplus -H IPADDR -U USERNAME -P PASSWORD power reset
IPMI是智能型平台管理接口(Intelligent Platform Management Interface)的缩写,是管理基于 Intel结构的企业系统中所使用的外围设备采用的一种工业标准,该标 ...
- 029. Python多态介绍
多态:不同的子类对象,调用相同的父类方法,产生不同的结果 继承 重写 在不改变原有代码的前提下,实现了不同的效果 class Soldier(): # 攻击 def attack(self): pas ...
- 如何做好FAE工作及FAE职位发展————资深FAE总结推荐
http://bbs.elecfans.com/jishu_932585_1_1.html 曾经认识一位做电源研发的工程师,转行在一家代理商做FAE,做了一年半以后,就提出了离职请求,他老板问他是什么 ...
- Servlet中的过滤器和监听器
1.什么是过滤器? Servlet规范中定义的一种特殊的组件,用来拦截容器的调用过程.容器收到请求之后,首先调用过滤器,然后再调用Servlet 2.生命周期: 1.servlet:servlet的生 ...
- CSS(2)盒子模型、定位浮动
盒子模型 盒子模型:一个盒子中主要的属性就5个.width与height.padding.border.margin.盒子模型标准有两种为标准盒模型和IE盒模型.学习上以标准盒子模型为主 width和 ...
- haproxy env 安装与基础配置
1. 安装 Use docker.package or source installations to install 第三方仓库 https://pkgs.org/download/haproxy ...