
Flutter 设置input边框
example 1

import 'package:flutter/material.dart';

void main() => runApp(MyApp());

class MyApp extends StatelessWidget {

  @override

  Widget build(BuildContext context) {

    return MaterialApp(

      home: HomePage(),

    );

  }

}

class HomePage extends StatefulWidget {

  @override

  _HomePageState createState() => _HomePageState();

}

class _HomePageState extends State<HomePage> {

  @override

  Widget build(BuildContext context) {

    return Scaffold(

      body: Center(

        child: Padding(

          padding: const EdgeInsets.all(24.0),

          child: Material(

            shape: BeveledRectangleBorder(

              borderRadius: BorderRadius.all(Radius.circular(10)),

              side: BorderSide(width: 1, color: Theme.of(context).primaryColor),

            ),

            child: Padding(

              padding: const EdgeInsets.only(left: 8.0, right: 8.0),

              child: TextField(

                decoration: InputDecoration(

                  hintText: "Username",

                  border: InputBorder.none,

                ),

              ),

            ),

          ),

        ),

      ),

    );

  }

}
example 2
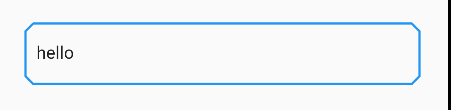
import 'package:flutter/material.dart';

import 'cut_corners_border.dart';

void main() => runApp(MyApp());

class MyApp extends StatelessWidget {

  @override

  Widget build(BuildContext context) {

    return MaterialApp(

      theme: ThemeData(

        inputDecorationTheme: InputDecorationTheme(

          border: CutCornersBorder(),

        ),

      ),

      home: HomePage(),

    );

  }

}

class HomePage extends StatefulWidget {

  @override

  _HomePageState createState() => _HomePageState();

}

class _HomePageState extends State<HomePage> {

  @override

  Widget build(BuildContext context) {

    return Scaffold(

      body: Center(

        child: Padding(

          padding: const EdgeInsets.all(24.0),

          child: TextField(

            decoration: InputDecoration(

              hintText: "Username",

            ),

          ),

        ),

      ),

    );

  }

}
cut_corners_border.dart 源码来至这里
import 'dart:ui' show lerpDouble;

import 'package:flutter/material.dart';

import 'package:flutter/widgets.dart';

class CutCornersBorder extends OutlineInputBorder {

  const CutCornersBorder({

    BorderSide borderSide: const BorderSide(),

    BorderRadius borderRadius: const BorderRadius.all(Radius.circular(2.0)),

    this.cut: 7.0,

    double gapPadding: 2.0,

  }) : super(

            borderSide: borderSide,

            borderRadius: borderRadius,

            gapPadding: gapPadding);

  @override

  CutCornersBorder copyWith({

    BorderSide borderSide,

    BorderRadius borderRadius,

    double gapPadding,

    double cut,

  }) {

    return CutCornersBorder(

      borderRadius: borderRadius ?? this.borderRadius,

      borderSide: borderSide ?? this.borderSide,

      cut: cut ?? this.cut,

      gapPadding: gapPadding ?? this.gapPadding,

    );

  }

  final double cut;

  @override

  ShapeBorder lerpFrom(ShapeBorder a, double t) {

    if (a is CutCornersBorder) {

      final CutCornersBorder outline = a;

      return CutCornersBorder(

        borderRadius: BorderRadius.lerp(outline.borderRadius, borderRadius, t),

        borderSide: BorderSide.lerp(outline.borderSide, borderSide, t),

        cut: cut,

        gapPadding: outline.gapPadding,

      );

    }

    return super.lerpFrom(a, t);

  }

  @override

  ShapeBorder lerpTo(ShapeBorder b, double t) {

    if (b is CutCornersBorder) {

      final CutCornersBorder outline = b;

      return CutCornersBorder(

        borderRadius: BorderRadius.lerp(borderRadius, outline.borderRadius, t),

        borderSide: BorderSide.lerp(borderSide, outline.borderSide, t),

        cut: cut,

        gapPadding: outline.gapPadding,

      );

    }

    return super.lerpTo(b, t);

  }

  Path _notchedCornerPath(Rect center,

      [double start = 0.0, double extent = 0.0]) {

    final Path path = Path();

    if (start > 0.0 || extent > 0.0) {

      path.relativeMoveTo(extent + start, center.top);

      _notchedSidesAndBottom(center, path);

      path..lineTo(center.left + cut, center.top)..lineTo(start, center.top);

    } else {

      path.moveTo(center.left + cut, center.top);

      _notchedSidesAndBottom(center, path);

      path.lineTo(center.left + cut, center.top);

    }

    return path;

  }

  Path _notchedSidesAndBottom(Rect center, Path path) {

    return path

      ..lineTo(center.right - cut, center.top)

      ..lineTo(center.right, center.top + cut)

      ..lineTo(center.right, center.top + center.height - cut)

      ..lineTo(center.right - cut, center.top + center.height)

      ..lineTo(center.left + cut, center.top + center.height)

      ..lineTo(center.left, center.top + center.height - cut)

      ..lineTo(center.left, center.top + cut);

  }

  @override

  void paint(

    Canvas canvas,

    Rect rect, {

    double gapStart,

    double gapExtent: 0.0,

    double gapPercentage: 0.0,

    TextDirection textDirection,

  }) {

    assert(gapExtent != null);

    assert(gapPercentage >= 0.0 && gapPercentage <= 1.0);

    final Paint paint = borderSide.toPaint();

    final RRect outer = borderRadius.toRRect(rect);

    if (gapStart == null || gapExtent <= 0.0 || gapPercentage == 0.0) {

      canvas.drawPath(_notchedCornerPath(outer.middleRect), paint);

    } else {

      final double extent =

          lerpDouble(0.0, gapExtent + gapPadding * 2.0, gapPercentage);

      switch (textDirection) {

        case TextDirection.rtl:

          {

            final Path path = _notchedCornerPath(

                outer.middleRect, gapStart + gapPadding - extent, extent);

            canvas.drawPath(path, paint);

            break;

          }

        case TextDirection.ltr:

          {

            final Path path = _notchedCornerPath(

                outer.middleRect, gapStart - gapPadding, extent);

            canvas.drawPath(path, paint);

            break;

          }

      }

    }

  }

}
Flutter 设置input边框的更多相关文章
- 27.给input边框和背景颜色设置全透明
给input边框和背景颜色设置全透明,但是里面的字不会消失 1.让背景颜色变透明(二选一) background-color:rgba(0,0,0,0); background:rgba(0,0,0, ...
- 通过CSS禁止Chrome自动为输入框添加橘黄色边框,修改/禁止 chrome input边框颜色,
1 /*Chrome浏览器 点击input 黄色边框 禁用*/ .NoOutLine:focus{outline: none} <asp:TextBox ID="txtTeleph ...
- 设置input框文字垂直居中和宽度
input { solid #999;height:22px; background:#ffffff; line-height:22px; margin:0px; padding:0px;/*表单输入 ...
- chrome内核浏览器input边框
直接给input加outline:none和设置input {outline:none}都没效 最后逼得没法,*:focus { outline: none; },然后整个世界就安静了,嚯嚯
- css设置input中placeholder字体
设置input中placeholder字体颜色 input::-webkit-input-placeholder {color:@a;} input:-moz-placeholder {color:@ ...
- 【css】a:hover 设置上下边框在 ie6 和 ie7 下失效
前段时间在写样式的时候发现了这个问题,虽然当时就解决了这个 bug 不过还是记录下,以免再次出现这样的问题. demo 代码: <!doctype html> <html lang= ...
- Qt 之 设置窗口边框的圆角(使用QSS和PaintEvent两种方法)
Qt在设置窗口边框圆角时有两种方式,一种是设置样式,另一种是在paintEvent事件中绘制窗口.下面分别叙述用这两种方式来实现窗口边框圆角的效果. 一.使用setStyleSheet方法 this- ...
- JQuery设置input属性(disabled、enabled)
document.getElementById("removeButton").disabled = false; //普通Js写法 $("#removeButton&q ...
- 设置input标签的placeholder的样式
设置input样式代码: input::-webkit-input-placeholder{ /*WebKit browsers*/ color: red; } input::-moz-input-p ...
随机推荐
- LOJ10131暗的连锁
题目描述 原题来自:POJ 3417 Dark 是一张无向图,图中有 N 个节点和两类边,一类边被称为主要边,而另一类被称为附加边.Dark 有 N–1 条主要边,并且 Dark 的任意两个节点之间都 ...
- 重绘和回流(Repaint & Reflow)总结,以及如何进行优化
1. 浏览器渲染机制 浏览器采用流式布局模型(Flow Based Layout) 浏览器会把HTML解析成DOM,把CSS解析成CSSOM,DOM和CSSOM合并就产生了渲染树(Render Tre ...
- 杂论-FTP
FTP 一 简单介绍 FTP 是File Transfer Protocol(文件传输协议)的英文简称,而中文简称为"文传协议".用于Internet上的控制文件的双向传输.同时, ...
- UI和3D物体的堆叠响应
一.问题:当3D物体和UI元素重叠显示时一般UI元素会遮挡物体,这时点击UI元素响应时UI后方的物体也会响应. private void OnMouseDown() { ChangeColor(); ...
- Qt项目的发布
Qt项目的发布 (1)首先将项目调为发布版 (2)找到缺失的DLL文件 发布好了后,双击生成的exe文件可能会出现如下的问题 像这样的错误警告可能会弹出好几个,对于这种错误有2种解决方案. 第一种:配 ...
- 2019牛客暑期多校训练营(第九场) D Knapsack Cryptosystem
题目 题意: 给你n(最大36)个数,让你从这n个数里面找出来一些数,使这些数的和等于s(题目输入),用到的数输出1,没有用到的数输出0 例如:3 4 2 3 4 输出:0 0 1 题解: 认真想一 ...
- AtCoder Beginner Contest 184 E - Third Avenue (BFS)
题意:给你一张图,\(S\)表示起点,\(G\)表示终点,\(.\)表示可以走,#表示不能走,小写字母可以传送到任意一个相同的字母的位置,问从\(S\)走到\(G\)的最小步数. 题解:假如不考虑字母 ...
- OpenStack Train版-5.安装nova计算服务(控制节点)
nova计算服务需要在 控制节点 和 计算节点 都安装 控制节点主要安装 nova-api(nova主服务) nova-scheduler(nova调度服务) nova-conductor(n ...
- Linux-输出/输入重定向
目录 重定向的分类 输出重定向 将标准输出重定向到文件 将标准输出追加重定向到文件 将错误输出重定向到文件 将标准输出和错误输出都重定向到文件 将错误输出重定向到黑洞文件 输入重定向 重定向的分类 名 ...
- Kubernets二进制安装(15)之安装部署coredns
在运维主机上(mfyxw50.mfyxw.com)准备Coredns镜像文件,以docker镜像文件的方式部署到Kubernetes集群中去. 1.下载coredns镜像 [root@mfyxw50 ...