本文介绍如何使用 Docker Swarm 来部署 Nebula Graph 集群,并部署客户端负载均衡和高可用
本文作者系:视野金服工程师 | 吴海胜
首发于 Nebula Graph 论坛:https://discuss.nebula-graph.com.cn/t/topic/1388
一、前言
本文介绍如何使用 Docker Swarm 来部署 Nebula Graph 集群,并部署客户端负载均衡和高可用。

二、nebula 集群搭建
2.1 环境准备
机器准备
| ip | 内存(Gb) | cpu(核数) |
|---|---|---|
| 192.168.1.166 | 16 | 4 |
| 192.168.1.167 | 16 | 4 |
| 192.168.1.168 | 16 | 4 |
在安装前确保所有机器已安装 Docker
2.2 初始化 swarm 集群
在 192.168.1.166 机器上执行
$ docker swarm init --advertise-addr 192.168.1.166

Swarm initialized: current node (dxn1zf6l61qsb1josjja83ngz) is now a manager.

To add a worker to this swarm, run the following command:

 docker swarm join \

 --token SWMTKN-1-49nj1cmql0jkz5s954yi3oex3nedyz0fb0xx14ie39trti4wxv-8vxv8rssmk743ojnwacrr2e7c \

 192.168.1.166:2377

To add a manager to this swarm, run 'docker swarm join-token manager' and follow the instructions.
2.3 加入 worker 节点
根据 init 命令提示内容,加入 swarm worker 节点,在 192.168.1.167 192.168.1.168 分别执行
docker swarm join \

 --token SWMTKN-1-49nj1cmql0jkz5s954yi3oex3nedyz0fb0xx14ie39trti4wxv-8vxv8rssmk743ojnwacrr2e7c \

 192.168.1.166:2377
2.4 验证集群
docker node ls

ID                            HOSTNAME            STATUS              AVAILABILITY        MANAGER STATUS      ENGINE VERSION

h0az2wzqetpwhl9ybu76yxaen *   KF2-DATA-166        Ready               Active              Reachable           18.06.1-ce

q6jripaolxsl7xqv3cmv5pxji     KF2-DATA-167        Ready               Active              Leader              18.06.1-ce

h1iql1uvm7123h3gon9so69dy     KF2-DATA-168        Ready               Active                                  18.06.1-ce
2.5 配置 docker stack
vi docker-stack.yml
配置如下内容
version: '3.6'

services:

  metad0:

    image: vesoft/nebula-metad:nightly

    env_file:

      - ./nebula.env

    command:

      - --meta_server_addrs=192.168.1.166:45500,192.168.1.167:45500,192.168.1.168:45500

      - --local_ip=192.168.1.166

      - --ws_ip=192.168.1.166

      - --port=45500

      - --data_path=/data/meta

      - --log_dir=/logs

      - --v=0

      - --minloglevel=2

    deploy:

      replicas: 1

      restart_policy:

        condition: on-failure

      placement:

        constraints:

          - node.hostname == KF2-DATA-166

    healthcheck:

      test: ["CMD", "curl", "-f", "http://192.168.1.166:11000/status"]

      interval: 30s

      timeout: 10s

      retries: 3

      start_period: 20s

    ports:

      - target: 11000

        published: 11000

        protocol: tcp

        mode: host

      - target: 11002

        published: 11002

        protocol: tcp

        mode: host

      - target: 45500

        published: 45500

        protocol: tcp

        mode: host

    volumes:

      - data-metad0:/data/meta

      - logs-metad0:/logs

    networks:

      - nebula-net

  metad1:

    image: vesoft/nebula-metad:nightly

    env_file:

      - ./nebula.env

    command:

      - --meta_server_addrs=192.168.1.166:45500,192.168.1.167:45500,192.168.1.168:45500

      - --local_ip=192.168.1.167

      - --ws_ip=192.168.1.167

      - --port=45500

      - --data_path=/data/meta

      - --log_dir=/logs

      - --v=0

      - --minloglevel=2

    deploy:

      replicas: 1

      restart_policy:

        condition: on-failure

      placement:

        constraints:

          - node.hostname == KF2-DATA-167

    healthcheck:

      test: ["CMD", "curl", "-f", "http://192.168.1.167:11000/status"]

      interval: 30s

      timeout: 10s

      retries: 3

      start_period: 20s

    ports:

      - target: 11000

        published: 11000

        protocol: tcp

        mode: host

      - target: 11002

        published: 11002

        protocol: tcp

        mode: host

      - target: 45500

        published: 45500

        protocol: tcp

        mode: host

    volumes:

      - data-metad1:/data/meta

      - logs-metad1:/logs

    networks:

      - nebula-net

  metad2:

    image: vesoft/nebula-metad:nightly

    env_file:

      - ./nebula.env

    command:

      - --meta_server_addrs=192.168.1.166:45500,192.168.1.167:45500,192.168.1.168:45500

      - --local_ip=192.168.1.168

      - --ws_ip=192.168.1.168

      - --port=45500

      - --data_path=/data/meta

      - --log_dir=/logs

      - --v=0

      - --minloglevel=2

    deploy:

      replicas: 1

      restart_policy:

        condition: on-failure

      placement:

        constraints:

          - node.hostname == KF2-DATA-168

    healthcheck:

      test: ["CMD", "curl", "-f", "http://192.168.1.168:11000/status"]

      interval: 30s

      timeout: 10s

      retries: 3

      start_period: 20s

    ports:

      - target: 11000

        published: 11000

        protocol: tcp

        mode: host

      - target: 11002

        published: 11002

        protocol: tcp

        mode: host

      - target: 45500

        published: 45500

        protocol: tcp

        mode: host

    volumes:

      - data-metad2:/data/meta

      - logs-metad2:/logs

    networks:

      - nebula-net

  storaged0:

    image: vesoft/nebula-storaged:nightly

    env_file:

      - ./nebula.env

    command:

      - --meta_server_addrs=192.168.1.166:45500,192.168.1.167:45500,192.168.1.168:45500

      - --local_ip=192.168.1.166

      - --ws_ip=192.168.1.166

      - --port=44500

      - --data_path=/data/storage

      - --log_dir=/logs

      - --v=0

      - --minloglevel=2

    deploy:

      replicas: 1

      restart_policy:

        condition: on-failure

      placement:

        constraints:

          - node.hostname == KF2-DATA-166

    depends_on:

      - metad0

      - metad1

      - metad2

    healthcheck:

      test: ["CMD", "curl", "-f", "http://192.168.1.166:12000/status"]

      interval: 30s

      timeout: 10s

      retries: 3

      start_period: 20s

    ports:

      - target: 12000

        published: 12000

        protocol: tcp

        mode: host

      - target: 12002

        published: 12002

        protocol: tcp

        mode: host

    volumes:

      - data-storaged0:/data/storage

      - logs-storaged0:/logs

    networks:

      - nebula-net

  storaged1:

    image: vesoft/nebula-storaged:nightly

    env_file:

      - ./nebula.env

    command:

      - --meta_server_addrs=192.168.1.166:45500,192.168.1.167:45500,192.168.1.168:45500

      - --local_ip=192.168.1.167

      - --ws_ip=192.168.1.167

      - --port=44500

      - --data_path=/data/storage

      - --log_dir=/logs

      - --v=0

      - --minloglevel=2

    deploy:

      replicas: 1

      restart_policy:

        condition: on-failure

      placement:

        constraints:

          - node.hostname == KF2-DATA-167

    depends_on:

      - metad0

      - metad1

      - metad2

    healthcheck:

      test: ["CMD", "curl", "-f", "http://192.168.1.167:12000/status"]

      interval: 30s

      timeout: 10s

      retries: 3

      start_period: 20s

    ports:

      - target: 12000

        published: 12000

        protocol: tcp

        mode: host

      - target: 12002

        published: 12004

        protocol: tcp

        mode: host

    volumes:

      - data-storaged1:/data/storage

      - logs-storaged1:/logs

    networks:

      - nebula-net

  storaged2:

    image: vesoft/nebula-storaged:nightly

    env_file:

      - ./nebula.env

    command:

      - --meta_server_addrs=192.168.1.166:45500,192.168.1.167:45500,192.168.1.168:45500

      - --local_ip=192.168.1.168

      - --ws_ip=192.168.1.168

      - --port=44500

      - --data_path=/data/storage

      - --log_dir=/logs

      - --v=0

      - --minloglevel=2

    deploy:

      replicas: 1

      restart_policy:

        condition: on-failure

      placement:

        constraints:

          - node.hostname == KF2-DATA-168

    depends_on:

      - metad0

      - metad1

      - metad2

    healthcheck:

      test: ["CMD", "curl", "-f", "http://192.168.1.168:12000/status"]

      interval: 30s

      timeout: 10s

      retries: 3

      start_period: 20s

    ports:

      - target: 12000

        published: 12000

        protocol: tcp

        mode: host

      - target: 12002

        published: 12006

        protocol: tcp

        mode: host

    volumes:

      - data-storaged2:/data/storage

      - logs-storaged2:/logs

    networks:

      - nebula-net

  graphd1:

    image: vesoft/nebula-graphd:nightly

    env_file:

      - ./nebula.env

    command:

      - --meta_server_addrs=192.168.1.166:45500,192.168.1.167:45500,192.168.1.168:45500

      - --port=3699

      - --ws_ip=192.168.1.166

      - --log_dir=/logs

      - --v=0

      - --minloglevel=2

    deploy:

      replicas: 1

      restart_policy:

        condition: on-failure

      placement:

        constraints:

          - node.hostname == KF2-DATA-166

    depends_on:

      - metad0

      - metad1

      - metad2

    healthcheck:

      test: ["CMD", "curl", "-f", "http://192.168.1.166:13000/status"]

      interval: 30s

      timeout: 10s

      retries: 3

      start_period: 20s

    ports:

      - target: 3699

        published: 3699

        protocol: tcp

        mode: host

      - target: 13000

        published: 13000

        protocol: tcp

#        mode: host

      - target: 13002

        published: 13002

        protocol: tcp

        mode: host

    volumes:

      - logs-graphd:/logs

    networks:

      - nebula-net

  graphd2:

    image: vesoft/nebula-graphd:nightly

    env_file:

      - ./nebula.env

    command:

      - --meta_server_addrs=192.168.1.166:45500,192.168.1.167:45500,192.168.1.168:45500

      - --port=3699

      - --ws_ip=192.168.1.167

      - --log_dir=/logs

      - --v=2

      - --minloglevel=2

    deploy:

      replicas: 1

      restart_policy:

        condition: on-failure

      placement:

        constraints:

          - node.hostname == KF2-DATA-167

    depends_on:

      - metad0

      - metad1

      - metad2

    healthcheck:

      test: ["CMD", "curl", "-f", "http://192.168.1.167:13001/status"]

      interval: 30s

      timeout: 10s

      retries: 3

      start_period: 20s

    ports:

      - target: 3699

        published: 3640

        protocol: tcp

        mode: host

      - target: 13000

        published: 13001

        protocol: tcp

        mode: host

      - target: 13002

        published: 13003

        protocol: tcp

#        mode: host

    volumes:

      - logs-graphd2:/logs

    networks:

      - nebula-net

  graphd3:

    image: vesoft/nebula-graphd:nightly

    env_file:

      - ./nebula.env

    command:

      - --meta_server_addrs=192.168.1.166:45500,192.168.1.167:45500,192.168.1.168:45500

      - --port=3699

      - --ws_ip=192.168.1.168

      - --log_dir=/logs

      - --v=0

      - --minloglevel=2

    deploy:

      replicas: 1

      restart_policy:

        condition: on-failure

      placement:

        constraints:

          - node.hostname == KF2-DATA-168

    depends_on:

      - metad0

      - metad1

      - metad2

    healthcheck:

      test: ["CMD", "curl", "-f", "http://192.168.1.168:13002/status"]

      interval: 30s

      timeout: 10s

      retries: 3

      start_period: 20s

    ports:

      - target: 3699

        published: 3641

        protocol: tcp

        mode: host

      - target: 13000

        published: 13002

        protocol: tcp

#        mode: host

      - target: 13002

        published: 13004

        protocol: tcp

        mode: host

    volumes:

      - logs-graphd3:/logs

    networks:

      - nebula-net

networks:

  nebula-net:

    external: true

    attachable: true

    name: host

volumes:

  data-metad0:

  logs-metad0:

  data-metad1:

  logs-metad1:

  data-metad2:

  logs-metad2:

  data-storaged0:

  logs-storaged0:

  data-storaged1:

  logs-storaged1:

  data-storaged2:

  logs-storaged2:

  logs-graphd:

  logs-graphd2:

  logs-graphd3:
编辑 nebula.env,加入如下内容
TZ=UTC

USER=root
2.6 启动 nebula 集群
docker stack deploy nebula -c docker-stack.yml
三、集群负载均衡及高可用配置
Nebula Graph 的客户端目前(1.X)没有提供负载均衡的能力,只是随机选一个 graphd 去连接。所以生产使用的时候要自己做个负载均衡和高可用。
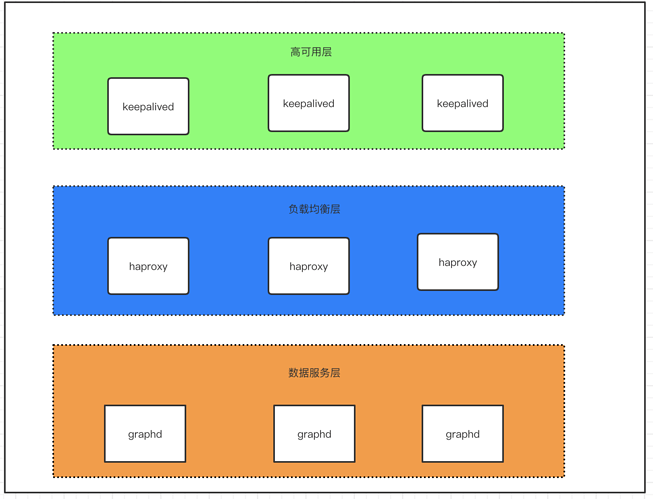
图 3.1
将整个部署架构分为三层,数据服务层,负载均衡层及高可用层。如图 3.1 所示
负载均衡层:对 client 请求做负载均衡,将请求分发至下方数据服务层
高可用层: 这里实现的是 haproxy 的高可用,保证负载均衡层的服务从而保证整个集群的正常服务
3.1 负载均衡配置
haproxy 使用 docker-compose 配置。分别编辑以下三个文件
Dockerfile 加入以下内容
FROM haproxy:1.7

COPY haproxy.cfg /usr/local/etc/haproxy/haproxy.cfg

EXPOSE 3640
docker-compose.yml 加入以下内容
version: "3.2"

services:

  haproxy:

    container_name: haproxy

    build: .

    volumes:

      - ./haproxy.cfg:/usr/local/etc/haproxy/haproxy.cfg

    ports:

      - 3640:3640

    restart: always

    networks:

      - app_net

networks:

  app_net:

    external: true
haproxy.cfg 加入以下内容
global

    daemon

    maxconn 30000

    log 127.0.0.1 local0 info

    log 127.0.0.1 local1 warning

defaults

    log-format %hr\ %ST\ %B\ %Ts

    log  global

    mode http

    option http-keep-alive

    timeout connect 5000ms

    timeout client 10000ms

    timeout server 50000ms

    timeout http-request 20000ms

# custom your own frontends && backends && listen conf

# CUSTOM

listen graphd-cluster

    bind *:3640

    mode tcp

    maxconn 300

    balance roundrobin

    server server1 192.168.1.166:3699 maxconn 300 check

    server server2 192.168.1.167:3699 maxconn 300 check

    server server3 192.168.1.168:3699 maxconn 300 check

listen stats

    bind *:1080

    stats refresh 30s

    stats uri /stats
3.2 启动 haproxy
docker-compose up -d
3.3 高可用配置
注:配置 keepalive 需预先准备好 vip(虚拟 ip),在以下配置中 192.168.1.99 便为虚拟 ip
在 192.168.1.166 、192.168.1.167、192.168.1.168上 均做以下配置
安装 keepalived
apt-get update && apt-get upgrade && apt-get install keepalived -y
更改 keepalived配置文件 /etc/keepalived/keepalived.conf(三台机器中 做如下配置,priority 应设置不同值确定优先级)
192.168.1.166 机器配置
global_defs {

    router_id lb01 # 标识信息,一个名字而已;

}

vrrp_script chk_haproxy {

    script "killall -0 haproxy"    interval 2

}

vrrp_instance VI_1 {

    state MASTER

    interface ens160

    virtual_router_id 52

    priority 999

    # 设定 MASTER 与 BACKUP 负载均衡器之间同步检查的时间间隔,单位是秒

    advert_int 1

    # 设置验证类型和密码

    authentication {

    # 设置验证类型,主要有 PASS 和 AH 两种

        auth_type PASS

    # 设置验证密码,在同一个 vrrp_instance 下,MASTER 与 BACKUP 必须使用相同的密码才能正常通信

        auth_pass amber1

    }

    virtual_ipaddress {

        # 虚拟 IP 为 192.168.1.99/24; 绑定接口为 ens160; 别名 ens169:1,主备相同

        192.168.1.99/24 dev ens160 label ens160:1

    }

    track_script {

        chk_haproxy

    }

}
167 机器配置
global_defs {

    router_id lb01 # 标识信息,一个名字而已;

}

vrrp_script chk_haproxy {

    script "killall -0 haproxy"    interval 2

}

vrrp_instance VI_1 {

    state BACKUP

    interface ens160

    virtual_router_id 52

    priority 888

    # 设定 MASTER 与 BACKUP 负载均衡器之间同步检查的时间间隔,单位是秒

    advert_int 1

    # 设置验证类型和密码

    authentication {

    # 设置验证类型,主要有 PASS 和 AH 两种

        auth_type PASS

    # 设置验证密码,在同一个 vrrp_instance 下,MASTER 与 BACKUP 必须使用相同的密码才能正常通信

        auth_pass amber1

    }

    virtual_ipaddress {

        # 虚拟 IP 为 192.168.1.99/24; 绑定接口为 ens160; 别名 ens160:1,主备相同

        192.168.1.99/24 dev ens160 label ens160:1

    }

    track_script {

        chk_haproxy

    }

}
168 机器配置
global_defs {

    router_id lb01 # 标识信息,一个名字而已;

}

vrrp_script chk_haproxy {

    script "killall -0 haproxy"    interval 2

}

vrrp_instance VI_1 {

    state BACKUP

    interface ens160

    virtual_router_id 52

    priority 777

    # 设定 MASTER 与 BACKUP 负载均衡器之间同步检查的时间间隔,单位是秒

    advert_int 1

    # 设置验证类型和密码

    authentication {

    # 设置验证类型,主要有 PASS 和 AH 两种

        auth_type PASS

    # 设置验证密码,在同一个 vrrp_instance 下,MASTER 与 BACKUP 必须使用相同的密码才能正常通信

        auth_pass amber1

    }

    virtual_ipaddress {

        # 虚拟 IP 为 192.168.1.99/24;绑定接口为 ens160; 别名 ens160:1,主备相同

        192.168.1.99/24 dev ens160 label ens160:1

    }

    track_script {

        chk_haproxy

    }

}
keepalived 相关命令
# 启动 keepalived

systemctl start keepalived

# 使 keepalived 开机自启

systemctl enable keeplived

# 重启 keepalived

systemctl restart keepalived
四、其他
离线怎么部署?把镜像更改为私有镜像库就成了,有问题欢迎来勾搭啊。

我的小鱼你醒了 还认识早晨吗 昨夜你曾经说 愿夜幕永不开启
如果你对本文有任何疑问,欢迎来论坛和原作者聊聊~~ 原帖地址:https://discuss.nebula-graph.com.cn/t/topic/1388

本文介绍如何使用 Docker Swarm 来部署 Nebula Graph 集群,并部署客户端负载均衡和高可用的更多相关文章
- 用Docker swarm快速部署Nebula Graph集群
用Docker swarm快速部署Nebula Graph集群 一.前言 本文介绍如何使用 Docker Swarm 来部署 Nebula Graph 集群. 二.nebula集群搭建 2.1 环境准 ...
- Docker Swarm和Kubernetes在大规模集群中的性能比较
Contents 这篇文章主要针对Docker Swarm和Kubernetes在大规模部署的条件下的3个问题展开讨论.在大规模部署下,它们的性能如何?它们是否可以被批量操作?需要采取何种措施来支持他 ...
- Linux 集群概念 , wsgi , Nginx负载均衡实验 , 部署CRM(Django+uwsgi+nginx), 部署学城项目(vue+uwsgi+nginx)
Linux 集群概念 , wsgi , Nginx负载均衡实验 , 部署CRM(Django+uwsgi+nginx), 部署学城项目(vue+uwsgi+nginx) 一丶集群和Nginx反向代理 ...
- SaltStack一键部署负载均衡和高可用
一.负载均衡的部署 server1 haproxy (调度器) server2 apache server3 nginx 1)在server1上首先安装salt-minion服务.并 ...
- Docker Swarm(十)Portainer 集群可视化管理
前言 搭建好我们的容器编排集群,那我们总不能日常的时候也在命令行进行操作,所以我们需要使用到一些可视化的工具,Docker图形化管理提供了很多工具,有Portainer.Docker UI.Shipy ...
- 使用容器编排工具docker swarm安装clickhouse多机集群
1.首先需要安装docker最新版,docker 目前自带swarm容器编排工具 2.选中一台机器作为master,执行命令sudo docker swarm init [options] 3,再需 ...
- HBase 1.2.6 完全分布式集群安装部署详细过程
Apache HBase 是一个高可靠性.高性能.面向列.可伸缩的分布式存储系统,是NoSQL数据库,基于Google Bigtable思想的开源实现,可在廉价的PC Server上搭建大规模结构化存 ...
- 使用 Kubeadm+Containerd 部署一个 Kubernetes 集群
本文独立博客阅读地址:https://ryan4yin.space/posts/kubernetes-deployemnt-using-kubeadm/ 本文由个人笔记 ryan4yin/knowle ...
- 简述SQL2008部署多实例集群(学习)
数据库集群 集群的存在意义是为了保证高可用.数据安全.扩展性以及负载均衡. 什么是集群? 由二台或更多物理上独立的服务器共同组成的"虚拟"服务器称之为集群服务器.一项称做M ...
随机推荐
- 上传文件到服务器指定位置 & 从服务器指定位置下载文件
需要的jar包: 去maven仓库自己搜索com.jcraft下载jar包 <dependency> <groupId>com.jcraft</groupId> & ...
- Java 得到指定时间加半个小时之后得时间
Calendar c = Calendar.getInstance(); c.setTime(cur); //设置时间 c.add(Calendar.MINUTE, 1); //日期分钟加1,Cale ...
- MySql 实现数组根据下标获取对应值逻辑(array[i]逻辑)
在使用sql模拟一段java逻辑开发时碰到有一段逻辑为从字符串数组中根据下标获取对应的值的情况,百度了一番没有发现有类似功能的函数和现成的实现方式,经过调试弄出来了,记录下来,以备参考 //举例:从数 ...
- jmeter连接redis取数据
1.导入fastjson-1.2.2.jar.jedis-2.2.1.jar到 jmeter\lib\ext\ 下 2.新建BeanShell Sampler import com.alibaba.f ...
- Go Http包解析:为什么需要response.Body.Close()
简单来讲就是:为了提高效率,http.Get 等请求的 TCP 连接是不会关闭的(再次向同一个域名请求时,复用连接),所以必须要手动关闭. 2019-01-24 10:43:32 更新 不管是否使用 ...
- Python数据类型方法整理
前言:主要是对Python数据类型做一个整理,部分知识点源于<python3程序开发指南(第二版)> 一.Python的关键要素 1.1 要素1:数据类型 int类型 str类型 ...
- Kubernetes探针踩坑记
1. 荒腔走板 最近一两个月生产K8s集群频繁出现短时503 Service Temporarily Unavailable,还不能主动复现,相当郁闷,压力山大. HTTP 5xx响应状态码用于定义服 ...
- 【漫话DevOps】What is DevOps?
最近几年"DevOps"这个关键词经常出现在项目开发当中,特别是随着微服务/容器/cloud在项目中的大范围应用,你不想知道都很难.作为一个伴随CI/CD到DevOps一路走来的工 ...
- 一、loadrunner脚本录制及回放
录制及回放的注意点: 1.测试系统教复杂时,正确的划分action,对监控的每一个业务模型和操作,起到重要作用 2.录制完成后,先进行编译(改动脚本之后检查下有没有语法错误):工具栏Vuser下有一个 ...
- Python3 学习笔记之 运算符