i.mx6 Android5.1.1 vibrator系统服务流程
0. 概述
0.1 小结
下面来从APP一直分析到kernel的driver,因为vibrator是我所知的最简单的系统服务,分析过程过来,可以获取整个安卓服务的运行思路,把相关知识点都串联起来,又不至于被很多复杂的功能性逻辑结构卡住。在vibrator中没有使用HAL,是一个相对简单的,我会在Sensor的系统服务中去分析带有HAL的流程。 链接: Sensor系统服务。
0.1 使用到的文件
frameworks/base/core/java/android/app/ActivityThread.java
frameworks/base/core/java/android/os/SystemVibrator.java
frameworks/base/core/java/android/app/ContextImpl.java
frameworks/base/services/core/java/com/android/server/VibratorService.java
frameworks/base/services/java/com/android/server/SystemServer.java
frameworks/base/services/core/jni/onload.cpp
frameworks/base/services/core/jni/com_android_server_VibratorService.cpp
hardware/libhardware/modules/vibrator/vibrator.c
frameworks/base/core/java/android/os/IVibratorService.aidl
0.3 流程回顾
1). 使用getSystemService调用系统服务(getSystemService是ContextImpl的方法)
2). ContextImpl会注册能给APP调用的系统服务(这跟ServiceManager的注册不一样,ServiceManager是把所有服务注册,然后可以查询服务,而这里的注册以我的理解主要是为了统一应用对系统服务调用的接口而再次进行的封装,在ContextImpl初始化的时候也会对ServiceManager进行调用,ContextImpl注册服务的时间段为系统初始化在SystemServer中新建Context对象的时候调用的静态代码块)
3).
一. 初始化阶段:
1). 在ServiceManager阶段加载libandroid_service.so(System.loadLibrary("android_servers")),调用onload.cpp,会加载所有cpp的代码:以后通过JNI进行调用了
2). 在ServiceManager阶段将系统ContextImpl对象实现(跟ServiceManager的注册不一样,ServiceManager是把所有服务注册,然后可以查询服务,而这里的注册以我的理解主要是为了统一应用对系统服务调用的接口而再次进行的封装,在ContextImpl初始化的时候也会对ServiceManager进行调用,ContextImpl注册服务的时间段为新建Context对象的时候调用的静态代码块,加载过程中会实例化vibrator对象):以后APP可以得到vibrator服务了
3). 在ServiceManager阶段将vibrator添加到SystemManager当中:可以通过binder得到服务了
二. 使用阶段:
1). 通过getSystemService调用系统服务(ContextImpl)
2). 通过上面一系列的初始化,建立关系后,JAVA调用到CPP再调用到C,最后调用到kernel
1. APP简单应用
在APP层,可以通过服务调用vibrator,接下来,我们写一个简单的应用,然后通过这个应用,一路往下分析:
public class MainActivity extends Activity {

     private Vibrator vibrator;

     @Override

    protected void onCreate(Bundle savedInstanceState) {

        super.onCreate(savedInstanceState);

        setContentView(R.layout.activity_main);

        vibrator = (Vibrator) getSystemService(VIBRATOR_SERVICE);    //获取vibrator服务,详见第2章

    }

     public void click(View view) {

        // vibrator.vibrate(2000);//震动2s

        vibrator.vibrate(new long[] { 3000, 100, 100, 1000 }, -1);  //等待3s,震动0.1s,等待0.1s,震动1S;-1表示只震动一次

     vibrator.vibrate(new long[] { 100, 100, 100, 1000 }, 0);    //等待3s,震动0.1s,等待0.1s,震动 1S;0表示一直震动

       vibrator.cancel();    //震动取消

     }

}
还有在AndroidMainfext.xml里添加权限
<uses-permission android:name="android.permission.VIBRATE"/>
2. getSystemService涉及到的点
2.1 相关知识介绍
涉及到的context,可以看看博客:
首先给给一副网上的图,感觉挺形象的
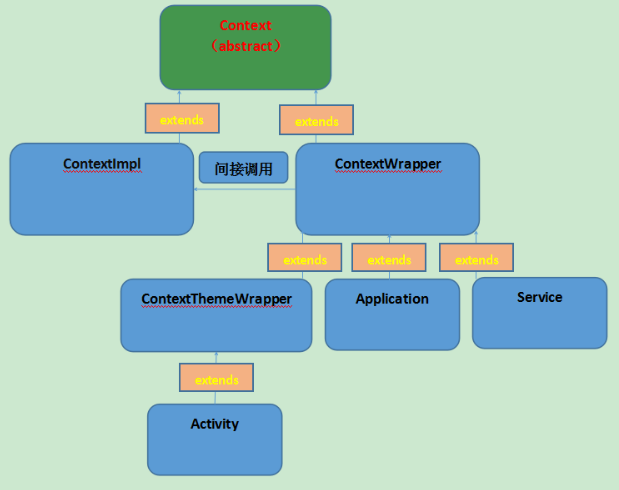
根据上图关系,再进行一下说明:
1. Context是一个抽象类,他有两个子类
2. Contextlmpl继承于Context,他是Context真正的实现
3. ContextWrapper里面是对Contextlmpl的引用,并没有自己的真正的Context对象
4. Service,Application, Activity都是直接或间接继承于ContextWrapper,但是真正的实现是Contextlmpl
好了,接着往下看
2.2. context
frameworks/base/services/java/com/android/server/SystemServer.java
private void run() {

        。。。// Initialize the system context.

        createSystemContext();//在这里面注册了context,进去查看

     。。。// Loop forever.

        Looper.loop();

        throw new RuntimeException("Main thread loop unexpectedly exited");

    }
private void createSystemContext() {

        ActivityThread activityThread = ActivityThread.systemMain();

        mSystemContext = activityThread.getSystemContext();   //得到一个系统的context,进去查看

        mSystemContext.setTheme(android.R.style.Theme_DeviceDefault_Light_DarkActionBar);

    }
frameworks/base/core/java/android/app/ActivityThread.java
public ContextImpl getSystemContext() {

        synchronized (this) {

            if (mSystemContext == null) {

                mSystemContext = ContextImpl.createSystemContext(this);   //从这里我们可以看出来创建了一个ContextImpl

            }

            return mSystemContext;

        }

    }
2.3 ContextImpl类
frameworks/base/core/java/android/app/ContextImpl.java
接着上面的查看
static ContextImpl createSystemContext(ActivityThread mainThread) {

        LoadedApk packageInfo = new LoadedApk(mainThread);

        ContextImpl context = new ContextImpl(null, mainThread,    //新建一个ContextImpl

                packageInfo, null, null, false, null, null);

        context.mResources.updateConfiguration(context.mResourcesManager.getConfiguration(),

                context.mResourcesManager.getDisplayMetricsLocked(Display.DEFAULT_DISPLAY));

        return context;

    }
从上面可以看到新建了一个ContextImpl,这个类有一个静态代码块,在第一次创建对象的时候会进行调用
static {

        registerService(ACCESSIBILITY_SERVICE, new ServiceFetcher() {

                public Object getService(ContextImpl ctx) {

                    return AccessibilityManager.getInstance(ctx);

                }});

        。。。
     //这里的VIBRATOR_SERVICE = "vibrator"

        registerService(VIBRATOR_SERVICE, new ServiceFetcher() {

                public Object createService(ContextImpl ctx) {

                    return new SystemVibrator(ctx);       //在这里创建系统Vibrator对象

                }});

        。。。

        registerService(WIFI_SERVICE, new ServiceFetcher() {

                public Object createService(ContextImpl ctx) {

                    IBinder b = ServiceManager.getService(WIFI_SERVICE);   //注意看这里,这个是从ServiceManager当中将服务取出

                    IWifiManager service = IWifiManager.Stub.asInterface(b);

                    return new WifiManager(ctx.getOuterContext(), service);

                }});

        。。。

    }
注意一下 SystemVibrator这个函数,在frameworks/base/core/java/android/os/SystemVibrator.java中;
package android.os;

import android.content.Context;

import android.media.AudioAttributes;

import android.util.Log;

public class SystemVibrator extends Vibrator {

    private static final String TAG = "Vibrator";

    private final IVibratorService mService;

    private final Binder mToken = new Binder();   //binder通信

    public SystemVibrator() {

        mService = IVibratorService.Stub.asInterface(

                ServiceManager.getService("vibrator"));  //注意:在构造器中会调用SerManager.getService,之后分析

    }

    public SystemVibrator(Context context) {

        super(context);

        mService = IVibratorService.Stub.asInterface(

                ServiceManager.getService("vibrator"));

    }

    @Override

    public boolean hasVibrator() {

        if (mService == null) {

            Log.w(TAG, "Failed to vibrate; no vibrator service.");

            return false;

        }

        try {

            return mService.hasVibrator();

        } catch (RemoteException e) {

        }

        return false;

    }

    /**

     * @hide

     */

    @Override

    public void vibrate(int uid, String opPkg, long milliseconds, AudioAttributes attributes) {

        if (mService == null) {

            Log.w(TAG, "Failed to vibrate; no vibrator service.");

            return;

        }

        try {

            mService.vibrate(uid, opPkg, milliseconds, usageForAttributes(attributes), mToken);

        } catch (RemoteException e) {

            Log.w(TAG, "Failed to vibrate.", e);

        }

    }

    /**

     * @hide

     */

    @Override

    public void vibrate(int uid, String opPkg, long[] pattern, int repeat,

            AudioAttributes attributes) {

        if (mService == null) {

            Log.w(TAG, "Failed to vibrate; no vibrator service.");

            return;

        }

        // catch this here because the server will do nothing.  pattern may

        // not be null, let that be checked, because the server will drop it

        // anyway

        if (repeat < pattern.length) {

            try {

                mService.vibratePattern(uid, opPkg, pattern, repeat, usageForAttributes(attributes),

                        mToken);

            } catch (RemoteException e) {

                Log.w(TAG, "Failed to vibrate.", e);

            }

        } else {

            throw new ArrayIndexOutOfBoundsException();

        }

    }

    private static int usageForAttributes(AudioAttributes attributes) {

        return attributes != null ? attributes.getUsage() : AudioAttributes.USAGE_UNKNOWN;

    }

    @Override

    public void cancel() {

        if (mService == null) {

            return;

        }

        try {

            mService.cancelVibrate(mToken);

        } catch (RemoteException e) {

            Log.w(TAG, "Failed to cancel vibration.", e);

        }

    }

}
接着看,就知道了这里的注册,就是相当于把服务放入了一个哈希表中,当需要用的时候,直接从哈希表中取出来。
private static final HashMap<String, ServiceFetcher> SYSTEM_SERVICE_MAP =

            new HashMap<String, ServiceFetcher>();

    private static int sNextPerContextServiceCacheIndex = 0;

    private static void registerService(String serviceName, ServiceFetcher fetcher) {

        if (!(fetcher instanceof StaticServiceFetcher)) {

            fetcher.mContextCacheIndex = sNextPerContextServiceCacheIndex++;

        }

        SYSTEM_SERVICE_MAP.put(serviceName, fetcher);

    }
2.4 getSystemService
frameworks/base/core/java/android/os/ContextImpl.java
在上面,我们已经把服务放入了哈希中了,在应用中我们是通过getSystemService将服务取出来的,下面来看看
public Object getSystemService(String name) {

        ServiceFetcher fetcher = SYSTEM_SERVICE_MAP.get(name);

        return fetcher == null ? null : fetcher.getService(this);

    }
然后查看getService
public Object getService(ContextImpl ctx) {

            ArrayList<Object> cache = ctx.mServiceCache;

            Object service;

            synchronized (cache) {

                if (cache.size() == 0) {

                    // Initialize the cache vector on first access.

                    // At this point sNextPerContextServiceCacheIndex

                    // is the number of potential services that are

                    // cached per-Context.

                    for (int i = 0; i < sNextPerContextServiceCacheIndex; i++) {

                        cache.add(null);

                    }

                } else {

                    service = cache.get(mContextCacheIndex);

                    if (service != null) {

                        return service;

                    }

                }

                service = createService(ctx);   //注意这里的调用:这个就是我们之前在匿名类里面覆写的

                cache.set(mContextCacheIndex, service);

                return service;

            }

        }
很简单,就是直接从表中把服务取出来而已,然后将服务创建出来,注意:这里的创建就是SystemVibrator这个类
2.5 小结
在上面的代码追踪中,还有两处代码,没有继续往下追
1. ServiceManager.getService:服务的注册
2. binder的通信。
3. AIDL跨进程的调用。
下面我们分别来说明这三个点。
3. 注册服务
3.1 SystemServer
frameworks/base/services/java/com/android/server/SystemServer.java
在之前我们分析到了ServiceManager.getService就没往下说了,这个是从ServiceManager当中把服务获取出啦,那么,有获取那肯定是由注册的。
首先说明一点:Vibrator是最终会调用到内核驱动的,所以路径肯定是JAVA-->CPP-->C-->kernel;
也就是说,在系统启动的时候,肯定会有程序加载.so动态库(也就是CPP),然后通过HAL调用到C,C最终才会调用到kernel driver。
开始分析SystemServer
private void run() {

        。。。// 这个函数就是加载动态库libandroid_servers.so
     //  也就是会调用Onload.cpp 查看3.2章

        System.loadLibrary("android_servers");

        nativeInit();   //
     。。。

        // Start services.

        try {

            startBootstrapServices();

            startCoreServices();

            startOtherServices();  //在这里会调用添加服务,查看3.3章

        } catch (Throwable ex) {

            Slog.e("System", "******************************************");

            Slog.e("System", "************ Failure starting system services", ex);

            throw ex;

        }

        。。。// Loop forever.

        Looper.loop();

        throw new RuntimeException("Main thread loop unexpectedly exited");

    }
3.2 Onload.cpp
frameworks/base/services/core/jni/onload.cpp
extern "C" jint JNI_OnLoad(JavaVM* vm, void* reserved)

{

    JNIEnv* env = NULL;

    jint result = -1;

    if (vm->GetEnv((void**) &env, JNI_VERSION_1_4) != JNI_OK) {

        ALOGE("GetEnv failed!");

        return result;

    }

    ALOG_ASSERT(env, "Could not retrieve the env!");

    register_android_server_PowerManagerService(env);

    register_android_server_SerialService(env);

    register_android_server_InputApplicationHandle(env);

    register_android_server_InputWindowHandle(env);

    register_android_server_InputManager(env);

    register_android_server_LightsService(env);

    register_android_server_AlarmManagerService(env);

    register_android_server_UsbDeviceManager(env);

    register_android_server_UsbHostManager(env);

    register_android_server_VibratorService(env);   //这里就是我们加载的Vibrator服务了

    register_android_server_SystemServer(env);

    register_android_server_location_GpsLocationProvider(env);

    register_android_server_location_FlpHardwareProvider(env);

    register_android_server_connectivity_Vpn(env);

    register_android_server_AssetAtlasService(env);

    register_android_server_ConsumerIrService(env);

    register_android_server_BatteryStatsService(env);

    register_android_server_hdmi_HdmiCecController(env);

    register_android_server_tv_TvInputHal(env);

    register_android_server_PersistentDataBlockService(env);

    register_android_server_fingerprint_FingerprintService(env);

    register_android_server_Watchdog(env);

    return JNI_VERSION_1_4;

}
继续往下追
frameworks/base/services/core/jni/com_android_server_VibratorService.cpp
查到在这里对JNI进行了注册。OK。暂时到这里,剩下的后面讲
int register_android_server_VibratorService(JNIEnv *env)

{

    return jniRegisterNativeMethods(env, "com/android/server/VibratorService",

            method_table, NELEM(method_table));

}
3.3 添加服务
从下面可以看出,vibrator确实添加入了SystemManager
private void startOtherServices() {

       VibratorService vibrator = null;   //注意这个参数VibratorService

     。。。


       Slog.i(TAG, "Vibrator Service");

       vibrator = new VibratorService(context);  //创建一个Vibrator的服务对象;

       ServiceManager.addService("vibrator", vibrator); //将服务添加进ServiceManager

        try {

            vibrator.systemReady();

        } catch (Throwable e) {

            reportWtf("making Vibrator Service ready", e);

        }

       。。。

    }
注意上面的那个VibratorService,我们之前都没有定义过,留一下。等下讲解;
到此时,我们已经对APP调用API,服务的注册,JNI的加载都进行了说明,那么接下来就是如果进行调用了
4. 进程间通信AIDL
4.1 AIDL简单介绍
这个章节,可以大概看看服务那篇:Android Service ,这里面有关于AIDL的介绍
注意到3.3章节的那个VibratorService,在我们之前的分析中,并没有定义这个类。那么他是如何得来的呢?
在Android当中,进程之间是不能直接进行通信的,在Android里提供了一种方式:AIDL来进行进程间通信
AIDL是android interface definition language(安卓接口定义语言),是把进程中的接口通过AIDL暴露出来,然后通过binder与其他进程进行交互。
4.2 IVibratorService.aidl
上面大概说了下AIDL是咋回事,在Android中,进程与服务之间的通讯都是进过AIDL的,所以vibrator想要被app调用,也要使用AIDL
frameworks/base/core/java/android/os/IVibratorService.aidl
package android.os;

/** {@hide} */

interface IVibratorService

{
   //这四个函数就是service暴露出来的接口

    boolean hasVibrator();

    void vibrate(int uid, String opPkg, long milliseconds, int usageHint, IBinder token);

    void vibratePattern(int uid, String opPkg, in long[] pattern, int repeat, int usageHint, IBinder token);

    void cancelVibrate(IBinder token);

}
frameworks/base/services/core/java/com/android/server/VibratorService.java
public class VibratorService extends IVibratorService.Stub

        implements InputManager.InputDeviceListener {

    。。。native static boolean vibratorExists();

    native static void vibratorOn(long milliseconds);

    native static void vibratorOff();

    private class Vibration implements IBinder.DeathRecipient {

  。。。

        Vibration(IBinder token, long millis, int usageHint, int uid, String opPkg) {

            this(token, millis, null, 0, usageHint, uid, opPkg);

        }

        Vibration(IBinder token, long[] pattern, int repeat, int usageHint, int uid,

                String opPkg) {

            this(token, 0, pattern, repeat, usageHint, uid, opPkg);

        }

        private Vibration(IBinder token, long millis, long[] pattern,

                int repeat, int usageHint, int uid, String opPkg) {

            mToken = token;

            mTimeout = millis;

            mStartTime = SystemClock.uptimeMillis();

            mPattern = pattern;

            mRepeat = repeat;

            mUsageHint = usageHint;

            mUid = uid;

            mOpPkg = opPkg;

        }

      。。。

            }

        }

    };

}
5.调用
到此为止,所有关系都打通,联系上了,接下来就没什么好说的了,直接调用就能找到
frameworks/base/services/core/jni/com_android_server_VibratorService.cpp
namespace android

{

static jboolean vibratorExists(JNIEnv *env, jobject clazz)

{

    return vibrator_exists() >  ? JNI_TRUE : JNI_FALSE;

}

static void vibratorOn(JNIEnv *env, jobject clazz, jlong timeout_ms)

{

    // ALOGI("vibratorOn\n");

    vibrator_on(timeout_ms);

}

static void vibratorOff(JNIEnv *env, jobject clazz)

{

    // ALOGI("vibratorOff\n");

    vibrator_off();

}

static JNINativeMethod method_table[] = {

    { "vibratorExists", "()Z", (void*)vibratorExists },

    { "vibratorOn", "(J)V", (void*)vibratorOn },

    { "vibratorOff", "()V", (void*)vibratorOff }

};

int register_android_server_VibratorService(JNIEnv *env)

{

    return jniRegisterNativeMethods(env, "com/android/server/VibratorService",

            method_table, NELEM(method_table));

}

};
从上面的cpp就能直接调用到vibrator中相对应的函数了;
hardware/libhardware/modules/vibrator/vibrator.c
static const char THE_DEVICE[] = "/sys/class/timed_output/vibrator/enable";  //从这里可知,这个就是我们vibrator的设备节点了

static int vibra_exists() {

    int fd;

    fd = TEMP_FAILURE_RETRY(open(THE_DEVICE, O_RDWR));

    if(fd < ) {

        ALOGE("Vibrator file does not exist : %d", fd);

        return ;

    }

    close(fd);

    return ;

}

static int sendit(unsigned int timeout_ms)

{

    int to_write, written, ret, fd;

    char value[]; /* large enough for millions of years */

    fd = TEMP_FAILURE_RETRY(open(THE_DEVICE, O_RDWR));

    if(fd < ) {

        return -errno;

    }

    to_write = snprintf(value, sizeof(value), "%u\n", timeout_ms);

    written = TEMP_FAILURE_RETRY(write(fd, value, to_write));

    if (written == -) {

        ret = -errno;

    } else if (written != to_write) {

        /* even though EAGAIN is an errno value that could be set

           by write() in some cases, none of them apply here.  So, this return

           value can be clearly identified when debugging and suggests the

           caller that it may try to call vibraror_on() again */

        ret = -EAGAIN;

    } else {

        ret = ;

    }

    errno = ;

    close(fd);

    return ret;

}

static int vibra_on(vibrator_device_t* vibradev __unused, unsigned int timeout_ms)

{

    /* constant on, up to maximum allowed time */

    return sendit(timeout_ms);

}

static int vibra_off(vibrator_device_t* vibradev __unused)

{

    return sendit();

}

static int vibra_close(hw_device_t *device)

{

    free(device);

    return ;

}

static int vibra_open(const hw_module_t* module, const char* id __unused,

                      hw_device_t** device __unused) {

    if (!vibra_exists()) {

        ALOGE("Vibrator device does not exist. Cannot start vibrator");

        return -ENODEV;

    }

    vibrator_device_t *vibradev = calloc(, sizeof(vibrator_device_t));

    if (!vibradev) {

        ALOGE("Can not allocate memory for the vibrator device");

        return -ENOMEM;

    }

    vibradev->common.tag = HARDWARE_DEVICE_TAG;

    vibradev->common.module = (hw_module_t *) module;

    vibradev->common.version = HARDWARE_DEVICE_API_VERSION(,);

    vibradev->common.close = vibra_close;

    vibradev->vibrator_on = vibra_on;

    vibradev->vibrator_off = vibra_off;

    *device = (hw_device_t *) vibradev;

    return ;

}

/*===========================================================================*/

/* Default vibrator HW module interface definition                           */

/*===========================================================================*/

static struct hw_module_methods_t vibrator_module_methods = {

    .open = vibra_open,

};

struct hw_module_t HAL_MODULE_INFO_SYM = {

    .tag = HARDWARE_MODULE_TAG,

    .module_api_version = VIBRATOR_API_VERSION,

    .hal_api_version = HARDWARE_HAL_API_VERSION,

    .id = VIBRATOR_HARDWARE_MODULE_ID,

    .name = "Default vibrator HAL",

    .author = "The Android Open Source Project",

    .methods = &vibrator_module_methods,

};
8. kernel driver
因为我们的代码没有添加 vibrator的驱动,所以我只是对代码进行了分析。
添加驱动的步骤如下:
desk@desk-ubuntu:~/myandroid$ cd kernel_imx/

desk@desk-ubuntu:~/myandroid/kernel_imx$ make menuconfig
将该路径下点上,就能使用了

内核代码我们以后再分析。暂时不分析了。
i.mx6 Android5.1.1 vibrator系统服务流程的更多相关文章
- i.mx6 Android5.1.1 初始化流程之框架
Android启动过程分为以下几个步骤: 1. Boot ROM: 上电后启动芯片固话代码. 2. BootLoader:固话代码会根据启动模式启动bootloader,(一般为启动引脚的电平的 ...
- i.mx6 Android5.1.1 初始化流程之init进程(未完成)
概述: 接在i.mx6 Android5.1.1 初始化流程之框架之后 参考资料:http://blog.csdn.net/mr_raptor/article/category/799879 相关源码 ...
- i.mx6 Android5.1.1 初始化流程之init.rc解析(未完成)
接上一篇:i.mx6 Android5.1.1 初始化流程之init进程 参考资料:http://blog.csdn.net/mr_raptor/article/category/799879 这个博 ...
- i.mx6 Android5.1.1 System server
1. 概述: 1. Zygote进程是Android Java世界的开创者,所有的Java应用程序进程都由Zygote进程创建: 2. Zygote创建应用程序进程过程其实就是复制自身进程地址空间作为 ...
- Android5 Zygote 与 SystemServer 启动流程分析
Android5 Zygote 与 SystemServer 启动流程分析 Android5 Zygote 与 SystemServer 启动流程分析 前言 zygote 进程 解析 zygoterc ...
- i.mx6 Android5.1.1 servicemanager本地服务
接在之前的 i.mx6 Android5.1.1 初始化流程之init进程 i.mx6 Android5.1.1 初始化流程之init.rc解析 servicemanager是由init创建的本地服务 ...
- i.mx6 Android5.1.1 build解析
参考资料:理解 Android Build 系统 把总结放前面: 1. 常用编译命令 make clean 执行清理,等同于:rm -rf out/. make sdk 编译出 Android 的 S ...
- i.mx6 Android5.1.1 Zygote
0. 总结: 0.1 相关源码目录: framework/base/cmds/app_process/app_main.cppframeworks/base/core/jni/AndroidRunti ...
- i.mx6 Android5.1.1 系统属性
属性变更的请求时init事件循环处理的另一个事件,在Android平台中,为了让运行中的所有进程共享系统运行时所需要的各种设置值,系统开辟了属性存储区域,并提供了访问该区域的API.属性由键(key) ...
随机推荐
- eCharts IE8兼容性问题
使用Echart的图表柱状图,里面用了Float32Array,IE8下面会提示无法找到Float32Array,黄色叹号. 网上查找后使用如下方法解决:不明觉厉 在<head></ ...
- 搭建 .NET Core 开发环境
安装 .Net Core 执行代码 任务时间:时间未知 .NET Core 的官方文档很详细,本实验带你建立一个.NET Core 1.1的Web运行环境,更多内容可以可以查阅微软官方文档. 安装 . ...
- 数据库路由中间件MyCat - 源代码篇(4)
此文已由作者易国强授权网易云社区发布. 欢迎访问网易云社区,了解更多网易技术产品运营经验. 2. 前端连接建立与认证 Title:MySql连接建立以及认证过程client->MySql:1.T ...
- python网络编程--socketserver 和 ftp功能简单说明
1. socketserver 我们之前写的tcp协议的socket是不是一次只能和一个客户端通信,如果用socketserver可以实现和多个客户端通信.它是在socket的基础上进行了一层封装,也 ...
- java—实现一个监听器HttpServletRequest的创建销毁、在线人数 (56)
在JavaWeb中的监听器分类 在Javaweb中存在三个被监听对象: HttpServletRequest HttpSessoin ServletContext 监听者 被监听者 监听到事件对象 H ...
- jquery中通过添加readonly或者disabled属性实现行为禁止 / 去除某个属性的方法
<!DOCTYPE html> <html lang="en"> <head> <meta charset="UTF-8&quo ...
- linux安装spark-2.3.0集群
(安装spark集群的前提是服务器已经配置了jdk并且安装hadoop集群(主要是hdfs)并正常启动,hadoop集群安装可参考<hadoop集群搭建(hdfs)>) 1.配置scala ...
- 5. STL编程五
1. STL的六大组件: 容器(Container) 算法(Algorithm) 迭带器(Iterator) 仿函数(Function object) 适配器(Adaptor) 空间配置器(alloc ...
- spring-boot-maven-plugin多模块install问题解决办法
一.问题描述: 项目分多个模块,open-eureka注册中心.open-provider服务提供者.open-common公共部分,provider依赖common.父pom使用spring-boo ...
- iOS中生成随机的UUID
+ (NSString *)uuidString { CFUUIDRef uuid_ref = CFUUIDCreate(NULL); CFStringRef uuid_string_ref= CFU ...