
MySQL安装再折腾--编码的设置
一、MySQL的安装
从官网(https://dev.mysql.com/downloads/mysql/)中下载Mac OS X 10.12 (x86, 64-bit), DMG Archive(mysql-5.7.19-macos10.12-x86_64.dmg)版,双击按提示安装,安装完成后可在控制面板下启动关闭MySQL服务器,

同时安装客户端:MySQL Workbench.app,(下载链接:https://dev.mysql.com/downloads/file/?id=468289)
启动MySQL服务器,打开MySQL Workbench,输入初始密码,随即提示修改初始密码。
二、设置Terminal下登录路径:
在/Users/**/新建文件:.bash_profile
文件中输入:
export PATH=${PATH}:/usr/local/mysql/bin
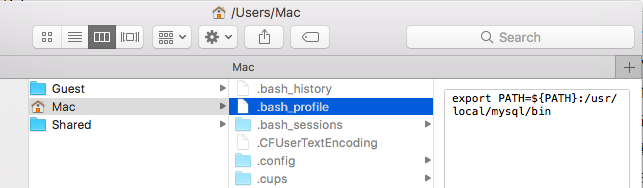
保存即可。在Terminal下,即可使用"mysql -u root -p"进行登录。
三、数据库编码问题
在Terminal中登录MySQL客户端(mysql -u root -p)查看数据库编码,命令如下:
mysql> SHOW VARIABLES LIKE 'char%';
发现
character_set_database | latin1
character_set_server | latin1
需要进行编码设置,但安装文件里无my.cnf文件,网上很多解决方法都没用,只能自建my.cnf文件。
关闭MySQL服务器,使用MacVim创建my.cnf,输入内容为:
# Example MySQL config file for medium systems.

  #

  # This is for a system with little memory (32M - 64M) where MySQL plays

  # an important part, or systems up to 128M where MySQL is used together with

  # other programs (such as a web server)

  #

  # MySQL programs look for option files in a set of

  # locations which depend on the deployment platform.

  # You can copy this option file to one of those

  # locations. For information about these locations, see:

  # http://dev.mysql.com/doc/mysql/en/option-files.html

  #

  # In this file, you can use all long options that a program supports.

  # If you want to know which options a program supports, run the program

  # with the "--help" option.

  # The following options will be passed to all MySQL clients

  [client]

  default-character-set=utf8

  #password   = your_password

  port        =

  socket      = /tmp/mysql.sock

  # Here follows entries for some specific programs

  # The MySQL server

  [mysqld]

  character-set-server=utf8

  init_connect='SET NAMES utf8

  port        =

  socket      = /tmp/mysql.sock

  skip-external-locking

  key_buffer_size = 16M

  max_allowed_packet = 1M

  table_open_cache =

  sort_buffer_size = 512K

  net_buffer_length = 8K

  read_buffer_size = 256K

  read_rnd_buffer_size = 512K

  myisam_sort_buffer_size = 8M

  character-set-server=utf8

  init_connect='SET NAMES utf8'

# Don't listen on a TCP/IP port at all. This can be a security enhancement,

# if all processes that need to connect to mysqld run on the same host.

# All interaction with mysqld must be made via Unix sockets or named pipes.

# Note that using this option without enabling named pipes on Windows

# (via the "enable-named-pipe" option) will render mysqld useless!

#

#skip-networking

  # Replication Master Server (default)

  # binary logging is required for replication

  log-bin=mysql-bin

    # binary logging format - mixed recommended

    binlog_format=mixed

      # required unique id between  and ^ -

      # defaults to  if master-host is not set

      # but will not function as a master if omitted

      server-id   =

    # Replication Slave (comment out master section to use this)

    #

    # To configure this host as a replication slave, you can choose between

    # two methods :

    #

    # ) Use the CHANGE MASTER TO command (fully described in our manual) -

    #    the syntax is:

    #

    #    CHANGE MASTER TO MASTER_HOST=<host>, MASTER_PORT=<port>,

    #    MASTER_USER=<user>, MASTER_PASSWORD=<password> ;

    #

    #    where you replace <host>, <user>, <password> by quoted strings and

    #    <port> by the master's port number (3306 by default).

    #

    #    Example:

    #

    #    CHANGE MASTER TO MASTER_HOST='125.564.12.1', MASTER_PORT=,

    #    MASTER_USER='joe', MASTER_PASSWORD='secret';

    #

    # OR

    #

    # ) Set the variables below. However, in case you choose this method, then

    #    start replication for the first time (even unsuccessfully, for example

    #    if you mistyped the password in master-password and the slave fails to

    #    connect), the slave will create a master.info file, and any later

    #    change in this file to the variables' values below will be ignored and

    #    overridden by the content of the master.info file, unless you shutdown

    #    the slave server, delete master.info and restart the slaver server.

    #    For that reason, you may want to leave the lines below untouched

    #    (commented) and instead use CHANGE MASTER TO (see above)

    #

    # required unique id between  and ^ -

    # (and different from the master)

    # defaults to  if master-host is set

    # but will not function as a slave if omitted

    #server-id       =

    #

    # The replication master for this slave - required

    #master-host     =   <hostname>

    #

    # The username the slave will use for authentication when connecting

    # to the master - required

    #master-user     =   <username>

    #

    # The password the slave will authenticate with when connecting to

    # the master - required

    #master-password =   <password>

    #

    # The port the master is listening on.

    # optional - defaults to

    #master-port     =  <port>

    #

    # binary logging - not required for slaves, but recommended

    #log-bin=mysql-bin

      # Uncomment the following if you are using InnoDB tables

      #innodb_data_home_dir = /usr/local/mysql/data

      #innodb_data_file_path = ibdata1:10M:autoextend

      #innodb_log_group_home_dir = /usr/local/mysql/data

      # You can set .._buffer_pool_size up to  -  %

      # of RAM but beware of setting memory usage too high

      #innodb_buffer_pool_size = 16M

      #innodb_additional_mem_pool_size = 2M

      # Set .._log_file_size to  % of buffer pool size

      #innodb_log_file_size = 5M

      #innodb_log_buffer_size = 8M

      #innodb_flush_log_at_trx_commit =

      #innodb_lock_wait_timeout =

        [mysqldump]

        quick

        max_allowed_packet = 16M

          [mysql]

          no-auto-rehash

          # Remove the next comment character if you are not familiar with SQL

          #safe-updates

          default-character-set=utf8

        [myisamchk]

        key_buffer_size = 20M

        sort_buffer_size = 20M

        read_buffer = 2M

        write_buffer = 2M

          [mysqlhotcopy]

          interactive-timeout
保存并将文件存在至/etc/目录之下,重启mysql服务器,即修改成功,
如果还是不能插入汉字,请重新创建数据库和表。
参考:http://www.jianshu.com/p/628bcf8bb557
MySQL安装再折腾--编码的设置的更多相关文章
- MySQL基础配置之mysql的默认字符编码的设置(my.ini设置字符编码) - 转载
MySQL基础配置之mysql的默认字符编码的设置(my.ini设置字符编码) MySQL的默认编码是Latin1,不支持中文,那么如何修改MySQL的默认编码呢,下面以设置UTF-8为例来说明. 需 ...
- MySQL基础配置之mysql的默认字符编码的设置(my.ini设置字符编码)
MySQL基础配置之mysql的默认字符编码的设置(my.ini设置字符编码) MySQL的默认编码是Latin1,不支持中文,那么如何修改MySQL的默认编码呢,下面以设置UTF-8为例来说明. 需 ...
- mysql 安装和修改编码(utf8mb4)
安装mysql(linux 我的环境centos 7) 安装MySQL官方的Yum Repository wget -i -c http://dev.mysql.com/get/mysql57-com ...
- Mysql安装与设置用户名、密码
个人博客网:https://wushaopei.github.io/ (你想要这里多有) 关于MySQL程序中数据库调度的流程图解: 1-MySql数据库的安装 安装前要注意,看看当前系 ...
- mysql安装 卸载 查字符集编码
下载地址 : https://cdn.mysql.com//Downloads/MySQL-8.0/mysql-8.0.11-winx64.zip 解压zip 解压完之后的目录 在里面新建一 ...
- 数据库 MySQL安装图解
MySQL安装图解 一.MYSQL的安装 1.打开下载的mysql安装文件,双击运行mysql-5.5.40-win32.msi. 2.选择安装类型,有"Typical(默认)". ...
- MySQL安装图解
MySQL安装图解 打开下载的mysql安装文件mysql-5.0.27-win32.zip,双击解压缩,运行“setup.exe”,出现如下界面: mysql安装向导启动,按“N ...
- Windown安装Mysql安装图解
一.MYSQL的安装 1.打开下载的mysql安装文件mysql-5.0.27-win32.zip,双击解压缩,运行“setup.exe”. 2.选择安装类型,有“Typical(默认)”.“Comp ...
- 数据库-MYSQL安装配置和删除
* 课程回顾: * 完成注册和登陆的功能. * 准备的工作 * 技术.开源jar包 * 开发的功能使用MVC模式 * C:控制层(接收请求和从客户端发送过来的参数) * 接收参数(request对象) ...
随机推荐
- python 之 爬普房网
from bs4 import BeautifulSoupimport reimport requestsimport pandas## pa pufangwangclass down(object) ...
- 获取指定订阅下所有Azure ARM虚拟机配置(CPU核数,内存大小,磁盘信息)的使用情况
脚本内容: <# .SYNOPSIS This script grab all ARM VM VHD file in the subscription and caculate VHD size ...
- Vue-cli 2.9 多页配置及多页面之间的跳转问题
vue开发,现在大部分做的都是(SPA)应用,但是,由于,需求不同,我们针对的用户需求变更较为,频繁,如果每次都全量打包更新,给开发的自测,及测试妹子的任务就会多,每次都要重新验证一下才放心.所以,想 ...
- Vue中引入jquery方法
vue-cli webpack 引入jquery 今天费了一下午的劲,终于在vue-cli 生成的工程中引入了jquery,记录一下.(模板用的webpack) 首先在package.json里的 ...
- Contest Hunter 1401 兔子与兔子
1401 兔子与兔子 0x10「基本数据结构」例题 描述 很久很久以前,森林里住着一群兔子.有一天,兔子们想要研究自己的 DNA 序列.我们首先选取一个好长好长的 DNA 序列(小兔子是外星生物,DN ...
- 区间DP的学习(持续更新)
例题: 1.Multiplication Puzzle 原题地址:http://poj.org/problem?id=1651 2.Dire Wolf 原题地址:http://acm.split.hd ...
- C#静态和实例
静态 实例 关键字static修饰类或方法 不能使用static修饰类或方法 修饰后类直接调用 需要先实例化对象,用对象调用 静态只会执行调用一次,并且在程序退出之前会一直保持状态,占领内存 实例化一 ...
- kubernetes 与LVM的结合
本文主要介绍k8s与LVM结合使用的场景,在原生的k8s中对于本地存储提供了hostPath与emptyDir两种volme,hostPath是直接将文件存储在本地主机上,存在的问题是无法进行quot ...
- C# 文件读写系列二
读取文件原则上非常简单,但它不是通过FileInfo和DirectoryInfo来完成的,关于FileInfo和DirectoryInfo请参考C# 文件操作系列一,在.Net Framework4. ...
- 警告: Hessian/Burlap: 'com.github.pagehelper.Page' is an unknown class in WebappClassLoader
项目中使用mybatis的分页插件pagehelper出现下面的警告 出现上面的警告,并不影响程序的运行.但是毕竟看着比较闹心. 使用debug进行代码根据发现,执行的过程中使用到了pagehelpe ...