Spring----Spring Boot Rest的使用方法
1.下载Google浏览器并安装插件
转载:
http://chromecj.com/web-development/2015-03/401/download.html
打开Google浏览器-》点击右上角 -》更多工具-》扩展程序
然后把 文件复制进来
打开右上角
完成
2.RestMain.java
import org.springframework.boot.SpringApplication;

import org.springframework.boot.autoconfigure.SpringBootApplication;

/**

 * 测试RestFul

 *

 */

@SpringBootApplication //等同于 @Configuration @EnableAutoConfiguration @ComponentScan

public class RestMain

{

    public static void main( String[] args )

    {

        SpringApplication.run(RestMain.class, args);

    }

}
3.BeanConfig.java
import org.springframework.context.annotation.ComponentScan;

import org.springframework.context.annotation.Configuration;

import org.springframework.context.annotation.EnableAspectJAutoProxy;

@Configuration

@ComponentScan(basePackages="com.maven") //这是扫描的包的主路径

@EnableAspectJAutoProxy   //AOP代理自动配置

public class BeanConfig {

//    @Bean

//    public AppService service(){

//        return new AppService();

//    }

//    @Bean

//    public User user(){

//        return new User();

//    }

//    @Bean

//    public ContactBook contactBook(){

//        return new ContactBook();

//    }

//    @Bean

//    public AspectConcern aspectConcern(){

//        return new AspectConcern();

//    }

}
4.WebConfig.java
import org.springframework.context.annotation.Bean;

import org.springframework.context.annotation.Configuration;

import org.springframework.web.servlet.ViewResolver;

import org.springframework.web.servlet.config.annotation.DefaultServletHandlerConfigurer;

import org.springframework.web.servlet.config.annotation.EnableWebMvc;

import org.springframework.web.servlet.config.annotation.WebMvcConfigurerAdapter;

import org.springframework.web.servlet.view.InternalResourceViewResolver;

@Configuration

@EnableWebMvc

public class WebConfig extends WebMvcConfigurerAdapter{

    /**

     * 这里的@bean()需要赋值一个名称,否则会抛出没有创建这个bean的异常

     *

     */

    @Bean("defaultServletHandlerMapping")

    public ViewResolver viewResolver(){

        InternalResourceViewResolver resolver = new InternalResourceViewResolver();

        resolver.setPrefix("WEB-INF/views/");

        resolver.setSuffix(".jsp");

        resolver.setExposeContextBeansAsAttributes(true);

        return resolver;

    }

    @Override

    public void configureDefaultServletHandling(DefaultServletHandlerConfigurer configurer) {

        configurer.enable();

    }

}
5.LoginController.java
import java.io.IOException;

import javax.servlet.http.HttpServletResponse;

import org.springframework.stereotype.Controller;

import org.springframework.web.bind.annotation.PathVariable;

import org.springframework.web.bind.annotation.RequestBody;

import org.springframework.web.bind.annotation.RequestMapping;

import org.springframework.web.bind.annotation.RequestMethod;

import org.springframework.web.bind.annotation.RequestParam;

import org.springframework.web.bind.annotation.ResponseBody;

import com.maven.demo.model.User;

@Controller

public class LoginController {

    @RequestMapping(value="/login",method=RequestMethod.GET)

    @ResponseBody

    public String getting(HttpServletResponse response) throws IOException{

        //设置成功时的响应码

        response.setStatus(606);

        //请求重定向

        response.sendRedirect("http://www.baidu.com");

        return "<div>Hello</div>";

    }

    /**

     * @param user      从体中获取的json数据(体中的数据与User里面的属性一一对应)

     * @param pathValue 从url地址中获取的路径名称

     * @param name      从url地址中获取的对应的参数的值(defaultValue表示默认值)

     * @param id

     * @return

     */

    @RequestMapping(value="/login/{pathValue}",method=RequestMethod.POST)

    @ResponseBody

    public User posting(@RequestBody User user,@PathVariable String pathValue,@RequestParam(defaultValue="tianheng")String name,int id){

        return user;

    }

}
6.User.java
import java.sql.Date;

import java.util.List;

import javax.persistence.Entity;

import javax.persistence.Id;

import javax.persistence.NamedQueries;

import javax.persistence.NamedQuery;

import javax.persistence.OneToMany;

import org.springframework.boot.context.properties.ConfigurationProperties;

import org.springframework.stereotype.Component;

/**

 * 用户实体类

 *

 */

@Component

//@ConfigurationProperties(prefix="my",locations = "classpath:application.yml")

//@ConfigurationProperties(prefix="my") //配合测试类@SpringBootTest()使用

//@Entity

//@NamedQueries({

//@NamedQuery(name = "User.findByNameWithNamedQuery",

//query = "select c from User c where c.name = ?1")})

public class User {

    //@Id

    private int id;

    private String name;

    private char sex;

    private Date birthDate;

    private int height;

    //@OneToMany(mappedBy="myUser")

    private List<ContactBook> contact;

    public User(){}

    public User(int id ,String name,char sex,Date birthDate,int height,List<ContactBook> contact){

        this.id = id;

        this.name = name;

        this.sex = sex;

        this.birthDate = birthDate;

        this.height = height;

        this.contact = contact;

    }

    public int getId() {

        return id;

    }

    public void setId(int id) {

        this.id = id;

    }

    public String getName() {

        return name;

    }

    public Date getBirthDate() {

        return birthDate;

    }

    public void setBirthDate(Date birthDate) {

        this.birthDate = birthDate;

    }

    public List<ContactBook> getContact() {

        return contact;

    }

    public void setContact(List<ContactBook> contact) {

        this.contact = contact;

    }

    public void setName(String name) {

        this.name = name;

    }

    public char getSex() {

        return sex;

    }

    public void setSex(char sex) {

        this.sex = sex;

    }

    public int getHeight() {

        return height;

    }

    public void setHeight(int height) {

        this.height = height;

    }

}
7.pom.xml
<project xmlns="http://maven.apache.org/POM/4.0.0" xmlns:xsi="http://www.w3.org/2001/XMLSchema-instance"

  xsi:schemaLocation="http://maven.apache.org/POM/4.0.0 http://maven.apache.org/xsd/maven-4.0.0.xsd">

  <modelVersion>4.0.0</modelVersion>

  <groupId>com.maven</groupId>

  <artifactId>demo</artifactId>

  <version>0.0.1-SNAPSHOT</version>

  <packaging>jar</packaging>

  <name>demo</name>

  <url>http://maven.apache.org</url>

  <properties>

    <project.build.sourceEncoding>UTF-8</project.build.sourceEncoding>

    <maven.compiler.source>1.8</maven.compiler.source> <!-- Java版本,不要在build path里面修改     -->

    <maven.compiler.target>1.8</maven.compiler.target>

  </properties>

  <dependencies>

    <dependency>

      <groupId>junit</groupId>

      <artifactId>junit</artifactId>

      <version>4.5</version>

      <scope>test</scope>

    </dependency>

    <dependency>

      <groupId>org.springframework</groupId>

      <artifactId>spring-context</artifactId>

      <version>4.3.7.RELEASE</version>

      </dependency>

    <dependency>

            <groupId>org.aspectj</groupId>

            <artifactId>aspectjweaver</artifactId>

            <version>1.8.9</version>

    </dependency>

    <dependency>

            <groupId>org.springframework.boot</groupId>

            <artifactId>spring-boot-starter-web</artifactId>

            <version>1.4.0.RELEASE</version>

    </dependency>

    <dependency>

            <groupId>org.springframework.boot</groupId>

            <artifactId>spring-boot-starter-tomcat</artifactId>

            <version>1.4.0.RELEASE</version>

    </dependency>

    <dependency>

            <groupId>org.springframework.boot</groupId>

            <artifactId>spring-boot-configuration-processor</artifactId>

            <version>1.4.0.RELEASE</version>

            <optional>true</optional>

    </dependency>

    <dependency>

            <groupId>org.springframework.boot</groupId>

            <artifactId>spring-boot-starter-test</artifactId>

            <version>1.4.0.RELEASE</version>

    </dependency>

    <dependency>

        <groupId>org.springframework.boot</groupId>

        <artifactId>spring-boot-starter-data-jpa</artifactId>

        <version>1.4.0.RELEASE</version>

    </dependency>

    <dependency>

        <groupId>com.h2database</groupId>

        <artifactId>h2</artifactId>

        <version>1.4.192</version>

    </dependency>

  </dependencies>

  <build>

    <plugins>

        <plugin>

            <groupId>org.springframework.boot</groupId>

            <artifactId>spring-boot-maven-plugin</artifactId>

        </plugin>

    </plugins>

   </build>

</project>
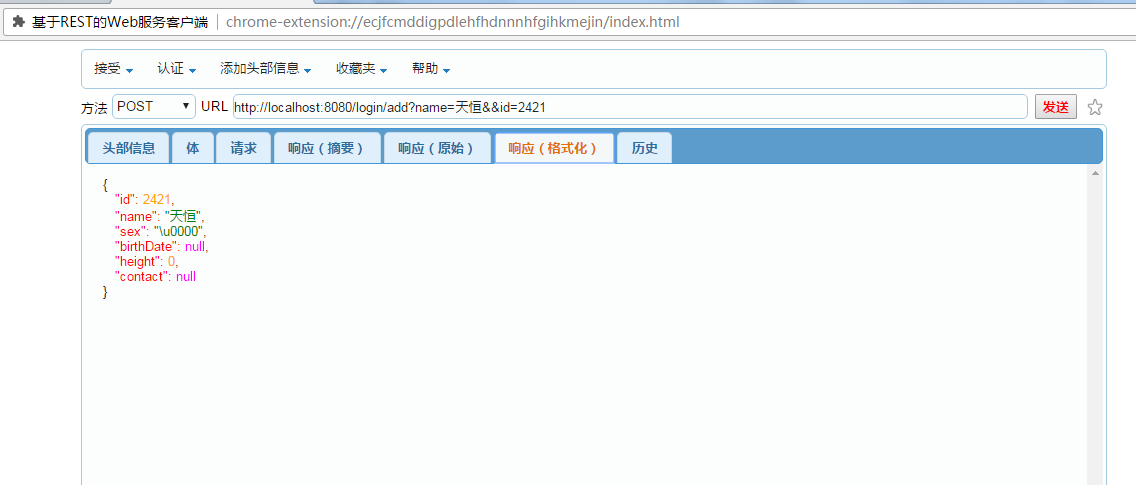
8.运行RestMain.java文件
9.
结果:
Spring----Spring Boot Rest的使用方法的更多相关文章
- 使用Spring Boot和AspectJ实现方法跟踪基础结构
了解如何使用Spring Boot和AspectJ实现方法跟踪基础结构!最近在优锐课学习收获颇多,记录下来大家一起进步! 在我们的应用程序中,获取方法的堆栈跟踪信息可能会节省很多时间.具有输入输出参数 ...
- Spring MVC & Boot & Cloud 技术教程汇总(长期更新)
昨天我们发布了Java成神之路上的知识汇总,今天继续. Java成神之路技术整理(长期更新) 以下是Java技术栈微信公众号发布的关于 Spring/ Spring MVC/ Spring Boot/ ...
- Spring -> Spring Boot > Spring Cloud
这几天刚刚上班,公司用的是Spring Cloud,接触不多.我得赶快学起来. 想学习就必须得知道什么是微服务,什么是Spring Boot,什么是Spring Cloud,以及两者之间有什么关系? ...
- HBase 学习之路(十一)—— Spring/Spring Boot + Mybatis + Phoenix 整合
一.前言 使用Spring+Mybatis操作Phoenix和操作其他的关系型数据库(如Mysql,Oracle)在配置上是基本相同的,下面会分别给出Spring/Spring Boot 整合步骤,完 ...
- HBase 系列(十一)—— Spring/Spring Boot + Mybatis + Phoenix 整合
一.前言 使用 Spring+Mybatis 操作 Phoenix 和操作其他的关系型数据库(如 Mysql,Oracle)在配置上是基本相同的,下面会分别给出 Spring/Spring Boot ...
- spring与mybatis三种整合方法
spring与mybatis三种整合方法 本文主要介绍Spring与Mybatis三种常用整合方法,需要的整合架包是mybatis-spring.jar,可通过链接 http://code.googl ...
- Spring AOP基于配置文件的面向方法的切面
Spring AOP基于配置文件的面向方法的切面 Spring AOP根据执行的时间点可以分为around.before和after几种方式. around为方法前后均执行 before为方法前执行 ...
- Spring -- 配置bean的三种方法
配置通过静态工厂方法创建的bean public class StaticBookFactory { //静态工厂方法: public static Book getBook(String bookN ...
- 和spring cloud/boot 学习如何管理自己的组件
案例, 功能: 需要写一个往kafka上报数据的组建. 当组建启动时,需要建立如下资源: 1, 和kafka建立若干条连接 2, 启动一个线程池 3, 启动上报一个缓冲区 问题如下: 1, 如何在sp ...
- Spring Bean初始化之后执行指定方法
转: Spring Bean初始化之后执行指定方法 2017年07月31日 15:59:33 vircens 阅读数:24807 Spring Bean初始化之后执行指定方法 在运用Spring进 ...
随机推荐
- js 的登录验证
$scope.startLogin = function () { console.log('loginTimeHelper:startLogin: ' + getCurrentTime()); ef ...
- js 过滤字符 和检测 特殊字符
// var str1 = str.replace(/[\'\"\\\/\b\f\n\r\t]/g, '');// 去掉转义字符 // var str2= str.replace(/[\-\ ...
- vue中sass的配置安装流程
1.安装node-sass,因为scss是基于此库的 cnpm install --save-dev node-sass 2.安装sass-loader cnpm install --save-dev ...
- PLSQL Developer新手使用教程(图文教程)
PLSQL Developer是Oracle数据库开发工具,很牛也很好用,PLSQL Developer功能很强大,可以做为集成调试器,有SQL窗口,命令窗口,对象浏览器和性能优化等功能,下面简单的介 ...
- 在jsp里面不要瞎用<!-- -->注释
如图: SEVERE: Servlet.service() for servlet jsp threw exceptionorg.apache.jasper.JasperException: /ch1 ...
- Servlet打印HTML页面乱码问题
代码就在下面,最开始我以为是request和response的编码问题,还去搞了一个filter,结果最后发现跟filter半毛钱关系都没有,都是因为没有打印这么一句 out.println(&quo ...
- LeetCode103 BinaryTreeZigzagLevelOrderTraversal(二叉树Z形层次遍历) Java题解
题目: Given a binary tree, return the zigzag level order traversal of its nodes' values. (ie, from lef ...
- SQL Server 禁止和启用约束
Alter Table XXX nocheck constraint xxx Alter Table XXX check constraint xxx
- Red Hat快捷键操作
Red Hat快捷键操作 .使用虚拟控制台 登录后按“Alt+F2”键可以看到“login:”提示符, 这就是第二个虚拟控制台. 一般新安装的Linux有四个虚拟控制台, 可以用“Alt+F1”到“A ...
- RESTful测试工具-RESTClient
很多测试人可能对RESTful的概念还是很模糊的,那么到底什么是RESTful?百度百科给出的一句话描述是一个架构样式的网络系统,似乎还是有点不懂?OK,说到Restful,我们一般从REST开始说起 ...