autotools源文件相同/不同目录下
关于Autotools
我们前面的章节中已经讲到了Makefile的使用(点击进入查看文章)。我们知道在Linux下面如果编译一个比较大型的项目,我们可以通过Makefile的方式来完成。
但是,我们又蛋疼了,Makefile拥有复杂的语法结构,甚至让人难以领会,当我们项目非常大的时候,维护Makefile会成为一件非常头疼的事情。于是我们就有了autotools工具,专门用来生成Makefile,这个工具让我们很大程度的降低了开发的难度。
Autotools并不是一个工具,而是一系列工具:
1. autoscan
2. aclocal
3. autoconf
4. autoheader
5. automake
记住,这一系列工具看着复杂,最终的目标还是生成Makefile
一般情况下系统中都会默认安装这一系列工具,如果未安装,则在Centeros中可以通过下面命令安装:
sudo yum install automake
c源文件同一目录下Autotools的使用
如果你的源文件都放在同一个目录下面,那么使用Autotools的时候会相对简单很多。比较著名的开源软件Memcache也是放在同一目录下的,你可以去看下它的源码包。
下面会按照步骤来实现同一目录下的Autotools工具的使用。
1. 源代码例子
入口文件main.c
#include <stdio.h>
#include <stdlib.h>
#include <unistd.h>
#include "sum.h"
#include "get.h"
//入口主函数
int main() {
int x = 10;
int y = 20;
int z = sum(&x, &y);
puts("This is Main");
printf("Z:%d\n", z);
x = 20;
z = get(&x, &y);
printf("Z:%d\n", z);
return 1;
}
sum.h和sum.c
#include <stdio.h>
#include <stdlib.h>
#include <unistd.h>
int sum(int *x, int *y);
#include "sum.h"
#include "val.h"
int sum(int *x, int *y) {
val(x);
puts("This is SUM Method!=========HDH");
return *x + *y;
}
val.h和val.c
#include <stdio.h>
#include <stdlib.h>
#include <unistd.h>
int val(int *x);
#include "val.h"
int val(int *x) {
puts("This is Value==");
printf("X:%d \n", *x);
return 0;
}
get.h和get.c
#include <stdio.h>
#include <stdlib.h>
#include <unistd.h>
int get(int *x, int *y);
#include "get.h"
int get(int *x, int *y) {
puts("This is get");
return (*x) * (*y);
}
上面这个例子,我们在Makefile这篇文章中已经讲解过如何来手工编写Makefile编译。这边的话我们继续使用这个例子,实现Autotools的工具编译。
[admin@localhost test_c2]$ ls
get.c get.h main.c sum.c sum.h val.c val.h
2. Autoscan命令
第一步,我们需要在我们的项目目录下执行autoscan命令。这个命令主要用于扫描工作目录,并且生成configure.scan文件。并且configure.scan需要重命令成configure.ac,然后编辑这个配置,我们才能继续执行后面的命令。
[admin@localhost test_c2]$ autoscan
[admin@localhost test_c2]$ ls
autoscan.log configure.scan get.c get.h main.c sum.c sum.h val.c val.h
[admin@localhost test_c2]$ mv configure.scan configure.ac
[admin@localhost test_c2]$ ls
autoscan.log configure.ac get.c get.h main.c sum.c sum.h val.c val.h
我们需要编辑configure.ac文件,首先我们打开configure.ac文件:
# -*- Autoconf -*-
# Process this file with autoconf to produce a configure script.
AC_PREREQ([2.69])
AC_INIT([FULL-PACKAGE-NAME], [VERSION], [BUG-REPORT-ADDRESS])
AC_CONFIG_SRCDIR([main.c])
# -*- Autoconf -*-
# Process this file with autoconf to produce a configure script.
AC_PREREQ([2.69])
AC_INIT([FULL-PACKAGE-NAME], [VERSION], [BUG-REPORT-ADDRESS])
AC_CONFIG_SRCDIR([main.c])
AC_CONFIG_HEADERS([config.h])
# Checks for programs.
AC_PROG_CC
# Checks for libraries.
# Checks for header files.
AC_CHECK_HEADERS([stdlib.h unistd.h])
# Checks for typedefs, structures, and compiler characteristics.
# Checks for library functions.
AC_OUTPUT
我们修改成:
# -*- Autoconf -*-
# Process this file with autoconf to produce a configure script.
AC_PREREQ([2.69])
AC_INIT([FULL-PACKAGE-NAME], [VERSION], [BUG-REPORT-ADDRESS])
AC_CONFIG_SRCDIR([main.c])
# -*- Autoconf -*-
# Process this file with autoconf to produce a configure script.
AC_PREREQ([2.69])
AC_INIT(hello,1.0,test@qq.com)
AM_INIT_AUTOMAKE(hello,1.0)
AC_CONFIG_SRCDIR([main.c])
AC_CONFIG_HEADERS([config.h])
# Checks for programs.
AC_PROG_CC
# Checks for libraries.
# Checks for header files.
AC_CHECK_HEADERS([stdlib.h unistd.h])
# Checks for typedefs, structures, and compiler characteristics.
# Checks for library functions.
AC_CONFIG_FILES([Makefile])
AC_OUTPUT
configure.ac标签说明:
标签
说明
AC_PREREQ
声明autoconf要求的版本号
AC_INIT
定义软件名称、版本号、联系方式
AM_INIT_AUTOMAKE
必须要的,参数为软件名称和版本号
AC_CONFIG_SCRDIR
宏用来侦测所指定的源码文件是否存在, 来确定源码目录的有效性.。此处为当前目录下main.c。
AC_CONFIG_HEADER
宏用于生成config.h文件,以便 autoheader 命令使用。
AC_PROG_CC
指定编译器,默认GCC
AC_CONFIG_FILES
生成相应的Makefile文件,不同文件夹下的Makefile通过空格分隔。例如:AC_CONFIG_FILES([Makefile, src/Makefile])
AC_OUTPUT
用来设定 configure 所要产生的文件,如果是makefile,configure 会把它检查出来的结果带入makefile.in文件产生合适的makefile。
3. Aclocal命令
第二步,执行aclocal命令。扫描 configure.ac 文件生成 aclocal.m4文件, 该文件主要处理本地的宏定义,它根据已经安装的宏、用户定义宏和 acinclude.m4 文件中的宏将 configure.ac 文件需要的宏集中定义到文件 aclocal.m4 中。
[admin@localhost test_c2]$ aclocal
[admin@localhost test_c2]$ ls
aclocal.m4 autom4te.cache autoscan.log configure.ac get.c get.h main.c sum.c sum.h val.c val.h
4. Autoconf命令
第三步,执行autoconf命令。这个命令将 configure.ac 文件中的宏展开,生成 configure 脚本。这个过程可能要用到aclocal.m4中定义的宏。
[admin@localhost test_c2]$ autoconf
[admin@localhost test_c2]$ ls
aclocal.m4 autom4te.cache autoscan.log configure configure.ac get.c get.h main.c sum.c sum.h val.c val.h
[admin@localhost test_c2]$
5. Autoheader命令
第四步,执行autoheader命令。该命令生成 config.h.in 文件。该命令通常会从 "acconfig.h” 文件中复制用户附加的符号定义。该例子中没有附加的符号定义, 所以不需要创建 "acconfig.h” 文件。
[admin@localhost test_c2]$ autoheader
[admin@localhost test_c2]$ ls
aclocal.m4 autom4te.cache autoscan.log config.h.in configure configure.ac get.c get.h main.c sum.c sum.h val.c val.h
[admin@localhost test_c2]$
6. 创建Makefile.am文件
第五步,创建Makefile.am文件。Automake工具会根据 configure.in 中的参量把 Makefile.am 转换成 Makefile.in 文件。最终通过Makefile.in生成Makefile文件,所以Makefile.am这个文件非常重要,定义了一些生成Makefile的规则
Makefile.am:
AUTOMARK_OPTIONS = foreign
bin_PROGRAMS = hello
hello_SOURCES = main.c val.h val.c get.h get.c sum.h sum.c
1. AUTOMAKE_OPTIONS:由于GNU对自己发布的软件有严格的规范, 比如必须附带许可证声明文件COPYING等,否则automake执行时会报错. automake提供了3中软件等级:foreign, gnu和gnits, 供用户选择。默认级别是gnu. 在本例中, 使用了foreign等级, 它只检测必须的文件。
2. bin_PROGRAMS = hello :生成的可执行文件名称,生成多个可执行文件,可以用空格隔开。
3. hello_SOURCES:生成可执行文件hello需要依赖的源文件。其中hello_为可执行文件的名称。
具体Makefile.am后面我们会有一个章节专门讲这块内容。
7. Automake命令
第六步,执行automake --add-missing命令。该命令生成 Makefile.in 文件。使用选项 "--add-missing" 可以让 Automake 自动添加一些必需的脚本文件。如果发现一些文件不存在,可以通过手工 touch命令创建。
[admin@localhost test_c2]$ automake --add-missing
configure.ac:6: warning: AM_INIT_AUTOMAKE: two- and three-arguments forms are deprecated. For more info, see:
configure.ac:6: http://www.gnu.org/software/automake/manual/automake.html#Modernize-AM_005fINIT_005fAUTOMAKE-invocation
configure.ac:6: installing './install-sh'
configure.ac:6: installing './missing'
Makefile.am: installing './INSTALL'
Makefile.am: error: required file './NEWS' not found
Makefile.am: error: required file './README' not found
Makefile.am: error: required file './AUTHORS' not found
Makefile.am: error: required file './ChangeLog' not found
Makefile.am: installing './COPYING' using GNU General Public License v3 file
Makefile.am: Consider adding the COPYING file to the version control system
Makefile.am: for your code, to avoid questions about which license your project uses
Makefile.am: installing './depcomp'
[admin@localhost test_c2]$ touch NEWS
[admin@localhost test_c2]$ touch README
[admin@localhost test_c2]$ touch AUTHORS
[admin@localhost test_c2]$ touch ChangeLog
[admin@localhost test_c2]$ automake --add-missing
configure.ac:6: warning: AM_INIT_AUTOMAKE: two- and three-arguments forms are deprecated. For more info, see:
configure.ac:6: http://www.gnu.org/software/automake/manual/automake.html#Modernize-AM_005fINIT_005fAUTOMAKE-invocation
[admin@localhost test_c2]$ ls
aclocal.m4 autom4te.cache ChangeLog configure COPYING get.c INSTALL main.c Makefile.in NEWS sum.c val.c
AUTHORS autoscan.log config.h.in configure.ac depcomp get.h install-sh Makefile.am missing README sum.h val.h
8. configure命令
第七步,估计大家都对 ./congigure这个命令很熟悉吧。大部分linux软件安装都先需要执行./congigure,然后执行make和make install命令。
./congigure主要把 Makefile.in 变成最终的 Makefile 文件。configure会把一些配置参数配置到Makefile文件里面。
./configure
#具体命令省了
#可以看到生成了Makefile命令
[admin@localhost test_c2]$ ls
aclocal.m4 autom4te.cache ChangeLog config.h.in config.status configure.ac depcomp get.h
install-sh Makefile Makefile.in NEWS
stamp-h1 sum.h val.h
AUTHORS autoscan.log config.h config.log configure COPYING get.c INSTALL main.c
Makefile.am missing
README sum.c val.c
9. make命令
第八步,执行make命令,执行make命令后,就生成了可执行文件hello。
[admin@localhost test_c2]$ make
make all-am
make[1]: 进入目录“/home/admin/test_c2”
gcc -DHAVE_CONFIG_H -I. -g -O2 -MT main.o -MD -MP -MF .deps/main.Tpo -c -o main.o main.c
mv -f .deps/main.Tpo .deps/main.Po
gcc -DHAVE_CONFIG_H -I. -g -O2 -MT val.o -MD -MP -MF .deps/val.Tpo -c -o val.o val.c
mv -f .deps/val.Tpo .deps/val.Po
gcc -DHAVE_CONFIG_H -I. -g -O2 -MT get.o -MD -MP -MF .deps/get.Tpo -c -o get.o get.c
mv -f .deps/get.Tpo .deps/get.Po
gcc -DHAVE_CONFIG_H -I. -g -O2 -MT sum.o -MD -MP -MF .deps/sum.Tpo -c -o sum.o sum.c
mv -f .deps/sum.Tpo .deps/sum.Po
gcc -g -O2 -o hello main.o val.o get.o sum.o
make[1]: 离开目录“/home/admin/test_c2”
[admin@localhost test_c2]$ ls
aclocal.m4 autom4te.cache ChangeLog config.h.in config.status configure.ac depcomp get.h
hello install-sh main.o Makefile.am missing README sum.c sum.o val.h
AUTHORS autoscan.log config.h config.log configure COPYING get.c
get.o INSTALL main.c Makefile Makefile.in NEWS stamp-h1 sum.h val.c val.o
[admin@localhost test_c2]$ ./hello
This is Value==
X:10
This is SUM Method!=========HDH
This is Main
Z:30
This is get
Z:400
c源文件不同目录下Autotools的使用
如果你的入口文件main.c和依赖的文件不是在同一个目录中的,使用Autotools来管理项目的时候会稍微复杂一下。
在不同的目录下,项目会生成*.a文件的静态连接(静态连接相当于将多个.o目标文件合成一个)。最外层的main.c会通过静态连接方式来实现连接。
1. 源代码例子
这个例子中会加入libevent和pthread,让例子稍显复杂,这样可以详细的介绍不同目录下的Autotools的使用。
我们创建两个目录:
include/ :放置.h头文件
src/ :放置.c 源文件
[admin@localhost test_c3]$ ls
include main.c src
入口文件main.c:
#include "include/common.h"
//入口主函数
int main() {
puts("当前线程sleep 2秒");
sleep(2);
int x = 10;
int y = 20;
int z = sum(&x, &y);
puts("This is Main");
printf("Z:%d\n", z);
x = 20;
z = get(&x, &y);
printf("Z:%d\n", z);
return 1;
}
common.h文件:
#include <stdio.h>
#include <stdlib.h>
#include <unistd.h>
#include <event2/event.h>
#include <event2/bufferevent.h>
#include <pthread.h>
get.h:
int get(int *x, int *y);
sum.h
int sum(int *x, int *y);
val.h
#include "common.h"
int val(int *x);
get.c
#include "../include/get.h"
int get(int *x, int *y) {
puts("This is get");
return (*x) * (*y);
}
sum.c
#include "../include/sum.h"
#include "../include/val.h"
int sum(int *x, int *y) {
val(x);
puts("This is SUM Method!=========HDH");
return *x + *y;
}
val.c
#include "../include/val.h"
int val(int *x) {
//引入libevent的方法
struct event_base *base; //定义一个event_base
base = event_base_new(); //初始化一个event_base
const char *x = event_base_get_method(base); //查看用了哪个IO多路复用模型,linux一下用epoll
printf("METHOD:%s\n", x);
event_base_free(base); //销毁libevent
puts("This is Value==");
printf("X:%d \n", *x);
return 0;
}
2. 创建Makefile.am文件
在项目根目录下先创建Makefile.am文件。
AUTOMAKE_OPTIONS=foreign #软件等级
SUBDIRS=src #先扫描子目录
bin_PROGRAMS=hello #软件生成后的可执行文件名称
hello_SOURCES=main.c #当前目录源文件
hello_LDADD=src/libpro.a #静态连接方式 连接src下生成的libpro.a文件
LIBS = -l pthread -l event #因为我们项目中用到了libevent和pthread,这个是动态连接
在src/目录下创建Makefile.am文件。
noinst_LIBRARIES=libpro.a #生成的静态库文件名称,noinst加上之后是只编译,不安装到系统中。
libpro_a_SOURCES=sum.c get.c val.c #这个静态库文件需要用到的依赖
include_HEADERS=../include/common.h ../include/sum.h ../include/get.h ../include/val.h #导入需要依赖的头文件
说明:src/目录下面不加include_HEADERS也是可以运行的,但是在使用make dist打包命令后,并不会将include/文件夹打包进去,所以还是需要加上include_HEADERS。
3. 执行Autoscan命令
第一步,我们需要在我们的项目目录下执行autoscan命令。这个命令主要用于扫描工作目录,并且生成configure.scan文件。并且configure.scan需要重命令成configure.ac,然后编辑这个配置,我们才能继续执行后面的命令。
[admin@localhost test_c3]$ autoscan
[admin@localhost test_c3]$ ls
autoscan.log configure.scan include main.c Makefile.am src
修改configure.ac文件,主要添加AC_PROG_RANLIB(生成静态库);AC_PROG_LIBTOOL (用来生成动态库)
# -*- Autoconf -*-
# Process this file with autoconf to produce a configure script.
AC_PREREQ([2.69])
AC_CONFIG_SRCDIR([main.c])
AC_INIT(hello,1.0,abc@126.com)
AM_INIT_AUTOMAKE(hello,1.0)
AC_PROG_RANLIB
AC_CONFIG_HEADERS([config.h])
# Checks for programs.
AC_PROG_CC
# Checks for libraries.
# Checks for header files.
AC_CHECK_HEADERS([stdlib.h unistd.h])
# Checks for typedefs, structures, and compiler characteristics.
# Checks for library functions.
AC_CONFIG_FILES([Makefile
src/Makefile])
AC_OUTPUT
4. Aclocal命令
第二步,执行aclocal命令。扫描 configure.ac 文件生成 aclocal.m4文件, 该文件主要处理本地的宏定义,它根据已经安装的宏、用户定义宏和 acinclude.m4 文件中的宏将 configure.ac 文件需要的宏集中定义到文件 aclocal.m4 中。
[admin@localhost test_c3]$ aclocal
[admin@localhost test_c3]$ ls
aclocal.m4 autom4te.cache autoscan.log configure.ac include main.c Makefile.am src
5. Autoconf命令
第三步,执行autoconf命令。这个命令将 configure.ac 文件中的宏展开,生成 configure 脚本。这个过程可能要用到aclocal.m4中定义的宏。
[admin@localhost test_c3]$ autoconf
[admin@localhost test_c3]$ ls
aclocal.m4 autoscan.log configure.ac main.c src
autom4te.cache configure include Makefile.am
6. Autoheader命令
第四步,执行autoheader命令。该命令生成 config.h.in 文件。该命令通常会从 "acconfig.h” 文件中复制用户附加的符号定义。该例子中没有附加的符号定义, 所以不需要创建 "acconfig.h” 文件。
[admin@localhost test_c3]$ autoheader
[admin@localhost test_c3]$ ls
aclocal.m4 autoscan.log configure include Makefile.am
autom4te.cache config.h.in configure.ac main.c src
7. Automake命令
第五步,执行automake --add-missing命令。该命令生成 Makefile.in 文件。使用选项 "--add-missing" 可以让 Automake 自动添加一些必需的脚本文件。如果发现一些文件不存在,可以通过手工 touch命令创建。
[admin@localhost test_c3]$ touch NEWS
[admin@localhost test_c3]$ touch README
[admin@localhost test_c3]$ touch AUTHORS
[admin@localhost test_c3]$ touch ChangeLog
[admin@localhost test_c3]$ automake --add-missing
configure.ac:7: warning: AM_INIT_AUTOMAKE: two- and three-arguments forms are deprecated. For more info, see:
configure.ac:7: http://www.gnu.org/software/automake/manual/automake.html#Modernize-AM_005fINIT_005fAUTOMAKE-invocation
[admin@localhost test_c3]$ ls
aclocal.m4 autoscan.log configure include Makefile.am NEWS
AUTHORS ChangeLog configure.ac install-sh Makefile.in README
autom4te.cache config.h.in depcomp main.c missing src
8. configure命令
第六步,执行./configure命令。./congigure主要把 Makefile.in 变成最终的 Makefile 文件。configure会把一些配置参数配置到Makefile文件里面。
[admin@localhost test_c3]$ ./configure
#命令省了
[admin@localhost test_c3]$ ls
aclocal.m4 ChangeLog config.status hello main.o missing stamp-h1
AUTHORS config.h configure include Makefile NEWS
autom4te.cache config.h.in configure.ac install-sh Makefile.am README
autoscan.log config.log depcomp main.c Makefile.in src
9. make命令
第七步,执行make命令。make执行后,会生成hello的可执行文件。
[admin@localhost test_c3]$ make
make all-recursive
make[1]: 进入目录“/home/admin/test_c3”
Making all in src
make[2]: 进入目录“/home/admin/test_c3/src”
gcc -DHAVE_CONFIG_H -I. -I.. -g -O2 -MT sum.o -MD -MP -MF .deps/sum.Tpo -c -o sum.o sum.c
mv -f .deps/sum.Tpo .deps/sum.Po
gcc -DHAVE_CONFIG_H -I. -I.. -g -O2 -MT val.o -MD -MP -MF .deps/val.Tpo -c -o val.o val.c
mv -f .deps/val.Tpo .deps/val.Po
rm -f libpro.a
ar cru libpro.a sum.o get.o val.o
ranlib libpro.a
make[2]: 离开目录“/home/admin/test_c3/src”
make[2]: 进入目录“/home/admin/test_c3”
gcc -DHAVE_CONFIG_H -I. -g -O2 -MT main.o -MD -MP -MF .deps/main.Tpo -c -o main.o main.c
mv -f .deps/main.Tpo .deps/main.Po
gcc -g -O2 -o hello main.o src/libpro.a -l pthread -l event
make[2]: 离开目录“/home/admin/test_c3”
make[1]: 离开目录“/home/admin/test_c3”
[admin@localhost test_c3]$ ./hello
当前线程sleep 2秒
METHOD:epoll
This is Value==
X:10
This is SUM Method!=========HDH
This is Main
Z:30
This is get
Z:400
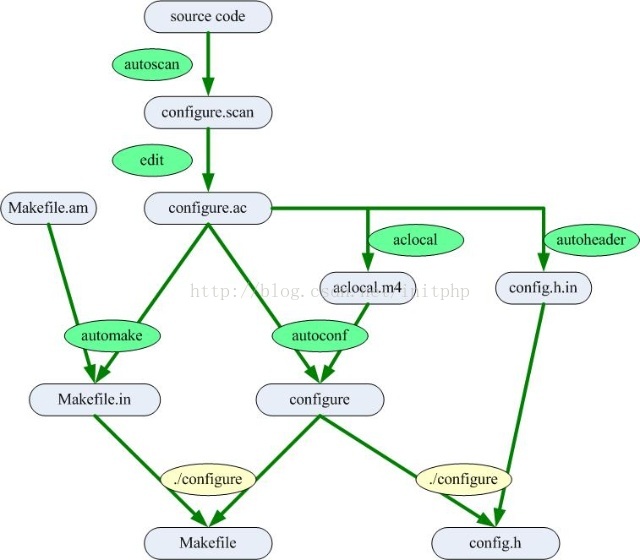
Autotools运行流程
流程总结:
1. 执行autoscan命令。这个命令主要用于扫描工作目录,并且生成configure.scan文件。
2. 修改configure.scan为configure.ac文件,并且修改配置内容。
3. 执行aclocal命令。扫描 configure.ac 文件生成 aclocal.m4文件。
4. 执行autoconf命令。这个命令将 configure.ac 文件中的宏展开,生成 configure 脚本。
5. 执行autoheader命令。该命令生成 config.h.in 文件。
6. 新增Makefile.am文件,修改配置内容
7. 执行automake --add-missing命令。该命令生成 Makefile.in 文件。
8. 执行 ./congigure命令。将Makefile.in命令生成Makefile文件。
9. 执行make命令。生成可执行文件。
流程图:
Make命令详解
1. make命令:编译文件。make命令主要通过Makefile文件生成可执行文件。
2. make clean命令。清楚编译的文件,包括目标文件*.o和可执行文件
3. make install 命令把目标文件安装到系统中。默认安装到/usr/local/bin目录下面。
4. make uninstall 命令,把目标文件从系统中卸载。
5. make dist 命令,打包发布。
如何使用发布的文件:
1. 下载到“hello-1.0.tar.gz”压缩文档
2. 使用“ tar -zxvf hello-1.0.tar.gz ”命令解压
3. 使用 “./configure” 命令,主要是生成Makefile命令,已经一些配置初始化。
4. 使用 “make” 命令编译源代码文件生成软件包。
5. 使用“make install ”命令来安装编译后的软件包到系统中。
Makefile.am解读
1. 可执行文件类型
可执行文件类型主要是只最终生成的可执行的文件。例如我们上面“c源文件同一目录下Autotools的使用”中的例子。
书写格式
说明
bin_PROGRAMS
生成的可执行文件名称。如果生成的可执行文件名称为多个,则可以通过空格的方式分隔。
bin_PROGRAMS:当运行make install命令的时候,可执行文件会默认安装到linux系统的/usr/local/bin目录下面
noinst_PROGRAMS:如果make install的时候不想被安装,可以使用noinst_PROGRAMS命令。
例子:bin_PROGRAMS=hello
hello_SOURCES
编译成可执行文件所依赖的.c源文件。多个源文件之间用空格分隔。hello为可执行文件名称。
hello_LDADD
编译成可执行文件过程中,连接所需的库文件,包括*.so的动态库文件和.a的静态库文件。
hello_LDFLAGS
连接的时候所需库文件的标识
bin_PROGRAMS=hello #软件生成后的可执行文件名称为hello
hello_SOURCES=main.c #当前目录源文件,如果当前目录有多个源文件,通过空格进行分隔
hello_LDADD=src/libpro.a #连接的时候所需的库文件
hello_LDFLAGS= #连接的时候所需库文件的标识
LIBS= -l pthread -l event #<strong><span style="color:#FF0000;">第三方的库</span></strong>
2. 静态库文件类型
静态库文件类型,一般会将c源码放在不同的文件夹中,并且每个文件夹中都会有各自的Makefile.am文件,并且会被编译成静态链接库 *.a格式的文件。
如果对静态库和动态库还没有一个概念,可以看我的《Linux c 开发 - 静态库和动态库》
注意:静态库使用中,需要对configure.ac中加入AC_PROG_RANLIB
书写格式
说明
noinst_LIBRARIES
生成静态库(*.a)或者动态库(*.so)的名称。
库文件一般以lib*.a或者lib*.so来命名。
noinst_LIBRARIES:当运行make install的时候,库文件不会被安装到linux默认的/usr/local/lib目录下。
lib_LIBRARIES:当运行make intsall的时候,则会被安装到/usr/local/lib目录下。
下面的例子:noinst_LIBRARIES=libpro.a
libpro_a_SOURCES
c的源文件,libpro_a即上面的livpro.a。多个文件用空格分开。
libpro_a_LDADD
加载所需的库文件。
libpro_a_LDFLAGS
编译的时候的连接标识。
noinst_LIBRARIES=libpro.a #生成的静态库文件名称,noinst加上之后是只编译,不安装到系统中。
libpro_a_SOURCES=sum.c get.c val.c #这个静态库文件需要用到的源文件。
libpro_a_LDADD = #加载库文件
libpro_a_LDFLAGS= #连接的时候所需库文件的标识
3. 头文件
我们一般需要导入一些*.h的头文件,如果你在Makefile.am中没有标识需要导入的头文件,可能在make dist打包的时候出现问题,头文件可能不会被打进包里面。
include_HEADERS=../include/common.h ../include/sum.h ../include/get.h ../include/val.h #可以将头文件引入
make install,头文件默认会被安装到linux系统/usr/local/include
4. 数据文件
data_DATA = data1 data2
5. 常用变量
AUTOMAKE_OPTIONS=foreign #软件等级
SUBDIRS=src #先扫描子目录,多个目录用空格隔开
LIBS = -l pthread -l event #因为我们项目中用到了libevent和pthread,这个是动态连接,在编译的时候会自动加上 -l pthread -l event
EXTRA_DIST = conf #打包一些配置文件
6. 安装目录
我们知道,默认情况下,执行make install命令,则会将文件安装到/usr/local/bin /usr/local/include /usr/local/lib目录下面。
我们可以通过命令./configure --prefix= 生成Makefile文件的时候,配置make install命令执行的时候的文件安装路径。
下面这个例子,我们在执行make install的时候,程序会被安装到/home/test目录下面。
./configure --prefix=/home/test
执行下面一系列命令:
./configure --prefix=/home/test
make
sudo make install
我们可以进入/home/test目录下看到相应的bin文件已经生成:
[admin@localhost test]$ ls
bin include lib
下面这些变量是已经定义好的安装路径的变量。
用户也可以修改这些变量。例如将bindir修改成$(prefix)/bin2
bindir = $(prefix)/bin。
libdir = $(prefix)/lib。
datadir=$(prefix)/share。
sysconfdir=$(prefix)/etc。
includedir=$(prefix)/include。
假如我们有自定义的文件夹,我们需要将这个文件夹下的内容安装到安装目录,
则需要配置一个自定义的文件夹目录confdir
confdir=${prefix}/conf #conf为名称 dir为每个文件夹变量必须带上
conf_DATA=conf/* #这个是将conf/目录下的内容安装到confdir目录下
EXTRA_DIST=conf #在make dist打包的时候 也要将扩展文件夹打包进去
confdir为需要创建的文件夹目录。
conf_DATA为需要拷贝的文件内容到${prefix}/conf目录中去
---------------------
作者:initphp
来源:CSDN
原文:https://blog.csdn.net/initphp/article/details/43705765
版权声明:本文为博主原创文章,转载请附上博文链接!
autotools源文件相同/不同目录下的更多相关文章
- Java_zip_多源文件压缩到指定目录下
依赖: <!-- https://mvnrepository.com/artifact/org.apache.commons/commons-compress --> <depend ...
- Eclipse下无法自动编译,或者WEB-INF/classes目录下没文件,编译失败的解决办法(转载)
文章来源:http://www.cnblogs.com/xfiver/archive/2010/07/07/1772764.html 1. IOException parsing XML docum ...
- linux复制指定目录下的全部文件到另一个目录中
linux复制指定目录下的全部文件到另一个目录中复制指定目录下的全部文件到另一个目录中文件及目录的复制是经常要用到的.linux下进行复制的命令为cp.假设复制源目录 为 dir1 ,目标目录为dir ...
- Zip文件压缩(加密||非加密||压缩指定目录||压缩目录下的单个文件||根据路径压缩||根据流压缩)
1.写入Excel,并加密压缩.不保存文件 String dcxh = String.format("%03d", keyValue); String folderFileName ...
- Eclipse中.setting目录下文件介绍
Eclipse项目中系统文件介绍 一. 写在前面 文章较长,可以直接到感兴趣的段落,或者直接关键字搜索: 请原谅作者掌握的编程语言少,这里只研究Java相关的项目: 每一个文件仅仅做一个常见内容的简单 ...
- SpringJUnit4加载类目录下(src)和WEF-INF目录下的配置文件
路径说明: 一.加载类目录下的配置文件 @RunWith(SpringJUnit4ClassRunner.class) @ContextConfiguration("classpath:ap ...
- JDK/bin目录下的不同exe文件的用途(转)
新安装完JDk 大家是否发现安装目录的bin文件夹有很多exe文件 下面就为大家讲解不同exe文件的用途 javac:Java编译器,将Java源代码换成字节代 java:Java解释器,直接从类文件 ...
- 多目录下多文件 makefile编写
前面已经分享了单目录项下多文件的makefile的编写,现在来看看多目录下多文件makefile的编写: 在做项目时,一般文件都会分几个目录来存放:基本的是 include/ bin/ src/ ...
- Linux编译多个不同目录下的文件以及静态库、动态库的使用
先看两篇博文,作为基础知识.如果对C/C++编译链接过程都了解的话,可以跳过不看. http://www.firedragonpzy.com.cn/index.php/archives/2556 ht ...
随机推荐
- ASP.NET MVC实现Excel文件的上传下载
在应用系统开发当中,文件的上传和下载是非常普遍的需求.在基于.NET的C/S架构的项目开发当中,有多种方案可以实现文件的上传和下载(httpwebrequest.webclient等),而且多采用异步 ...
- css 获取从第n个开始,之后的所有元素
<div id="box"> <div></div> <div>等待获取</div> <div>等待获取&l ...
- spring-boot 集成 log4j 记录日志
1.pom文件中移除和添加依赖 <!-- 移除boot—starter 的log4j --> <dependency> <groupId>org.springfra ...
- maven学习之pom.xml或settings.xml对nexus的配置(转)
(1)在POM中配置Nexus仓库 <project> ... <repositories> <repository ...
- mysql 锁查询
1.查看正在被锁定的的表 show OPEN TABLES where In_use > 0; in_use:多少个线程在使用 name_locked:是否被锁 2.查询哪些线程正在运行. 这个 ...
- HTML、CSS知识点,面试开发都会需要--No.5 文章段落
No.5 文章段落 1.文字属性 文字属性包含font-*和text-*两类. 2.基于font的属性 (1)font-family:字体属性,多个字体之前用逗号隔开.如果第一个字体没找到,则依次找后 ...
- partial_sum
版本1: template < class InputIterator, class OutputIterator > OutputIterator partial_sum(InputIt ...
- SQL Fundamentals: 子查询 || 分析函数(PARTITION BY,ORDER BY, WINDOWING)
SQL Fundamentals || Oracle SQL语言 子查询(基础) 1.认识子查询 2.WHERE子句中使用子查询 3.在HAVING子句中使用子查询 4.在FROM子句中使用子查询 5 ...
- Eclipse 00: 安装教程 + 汉化 + 简单创建java项目
Java 安装教程(Eclipse) 目录: 要安装Java 要分两个步骤: 1.JDK的安装 2.Eclipse的安装 3.Eclipse汉化 4.Eclipse创建简单java项目 1和2的顺序不 ...
- vimrc同步文档
目录 vimrc ims.vim vimrc if has("syntax") syntax on endif set nocompatible "取消vi 兼容模式 & ...