服务注册发现、配置中心集一体的 Spring Cloud Consul
前面讲了 Eureka 和 Spring Cloud Config,今天介绍一个全能选手 「Consul」。它是 HashiCorp 公司推出,用于提供服务发现和服务配置的工具。用 go 语言开发,具有很好的可移植性。被 Spring Cloud 纳入其中,Eureka 停止新版本开发,更多的想让开发者使用 Consul 来作为服务注册发现使用。
Consul 提供的功能包括如下几个:
服务发现
Consul 让服务注册和服务发现(通过 DNS 和 HTTP 接口)更加简单,甚至对于外部服务(例如SaaS)注册也一样。
故障检测
通过健康检查,服务发现可以防止请求被路由到不健康的主机,并且可以使服务容易断开(不再提供服务)。
多数据中心
Consul 不需要复杂的配置即可简便的扩展到多个数据中心,查找其它数据中心的服务或者只请求当前数据中心的服务。
键值存储
灵活的键值存储,提供动态配置、特征标记、协作、leader 选举等功能,通过长轮询实现配置改变的即时通知。
Spring Cloud Consul 将 Consul 进行自动配置和进一步封装。
Spring Cloud Consul 可替代已有的 Spring Cloud Eureka,也就是当做服务注册发现框架使用。并且 Eureka 2.x 版本也已经停止开发,并且 Spring Cloud 官方也建议用 Spring Cloud Consul 来替代,当然如果已经用了 Eureka 在项目中也没有关系,Eureka 已经足够稳定,正常使用没有任何问题。
Spring Cloud Consul 可替代已有的 Spring Cloud Config ,也就是当做配置中心使用。
Spring Cloud Consul 主要用作服务注册发现,并且官方建议替代 Eureka,那么它肯定具有 Eureka 或其他框架不具备的优势,下面看一下对比它和其他服务发现方式做的一下对比(摘自网络):
| 功能点 | euerka | Consul | zookeeper | etcd |
|---|---|---|---|---|
| 服务健康检查 | 可配支持 | 服务状态,内存,硬盘等 | (弱)长连接,keepalive | 连接心跳 |
| 多数据中心 | — | 支持 | — | — |
| kv 存储服务 | — | 支持 | 支持 | 支持 |
| 一致性 | — | raft | paxos | raft |
| cap | ap(高可用、分区容错) | ca(数据一致、高可用) | cp | cp |
| 使用接口(多语言能力) | http(sidecar) | 支持 http 和 dns | 客户端 | http/grpc |
| watch 支持 | 支持 long polling/大部分增量 | 全量/支持long polling | 支持 | 支持 long polling |
| 自身监控 | metrics | metrics | — | metrics |
| 安全 | — | acl /https | acl | https 支持(弱) |
| spring cloud 集成 | 已支持 | 已支持 | 已支持 | 已支持 |
Consul 采用 raft 算法来保证数据的强一致性,如此带来的优势很明显,相应的也带来了一些牺牲:
- 服务注册相比 Eureka 会稍慢一些。因为 Consul 的 raft 协议要求必须过半数的节点都写入成功才认为注册成功;
- Leader挂掉时,重新选举期间整个 consul 不可用,以此保证了强一致性但牺牲了可用性。
Consul 的安装和启动
与 Eureka 不同,Consul 需要独立安装,可以到官网(https://www.consul.io/downloads.html)下载。具体操作系统的安装方式不同,可参考官网。
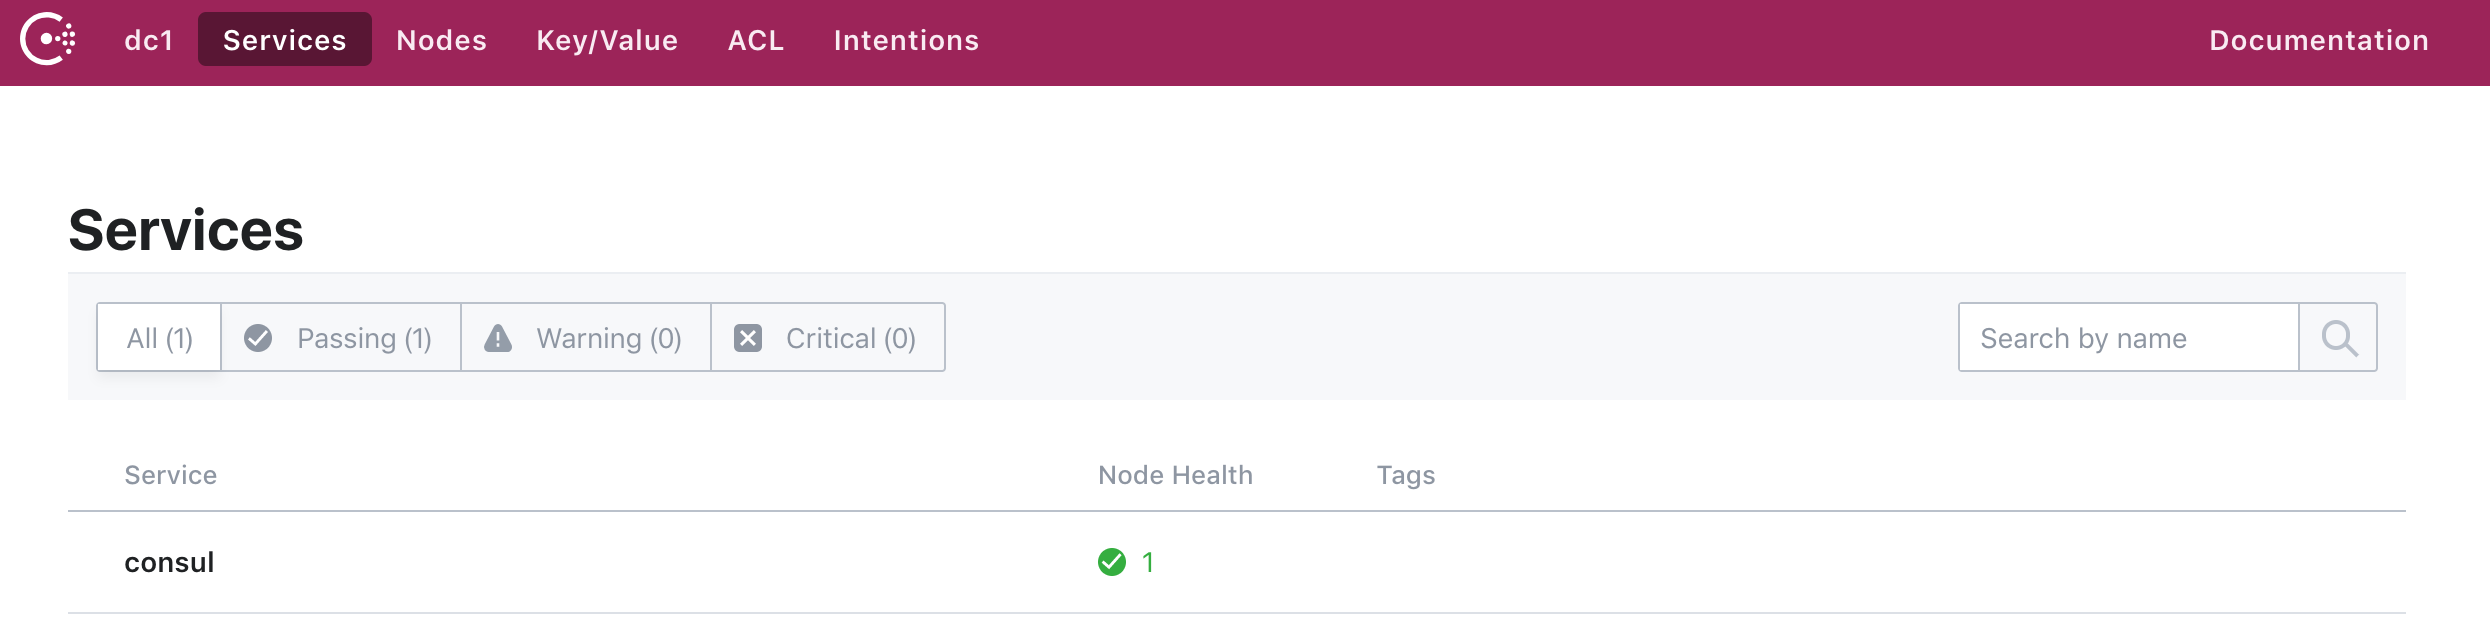
Consul 提供了一系列的参数,用于在命令行执行。Consul 默认提供了 web UI 界面来查看配置。通过访问 server 的 8500 端口可以访问到 web UI 控制台。
开发过程中,我们可以通过命令 consul agent -dev 来启动开发模式,启动成功后,访问 localhost:8500 可以看到当前 consul 的所有服务。如下图:
更多的在生成环境的部署可自行搜索相关介绍,这里暂时只用 dev 模式启动,用来介绍 Spring Cloud Consul 的使用。
实现服务提供者
1、引用 spring-cloud-consul
<dependency>

    <groupId>org.springframework.cloud</groupId>

    <artifactId>spring-cloud-starter-consul-all</artifactId>

</dependency>

<dependency>

    <groupId>org.springframework.boot</groupId>

    <artifactId>spring-boot-starter-web</artifactId>

</dependency>

<dependency>

    <groupId>org.springframework.boot</groupId>

    <artifactId>spring-boot-starter-actuator</artifactId>

</dependency>

<dependencyManagement>

    <dependencies>

        <dependency>

            <groupId>org.springframework.cloud</groupId>

            <artifactId>spring-cloud-consul-dependencies</artifactId>

            <version>2.1.0.M2</version>

            <type>pom</type>

            <scope>import</scope>

        </dependency>

    </dependencies>

</dependencyManagement>
2、设置 consul 相关配置,在 bootstrap.yml 配置文件中,配置如下:
spring:

  cloud:

    consul:

      discovery:

        service-name: consul-provider  ## 服务提供者名称

      host: localhost                  ## consul 所在服务地址

      port: 8500					   ## consul 端口
3、设置 server 相关配置,在 application.yml 配置文件中,配置如下:
spring:

  application:

    name: consul-provider

server:

  port: 5000

endpoints:

  health:

    sensitive: false

  restart:

    enabled: true

  shutdown:

    enabled: true

management:

  security:

    enabled: false
4、增加一个 RestController ,写两个测试服务方法
@RestController

@Slf4j

public class HelloController {

    @Autowired

    private DiscoveryClient discoveryClient;

    @GetMapping(value = "test")

    public String test(){

        List<String> services = discoveryClient.getServices();

        for(String s : services){

            log.info(s);

        }

        return "hello spring cloud!";

    }

    @GetMapping(value = "nice")

    public String nice(){

        List<String> services = discoveryClient.getServices();

        for(String s : services){

            log.info("gogogo" + s);

        }

        return "nice to meet you!";

    }

}
5、Spring boot 启动类
@SpringBootApplication

@EnableDiscoveryClient

public class Application {

    public static void main(String[] args) {

        SpringApplication.run(Application.class, args);

    }

}
@EnableDiscoveryClient 注解标示这是一个 client 端。
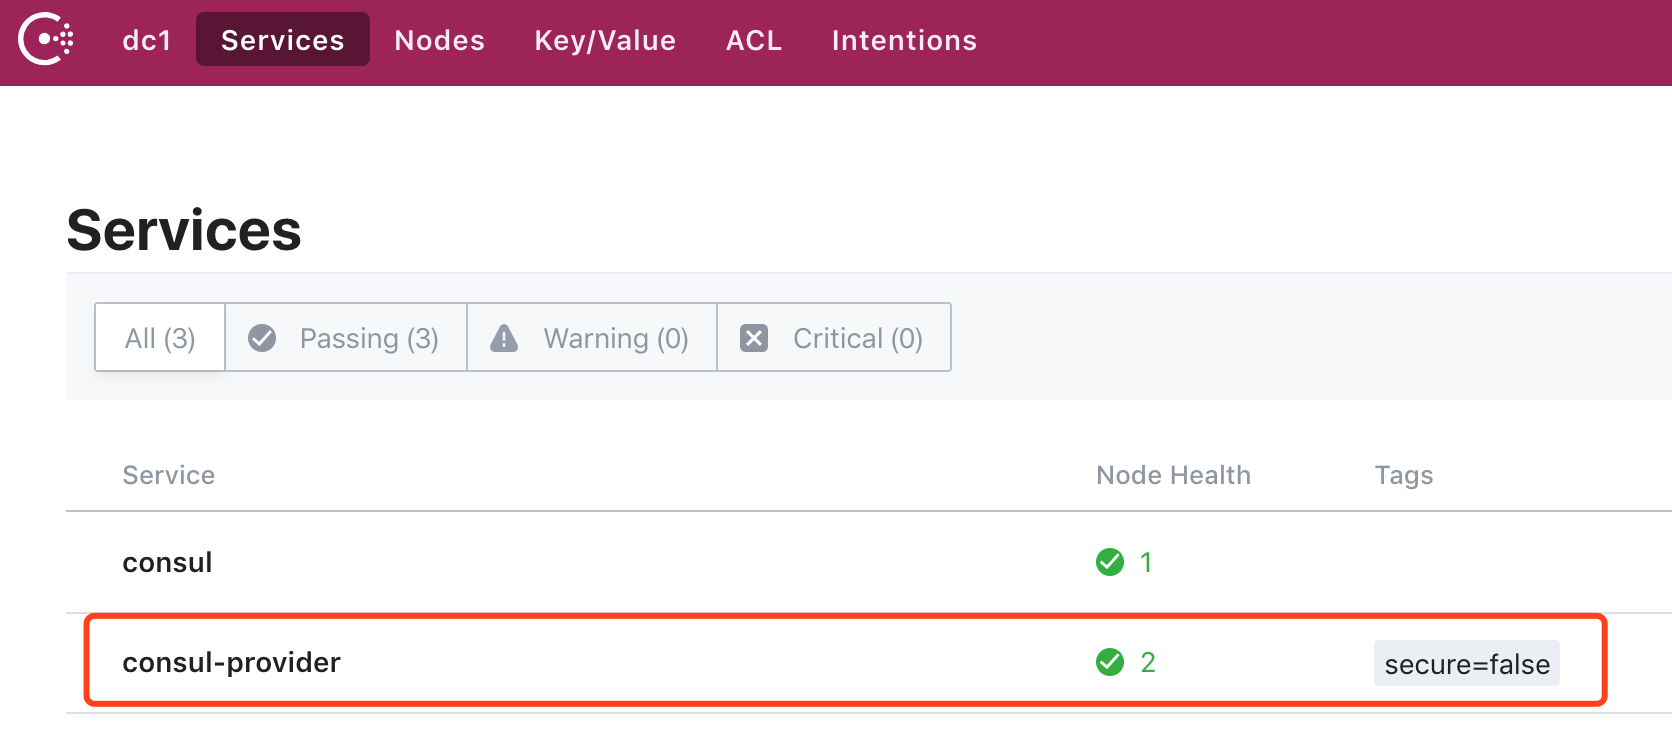
启动这个服务提供者,打开 http://localhost:8500 可以看到这个服务
实现服务消费者
1、引用相关 maven 包,除了引用与上面服务提供者相同的包外,还引用了 openFeign
<dependency>

    <groupId>org.springframework.cloud</groupId>

    <artifactId>spring-cloud-starter-openfeign</artifactId>

</dependency>
2、bootstrap.yml 配置,因为作为服务消费者,所以设置不注册到 consul
spring:

  cloud:

    consul:

      discovery:

        register: false
3、application.yml 配置
spring:

  application:

    name: consul-customer

server:

  port: 5001

endpoints:

  health:

    sensitive: false

  restart:

    enabled: true

  shutdown:

    enabled: true

management:

  security:

    enabled: false
4、项目启动类
@SpringBootApplication

@EnableDiscoveryClient

@EnableFeignClients

public class Application {

    @Bean

    @LoadBalanced

    public RestTemplate restTemplate() {

        return new RestTemplate();

    }

    public static void main(String[] args) {

        SpringApplication.run(Application.class, args);

    }

}
使用 @EnableDiscoveryClient 注解表示作为服务 client 端,@EnableFeignClients 启用 openFeign 。
5、新建一个 openFeign 服务接口
@FeignClient(value = "consul-provider")

public interface IHelloService {

    @RequestMapping(value = "/hello")

    String hello();

    @RequestMapping(value = "nice")

    String nice();

}
对应服务提供者中提供的两个 RESTful 接口地址
6、实现一个 RestController 来访问服务提供者开放出来的服务
@RestController

public class ConsumerController {

    @Autowired

    private LoadBalancerClient loadBalancer;

    @Autowired

    private DiscoveryClient discoveryClient;

    @Autowired

    private RestTemplate restTemplate;

    @Autowired

    private IHelloService helloService;

    private final static String SERVICE_NAME = "consul-provider";

    /**

     * 使用普通的 RestTemplate 方法访问服务

     *

     * @return

     */

    @GetMapping(value = "test")

    public Object test() {

        String result = restTemplate.getForObject("http://"+SERVICE_NAME + "/test", String.class);

        System.out.println(result);

        return result;

    }

    /**

     * 使用 openFeign 方式访问服务

     *

     * @return

     */

    @GetMapping(value = "feign")

    public Object feign() {

        String s = helloService.nice();

        return s;

    }

    /**

     * 获取所有服务实例

     *

     * @return

     */

    @GetMapping(value = "/services")

    public Object services() {

        return discoveryClient.getInstances(SERVICE_NAME);

    }

    /**

     * 从所有服务中选择一个服务(轮询)

     */

    @GetMapping(value = "/choose")

    public Object choose() {

        return loadBalancer.choose(SERVICE_NAME).getUri().toString();

    }

}
启动消费者程序,然后访问对应的 RESTful 接口,可以得到对应的结果。
实现高可用服务提供者
线上的微服务最好不要是单点形式,接下来通过配置来启动两个服务提供者,只要保证 service-name 相同,就表示这是同一个服务。
1、 bootstrap.yml 配置不变
spring:

  cloud:

    consul:

      discovery:

        service-name: consul-provider

      host: localhost

      port: 8500
2、application.yml 修改为如下配置
spring:

  profiles:

    active: consul-provider1

endpoints:

  health:

    sensitive: false

  restart:

    enabled: true

  shutdown:

    enabled: true

management:

  security:

    enabled: false

---

spring:

  profiles: consul-provider1

  application:

    name: consul-provider1

server:

  port: 5000

---

spring:

  profiles: consul-provider2

  application:

    name: consul-provider2

server:

  port: 5002
3、之后启动的时候加上 vm 参数。分别加上参数:
-Dspring.profiles.active=consul-provider1
-Dspring.profiles.active=consul-provider2
分别在 5000 端口和 5002 端口启动服务提供者 consul-provider
4、最后仍然访问消费者的 RESTful 接口地址,可以在服务提供者后台看到每次请求调用的服务实例。
用作配置中心
我们知道,Spring Cloud Config 提供了配置中心的功能,但是需要配合 git、svn 或外部存储(例如各种数据库),那么既然使用了 Consul ,就可以使用 Consul 提供的配置中心功能,并且不需要额外的 git 、svn、数据库等配合使用。
接下来,简单介绍一下 Spring Cloud Consul 如何用作配置中心。Consul 支持 yaml 和 properties 格式的配置文件内容,本例中以 yaml 格式为例。
1、引用相关的 maven 包
<dependency>

    <groupId>org.springframework.cloud</groupId>

    <artifactId>spring-cloud-starter-consul-config</artifactId>

</dependency>

<dependency>

    <groupId>org.springframework.boot</groupId>

    <artifactId>spring-boot-starter-web</artifactId>

</dependency>

<dependency>

    <groupId>org.springframework.boot</groupId>

    <artifactId>spring-boot-starter-actuator</artifactId>

</dependency>
2、bootstrap.yml 配置,这里主要设置有关 config 的参数
spring:
cloud:
consul:
config:
enabled: true # 启用配置中心
format: yaml # 指定配置格式为 yaml
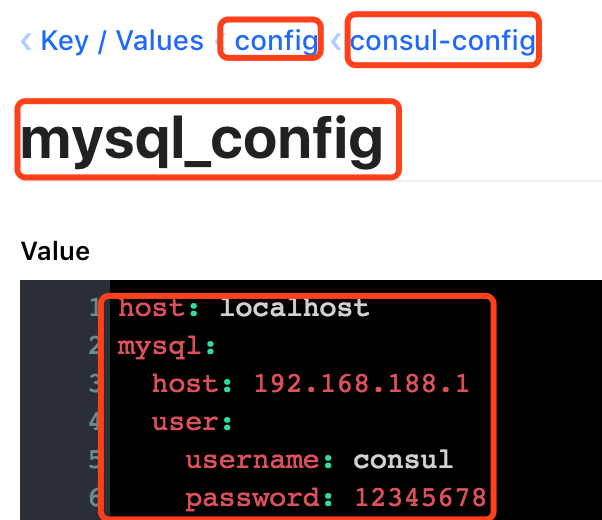
data-key: mysql_config # 也就是 consul 中 key/value 中的 key
prefix: config # 可以理解为配置文件所在的最外层目录
defaultContext: consul-config # 可以理解为 mysql_config 的上级目录
discovery:
register: false
对应到 consul 上,key/value 里的配置如下:
3、application.yml 配置文件内容
spring:

  application:

    name: consul-config

server:

  port: 5008

endpoints:

  health:

    sensitive: false

  restart:

    enabled: true

  shutdown:

    enabled: true

management:

  security:

    enabled: false
4、定义配置文件实体类,指定 @ConfigurationProperties 注解,指定前缀为 mysql,也就是 key/value 配置文件中的顶层 key。
@Component

@ConfigurationProperties(prefix = "mysql")

public class MySqlComplexConfig {

    public static class UserInfo{

        private String username;

        private String password;

        public String getUsername() {

            return username;

        }

        public void setUsername(String username) {

            this.username = username;

        }

        public String getPassword() {

            return password;

        }

        public void setPassword(String password) {

            this.password = password;

        }

        @Override

        public String toString() {

            return "UserInfo{" +

                    "username='" + username + '\'' +

                    ", password='" + password + '\'' +

                    '}';

        }

    }

    private String host;

    private UserInfo user;

    public String getHost() {

        return host;

    }

    public void setHost(String host) {

        this.host = host;

    }

    public UserInfo getUser() {

        return user;

    }

    public void setUser(UserInfo user) {

        this.user = user;

    }

}
5、新建一个 RestController 来获取输出 value 内容
@RestController

@Slf4j

public class ConfigController {

    @Autowired

    private MySqlConfig mySqlConfig;

    @Autowired

    private MySqlComplexConfig mySqlComplexConfig;

    @GetMapping(value = "mysqlhost")

    public String getMysqlHost(){

        return mySqlConfig.getHost();

    }

    @GetMapping(value = "mysqluser")

    public String getMysqlUser(){

        log.info(mySqlComplexConfig.getHost());

        MySqlComplexConfig.UserInfo userInfo = mySqlComplexConfig.getUser();

        return userInfo.toString();

    }

}
6、最后,启动应用,访问 RestController 中的 RESTful 接口即可看到配置文件内容。
与 Spring Cloud Config 相比,Consul 在控制台修改配置后,会立即更新,不用再结合 Spring Cloud Bus 之类的配合了。
源码地址
如果你觉得写的还可以的话,请点个「推荐」吧
欢迎关注,不定期更新本系列和其他文章
古时的风筝 ,进入公众号可以加入交流群

服务注册发现、配置中心集一体的 Spring Cloud Consul的更多相关文章
- CoSky 高性能 服务注册/发现 & 配置中心
CoSky 基于 Redis 的服务治理平台(服务注册/发现 & 配置中心) Consul + Sky = CoSky CoSky 是一个轻量级.低成本的服务注册.服务发现. 配置服务 SDK ...
- spring cloud+dotnet core搭建微服务架构:配置中心续(五)
前言 上一章最后讲了,更新配置以后需要重启客户端才能生效,这在实际的场景中是不可取的.由于目前Steeltoe配置的重载只能由客户端发起,没有实现处理程序侦听服务器更改事件,所以还没办法实现彻底实现这 ...
- spring cloud+.net core搭建微服务架构:配置中心续(五)
前言 上一章最后讲了,更新配置以后需要重启客户端才能生效,这在实际的场景中是不可取的.由于目前Steeltoe配置的重载只能由客户端发起,没有实现处理程序侦听服务器更改事件,所以还没办法实现彻底实现这 ...
- Consul 多数据中心下的服务注册发现与配置共享
1. Consul简介 Consul是HashiCorp公司推出的开源软件,它提供了一套分布式高可用可横向扩展的解决方案,能为微服务提供服务治理.健康检查.配置共享等能力. Eurake2.x ...
- 服务注册发现Eureka之二:高可用服务注册中心
前言 在Spring Cloud系列文章的开始,我们就介绍了服务注册与发现,其中,主要演示了如何构建和启动服务注册中心Eureka Server,以及如何将服务注册到Eureka Server中,但是 ...
- 基于docker,consul,consul-template, registrator, nginx服务注册发现集群
介绍 该工程主要实现服务的自动注册发现,从而达到提高运维效率,做到服务的自动发现和动态扩展. 服务注册发现 服务启动后自动被发现 动态变更负载均衡 自动伸缩 工具 1.Registrator 这是 ...
- 服务注册发现与注册中心对比-Eureka,Consul,Zookeeper,Nacos对比
服务注册发现与注册中心对比-Eureka,Consul,Zookeeper,Nacos对比 注册中心简介 流程和原理 基础流程 核心功能 1.Eureka.Consul.Zookeeper三者异同点 ...
- spring-cloud-consul 服务注册发现与配置
下面是 Spring Cloud 支持的服务发现软件以及特性对比(Eureka 已停止更新,取而代之的是 Consul): Feature euerka Consul zookeeper etcd 服 ...
- netty集群(一)-服务注册发现
上篇文章介绍了如何搭建一个单机版本的netty聊天室:https://www.jianshu.com/p/f786c70eeccc. 一.需要解决什么问题: 当连接数超过单机的极限时,需要将netty ...
随机推荐
- 百度AI之百度图像识别java版本使用
百度AI之百度图像识别java版本使用\ 官网 http://ai.baidu.com/ 创建应用 查看 appid,appkey,sk 下载sdk https://ai.baidu.com/sdk# ...
- [leetcode] 264. Ugly Number II (medium)
263. Ugly Number的子母题 题目要求输出从1开始数,第n个ugly number是什么并且输出. 一开始想着1遍历到n直接判断,超时了. class Solution { public: ...
- 01、HTML 简介
实例: <!DOCTYPE html> <html> <head> <meta charset="utf-8"> <title ...
- 并发,并行,线程,进程,GIL锁
1.并发和并行 并发: 同时做某些事,但是强调同一时段做多件事 如:同一路口,发生了车辆要同时通过路面的时间. 并行: 互不干扰的在同一时刻做多件事 如:同一时刻,同时有多辆车在多条车道上跑,即同时发 ...
- 0 推荐系统——CB和CF
一.基于内容的推荐(CB,Content-based Recommendations): 基于内容的推荐CB应该算是最早被使用的推荐方法,它根据用户过去喜欢的产品(本文统称为 item),为用户推荐和 ...
- windows上使用pip下载东西时报编码错误问题解决方法
原因是pip安装python包会加载我的用户目录,我的用户目录恰好是中文的,ascii不能编码.解决办法是: python目录 Python27\Lib\site-packages 建一个文件site ...
- unity3d立方体碰撞检测(c#代码实现)
由于unity自带的碰撞组件特别耗费性能,网上的unity物体碰撞的c#代码实现比较少,没有适合的,只能自己写一个来用: using System; using System.Collections. ...
- hdoj 4712 Hamming Distance(靠人品过的)
我先解释一下汉明距离 以下来自百度百科 在信息论中,两个等长字符串之间的汉明距离是两个字符串对应位置的字符不同的个数.换句话说,它就是将 一个字符串变换成另外一个字符串所需要替换的字符个数. 例如: ...
- maven项目引用错误 和项目结构问题
解决办法: 鼠标右键 maven ---->update prroject Configuration 然后 maven clean maven install
- go单元测试
testing模块 测试代码放在当前包以_test.go结尾的文件中 测试函数以Test为名称前缀 测试命令(go test) 正常编译操作(go build/install)会忽略测试文件 单例模式 ...