Pytest测试框架(一):pytest安装及用例执行
PyTest是基于Python的开源测试框架,语法简单易用,有大量的插件,功能非常多。自动检测测试用例,支持参数化,跳过特定用例,失败重试等功能。
安装
pip install -U pytest  # 安装

pytest --version # 查看版本

pytest -h # 查看帮助信息
用例识别
- pytest识别文件名为test_.py或者_test.py的测试文件
- 测试文件中可以在Test*类中写测试用例(测试用例以test_*开头,并且测试类不能有__init__方法)
- 不在Test类中的test_用例也可以被识别到。
识别包含“add”的用例:
pytest -k "add" --collect-only
(base) D:\ProgramWorkspace\TestingDemo>pytest -k "add" --collect-only

============================================== test session starts ==============================================

platform win32 -- Python 3.7.6, pytest-5.3.5, py-1.8.1, pluggy-0.13.1

rootdir: D:\ProgramWorkspace\TestingDemo

plugins: hypothesis-5.5.4, arraydiff-0.3, astropy-header-0.1.2, doctestplus-0.5.0, openfiles-0.4.0, remotedata-0.3

.2

collected 20 items / 11 deselected / 9 selected

<Package D:\ProgramWorkspace\TestingDemo\testing>

  <Module test_calc.py>

    <UnitTestCase TestCalc>

      <TestCaseFunction test_add_1>

      <TestCaseFunction test_add_2>

  <Module test_calc2.py>

    <Class TestCalc>

        <Function test_add[1-2-3]>

        <Function test_add[-1--2--3]>

        <Function test_add[0-1-1]>

        <Function test_add[0--1--1]>

        <Function test_add[0.1-0.2-0.3]>

        <Function test_add[999999-1000000-1999999]>

        <Function test_add_1>
打印文件下所有用例:
pytest --collect-only
(base) D:\ProgramWorkspace\TestingDemo>pytest --collect-only

============================================== test session starts ==============================================

platform win32 -- Python 3.7.6, pytest-5.3.5, py-1.8.1, pluggy-0.13.1

rootdir: D:\ProgramWorkspace\TestingDemo

plugins: hypothesis-5.5.4, arraydiff-0.3, astropy-header-0.1.2, doctestplus-0.5.0, openfiles-0.4.0, remotedata-0.3

.2

collected 20 items

<Module test_pytest.py>

  <Function test_one>

  <Function test_two>

  <Function test_three>

<Module test_pytest2.py>

  <Class Test_Demo>

      <Function test_one>

      <Function test_two>

      <Function test_three>

<Package D:\ProgramWorkspace\TestingDemo\testing>

  <Module test_calc.py>

    <UnitTestCase TestCalc>

      <TestCaseFunction test_add_1>

      <TestCaseFunction test_add_2>

  <Module test_calc2.py>

    <Class TestCalc>

        <Function test_add[1-2-3]>

        <Function test_add[-1--2--3]>

        <Function test_add[0-1-1]>

        <Function test_add[0--1--1]>

        <Function test_add[0.1-0.2-0.3]>

        <Function test_add[999999-1000000-1999999]>

        <Function test_div[1-2-0.5]>

        <Function test_div[-1--2-0.5]>

        <Function test_div[0-1-0]>

        <Function test_div[1-0-0]>

        <Function test_div[0.1-0.2-0.5]>

        <Function test_add_1>
Pytest执行
一个简单的测试用例test_pytest.py:
import pytest

def calc(a,b):

    return a + b

class TestDemo():

    def test_answer1(self):

        assert calc(1, 1) == 2

    def test_answer2(self):

        assert calc(2, 1) == 3

	@pytest.mark.answer3

    def test_answer3(self):

        assert calc(6, 6) == 12

if __name__=='__main__':

    pytest.main()
用例执行
# 执行test_pytest.py所有用例(模块)

pytest test_pytest.py

# 执行test_pytest.py里的TestDemo类

pytest test_pytest.py::TestDemo

# 执行test_pytest.py里的TestDemo类的test_answer2方法

pytest test_pytest.py::TestDemo::test_answer2
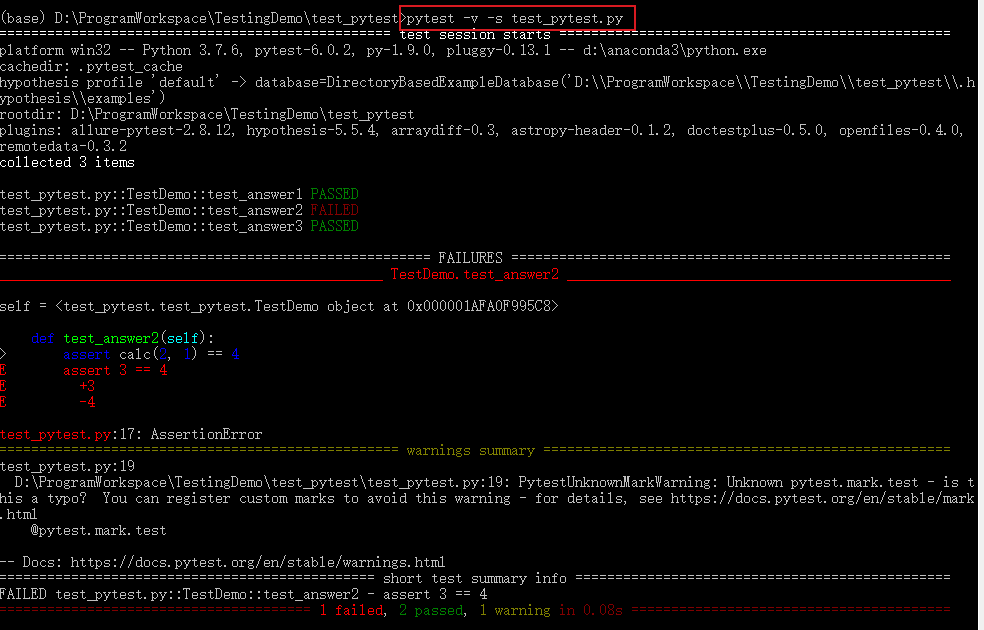
打印日志信息
# 打印详细运行日志信息

pytest -v test_pytest.py

pytest -s test_pytest.py
跳过某个用例
# 跳过运行某个用例

pytest -v -k "类名 and not方法名" 文件名

pytest -v -k "TestDemo and not test_answer2" test_pytest.py

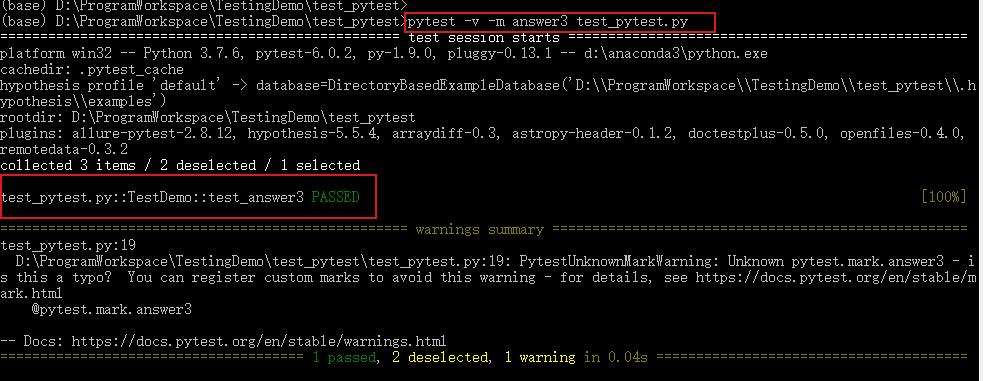
运行某个标记的用例
# 将运行有这个标记的测试用例:@pytest.mark.[标记名]

pytest -m [标记名] 文件名

pytest -m answer3 test_pytest.py
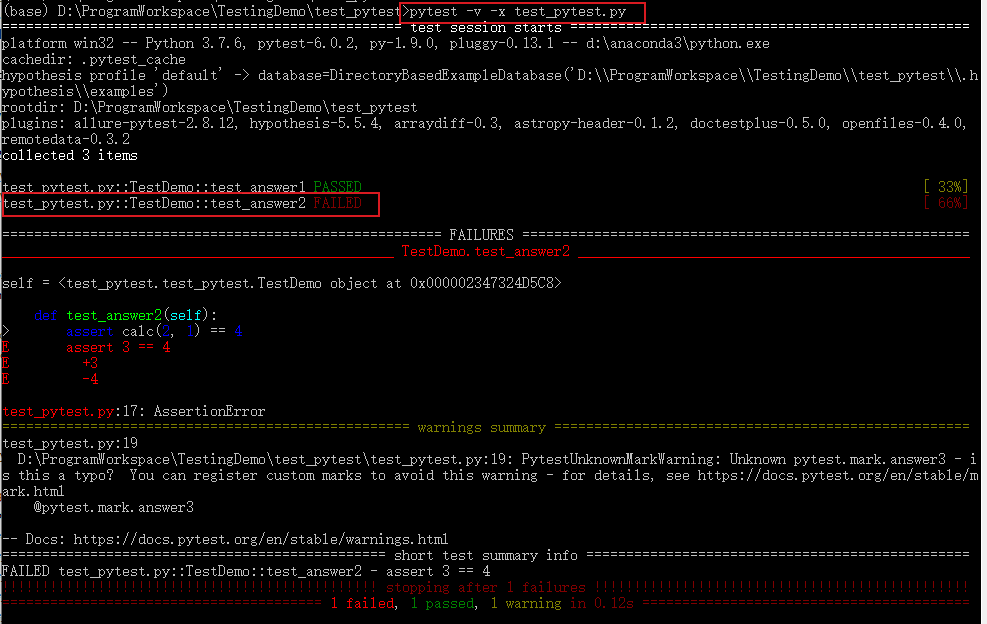
报错停止
# 一旦运行到报错用例就停止运行
pytest -x 文件名
pytest -x test_pytest.py
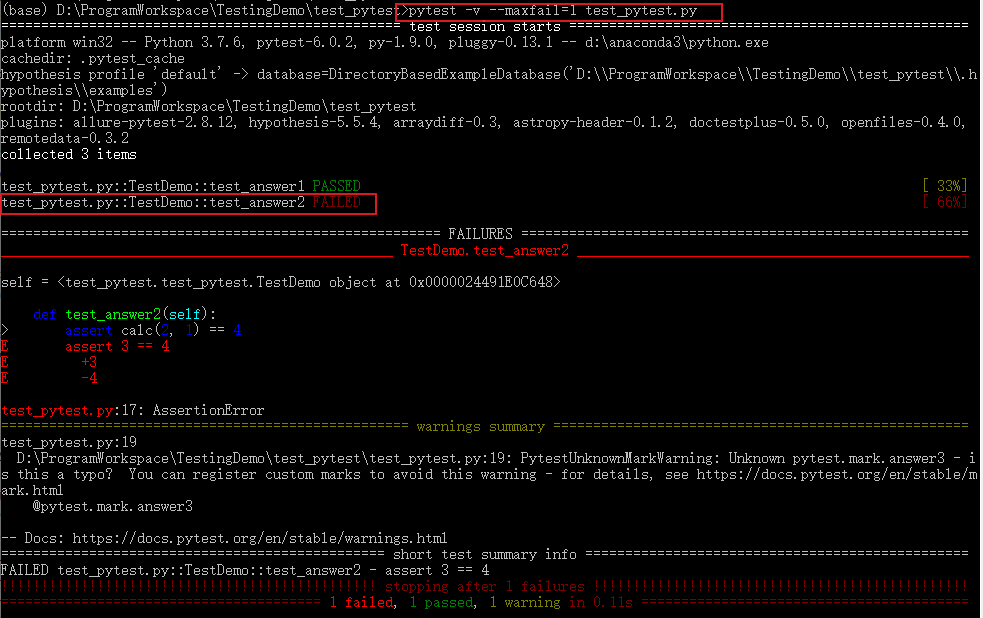
# 当报错达到num的时候就停止运行
pytest --maxfail=[num] 文件名
pytest --maxfail=[num] test_pytest.py
失败重新运行
安装 pytest-rerunfailures 插件:
pip install pytest-rerunfailures
测试失败后重新运行n次,在重新运行间延迟n秒再运行:
# 重新运行3次

pytest --reruns 3 -v -s test_pytest.py

# 重新运行5次,延迟1s

pytest --reruns 5 --reruns-delay 1 -v test_pytest.py

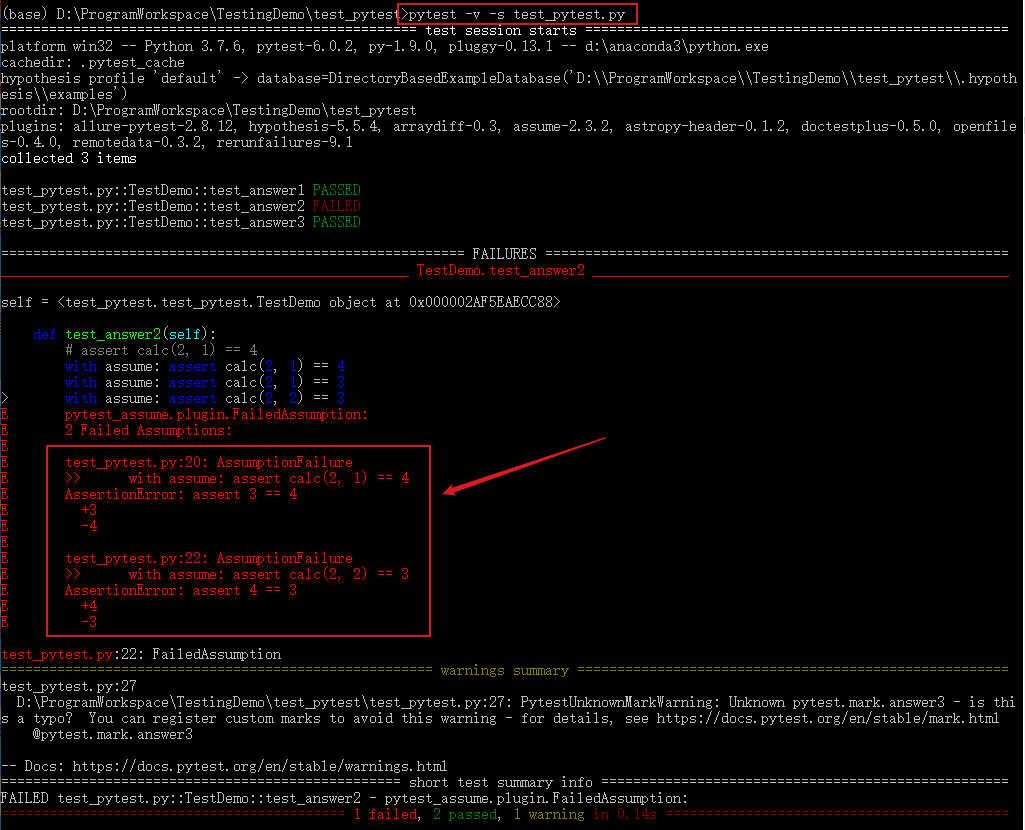
多条断言
一个方法中有多条断言,通常第一条失败后下面就不执行了,pytest-assume插件可以解决断言失败后继续执行断言的问题。
安装
pip install pytest-assume
执行多条断言:
# 写法1

pytest.assume(x == y)

pytest.assume(True)

pytest.assume(False)

# 写法2

with assume: assert calc(2, 1) == 4

with assume: assert calc(2, 1) == 3

with assume: assert calc(2, 2) == 3
修改测试用例test_pytest.py:
import pytest

from pytest import assume

def calc(a,b):

    return a + b

class TestDemo():

    def test_answer1(self):

        assert calc(1, 1) == 2

    def test_answer2(self):

  		with assume: assert calc(2, 1) == 4

		with assume: assert calc(2, 1) == 3

		with assume: assert calc(2, 2) == 3

	@pytest.mark.answer3

    def test_answer3(self):

        assert calc(6, 6) == 12

if __name__=='__main__':

    pytest.main()
测试结果:
pytest.main()
除了在终端执行外,也可以通过pytest.main()来执行,pytest.main() 自动查找当前目录下以test_开头的文件或者以_test结尾的py文件。
括号内可传入执行参数,通过[]进行分割,[]内的多个参数通过逗号分割,所有的参数和pytest命令行方式一样:
pytest.main(['-v', 'test_pytest.py']) # 执行test_pytest.py用例
或者直接在测试文件最后写如下代码,执行py文件。
if __name__=='__main__':

    pytest.main()

    # pytest.main(['-v', 'test_pytest.py'])
更多pytest执行方法可参考官方文档:https://docs.pytest.org/en/latest/contents.html#toc
--THE END--
文章标题:Pytest测试框架(一):pytest安装及用例执行
本文作者:hiyo
本文链接:https://hiyong.gitee.io/posts/install-pytest-and-run-test/
欢迎关注公众号:「测试开发小记」及时接收最新技术文章!
Pytest测试框架(一):pytest安装及用例执行的更多相关文章
- python nose测试框架全面介绍十二 ----用例执行顺序打乱
在实际执行自动化测试时,发现我们的用例在使用同一个资源的操作时,用例的执行顺序对测试结果有影响,在手工测试时是完全没法覆盖的. 但每一次都是按用例名字来执行,怎么打乱来执行的. 在网上看到一个有意思的 ...
- 『德不孤』Pytest框架 — 1、Pytest测试框架介绍
目录 1.什么是单元测试框架 2.单元测试框架主要做什么 3.单元测试框架和自动化测试框架有什么关系 4.Pytest测试框架说明 5.Pytest框架和Unittest框架区别 (1)Unittes ...
- pytest测试框架 -- 简介
一.pytest测试框架简介: (1)pytest是python的第三方测试框架,是基于unittest的扩展框架,比unittest更简洁,更高效. (2)pytest框架可以兼容unittest用 ...
- Pytest测试框架(五):pytest + allure生成测试报告
Allure 是一款轻量级.支持多语言的开源自动化测试报告生成框架,由Java语言开发,可以集成到 Jenkins. pytest 测试框架支持Allure 报告生成. pytest也可以生成juni ...
- Pytest测试框架(二):pytest 的setup/teardown方法
PyTest支持xUnit style 结构, setup() 和 teardown() 方法用于初始化和清理测试环境,可以保证测试用例的独立性.pytest的setup/teardown方法包括:模 ...
- Pytest测试框架(三):pytest fixture 用法
xUnit style 结构的 fixture用于初始化测试函数, pytest fixture是对传统的 xUnit 架构的setup/teardown功能的改进.pytest fixture为测试 ...
- python pytest测试框架介绍二
在介绍一中简单介绍了pytest的安装和简单使用,接下来我们就要实际了解pytest了 一.pytest的用例发现规则 pytest可以在不同的函数.包中发现用例,发现的规则如下 文件名以test_开 ...
- [翻译]pytest测试框架(一)
此文已由作者吴琪惠授权网易云社区发布. 欢迎访问网易云社区,了解更多网易技术产品运营经验. 纯官网译文而已... pytest是一个成熟的.全功能的python测试工具. pytest框架编写测试用例 ...
- 全功能Python测试框架:pytest
python通用测试框架大多数人用的是unittest+HTMLTestRunner,这段时间看到了pytest文档,发现这个框架和丰富的plugins很好用,所以来学习下pytest. imag ...
随机推荐
- Flink实战(102):配置(一)管理配置
来源:http://www.54tianzhisheng.cn/2019/03/28/flink-additional-data/ 前言 如果你了解 Apache Flink 的话,那么你应该熟悉该如 ...
- 在html页中添加视频的几种方式
1.avi格式代码片断如下: <object id="video" width="400" height="200" border=& ...
- Docker学习—Stack
前言: 前一篇了解Docker使用Swarm集群部署方式,并创建服务到Swarm集群中:如果在集群部署过程中存在大量服务部署.编排那么该如何处理呢? 那么就需要了解Docker Stack了. 1.D ...
- PyQt(Python+Qt)学习随笔:QTreeWidget中给树型部件增加顶层项的方法
老猿Python博文目录 专栏:使用PyQt开发图形界面Python应用 老猿Python博客地址 QTreeWidget对象创建后,是没有任何项的,要给部件增加项,首先要增加顶层项.顶层项的增加有三 ...
- PyQt(Python+Qt)学习随笔:QTreeView树形视图的itemsExpandable属性
老猿Python博文目录 专栏:使用PyQt开发图形界面Python应用 老猿Python博客地址 QTreeView树形视图的itemsExpandable属性用于控制视图中用户是否可以通过操作展开 ...
- PyQt(Python+Qt)学习随笔:QTableView的sortingEnabled属性
老猿Python博文目录 老猿Python博客地址 sortingEnabled属性用于控制是企业视图按列排序功能,如果此属性为True,则对tableView视图中的数据启用排序,如果此属性为Fal ...
- PyQt(Python+Qt)学习随笔:部件的大小策略sizePolicy的含义
在Qt Designer中的每个部件,除了设置部件的位置(geometry)之外,还可以指定部件的大小策略sizePolicy.部件的sizePolicy用于说明部件在布局管理中的缩放方式,当部件没有 ...
- PyQt(Python+Qt)学习随笔:Qt Designer中图像资源的使用及资源文件的管理
一.概述 在Qt Designer中要使用图片资源有三种方法:通过图像文件指定.通过资源文件指定.通过theme主题方式指定,对应的设置界面在需要指定图像的属性栏如windowIcon中通过点击属性设 ...
- Flask+MySQL+Redis的Docker配置
Docker配置了好多天,昨天晚上终于把碎遮项目的Docker打包完成了,后面会继续完善项目代码,把稳定版本打包后推送到DockerHub上. 网上关于Docker配置的文章很多,但大部分都是复制粘贴 ...
- libev的用法
本例是以linux环境c++的用法,ide用的是vs2019 一.libev的安装 我们采用的是apt-get方法(偷懒^_^),你也可以采用源码方式安装 sudo apt-get install l ...