python pytest测试框架介绍二
在介绍一中简单介绍了pytest的安装和简单使用,接下来我们就要实际了解pytest了
一、pytest的用例发现规则
pytest可以在不同的函数、包中发现用例,发现的规则如下
- 文件名以test_开头的py文件
- 以test_开头的函数
- 以Test开头的类
- 以test_开头的方法(与2类似)
- 要注意的是所有的包必须要有init.py文件(在使用各种编辑器时会自动生成)
二、pytest运行方式
1、单独执行某一个py文件里所有的用例
pytest test_mod.py
2、执行目录下所有的用例
pytest testing/
会按发现规则执行该目录下符合的用例
3、单独执行某一个用例
以函数形式的用例

pytest test_mod.py::testfunc

以类形式的用例

pytest testmod.py::testclass::test_method
三、pytest的测试框架(fixture)模式---xUnit格式
pytest支持以xUnit格式型的测试模型(setup/teardown),但还与python自带的unittest还是有一点差别,如下
- 模块形式----使用setup_module/teardown_module
- 函数形式----使用setup_function/teardown_function
- 类形式----使用setup_class/teardown_class
- 方法形式---使用setup_method/teardown_method
说了还是不好理解,我们还是通过例子还呈现
1、pytest以函数形式形成测试用例
from __future__ import print_function

def setup_module(module):

    print('\nsetup_module()')

def teardown_module(module):

    print('teardown_module()')

def setup_function(function):

    print('\nsetup_function()')

def teardown_function(function):

    print('\nteardown_function()')

def test_1():

    print('-  test_1()')

def test_2():

    print('-  test_2()')
运行结果如下:
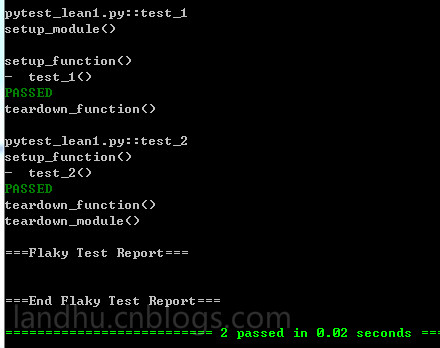
通过结果可以看出,各顺序如下
setup_module()----->setup_function()----->test_1----->teardown_function()----->setup_function()----->test_2--->teardown_function()---->teardown_module()
setup_module()和teardown_module只会在开始测试及测试结束时各运行一次
而setup_function()和teardwon_function会在每个用例开始前及结束后各运行一次
2、pytest以类形式的测试用例
from __future__ import print_function

class TestClass:

    @classmethod

    def setup_class(cls):

        print ('\nsetup_class()')

    @classmethod

    def teardown_class(cls):

        print ('teardown_class()')

    def setup_method(self, method):

        print ('\nsetup_method()')

    def teardown_method(self, method):

        print ('\nteardown_method()')

    def test_3(self):

        print('- test_3()')

    def test_4(self):

        print('- test_4()')
运行结果如下
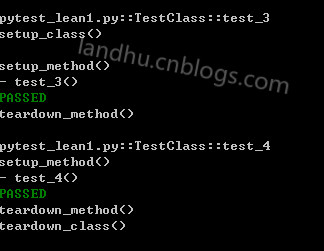
从结果可以看出,类形式的执行顺序如下
setup_class()--->setup_method()---->test_3()---->teardown_method()--->setup_mothod()-->test_4()---->teardown_method()---->teardonw_class()
setup_class和teardown_class只会在类调用前及结束后各运行一次
setup_method和teardown_method会在每个用例时都会运行
以类形式运行时,类里的用例执行顺序是不会变的,这点比unittest好
3、运行unittest框架模式
pytest也可以直接运行unittest模式的测试用例,如下
class my(unittest.TestCase):

    def delf(self,a):

        print a

    @classmethod

    def set_resource(self):

        bb='setUpclass'

        print bb

    @classmethod

    def setUpClass(cls):

        print "setUpclass"

        cls.set_resource()

    def setUp(self):

        print "setUp"

        floating_ip = ('setUptoTearDwon',)

        self.addCleanup(self.delf,

                        floating_ip[0])

    def test_1(self):

        '''i dont konw'''

        a=''

        print "test_1"

        floating_ip = ('bbbbb',)

        self.addCleanup(self.delf,

                        floating_ip[0])

        print ""

        self.addCleanup(self.delf,

                        a)

    def tearDown(self):

        print 'this is tearDown'

    def test_2(self):

        print "test_2"

    @classmethod

    def tearDownClass(cls):

        print "teardown...."
使用pytest运行该文件,结果如下
collected 2 items

unittest_fomater.py ..

========================== 2 passed in 0.19 seconds ===========================
可以看出,pytest也支持unittest的addCleanup功能等
需要注意的是,如果你在pytest模式中使用setupClass()函数是不行的,不会识别,但如果用例类继承之unittest.Testcase,还是可以识别的
class TestClass:

    @classmethod

    def setUpClass(cls):

        print ('\nsetup_class()')

    @classmethod

    def teardown_class(cls):

        print ('teardown_class()')

    def setup(self):

        print ('\nsetup_method()')

    def teardown_method(self, method):

        print ('\nteardown_method()')

    def test_3(self):

        print('- test_3()')

    def test_4(self):

        print('- test_4()')
用pytest运行时,结果如下,没有识别到setUpclass
collected 2 items

pytest_lean1.py::TestClass::test_3

setup_method()

- test_3()

PASSED

teardown_method()

pytest_lean1.py::TestClass::test_4

setup_method()

- test_4()

PASSED

teardown_method()

teardown_class()
python pytest测试框架介绍二的更多相关文章
- python pytest测试框架介绍四----pytest-html插件html带错误截图及失败重测机制
一.html报告错误截图 这次介绍pytest第三方插件pytest-html 这里不介绍怎么使用,因为怎么使用网上已经很多了,这里给个地址给大家参考,pytest-html生成html报告 今天在这 ...
- python pytest测试框架介绍三
之前介绍了pytest以xUnit形式来写用例,下面来介绍pytest特有的方式来写用例 1.pytest fixture实例1 代码如下 from __future__ import print_f ...
- python pytest测试框架介绍一
一.安装 pytest不是python默认的package,需要自动手工安装. pytest支持python 2.6--3.5之间的版本,同时可以在unix及windows上安装 安装方式: pip ...
- python pytest测试框架介绍五---日志实时输出
同样的,在使用pytest进行自动化测试时,需要将实时日志打印出来,而不是跑完后才在报告中出结果. 不过,好在pytest在3.3版本开始,就支持这一功能了,而不用再像nose一样,再去装第三方插件. ...
- Pytest测试框架(二):pytest 的setup/teardown方法
PyTest支持xUnit style 结构, setup() 和 teardown() 方法用于初始化和清理测试环境,可以保证测试用例的独立性.pytest的setup/teardown方法包括:模 ...
- 『德不孤』Pytest框架 — 1、Pytest测试框架介绍
目录 1.什么是单元测试框架 2.单元测试框架主要做什么 3.单元测试框架和自动化测试框架有什么关系 4.Pytest测试框架说明 5.Pytest框架和Unittest框架区别 (1)Unittes ...
- 【pytest系列】- pytest测试框架介绍与运行
如果想从头学起pytest,可以去看看这个系列的文章! https://www.cnblogs.com/miki-peng/category/1960108.html 前言 目前有两种纯测试的测 ...
- [翻译]pytest测试框架(二):使用
此文已由作者吴琪惠授权网易云社区发布. 欢迎访问网易云社区,了解更多网易技术产品运营经验. 调用pytest 调用命令: python -m pytest [...] 上面的命令相当于在命令行直接调用 ...
- python nose测试框架全面介绍十---用例的跳过
又来写nose了,这次主要介绍nose中的用例跳过应用,之前也有介绍,见python nose测试框架全面介绍四,但介绍的不详细.下面详细解析下 nose自带的SkipTest 先看看nose自带的S ...
随机推荐
- 【WP8】自定义控件
1.测量和安排布局:MeasureOverride, ArrangeOverride //测量(传入控件的可用大小) protected override Size MeasureOverride(S ...
- 设置回车的默认按钮detectEnter
场景: 页面有一个搜索文本框和搜索按钮.正常情况下,当我在搜索文本框输入关键字后按回车键就可以触发搜索按钮进行内容搜索,但由于页面上还有其它按钮,而且默认不是搜索按钮,怎样才能实现回车就触发我们的搜索 ...
- UNIX环境编程学习笔记(8)——文件I/O之校验当前登录用户对文件的访问权限
lienhua342014-09-03 通过前面一篇随笔(文件访问权限与进程访问控制),我们知道内核校验文件的访问权限使用的是进程的有效用户 ID 和有效组 ID.但有时我们需要知道当前登录用户对某个 ...
- Redis Crackit漏洞利用和防护
注意:本文只是阐述该漏洞的利用方式和如何预防.根据职业道德和<中华人民共和国计算机信息系统安全保护条例>,如果发现的别人的漏洞,千万不要轻易入侵,这个是明确的违法的哦!!! 目前Redis ...
- nvm安装node和npm,个人踩坑记录
我采用nvm-setup安装windows版本的nvm nvm安装node出现的问题: 1.node成功了,npm没成功 解决:在nvm 安装了node之后,输入npm找不到该命令,当时安装报错如下: ...
- Spring3+mybatis3在多数据源情况下找不到数据库驱动的问题
解决问题的过程如下: 1.遇到问题和一般的解决方法和下面这个帖子的一样: http://www.oschina.net/question/188964_32305 2.我在按照1的做法配置了以后,依然 ...
- 关于测试中哪些信息需要放到jira上面
1.每个新需求的功能点,全部在jira上一一呈现 2.每个bug也一样在jira上一一呈现 3.任务一个需要优化改进的点也一一在jira上呈现 然后程序员一直开发新功能和修改新bug,测试人员负责bu ...
- MTK 时区修改
1.修改packages/apps/Settings/res/xml-xx-xx/timezones.xml (xx-xx表示不同的语言和区域),添加下面的内容: <!-- timezo ...
- 【数据分析】Superset 之四 直接安装
apt install python-pip pip install --upgrade pip apt-get install build-essential libssl-dev libffi-d ...
- linux下查看当前目录属于哪个分区?
下班之前写哈今天用的一个新命令. df -h /opt/test