pytorch中检测分割模型中图像预处理探究
- 主要探究检测分割模型数据增强操作有哪些?
- 检测分割模型图像输入大小?检测模型Faster rcnn输入较大800+;而ssd则有300,512之分;分割模型一般deeplab使用321,513,769等;输入大小对结果敏感吗?
- 检测分割模型的batch-szie都比较小;这对显存消耗很大,和输入大小的关系?本身分割模型deeplab系列就有空洞卷积,显存消耗就大了;
- https://blog.paperspace.com/data-augmentation-for-object-detection-rotation-and-shearing/
- https://github.com/ranjiewwen?tab=stars&utf8=%E2%9C%93&q=+Data+Augmentation+
检测模型
- 统计数据集RGB通道的均值;减均值;
- 尺度缩放,这样进行的缩放不会造成图像形变;
- 像素填充32倍整数;
- 另外检测模型中的数据增强方法?一般采用什么,主要是针对ann(bounding box不好操作吧!)
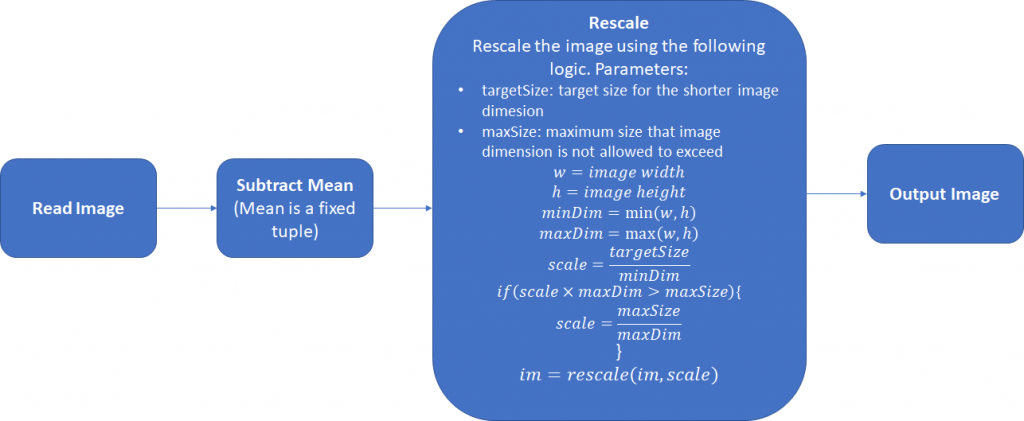
其中还可以采取第三步,将图片的宽和高扩展为32的整倍数,正如在Retinanet使用的。下面是一个简单的Pytorch数据预处理模块:
class Resizer():

    def __call__(self, sample, targetSize=608, maxSize=1024, pad_N=32):

        image, anns = sample['img'], sample['ann']

        rows, cols = image.shape[:2]

        smaller_size, larger_size = min(rows, cols), max(rows, cols)

        scale = targetSize / smaller_size

        if larger_size * scale > maxSize:

            scale = maxSize / larger_size

        image = skimage.transform.resize(image, (int(round(rows*scale)),

                                                 int(round(cols*scale))),

                                         mode='constant')

        rows, cols, cns = image.shape[:3]

        pad_w, pad_h = (pad_N - cols % pad_N), (pad_N - rows % pad_N)

        new_image = np.zeros((rows + pad_h, cols + pad_w, cns)).astype(np.float32)

        new_image[:rows, :cols, :] = image.astype(np.float32)

        anns[:, :4] *= scale

        return {'img': torch.from_numpy(new_image),

                'ann':torch.from_numpy(anns),

                'scale':scale}
分割模型
- 分割模型对数据增强的处理!
- https://github.com/hualin95/Deeplab-v3plus/blob/master/datasets/cityscapes_Dataset.py
def __getitem__(self, item):

        id = self.items[item]

        filename = id.split("train_")[-1].split("val_")[-1]

        image_filepath = os.path.join(self.image_filepath, id.split("_")[0], id.split("_")[1])

        image_filename = filename + "_leftImg8bit.png"

        image_path = os.path.join(image_filepath, image_filename)

        image = Image.open(image_path).convert("RGB")

        if self.split == "test":

            return self._test_transform(image), filename

        gt_filepath = os.path.join(self.gt_filepath, id.split("_")[0], id.split("_")[1])

        gt_filename = filename + "_gtFine_labelIds.png"

        gt_image_path = os.path.join(gt_filepath, gt_filename)

        gt_image = Image.open(gt_image_path)

        if self.split == "train" or self.split == "trainval":

            image, gt_image = self._train_sync_transform(image, gt_image)

        else:

            image, gt_image = self._val_sync_transform(image, gt_image,filename)

        # print(filename)

        return image, gt_image, filename

    def _train_sync_transform(self, img, mask):

        '''

        :param image:  PIL input image

        :param gt_image: PIL input gt_image

        :return:

        '''

        # random mirror

        if random.random() < 0.5:

            img = img.transpose(Image.FLIP_LEFT_RIGHT)

            mask = mask.transpose(Image.FLIP_LEFT_RIGHT)

        crop_size = self.crop_size

        # random scale (short edge)

        short_size = random.randint(int(self.base_size * 0.5), int(self.base_size * 2.0))

        w, h = img.size

        if h > w:

            ow = short_size

            oh = int(1.0 * h * ow / w)

        else:

            oh = short_size

            ow = int(1.0 * w * oh / h)

        img = img.resize((ow, oh), Image.BILINEAR)

        mask = mask.resize((ow, oh), Image.NEAREST)

        # pad crop

        if short_size < crop_size:

            padh = crop_size - oh if oh < crop_size else 0

            padw = crop_size - ow if ow < crop_size else 0

            img = ImageOps.expand(img, border=(0, 0, padw, padh), fill=0)

            mask = ImageOps.expand(mask, border=(0, 0, padw, padh), fill=0)

        # random crop crop_size

        w, h = img.size

        x1 = random.randint(0, w - crop_size)

        y1 = random.randint(0, h - crop_size)

        img = img.crop((x1, y1, x1 + crop_size, y1 + crop_size))

        mask = mask.crop((x1, y1, x1 + crop_size, y1 + crop_size))

        # gaussian blur as in PSP

        if random.random() < 0.5:

            img = img.filter(ImageFilter.GaussianBlur(

                radius=random.random()))

        # final transform

        img, mask = self._img_transform(img), self._mask_transform(mask)

        return img, mask

    def _val_sync_transform(self, img, mask,filename=None):

        outsize = self.crop_size

        short_size = outsize

        w, h = img.size

        if w > h:

            oh = short_size

            ow = int(1.0 * w * oh / h)

        else:

            ow = short_size

            oh = int(1.0 * h * ow / w)

        img = img.resize((ow, oh), Image.BILINEAR)

        mask = mask.resize((ow, oh), Image.NEAREST)

        # center crop

        w, h = img.size

        x1 = int(round((w - outsize) / 2.))

        y1 = int(round((h - outsize) / 2.))

        img = img.crop((x1, y1, x1 + outsize, y1 + outsize))

        mask = mask.crop((x1, y1, x1 + outsize, y1 + outsize))

        # final transform

        img, mask = self._img_transform(img), self._mask_transform(mask,filename)

        return img, mask

    def _test_transform(self, img):

        outsize = self.crop_size

        short_size = outsize

        w, h = img.size

        if w > h:

            oh = short_size

            ow = int(1.0 * w * oh / h)

        else:

            ow = short_size

            oh = int(1.0 * h * ow / w)

        img = img.resize((ow, oh), Image.BILINEAR)

        # center crop

        w, h = img.size

        x1 = int(round((w - outsize) / 2.))

        y1 = int(round((h - outsize) / 2.))

        img = img.crop((x1, y1, x1 + outsize, y1 + outsize))

        # final transform

        img = self._img_transform(img)

        return img

    def _img_transform(self, image):

        image_transforms = ttransforms.Compose([

            ttransforms.ToTensor(),

            ttransforms.Normalize([.485, .456, .406], [.229, .224, .225]),

        ])

        image = image_transforms(image)

        return image

    def _mask_transform(self, gt_image,filename=None):

        target = self._class_to_index(np.array(gt_image).astype('int32'),filename)

        target = torch.from_numpy(target)

        return target

    def __len__(self):

        return len(self.items)
- 读取图使用PIL,因此需要转为RGB通道顺序;
- 需要对img,mask都进行数据增强操作;
- https://github.com/kazuto1011/deeplab-pytorch/blob/master/libs/datasets/cocostuff.py
    def __getitem__(self, index):

        if self.preload:

            image, label = self.images[index], self.labels[index]

        else:

            image_id = self.files[index]

            image, label = self._load_data(image_id)

        image, label = self._transform(image, label)

        return image.astype(np.float32), label.astype(np.int64)

    def _load_data(self, image_id):

        # Set paths

        image_path = osp.join(self.root, "images", image_id + ".jpg")

        label_path = osp.join(self.root, "annotations", image_id + ".mat")

        # Load an image

        image = cv2.imread(image_path, cv2.IMREAD_COLOR).astype(np.float32)

        # Load a label map

        if self.version == "1.1":

            label = sio.loadmat(label_path)["S"].astype(np.int64)

            label -= 1  # unlabeled (0 -> -1)

        elif self.version == "1.0":

            label = np.array(h5py.File(label_path, "r")["S"], dtype=np.int64)

            label = label.transpose(1, 0)

            label -= 2  # unlabeled (1 -> -1)

        else:

            raise NotImplementedError(

                "1.0 or 1.1 expected, but got: {}".format(self.version)

            )

        return image, label

    def _transform(self, image, label):

        # Mean subtraction

        image -= self.mean

        # Pre-scaling

        if self.warp:

            base_size = (self.base_size,) * 2

        else:

            raw_h, raw_w = label.shape

            if raw_h > raw_w:

                base_size = (int(self.base_size * raw_w / raw_h), self.base_size)

            else:

                base_size = (self.base_size, int(self.base_size * raw_h / raw_w))

        image = cv2.resize(image, base_size, interpolation=cv2.INTER_LINEAR)

        label = cv2.resize(label, base_size, interpolation=cv2.INTER_NEAREST)

        if self.scale is not None:

            # Scaling

            scale_factor = random.choice(self.scale)

            scale_kwargs = {"dsize": None, "fx": scale_factor, "fy": scale_factor}

            image = cv2.resize(image, interpolation=cv2.INTER_LINEAR, **scale_kwargs)

            label = cv2.resize(label, interpolation=cv2.INTER_NEAREST, **scale_kwargs)

            scale_h, scale_w = label.shape

            # Padding

            pad_h = max(max(base_size[1], self.crop_size) - scale_h, 0)

            pad_w = max(max(base_size[0], self.crop_size) - scale_w, 0)

            pad_kwargs = {

                "top": 0,

                "bottom": pad_h,

                "left": 0,

                "right": pad_w,

                "borderType": cv2.BORDER_CONSTANT,

            }

            if pad_h > 0 or pad_w > 0:

                image = cv2.copyMakeBorder(image, value=(0.0, 0.0, 0.0), **pad_kwargs)

                label = cv2.copyMakeBorder(label, value=self.ignore_label, **pad_kwargs)

            # Random cropping

            base_h, base_w = label.shape

            start_h = random.randint(0, base_h - self.crop_size)

            start_w = random.randint(0, base_w - self.crop_size)

            end_h = start_h + self.crop_size

            end_w = start_w + self.crop_size

            image = image[start_h:end_h, start_w:end_w]

            label = label[start_h:end_h, start_w:end_w]

        if self.flip:

            # Random flipping

            if random.random() < 0.5:

                image = np.fliplr(image).copy()  # HWC

                label = np.fliplr(label).copy()  # HW

        # HWC -> CHW

        image = image.transpose(2, 0, 1)

        return image, label
- 使用opencv进行读图;
- 都没有进行随机翻转操作,可能对旋转后会产生黑色区域;
- 针对这些问题:在以后的实际项目中注意操作用法,训练网络,查看实际数据增强对任务的提升效果!!!
pytorch中检测分割模型中图像预处理探究的更多相关文章
- 基于OpenCV的火焰检测(一)——图像预处理
博主最近在做一个基于OpenCV的火焰检测的项目,不仅可以检测图片中的火焰,还可以检测视频中的火焰,最后在视频检测的基础上推广到摄像头实时检测.在做这个项目的时候,博主参考了很多相关的文献,用了很多种 ...
- laravel中如何在模型中自关联?
https://segmentfault.com/q/1010000007926567 在模型中声明一对多的关系,关联表本身.parent_id对应父记录的id.我在sof中查阅到很多这样的写法: p ...
- 在SQL Server中实现关系模型
使用SQL Server的Transact-SQL(T-SQL)方言,此楼梯将为您提供如何使用SQL Server表中的数据的基本了解. DML是数据操作语言,是处理数据的语言的一个方面.它包括SEL ...
- asp.net MVC 自定义模型绑定 从客户端中检测到有潜在危险的 Request.QueryString 值
asp.net mvc 自定义模型绑定 有潜在的Requset.Form 自定义了一个模型绑定器.前端会传过来一些敏感字符.调用bindContext. valueProvider.GetValue( ...
- 在Keras模型中one-hot编码,Embedding层,使用预训练的词向量/处理图片
最近看了吴恩达老师的深度学习课程,又看了python深度学习这本书,对深度学习有了大概的了解,但是在实战的时候, 还是会有一些细枝末节没有完全弄懂,这篇文章就用来总结一下用keras实现深度学习算法的 ...
- 深度学习中的Normalization模型
Batch Normalization(简称 BN)自从提出之后,因为效果特别好,很快被作为深度学习的标准工具应用在了各种场合.BN 大法虽然好,但是也存在一些局限和问题,诸如当 BatchSize ...
- [优化]深度学习中的 Normalization 模型
来源:https://www.chainnews.com/articles/504060702149.htm 机器之心专栏 作者:张俊林 Batch Normalization (简称 BN)自从提出 ...
- css中的盒子模型
css中的盒子模型 css中的盒子模型,有两种,一种是“标准 W3C 盒子模型”,另外一种是IE盒子模型. 1.w3c盒子模型 从图中可以看出:w3c盒子模型的范围包括了:margin,borde ...
- 深入理解JAVA I/O系列六:Linux中的IO模型
IO模型 linux系统IO分为内核准备数据和将数据从内核拷贝到用户空间两个阶段. 这张图大致描述了数据从外部磁盘向运行中程序的内存中移动的过程. 用户空间.内核空间 现在操作系统都是采用虚拟存储器, ...
随机推荐
- C++ code:位操作实例(bit operation example)
某任务需要在A.B.C.D.E这五个人中物色人员去完成,但派人受限于下列条件: (1)若A去,则B跟去 (2)D,E两人中必有人去 (3)B,C两人中必有人去,但只去一人 (4)C,D两人要么都去,要 ...
- cf220b
不知道为什么线段树区间更新专题里有这题.. 可以用莫队解,也可以直接开数组解 /* n个询问,m个元素 O(m*m):记录每个元素出现次数,筛掉出现次数小于数值的数 */ #include<io ...
- python+selenium十三:破解简单的图形验证码
此方法可破解简单的验证码,如: 注:中文识别正在寻找办法 安装: 1.python3 2.Pillow 3.pytesseract 4.tesseract-ocr 下载地址:https://pa ...
- 遍历DOM树
遍历DOM在jQuery中是非常重要的技术. 遍历DOM之前,需要对DOM有清晰的认识,了解文档节点.元素节点.属性节点.文本节点等相关概念.不清楚可以温习下<JavaScript教程.DOM树 ...
- Java多线程系列目录
java多线程学习: 传送门:Java多线程系列目录(共43篇)
- Windows10 Compatibility Telemetry(CompatTelRunner.exe) 占用硬盘100%
相信很多人跟我一样总被Compatibility Telemetry(CompatTelRunner.exe) 占用硬盘100%困扰,Compatibility Telemetry翻译过来就是“微软兼 ...
- day17--JQuery
JQuery(中文社区:http://jquery.cuishifeng.cn/) 模块 类库 在不同语言叫法不一样而已 DOM/BOM/JavaScript的类库 一.查找元素 JQue ...
- day16--HTML、CSS、JavaScript总结
HTML 一大堆的标签:块级.行内 CSS position background text-align padding font-size background-image z-index ...
- Kubernetes学习系列
这段时间项目组内想要引入Kubernetes,作为第二代容器调度引擎,故最近在系统的学习Kubernetes.整理了一些学习笔记,心得,放到博客中,一来记录自己的学习经过,二来看能否帮到有需要的同学. ...
- 016 在大数据中,SSH无密钥登录
一:概述 1.关于ssh ssh是一种安全协议. 会生成一对公钥和私钥. 2.问题的由来 3.解决方式 将生成的公钥发送到远程的机器上. 4.位置 主目录下的.ssh文件下. 二:在伪分布式下的操作 ...