Struts 2 - Hello World Example
As you learnt from the Struts 2 architecture, when you click on a hyperlink or submit an HTML form in a Struts 2 web application, the input is collected by the Controller which is sent to a Java class called Actions. After the Action is executed, a Result selects a resource to render the response. The resource is generally a JSP, but it can also be a PDF file, an Excel spreadsheet, or a Java applet window.
Assume you already build-up your development environment. Now let us proceed for building our first Hello World struts2 project. The aim of this project is to build a web application that collects the user's name and displays "Hello World" followed by the user name. We would have to create following four components for any Struts 2 project:
| SN | Components & Description |
|---|---|
| 1 | Action Create an action class which will contain complete business logic and control the interaction between the user, the model, and the view. |
| 2 | Interceptors Create interceptors if required, or use existing interceptors. This is part of Controller. |
| 3 | View Create a JSPs to interact with the user to take input and to present the final messages. |
| 4 | Configuration Files Create configuration files to couple the Action, View and Controllers. These files are struts.xml, web.xml, struts.properties. |
I am going to use Eclipse IDE, so all the required components will be created under a Dynamic Web Project. So let us start with creating Dynamic Web Project.
Create a Dynamic Web Project:
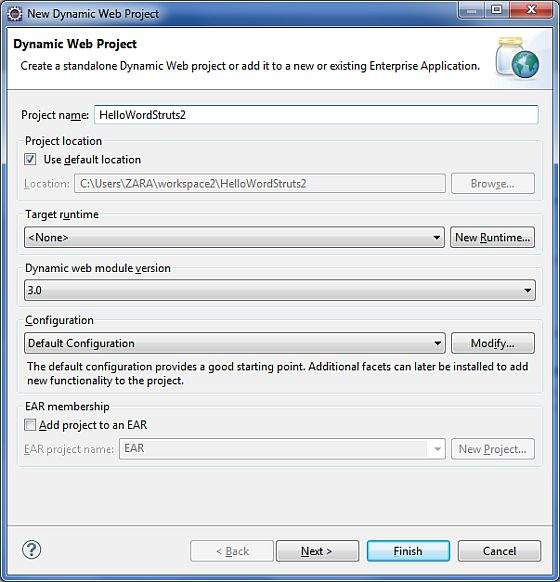
Start your Eclipse and then go with File > New > Dynamic Web Project and enter project name as HelloWorldStruts2 and set rest of the options as given in the following screen:
Select all the default options in the next screens and finally check Generate Web.xml deployment descriptor option. This will create a dynamic web project for you in Eclipse. Now go with Windows > Show View > Project Explorer, and you will see your project window something as below:

Now copy following files from struts 2 lib folder C:\struts-2.2.3\lib to our project's WEB-INF\lib folder. To do this, you can simply drag and drop all the following files into WEB-INF\lib folder.
    commons-fileupload-x.y.z.jar

    commons-io-x.y.z.jar

    commons-lang-x.y.jar

    commons-logging-x.y.z.jar

    commons-logging-api-x.y.jar

    freemarker-x.y.z.jar

    javassist-.xy.z.GA

    ognl-x.y.z.jar

    struts2-core-x.y.z.jar

    xwork-core.x.y.z.jar
Create Action Class:
Action class is the key to Struts 2 application and we implement most of the business logic in action class. So let us create a java file HelloWorldAction.java under Java Resources > src with a package name com.tutorialspoint.struts2 with the contents given below.
The Action class responds to a user action when user clicks a URL. One or more of the Action class's methods are executed and a String result is returned. Based on the value of the result, a specific JSP page is rendered.
package com.tutorialspoint.struts2;

public class HelloWorldAction{

   private String name;

   public String execute() throws Exception {

      return "success";

   }

   public String getName() {

      return name;

   }

   public void setName(String name) {

      this.name = name;

   }

}
This is a very simple class with one property called "name". We have standard getters and setter methods for the "name" property and an execute method that returns the string "success".
The Struts 2 framework will create an object of the HelloWorldAction class and call the execute method in response to a user's action. You put your business logic inside execute method and finally returns the String constant. Simply saying for for each URL, you would have to implement one action class and either you can use that class name directly as your action name or you can map to some other name using struts.xml file as shown below.
Create a View
We need a JSP to present the final message, this page will be called by Struts 2 framework when a predefined action will happen and this mapping will be defined in struts.xml file. So let us create the below jsp file HelloWorld.jsp in the WebContent folder in your eclipse project. To do this, right click on the WebContent folder in the project explorer and select New >JSP File.
<%@ page contentType="text/html; charset=UTF-8" %>

<%@ taglib prefix="s" uri="/struts-tags" %>

<html>

<head>

<title>Hello World</title>

</head>

<body>

   Hello World, <s:property value="name"/>

</body>

</html>
The taglib directive tells the Servlet container that this page will be using the Struts 2 tags and that these tags will be preceded by s. The s:property tag displays the value of action class property "name> which is returned by the method getName() of the HelloWorldAction class.
Create main page:
We also need to create index.jsp in the WebContent folder. This file will serve as the initial action URL where a user can click to tell the Struts 2 framework to call the a defined method of the HelloWorldAction class and render the HelloWorld.jsp view.
<%@ page language="java" contentType="text/html; charset=ISO-8859-1"

   pageEncoding="ISO-8859-1"%>

<%@ taglib prefix="s" uri="/struts-tags"%>

   <!DOCTYPE html PUBLIC "-//W3C//DTD HTML 4.01 Transitional//EN"

"http://www.w3.org/TR/html4/loose.dtd">

<html>

<head>

<title>Hello World</title>

</head>

<body>

   <h1>Hello World From Struts2</h1>

   <form action="hello">

      <label for="name">Please enter your name</label><br/>

      <input type="text" name="name"/>

      <input type="submit" value="Say Hello"/>

   </form>

</body>

</html>
The hello action defined in the above view file will be mapped to the HelloWorldAction class and its execute method using struts.xml file. When a user clicks on the Submit button it will cause the Struts 2 framework to run the execute method defined in the HelloWorldAction class and based on the returned value of the method, an appropriate view will be selected and rendered as a response.
Configuration Files
We need a mapping to tie the URL, the HelloWorldAction class (Model), and the HelloWorld.jsp (the view) together. The mapping tells the Struts 2 framework which class will respond to the user's action (the URL), which method of that class will be executed, and what view to render based on the String result that method returns.
So let us create a file called struts.xml. Since Struts 2 requires struts.xml to be present in classes folder. So create struts.xml file under the WebContent/WEB-INF/classes folder. Eclipse does not create the "classes" folder by default, so you need to do this yourself. To do this, right click on the WEB-INF folder in the project explorer and select New > Folder. Your struts.xml should look like:
<?xml version="1.0" encoding="UTF-8"?>

<!DOCTYPE struts PUBLIC

   "-//Apache Software Foundation//DTD Struts Configuration 2.0//EN"

   "http://struts.apache.org/dtds/struts-2.0.dtd">

<struts>

<constant name="struts.devMode" value="true" />

   <package name="helloworld" extends="struts-default">

      <action name="hello"

            class="com.tutorialspoint.struts2.HelloWorldAction"

            method="execute">

            <result name="success">/HelloWorld.jsp</result>

      </action>

   </package>

</struts>
Few words about the above configuration file. Here we set the constant struts.devMode to true, because we are working in development environment and we need to see some useful log messages. Then, we defined a package called helloworld. Creating a package is useful when you want to group your actions together. In our example, we named our action as "hello" which is corresponding to the URL /hello.action and is backed up by the HelloWorldAction.class. The execute method of HelloWorldAction.class is the method that is run when the URL /hello.action is invoked. If the outcome of the execute method returns "success", then we take the user to HelloWorld.jsp.
Next step is to create a web.xml file which is an entry point for any request to Struts 2. The entry point of Struts2 application will be a filter defined in deployment descriptor (web.xml). Hence we will define an entry oforg.apache.struts2.dispatcher.FilterDispatcher class in web.xml. The web.xml file needs to be created under the WEB-INF folder under WebContent. Eclipse had already created a skelton web.xml file for you when you created the project. So, lets just modify it as follows:
<?xml version="1.0" encoding="UTF-8"?>

<web-app xmlns:xsi="http://www.w3.org/2001/XMLSchema-instance"

   xmlns="http://java.sun.com/xml/ns/javaee"

   xmlns:web="http://java.sun.com/xml/ns/javaee/web-app_2_5.xsd"

   xsi:schemaLocation="http://java.sun.com/xml/ns/javaee

   http://java.sun.com/xml/ns/javaee/web-app_3_0.xsd"

   id="WebApp_ID" version="3.0">

   <display-name>Struts 2</display-name>

   <welcome-file-list>

      <welcome-file>index.jsp</welcome-file>

   </welcome-file-list>

   <filter>

      <filter-name>struts2</filter-name>

      <filter-class>

         org.apache.struts2.dispatcher.FilterDispatcher

      </filter-class>

   </filter>

   <filter-mapping>

      <filter-name>struts2</filter-name>

      <url-pattern>/*</url-pattern>

   </filter-mapping>

</web-app>
We have specified index.jsp to be our welcome file. Then we have configured the Struts2 filter to run on all urls (i.e, any url that match the pattern /*)
Enable Detailed Log:
You can enabled complete logging functionality while working with Struts 2 by creating logging.properties file under WEB-INF/classes folder. Keep the following two lines in your property file:
org.apache.catalina.core.ContainerBase.[Catalina].level = INFO

org.apache.catalina.core.ContainerBase.[Catalina].handlers = \

                              java.util.logging.ConsoleHandler
The default logging.properties specifies a ConsoleHandler for routing logging to stdout and also a FileHandler. A handler's log level threshold can be set using SEVERE, WARNING, INFO, CONFIG, FINE, FINER, FINEST or ALL.
That's it. We are ready to run our Hello World application using Struts 2 framework.
Execute the Application
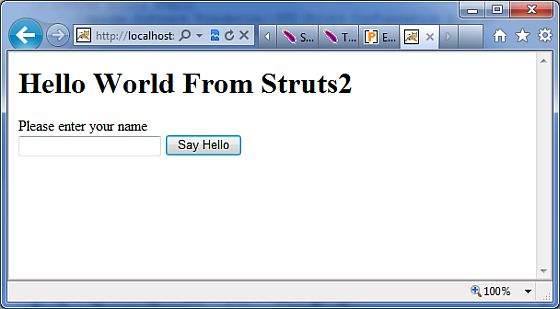
Right click on the project name and click Export > WAR File to create a War file. Then deploy this WAR in the Tomcat's webapps directory. Finally, start Tomcat server and try to access URL http://localhost:8080/HelloWorldStruts2/index.jsp. This will give you following screen:
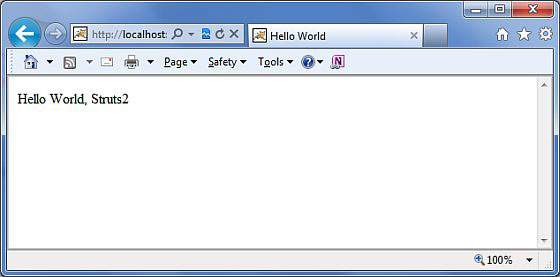
Enter a value "Struts2" and submit the page. You should see the next page
Note that you can define index as an action in struts.xml file and in that case you can call index page as http://localhost:8080/HelloWorldStruts2/index.action. Check below how you can define index as an action:
<?xml version="1.0" encoding="UTF-8"?>

<!DOCTYPE struts PUBLIC

   "-//Apache Software Foundation//DTD Struts Configuration 2.0//EN"

   "http://struts.apache.org/dtds/struts-2.0.dtd">

<struts>

<constant name="struts.devMode" value="true" />

   <package name="helloworld" extends="struts-default">

      <action name="index">

            <result >/index.jsp</result>

      </action>

      <action name="hello"

            class="com.tutorialspoint.struts2.HelloWorldAction"

            method="execute">

            <result name="success">/HelloWorld.jsp</result>

      </action>

   </package>

</struts>
Struts 2 - Hello World Example的更多相关文章
- 菜鸟学Struts2——Struts工作原理
在完成Struts2的HelloWorld后,对Struts2的工作原理进行学习.Struts2框架可以按照模块来划分为Servlet Filters,Struts核心模块,拦截器和用户实现部分,其中 ...
- Struts的拦截器
Struts的拦截器 1.什么是拦截器 Struts的拦截器和Servlet过滤器类似,在执行Action的execute方法之前,Struts会首先执行Struts.xml中引用的拦截器,在执行完所 ...
- Struts框架的核心业务
Struts的核心业务 Struts核心业务有很多,这里主要介绍了比较简单一些的: 请求数据的处理,和数据自动封装,类型自动转换 1.Struts中数据处理 1.1.方式1:直接过去servletap ...
- Struts的文件上传下载
Struts的文件上传下载 1.文件上传 Struts2的文件上传也是使用fileUpload的组件,这个组默认是集合在框架里面的.且是使用拦截器:<interceptor name=" ...
- 配置hibernate,Struts。文件
hibernate文件配置 <?xml version="1.0" encoding="UTF-8"?> <!DOCTYPE hibernat ...
- hibernate与Struts框架结合编写简单针对修改练习
失败页面fail.jsp <%@ page language="java" contentType="text/html; charset=UTF-8" ...
- 3. 解析 struts.xml 文件
1. struts.xml 文件基本配置: 主要放在资源路径下,配置 sturts2相关的 Action , 拦截器等配置 <struts> <!-- 设置常量 --> < ...
- Struts+Spring+Hibernate项目的启动线程
在Java Web项目中,经常要在项目开始运行时启动一个线程,每隔一定的时间就运行一定的代码,比如扫描数据库的变化等等.要实现这个功能,可以现在web.xml文件中定义一个Listener,然后在这个 ...
- Struts 原理
今天开始接触公司的框架,叫YNA,三个字母应该是雅马哈的缩写,这个框架听公司前辈说功能很强大,但实际上我看不懂.哈哈...... 其中整合了SSH框架,接下来我说下Struts的一些原理 其实这张图就 ...
- axis2+struts拦截地址冲突问题
axis2和struts在整合过程中,struts会把axis的地址也拦截了,默认当成一个action处理, 会因为找不到action而报错: <!-- struts配置 --> < ...
随机推荐
- Chapter 1(数据结构绪论)
附件列表 数据结构绪论.jpg
- 阿里云上部署了zabbix,突然无法收到报警邮件的解决办法
在阿里云上部署了zabbix,一直能正常接收到zbx发来的报警邮件(报警邮箱是163的),不知是什么原因,突然无法接收到报警邮件了. 但在服务器上手动执行echo "hello"| ...
- Docker入门与应用系列(四)数据卷管理
一.介绍 Docker镜像是由多个文件系统(只读层)叠加而成.当我们启动一个容器的时候,Docker会加载只读镜像层并在其上(译者注:镜像栈顶部)添加一个读写层.如果运行中的容器修改了现有的一个已经存 ...
- Ansible6:Playbook简单使用
目录 一个简单的示例 通过Playbook安装apache示例 playbook的构成 Hosts和Users 任务列表和action handlers tags 示例 ansbile-playboo ...
- [大数据]-hadoop2.8和spark2.1完全分布式搭建
一.前期准备工作: 1.安装包的准备: VMware(10.0版本以上) : 官方网站:https://www.vmware.com/cn.html 官方下载地址:http://www.vmware. ...
- (转)tomcat+nginx+redis实现均衡负载、session共享(一)
在项目运营时,我们都会遇到一个问题,项目需要更新时,我们可能需先暂时关闭下服务器来更新.但这可能会出现一些状况: 1.用户还在操作,被强迫终止了(我们可以看日志等没人操作的时候更新,但总可能会有万一) ...
- mongo转换副本集
本文介绍如何把独立的mongo实例转换成包含3个成员的副本集.开发和测试使用独立实例,生产使用副本集.如何安装独立的mongo实例本文不再赘述. 如果在部署副本集时还没有安装mongo实例,可以查看部 ...
- 离线下载pip包安装
Host-A 不能上网,但是需要在上面安装python-package 通过另外一台能上网的Host-B主机 1. 下载需要离线安装的Packages 在Host-B上执行如下命令: 安装单个Pack ...
- [CQOI2009]DANCE跳舞(ISAP写法)
https://daniu.luogu.org/problemnew/show/3153 #include<queue> #include<cstdio> #include&l ...
- android studio run 的时候,报the apk file does not exist on disk,
1.首先 clean rebuild,重启,不能解决的话,再找到这个 然后是这里: 不用填,点ok,ok即可,他喵的,卡我俩小时