WPF 如何画一颗心
如何用WPF画一个心。
MainWindow.xaml
<Window x:Class="Heart.MainWindow"

        xmlns="http://schemas.microsoft.com/winfx/2006/xaml/presentation"

        xmlns:x="http://schemas.microsoft.com/winfx/2006/xaml"

        xmlns:d="http://schemas.microsoft.com/expression/blend/2008"

        xmlns:mc="http://schemas.openxmlformats.org/markup-compatibility/2006"

        xmlns:local="clr-namespace:Heart"

        mc:Ignorable="d"

        Title="MainWindow" Height="" Width="">

    <Grid>

        <Grid.RowDefinitions>

            <RowDefinition Height="66*"/>

            <RowDefinition Height="74*"/>

            <RowDefinition Height="77*"/>

            <RowDefinition Height="98*"/>

            <RowDefinition Height="69*"/>

            <RowDefinition Height="62*"/>

            <RowDefinition Height="72*"/>

            <RowDefinition Height="52*"/>

        </Grid.RowDefinitions>

        <Grid.ColumnDefinitions>

            <ColumnDefinition Width="134*"/>

            <ColumnDefinition Width="525*"/>

            <ColumnDefinition Width="134*"/>

        </Grid.ColumnDefinitions>

        <Button Content="画心" Grid.Column="" Grid.Row="" Click="ButtonStart_Click" Width=""></Button>

        <Canvas x:Name="canvas_Shape" HorizontalAlignment="Stretch" VerticalAlignment="Stretch" Width="" Margin="12,0" Grid.Column="" Grid.RowSpan=""/>

    </Grid>

</Window>
MainWindow.xaml.cs
using System;

using System.Collections.Generic;

using System.Windows;

using System.Windows.Controls;

using System.Windows.Media.Imaging;

using System.Drawing;

using System.Drawing.Drawing2D;

using System.Runtime.InteropServices;

using System.Threading;

namespace Heart

{

    /// <summary>

    /// MainWindow.xaml 的交互逻辑

    /// </summary>

    public partial class MainWindow : Window

    {

        public MainWindow()

        {

            InitializeComponent();

            imageList = new List<System.Windows.Controls.Image>();

            imageList1 = new List<System.Windows.Controls.Image>();

            CreateHeartLine(true);

            CreateHeartLine(false);

            m_iImageCount = imageList.Count;

        }

        private int maxStep = ;

        private double radius;

        private double centerPt;

        private Bitmap m_Snow;

        private Bitmap m_Snow1;

        private int m_iImageCount = ;

        private List<System.Windows.Controls.Image> imageList = null;

        private List<System.Windows.Controls.Image> imageList1 = null;

        [DllImport("gdi32")]

        static extern int DeleteObject(IntPtr o);

        private BitmapSource GetBitmapSource(Bitmap bitmap)

        {

            IntPtr inptr = bitmap.GetHbitmap();

            BitmapSource bitmapSource = System.Windows.Interop.Imaging.CreateBitmapSourceFromHBitmap(

                inptr, IntPtr.Zero, Int32Rect.Empty, BitmapSizeOptions.FromEmptyOptions());

            DeleteObject(inptr);

            return bitmapSource;

        }

        private void SetImageSoure(System.Windows.Controls.Image img , Bitmap mSnow)

        {

            BitmapSource bitmapSource = GetBitmapSource(mSnow);

            img.Source = bitmapSource;

        }

        private void CreateHeartLine(bool bShow)

        {

            centerPt = canvas_Shape.Width / ;

            radius = canvas_Shape.Width / ;

            for (int i = ; i < maxStep; i++)

            {

                System.Windows.Controls.Image img = new System.Windows.Controls.Image();

                BitmapSource bitmapSource;

                if (bShow)

                {

                    bitmapSource  = GetBitmapSource(Snow);

                    img.Source = bitmapSource;

                    img.Visibility = Visibility.Hidden;

                    imageList.Add(img);

                }

                else

                {

                    bitmapSource = GetBitmapSource(Snow1);

                    img.Source = bitmapSource;

                    imageList1.Add(img);

                }

                double angle =  * Math.PI / maxStep * i;

                double r =  * radius * ( - Math.Sin(angle));

                //桃形心

                double x = centerPt -  * (Math.Sin(angle) * Math.Sin(angle) * Math.Sin(angle)) * ;//

                double y = centerPt - ( * Math.Cos(angle) -  * Math.Cos( * angle) -  * Math.Cos( * angle) - Math.Cos( * angle)) * ;//

                Canvas.SetLeft(img, x);

                Canvas.SetTop(img, y);

                canvas_Shape.Children.Add(img);

            }

        }

        private Bitmap Snow

        {

            get

            {

                if (m_Snow == null)

                {

                    m_Snow = new Bitmap(, );

                    using (Graphics g = Graphics.FromImage(m_Snow))

                    {

                        g.SmoothingMode = SmoothingMode.AntiAlias;

                        g.Clear(System.Drawing.Color.Transparent);

                        g.TranslateTransform(, , MatrixOrder.Append);

                        System.Drawing.Color black = System.Drawing.Color.FromArgb(, , );

                        System.Drawing.Color white = System.Drawing.Color.FromArgb(, , );

                        DrawSnow(g, new SolidBrush(black), new System.Drawing.Pen(black, 3f));

                        DrawSnow(g, new SolidBrush(white), new System.Drawing.Pen(white, 2f));

                        g.Save();

                    }

                }

                return m_Snow;

            }

        }

        private Bitmap Snow1

        {

            get

            {

                if (m_Snow1 == null)

                {

                    m_Snow1 = new Bitmap(, );

                    using (Graphics g = Graphics.FromImage(m_Snow1))

                    {

                        g.SmoothingMode = SmoothingMode.AntiAlias;

                        g.Clear(System.Drawing.Color.Transparent);

                        g.TranslateTransform(, , MatrixOrder.Append);

                        System.Drawing.Color black = System.Drawing.Color.FromArgb(, , );

                        System.Drawing.Color white = System.Drawing.Color.FromArgb(, , );

                        DrawSnow(g, new SolidBrush(black), new System.Drawing.Pen(black, 3f));

                        DrawSnow(g, new SolidBrush(white), new System.Drawing.Pen(white, 2f));

                        g.Save();

                    }

                }

                return m_Snow1;

            }

        }

        private static void DrawSnow(Graphics g, System.Drawing.Brush b, System.Drawing.Pen p)

        {

            const int a = ;

            const int a2 = a + ;

            const int r = ;

            g.DrawLine(p, -a, -a, +a, +a);

            g.DrawLine(p, -a, +a, +a, -a);

            g.DrawLine(p, -a2, , +a2, );

            g.DrawLine(p, , -a2, , +a2);

            g.FillEllipse(b, -r, -r, r * , r * );

        }

        private void ButtonStart_Click(object sender, RoutedEventArgs e)

        {

            Thread thread = new Thread(ShowImageList);

            thread.SetApartmentState(ApartmentState.STA);

            thread.IsBackground = true;

            thread.Start();

        }

        private void ShowImageList()

        {

            while (true)

            {

                for (int i = ; i < imageList.Count; i++)

                {

                    this.Dispatcher.Invoke((Action)(() =>

                    {

                        ShowImageIndex(i);

                    }));

                    Thread.Sleep();

               }

            }

        }

        private void ShowImageIndex(int index)

        {

            if (imageList1[index].Visibility == Visibility.Visible)

            {

                imageList1[index].Visibility = Visibility.Hidden;

                imageList[index].Visibility = Visibility.Visible;

            }

            else

            {

                imageList1[index].Visibility = Visibility.Visible;

                imageList[index].Visibility = Visibility.Hidden;

            }

        }

    }

}
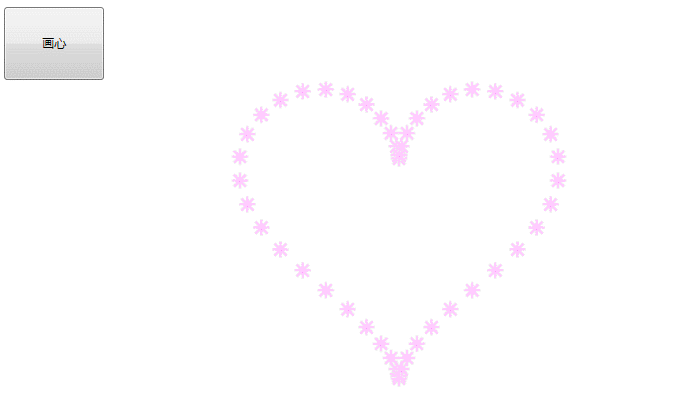
效果如下:
WPF 如何画一颗心的更多相关文章
- 从零开始学习PYTHON3讲义(十二)画一颗心送给你
(内容需要,本讲使用了大量在线公式,如果因为转帖网站不支持公式无法显示的情况,欢迎访问原始博客.) <从零开始PYTHON3>第十二讲 上一节课我们主要讲解了数值计算和符号计算.数值计算的 ...
- WPF中画虚线
原文:WPF中画虚线 在WPF中,画线的方法十分简单,只要声明一个Line然后添加到指定的位置就可以了,但Line并不仅仅只能画一条直线,还可以对直线进行修饰. 1.Line.StrokeDashAr ...
- 就算会用python画颗心,可你依然还是只单身狗
:) 标题是开玩笑的,千万别认真. 随着AI的飞速发展,有志于此行的码农也是急剧的增加,带来的就是大家对算法.数学的兴趣也格外升高. 本文的来历是这样,今天某老同事在朋友圈发了一张屏拍,求公式. 看了 ...
- 用Python画一颗特别的心送给她
import numpy as np import matplotlib.pyplot as plt x_coords = np.linspace(-100, 100, 500) y_coords = ...
- 基于微博数据用 Python 打造一颗“心”
一年一度的虐狗节刚过去不久,朋友圈各种晒,晒自拍,晒娃,晒美食,秀恩爱的.程序员在晒什么,程序员在加班.但是礼物还是少不了的,送什么好?作为程序员,我准备了一份特别的礼物,用以往发的微博数据打造一颗“ ...
- WPF 如何画出1像素的线
如何有人告诉你,请你画出1像素的线,是不是觉得很简单,实际上在 WPF 上还是比较难的. 本文告诉大家,如何让画出的线不模糊 画出线的第一个方法,创建一个 Canvas ,添加一个线 界面代码 < ...
- 利用python基于微博数据打造一颗“心”
一年一度的虐狗节将至,朋友圈各种晒,晒自拍,晒娃,晒美食,秀恩爱的.程序员在晒什么,程序员在加班.但是礼物还是少不了的,送什么好?作为程序员,我准备了一份特别的礼物,用以往发的微博数据打造一颗&quo ...
- 用Sklearn画一颗决策树
小伙伴们大家好~o( ̄▽ ̄)ブ,首先声明一下,我的开发环境是Jupyter lab,所用的库和版本大家参考: Python 3.7.1(你的版本至少要3.4以上 Scikit-learn 0.20.0 ...
- WPF设计の画刷(Brush)
一.什么是画刷 画刷是是一种渲染方式,用于填充图形形状,如矩形.椭圆.扇形.多边形和封闭路径.在GDI+中,画刷分为以下几种:SolidBrush,TextureBrush,HatchBrush,Li ...
随机推荐
- 利用scrapy和MongoDB来开发一个爬虫
今天我们利用scrapy框架来抓取Stack Overflow里面最新的问题(),并且将这些问题保存到MongoDb当中,直接提供给客户进行查询. 安装 在进行今天的任务之前我们需要安装二个框架,分别 ...
- linux下cetos7无线网络设置办法
首先检查是否安装了networkmanger wifi.RPM 检查方法,终端输入rpm一qa 如果不存在,利用rpm一ivh 文件名 进行安装,并且重启
- Chrome 开发工具之Sources
Sources面板主要用于查看web站点的资源列表及javascript代码的debug 熟悉面板 了解完面板之后,下面来试试这些功能都是如何使用的. 文件列表 展示当前页面内所引用资源的列表,和平常 ...
- PHP CLI编程基础知识积累(进程、子进程、线程)
.note-content { font-family: "Helvetica Neue", Arial, "Hiragino Sans GB", STHeit ...
- MySQL 新装数据库不能链接解决方法
在my.ini的[mysqld]字段加入: skip-grant-tables 重启mysql服务,这时的mysql不需要密码即可登录数据库 然后进入mysql mysql>use mysql; ...
- JavaScript中让Html页面中循环播放文字
JavaScript中让Html页面中循环播放文字 <html> <head> <meta http-equiv="Content-Type" con ...
- XTREE随笔
1.XTREE简介: XTREE是一个基于AJAX实现的树形菜单.它的原理就是每次都只加载当前结点下的所有结点,而对开发人员来说,就是只需要按一定的格式,生成一段XML代码.XTREE可以自己定制每个 ...
- Struts2之开山篇
①Struts2是什么? Struts2是一个基于MVC设计模式的Web应用框架,它本质上相当于一个servlet,在MVC设计模式中,Struts2作为控制器(Controller)来建立模型与视图 ...
- javascript的console.log用法
f1.html代码 <iframe id="frame2" name="frame1" src="ww.html"></i ...
- C语言基础(10)-数组
一.数组的定义 数组就是在内存中连续的相同类型的变量空间. 二.数组在内存中的存储方式 同一个数组所有的成员都是相同的数据类型,同时所有的成员在内存中的地址是连续的,数组名是一个地址的常量,代表数组中 ...