okHttp3源码简要分析
首先看一下使用,
public static void main(String[] args) throws IOException {

	    OkHttpClient client = new OkHttpClient();  //创建client

        Request request = new Request.Builder().url("http://www.xxx.com")

                .get().build();  //构建请求体

        Call call = client.newCall(request);//产生一个请求call

         //同步请求

        Response response=call.execute();

        System.out.println("result=:"+response.body().string());

        //异步请求,enqueue方式

        Call call2 = client.newCall(request);

        call2.enqueue(new Callback() {

			@Override

			public void onFailure(Call call, IOException e) {

				// TODO Auto-generated method stub

			}

			@Override

			public void onResponse(Call call, Response response)

					throws IOException {

				// TODO Auto-generated method stub

			}

        });

	}
这里主要分为一下几个步骤:

Call对象分析:
从client.newCall(request)开始,client根据request创建请求Call,这个Call为一接口对象,真正实现的是RealCall
/**

   * Prepares the {@code request} to be executed at some point in the future.

   */

  @Override public Call newCall(Request request) {

    return new RealCall(this, request, false /* for web socket */);

  }

final class RealCall implements Call {

  final OkHttpClient client;

  final RetryAndFollowUpInterceptor retryAndFollowUpInterceptor;

  /** The application's original request unadulterated by redirects or auth headers. */

  final Request originalRequest;

  final boolean forWebSocket;

  // Guarded by this.

  private boolean executed;

  RealCall(OkHttpClient client, Request originalRequest, boolean forWebSocket) {

    this.client = client;

    this.originalRequest = originalRequest;

    this.forWebSocket = forWebSocket;

    this.retryAndFollowUpInterceptor = new RetryAndFollowUpInterceptor(client, forWebSocket);

  }

......
继续看一下excute实现,
 @Override public Response execute() throws IOException {

    synchronized (this) {//判断call是否执行过,可以看出每个Call对象只能使用一次原则

      if (executed) throw new IllegalStateException("Already Executed");

      executed = true;

    }

    captureCallStackTrace();

    try {

      client.dispatcher().executed(this);//把请求任务加入dispatcher任务调度器等待队列

      Response result = getResponseWithInterceptorChain();//使用拦截器处理response

      if (result == null) throw new IOException("Canceled");//调用cancel时,response为null

      return result;

    } finally {

      client.dispatcher().finished(this);

    }

  }
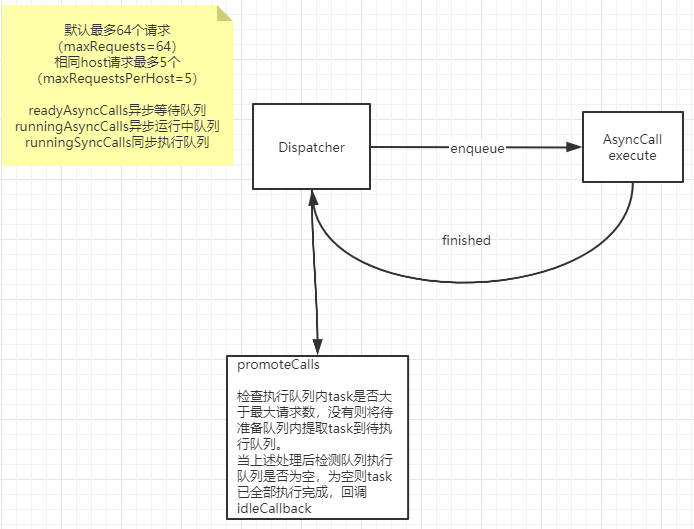
Dispatcher负责Request调度处理,我们看一下这个类实现
public final class Dispatcher {

  private int maxRequests = 64;

  private int maxRequestsPerHost = 5;

  private Runnable idleCallback;

  /** Executes calls. Created lazily. */

  private ExecutorService executorService;

  /** Ready async calls in the order they'll be run. */ //双端队列维护异步中等待执行任务

  private final Deque<AsyncCall> readyAsyncCalls = new ArrayDeque<>();

  /** Running asynchronous calls. Includes canceled calls that haven't finished yet. */

  private final Deque<AsyncCall> runningAsyncCalls = new ArrayDeque<>();//双端队列维护异步中正在运行中的任务

  /** Running synchronous calls. Includes canceled calls that haven't finished yet. */

  private final Deque<RealCall> runningSyncCalls = new ArrayDeque<>();//同步等待执行任务

  public Dispatcher(ExecutorService executorService) {//可以更换自定义的线程池

    this.executorService = executorService;

  }

  public Dispatcher() {

  }

  public synchronized ExecutorService executorService() {

    if (executorService == null) {//异步请求线程池,无上限,自动回收限制60s的线程,不对任务线程数量限制

      executorService = new ThreadPoolExecutor(0, Integer.MAX_VALUE, 60, TimeUnit.SECONDS,

          new SynchronousQueue<Runnable>(), Util.threadFactory("OkHttp Dispatcher", false));

    }

    return executorService;

  }

   /** Used by {@code Call#execute} to signal it is in-flight. */

  synchronized void executed(RealCall call) {//加入同步请求队列

    runningSyncCalls.add(call);

  }

   synchronized void enqueue(AsyncCall call) {//加入异步请求队列,最多64个请求,相同host请求为5个

    if (runningAsyncCalls.size() < maxRequests && runningCallsForHost(call) < maxRequestsPerHost) {

      runningAsyncCalls.add(call);

      executorService().execute(call);

    } else {//超过最大同时请求数量,则加入等待队列

      readyAsyncCalls.add(call);

    }

  }

   private <T> void finished(Deque<T> calls, T call, boolean promoteCalls) {

    ...

    synchronized (this) {//异步任务执行完成后,移除已经完成Call,调用加入等待执行任务到运行中的队列

      if (!calls.remove(call)) throw new AssertionError("Call wasn't in-flight!");

      if (promoteCalls) promoteCalls();

      runningCallsCount = runningCallsCount();

      idleCallback = this.idleCallback;

    }

...

  }

    private void promoteCalls() {//将等待执行的队列任务,放入执行的任务队列中,限制执行任务数量

    if (runningAsyncCalls.size() >= maxRequests) return; // Already running max capacity.

    if (readyAsyncCalls.isEmpty()) return; // No ready calls to promote.

    for (Iterator<AsyncCall> i = readyAsyncCalls.iterator(); i.hasNext(); ) {

      AsyncCall call = i.next();

      if (runningCallsForHost(call) < maxRequestsPerHost) {//相同host最多请求数量,可优化

        i.remove();

        runningAsyncCalls.add(call);

        executorService().execute(call);

      }

      if (runningAsyncCalls.size() >= maxRequests) return; // Reached max capacity.

    }

  }
AcyncCal为RealCall内部类,实现NamedRunnable,NamedRunnable为Runable实现,定义excute方法由run调用
final class AsyncCall extends NamedRunnable {

    ......

public abstract class NamedRunnable implements Runnable {

  protected final String name;

  public NamedRunnable(String format, Object... args) {

    this.name = Util.format(format, args);

  }

  @Override public final void run() {

    String oldName = Thread.currentThread().getName();

    Thread.currentThread().setName(name);

    try {

      execute();

    } finally {

      Thread.currentThread().setName(oldName);

    }

  }

  protected abstract void execute();
AsyncCal的excute实现:
@Override protected void execute() {

      boolean signalledCallback = false;

      try {

        Response response = getResponseWithInterceptorChain();//response拦截器实现,通过拦截器处理Response

        if (retryAndFollowUpInterceptor.isCanceled()) {//取消的任务调用onnfail

          signalledCallback = true;

          responseCallback.onFailure(RealCall.this, new IOException("Canceled"));

        } else {

          signalledCallback = true;

          responseCallback.onResponse(RealCall.this, response);

        }

      } catch (IOException e) {

        if (signalledCallback) {

          // Do not signal the callback twice!

          Platform.get().log(INFO, "Callback failure for " + toLoggableString(), e);

        } else {

          responseCallback.onFailure(RealCall.this, e);

        }

      } finally {

        client.dispatcher().finished(this);

      }

    }
因为excute在run里调用,所以这里的callback方法是在线程里回调的!!
Dispatcher处理流程:
强大的Interceptor:okhttp内部设计了Interceptor,使其设计更加灵活,使得每个request,response对其进行相关拦截与修改,
上面分析看出其实对网络处理是以Interceptor处理,那我们看一下Response result = getResponseWithInterceptorChain();
Response getResponseWithInterceptorChain() throws IOException {

    // Build a full stack of interceptors.

    List<Interceptor> interceptors = new ArrayList<>();

    interceptors.addAll(client.interceptors());

    interceptors.add(retryAndFollowUpInterceptor);//RetryAndFollowUpInterceptor 处理连接错误,重定向

    interceptors.add(new BridgeInterceptor(client.cookieJar()));//桥接应用层,网络层(请求头,cookie,encode)gzip处理

    interceptors.add(new CacheInterceptor(client.internalCache()));//Etag,Last-Modified请求头,缓存请求结果

    interceptors.add(new ConnectInterceptor(client));//打开网络连接处理

    if (!forWebSocket) {

      interceptors.addAll(client.networkInterceptors());

    }

    interceptors.add(new CallServerInterceptor(forWebSocket));//访问远端服务器 write read处理

    Interceptor.Chain chain = new RealInterceptorChain(

        interceptors, null, null, null, 0, originalRequest);

    return chain.proceed(originalRequest);

  }
由此可以看出OKHttp本身很多功能也是采用Interceptor按功能划分来处理
这里面涉及到设计模式FilterChain(责任链)过滤器来处理,整个请求过程通过递归调用由RealInterceptorChain的process()来完成,在每个Interceptor递归下一个Interceptor 直到最后返回RealInterceptorChain interceptor完成整个流程响应处理
public Response proceed(Request request, StreamAllocation streamAllocation, HttpCodec httpCodec,

      Connection connection) throws IOException {

    if (index >= interceptors.size()) throw new AssertionError();

    ......

    // Call the next interceptor in the chain.//每个Intercepter都是通过RealInterceptorChain封装后在进行调用下一个interceptor

    RealInterceptorChain next = new RealInterceptorChain(

        interceptors, streamAllocation, httpCodec, connection, index + 1, request);

    Interceptor interceptor = interceptors.get(index);

    Response response = interceptor.intercept(next);

    ......

    return response;

  }
Http connect连接处理 ,ConnectInterceptor负责处理server连接。
public final class ConnectInterceptor implements Interceptor {

 ...

  @Override public Response intercept(Chain chain) throws IOException {

    RealInterceptorChain realChain = (RealInterceptorChain) chain;

    Request request = realChain.request();

    StreamAllocation streamAllocation = realChain.streamAllocation();

    // We need the network to satisfy this request. Possibly for validating a conditional GET.

    boolean doExtensiveHealthChecks = !request.method().equals("GET");
//HttpCodechttp request编码,response解码处理

    HttpCodec httpCodec = streamAllocation.newStream(client, doExtensiveHealthChecks);
//一个请求连接

    RealConnection connection = streamAllocation.connection();

    return realChain.proceed(request, streamAllocation, httpCodec, connection);

  }

}
StreamAllocation负责维护:连接(Connection)创建,取消,释放(Connection)内部使用ConnectionPool方式存取Connection
ConnectionPool处理维护连接复用
public final class ConnectionPool {

  private static final Executor executor = new ThreadPoolExecutor(0 /* corePoolSize */,

      Integer.MAX_VALUE /* maximumPoolSize */, 60L /* keepAliveTime */, TimeUnit.SECONDS,

      new SynchronousQueue<Runnable>(), Util.threadFactory("OkHttp ConnectionPool", true));

  //最大连接数量

  private final int maxIdleConnections;

 //清理资源间隔

  private final long keepAliveDurationNs;

//清理资源执行任务

  private final Runnable cleanupRunnable = new Runnable() {

    @Override public void run() {

      while (true) {

        long waitNanos = cleanup(System.nanoTime());

        if (waitNanos == -1) return;

        if (waitNanos > 0) {

          long waitMillis = waitNanos / 1000000L;

          waitNanos -= (waitMillis * 1000000L);

          synchronized (ConnectionPool.this) {

            try {

              ConnectionPool.this.wait(waitMillis, (int) waitNanos);

            } catch (InterruptedException ignored) {

            }

          }

        }

      }

    }

  };

//双端队列存储connection

  private final Deque<RealConnection> connections = new ArrayDeque<>();

  final RouteDatabase routeDatabase = new RouteDatabase();

  boolean cleanupRunning;

 //默认为最多5个connection,每5min定时清理无用的连接资源

  public ConnectionPool() {

    this(5, 5, TimeUnit.MINUTES);

  }

  public ConnectionPool(int maxIdleConnections, long keepAliveDuration, TimeUnit timeUnit) {

    this.maxIdleConnections = maxIdleConnections;

    this.keepAliveDurationNs = timeUnit.toNanos(keepAliveDuration);

    // Put a floor on the keep alive duration, otherwise cleanup will spin loop.

    if (keepAliveDuration <= 0) {

      throw new IllegalArgumentException("keepAliveDuration <= 0: " + keepAliveDuration);

    }

  }
拦截器应用,看一下官方例子
OkHttpClient client = new OkHttpClient.Builder()

    .addInterceptor(new LoggingInterceptor())

    .build();

Request request = new Request.Builder()

    .url("http://www.publicobject.com/helloworld.txt")

    .header("User-Agent", "OkHttp Example")

    .build();

Response response = client.newCall(request).execute();

 class LoggingInterceptor implements Interceptor {

          @Override public Response intercept(Interceptor.Chain chain) throws IOException {

             //get request instance detail modify or add header and so on

            Request request = chain.request();

            long t1 = System.nanoTime();

            logger.info(String.format("Sending request %s on %s%n%s",

                request.url(), chain.connection(), request.headers()));

            //get response instance detail modify body and so on

            Response response = chain.proceed(request);

            long t2 = System.nanoTime();

            logger.info(String.format("Received response for %s in %.1fms%n%s",

                response.request().url(), (t2 - t1) / 1e6d, response.headers()));

            return response;

          }

        }
INFO: Sending request http://www.publicobject.com/helloworld.txt on null

User-Agent: OkHttp Example

INFO: Received response for https://publicobject.com/helloworld.txt in 1179.7ms

Server: nginx/1.4.6 (Ubuntu)

Content-Type: text/plain

Content-Length: 1759

Connection: keep-alive
通过一个拦截器很容易实现网络每个请求日志记录使用,可以看到拦截器可以对同一个request操作,也可以对Response进行处理既支持双向处理。
再来一个自己的实现
class MyIntercepter implements Interceptor {

		@Override

		public Response intercept(Chain chain) throws IOException {

			Response response = null;

			//指定debug下拦截指定的url 的response

			if (BuildConfig.DEBUG

					&& chain.request().url().uri().getPath()

							.equals("/api/id")) {

				// 这里读取我们需要返回的 Json 字符串

				String responseString = "{...}";

				//构建新的response

				response = new Response.Builder()

						.code(200)

						.message(responseString)

						.request(chain.request())

						.protocol(Protocol.HTTP_1_0)

						.body(ResponseBody.create(

								MediaType.parse("application/json"),

								responseString.getBytes()))

						.addHeader("content-type", "application/json").build();

			} else {

				response = chain.proceed(chain.request());

			}

			return response;

		}

	}
从例子可以看出拦截器强大与灵活。
okhttp中分为两种拦截方式,
1,Application Interceptors
2,Network Interceptors
上一个例子是Application Interceptors,修改为Network Interceptors后再看
OkHttpClient client = new OkHttpClient.Builder()

	    //.addInterceptor(new LoggingInterceptor())

	    .addNetworkInterceptor(new LoggingInterceptor())

	    .build();
INFO: Sending request http://www.publicobject.com/helloworld.txt on Connection{www.publicobject.com:80, proxy=DIRECT hostAddress=54.187.32.157 cipherSuite=none protocol=http/1.1}

User-Agent: OkHttp Example

Host: www.publicobject.com

Connection: Keep-Alive

Accept-Encoding: gzip

INFO: Received response for http://www.publicobject.com/helloworld.txt in 115.6ms

Server: nginx/1.4.6 (Ubuntu)

Content-Type: text/html

Content-Length: 193

Connection: keep-alive

Location: https://publicobject.com/helloworld.txt

INFO: Sending request https://publicobject.com/helloworld.txt on Connection{publicobject.com:443, proxy=DIRECT hostAddress=54.187.32.157 cipherSuite=TLS_ECDHE_RSA_WITH_AES_256_CBC_SHA protocol=http/1.1}

User-Agent: OkHttp Example

Host: publicobject.com

Connection: Keep-Alive

Accept-Encoding: gzip

INFO: Received response for https://publicobject.com/helloworld.txt in 80.9ms

Server: nginx/1.4.6 (Ubuntu)

Content-Type: text/plain

Content-Length: 1759

Connection: keep-alive
这个是链接发生重定向日志结果,变为Network Interceptors时信息更全,网络中的具体情况redirect,retries等都会调用process(即多次执行process)
而Application Interceptors只会调用一次。
应用场景;通过intercepter我们可以更加方便灵活的方式实现不同方式,
修改header参数:
Request request = new Request.Builder()

    .url("https://api.github.com/repos/square/okhttp/issues")

    .header("User-Agent", "OkHttp Headers.java")

    .addHeader("Accept", "application/json; q=0.5")

    .addHeader("Accept", "application/vnd.github.v3+json")

    .build();
通过intercepter实现
public Response intercept(Interceptor.Chain chain) throws IOException {

        Request request = chain.request();

        Request newRequest;

        newRequest = request.newBuilder()

                .addHeader(HeadersContract.HEADER_AUTHONRIZATION, O_AUTH_AUTHENTICATION)

                .addHeader(HeadersContract.HEADER_X_CLIENT_ID, CLIENT_ID)

                .build();

        return chain.proceed(newRequest);

    }
可以看出intercepterer大大增加程序可扩展性,像插件一样可以方便特性,强大的组合功能
小结:
1,通过Intercepter实现实现功能划分处理,可扩展,自定义配置十分灵活
2,使用connectionPool实现连接复用,提高连接资源使用率
3,Dispatcher实现Request分发,维护请求队列,控制并行度
okhttp3结合okio request response读写操作,
private boolean bodyHasUnsupportedEncoding(Headers headers) {
        String contentEncoding = headers.get("Content-Encoding");
        return contentEncoding != null &&
                !contentEncoding.equalsIgnoreCase("identity") &&
                !contentEncoding.equalsIgnoreCase("gzip");
    }

    private boolean bodyGzipped(Headers headers) {
        String contentEncoding = headers.get("Content-Encoding");
        return "gzip".equalsIgnoreCase(contentEncoding);
    }

    private String readFromBuffer(Buffer buffer, Charset charset) {

        long bufferSize = buffer.size();

        long maxBytes = Math.min(bufferSize, maxContentLength);

        String body = "";

        try {

            body = buffer.readString(maxBytes, charset);

        } catch (EOFException e) {

            body += context.getString(R.string.chuck_body_unexpected_eof);

        }

        if (bufferSize > maxContentLength) {

            body += context.getString(R.string.chuck_body_content_truncated);

        }

        return body;

    }

    private BufferedSource getNativeSource(BufferedSource input, boolean isGzipped) {

        if (isGzipped) {

            GzipSource source = new GzipSource(input);

            return Okio.buffer(source);

        } else {

            return input;

        }

    }

    private BufferedSource getNativeSource(Response response) throws IOException {

        if (bodyGzipped(response.headers())) {

            BufferedSource source = response.peekBody(maxContentLength).source();

            if (source.buffer().size() < maxContentLength) {

                return getNativeSource(source, true);

            } else {

                Log.w(LOG_TAG, "gzip encoded response was too long");

            }

        }

        return response.body().source();

    }
 private static final Charset UTF8 = Charset.forName("UTF-8");

private long maxContentLength = 250000L;

/**

     * Returns true if the body in question probably contains human readable text. Uses a small sample

     * of code points to detect unicode control characters commonly used in binary file signatures.

     */

    private boolean isPlaintext(Buffer buffer) {

        try {

            Buffer prefix = new Buffer();

            long byteCount = buffer.size() < 64 ? buffer.size() : 64;

            buffer.copyTo(prefix, 0, byteCount);

            for (int i = 0; i < 16; i++) {

                if (prefix.exhausted()) {

                    break;

                }

                int codePoint = prefix.readUtf8CodePoint();

                if (Character.isISOControl(codePoint) && !Character.isWhitespace(codePoint)) {

                    return false;

                }

            }

            return true;

        } catch (EOFException e) {

            return false; // Truncated UTF-8 sequence.

        }

    }

ResponseBody responseBody = response.body();

        transaction.setRequestHeaders(response.request().headers()); // includes headers added later in the chain

        transaction.setResponseDate(new Date());

        transaction.setProtocol(response.protocol().toString());

        transaction.setResponseCode(response.code());

        transaction.setResponseMessage(response.message());

        transaction.setResponseContentLength(responseBody.contentLength());

        if (responseBody.contentType() != null) {

            transaction.setResponseContentType(responseBody.contentType().toString());

        }

        transaction.setResponseHeaders(response.headers());

        transaction.setResponseBodyIsPlainText(!bodyHasUnsupportedEncoding(response.headers()));

        if (HttpHeaders.hasBody(response) && transaction.responseBodyIsPlainText()) {

            BufferedSource source = getNativeSource(response);

            source.request(Long.MAX_VALUE);

            Buffer buffer = source.buffer();

            Charset charset = UTF8;

            MediaType contentType = responseBody.contentType();

            if (contentType != null) {

                try {

                    charset = contentType.charset(UTF8);

                } catch (UnsupportedCharsetException e) {

                    update(transaction, transactionUri);

                    return response;

                }

            }

            if (isPlaintext(buffer)) {

                transaction.setResponseBody(readFromBuffer(buffer.clone(), charset));

            } else {

                transaction.setResponseBodyIsPlainText(false);

            }

            transaction.setResponseContentLength(buffer.size());

        }
okHttp3源码简要分析的更多相关文章
- Activity源码简要分析总结
Activity源码简要分析总结 摘自参考书籍,只列一下结论: 1. Activity的顶层View是DecorView,而我们在onCreate()方法中通过setContentView()设置的V ...
- [Java] LinkedHashMap 源码简要分析
特点 * 各个元素不仅仅按照HashMap的结构存储,而且每个元素包含了before/after指针,通过一个头元素header,形成一个双向循环链表.使用循环链表,保存了元素插入的顺序. * 可设置 ...
- [Java] HashMap 源码简要分析
特性 * 允许null作为key/value. * 不保证按照插入的顺序输出.使用hash构造的映射一般来讲是无序的. * 非线程安全. * 内部原理与Hashtable类似. 源码简要分析 pu ...
- [Java] Hashtable 源码简要分析
Hashtable /HashMap / LinkedHashMap 概述 * Hashtable比较早,是线程安全的哈希映射表.内部采用Entry[]数组,每个Entry均可作为链表的头,用来解决冲 ...
- RxJava && Agera 从源码简要分析基本调用流程(2)
版权声明:本文由晋中望原创文章,转载请注明出处: 文章原文链接:https://www.qcloud.com/community/article/124 来源:腾云阁 https://www.qclo ...
- RxJava && Agera 从源码简要分析基本调用流程(1)
版权声明:本文由晋中望原创文章,转载请注明出处: 文章原文链接:https://www.qcloud.com/community/article/123 来源:腾云阁 https://www.qclo ...
- Redis源码简要分析
转载请注明来源:https://www.cnblogs.com/hookjc/ 把所有服务端文件列出来,并且标示出其作用:adlist.c //双向链表ae.c //事件驱动ae_epoll.c // ...
- Elasticsearch之client源码简要分析
问题 让我们带着问题去学习,效率会更高 1 es集群只配置一个节点,client是否能够自动发现集群中的所有节点?是如何发现的? 2 es client如何做到负载均衡? 3 一个es node ...
- spring mvc 源码简要分析
关于web项目,运用比较多的是过滤器和拦截器 过滤器基于责任链设计模式 创建过滤器链 / Create the filter chain for this requestApplicationFilt ...
- Okhttp3源码解析(3)-Call分析(整体流程)
### 前言 前面我们讲了 [Okhttp的基本用法](https://www.jianshu.com/p/8e404d9c160f) [Okhttp3源码解析(1)-OkHttpClient分析]( ...
随机推荐
- django搭建简易blog
目录 下载安装django 创建一个django项目 创建一个django应用 models.py urls.py views.py admin.py 配置应用到项目下 路由设置urls.py set ...
- vue3 、typescript环境, props自定义类型propType
vue3 .typescript环境, props自定义类型propType //子组件的props类型是复杂的类型的时候,可以用propType进行强制类型转换 //eg 复杂函数,对象数组,对象的 ...
- Spring全家桶(一)之Spring总结
0. Spring常用注解汇总 Spring常用注解汇总 使用注解之前要开启自动扫描功能,其中base-package为需要扫描的包(含子包). <context:component-scan ...
- 蓝牙mesh组网实践(节点功能介绍)
目录 未配网设备在配好网,被纳入网络后,可称之为节点. 蓝牙mesh网络中,节点可以有选择地支持四大功能--朋友.低功耗.转发.代理功能,可以复用多个功能(由于单片机硬件限制,ch582除了复用转发功 ...
- K8S详细教程
Kubernetes详细教程 1. Kubernetes介绍 1.1 应用部署方式演变 在部署应用程序的方式上,主要经历了三个时代: 传统部署:互联网早期,会直接将应用程序部署在物理机上 优点:简单, ...
- MySQL数据库SQL语法常规操作
必备sql和表关系及授权 graph LR 执行1[必备sql和授权] 执行2[SQL强化和实践] 执行3[索引和函数以及存储过程] 执行4[Python操作mysql和应用] 执行5[常见SQL语句 ...
- Mac上好用的app们
记录下自己在mac上用的一些很不错的app,大多免费. 排名随缘. 不定期更新. Amphetamine 来源 AppStore 说明 欢迎使用Amphetamine,一款为macOS打造的最棒的防睡 ...
- 服务器consul与本地服务健康检查不通问题解决
(125条消息) 服务器consul与本地服务健康检查不通问题解决_向往鸟的博客-CSDN博客_consul健康检查失败 .MathJax, .MathJax_Message, .MathJax_Pr ...
- .什么是 SPA 单页面,它的优缺点分别是什么
SPA( single-page application )即一个web项目就只有一个页面(即一个HTML文件,HTML 内容的变换是利用路由机制实现的. 仅在 Web 页面初始化时加载相应的 HTM ...
- 08.JSP技术
一.什么是JSP JSP(Java Server Pages)是JavaWeb服务器端的动态资源.它与html页面的作用是相同的,显示数据和获取数据.JSP文件的扩展名是.jsp. JSP = htm ...