digitalocean --- How To Install Apache Tomcat 8 on Ubuntu 16.04
https://www.digitalocean.com/community/tutorials/how-to-install-apache-tomcat-8-on-ubuntu-16-04
Introduction
Apache Tomcat is a web server and servlet container that is used to serve Java applications. Tomcat is an open source implementation of the Java Servlet and JavaServer Pages technologies, released by the Apache Software Foundation. This tutorial covers the basic installation and some configuration of the latest release of Tomcat 8 on your Ubuntu 16.04 server.
Prerequisites
Before you begin with this guide, you should have a non-root user with sudo privileges set up on your server. You can learn how to do this by completing our Ubuntu 16.04 initial server setup guide.
Step 1: Install Java
Tomcat requires Java to be installed on the server so that any Java web application code can be executed. We can satisfy that requirement by installing OpenJDK with apt-get.
First, update your apt-get package index:
- sudo apt-get update
Then install the Java Development Kit package with apt-get:
- sudo apt-get install default-jdk
Now that Java is installed, we can create a tomcat user, which will be used to run the Tomcat service.
Step 2: Create Tomcat User
For security purposes, Tomcat should be run as an unprivileged user (i.e. not root). We will create a new user and group that will run the Tomcat service.
First, create a new tomcat group:
- sudo groupadd tomcat
Next, create a new tomcat user. We'll make this user a member of the tomcat group, with a home directory of /opt/tomcat (where we will install Tomcat), and with a shell of /bin/false (so nobody can log into the account):
- sudo useradd -s /bin/false -g tomcat -d /opt/tomcat tomcat
Now that our tomcat user is set up, let's download and install Tomcat.
Step 3: Install Tomcat
The best way to install Tomcat 8 is to download the latest binary release then configure it manually.
Find the latest version of Tomcat 8 at the Tomcat 8 Downloads page. At the time of writing, the latest version is 8.5.5, but you should use a later stable version if it is available. Under the Binary Distributions section, then under the Core list, copy the link to the "tar.gz".
Next, change to the /tmp directory on your server. This is a good directory to download ephemeral items, like the Tomcat tarball, which we won't need after extracting the Tomcat contents:
- cd /tmp
Use curl to download the link that you copied from the Tomcat website:
- curl -O http://apache.mirrors.ionfish.org/tomcat/tomcat-8/v8.5.5/bin/apache-tomcat-8.5.5.tar.gz
We will install Tomcat to the /opt/tomcat directory. Create the directory, then extract the archive to it with these commands:
- sudo mkdir /opt/tomcat
- sudo tar xzvf apache-tomcat-8*tar.gz -C /opt/tomcat --strip-components=1
Next, we can set up the proper user permissions for our installation.
Step 4: Update Permissions
The tomcat user that we set up needs to have access to the Tomcat installation. We'll set that up now.
Change to the directory where we unpacked the Tomcat installation:
- cd /opt/tomcat
Give the tomcat group ownership over the entire installation directory:
- sudo chgrp -R tomcat /opt/tomcat
Next, give the tomcat group read access to the conf directory and all of its contents, and execute access to the directory itself:
- sudo chmod -R g+r conf
- sudo chmod g+x conf
Make the tomcat user the owner of the webapps, work, temp, and logs directories:
- sudo chown -R tomcat webapps/ work/ temp/ logs/
Now that the proper permissions are set up, we can create a systemd service file to manage the Tomcat process.
Step 5: Create a systemd Service File
We want to be able to run Tomcat as a service, so we will set up systemd service file.
Tomcat needs to know where Java is installed. This path is commonly referred to as "JAVA_HOME". The easiest way to look up that location is by running this command:
- sudo update-java-alternatives -l
java-1.8.0-openjdk-amd64 1081 /usr/lib/jvm/java-1.8.0-openjdk-amd64
The correct JAVA_HOME variable can be constructed by taking the output from the last column (highlighted in red) and appending /jre to the end. Given the example above, the correct JAVA_HOME for this server would be:
/usr/lib/jvm/java-1.8.0-openjdk-amd64/jre
Your JAVA_HOME may be different.
With this piece of information, we can create the systemd service file. Open a file called tomcat.service in the /etc/systemd/system directory by typing:
- sudo nano /etc/systemd/system/tomcat.service
Paste the following contents into your service file. Modify the value of JAVA_HOME if necessary to match the value you found on your system. You may also want to modify the memory allocation settings that are specified in CATALINA_OPTS:
[Unit]

Description=Apache Tomcat Web Application Container

After=network.target

[Service]

Type=forking

Environment=JAVA_HOME=/usr/lib/jvm/java-1.8.0-openjdk-amd64/jre

Environment=CATALINA_PID=/opt/tomcat/temp/tomcat.pid

Environment=CATALINA_HOME=/opt/tomcat

Environment=CATALINA_BASE=/opt/tomcat

Environment='CATALINA_OPTS=-Xms512M -Xmx1024M -server -XX:+UseParallelGC'

Environment='JAVA_OPTS=-Djava.awt.headless=true -Djava.security.egd=file:/dev/./urandom'

ExecStart=/opt/tomcat/bin/startup.sh

ExecStop=/opt/tomcat/bin/shutdown.sh

User=tomcat

Group=tomcat

UMask=0007

RestartSec=10

Restart=always

[Install]

WantedBy=multi-user.target
When you are finished, save and close the file.
Next, reload the systemd daemon so that it knows about our service file:
- sudo systemctl daemon-reload
Start the Tomcat service by typing:
- sudo systemctl start tomcat
Double check that it started without errors by typing:
- sudo systemctl status tomcat
Step 6: Adjust the Firewall and Test the Tomcat Server
Now that the Tomcat service is started, we can test to make sure the default page is available.
Before we do that, we need to adjust the firewall to allow our requests to get to the service. If you followed the prerequisites, you will have a ufw firewall enabled currently.
Tomcat uses port 8080 to accept conventional requests. Allow traffic to that port by typing:
- sudo ufw allow 8080
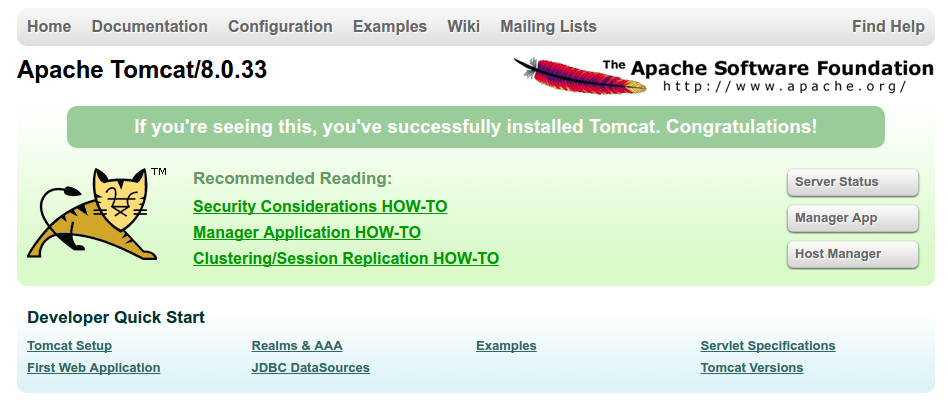
With the firewall modified, you can access the default splash page by going to your domain or IP address followed by :8080 in a web browser:
http://server_domain_or_IP:8080
You will see the default Tomcat splash page, in addition to other information. However, if you click the links for the Manager App, for instance, you will be denied access. We can configure that access next.
If you were able to successfully accessed Tomcat, now is a good time to enable the service file so that Tomcat automatically starts at boot:
- sudo systemctl enable tomcat
Step 7: Configure Tomcat Web Management Interface
In order to use the manager web app that comes with Tomcat, we must add a login to our Tomcat server. We will do this by editing the tomcat-users.xml file:
- sudo nano /opt/tomcat/conf/tomcat-users.xml
You will want to add a user who can access the manager-gui and admin-gui (web apps that come with Tomcat). You can do so by defining a user, similar to the example below, between the tomcat-users tags. Be sure to change the username and password to something secure:
<tomcat-users . . .>

    <user username="admin" password="password" roles="manager-gui,admin-gui"/>

</tomcat-users>
Save and close the file when you are finished.
By default, newer versions of Tomcat restrict access to the Manager and Host Manager apps to connections coming from the server itself. Since we are installing on a remote machine, you will probably want to remove or alter this restriction. To change the IP address restrictions on these, open the appropriate context.xml files.
For the Manager app, type:
- sudo nano /opt/tomcat/webapps/manager/META-INF/context.xml
For the Host Manager app, type:
- sudo nano /opt/tomcat/webapps/host-manager/META-INF/context.xml
Inside, comment out the IP address restriction to allow connections from anywhere. Alternatively, if you would like to allow access only to connections coming from your own IP address, you can add your public IP address to the list:
<Context antiResourceLocking="false" privileged="true" >

  <!--<Valve className="org.apache.catalina.valves.RemoteAddrValve"

         allow="127\.\d+\.\d+\.\d+|::1|0:0:0:0:0:0:0:1" />-->

</Context>
Save and close the files when you are finished.
To put our changes into effect, restart the Tomcat service:
- sudo systemctl restart tomcat
Step 8: Access the Web Interface
Now that we have create a user, we can access the web management interface again in a web browser. Once again, you can get to the correct interface by entering your server's domain name or IP address followed on port 8080 in your browser:
http://server_domain_or_IP:8080
The page you see should be the same one you were given when you tested earlier:
Let's take a look at the Manager App, accessible via the link or http://server_domain_or_IP:8080/manager/html. You will need to enter the account credentials that you added to the tomcat-users.xml file. Afterwards, you should see a page that looks like this:
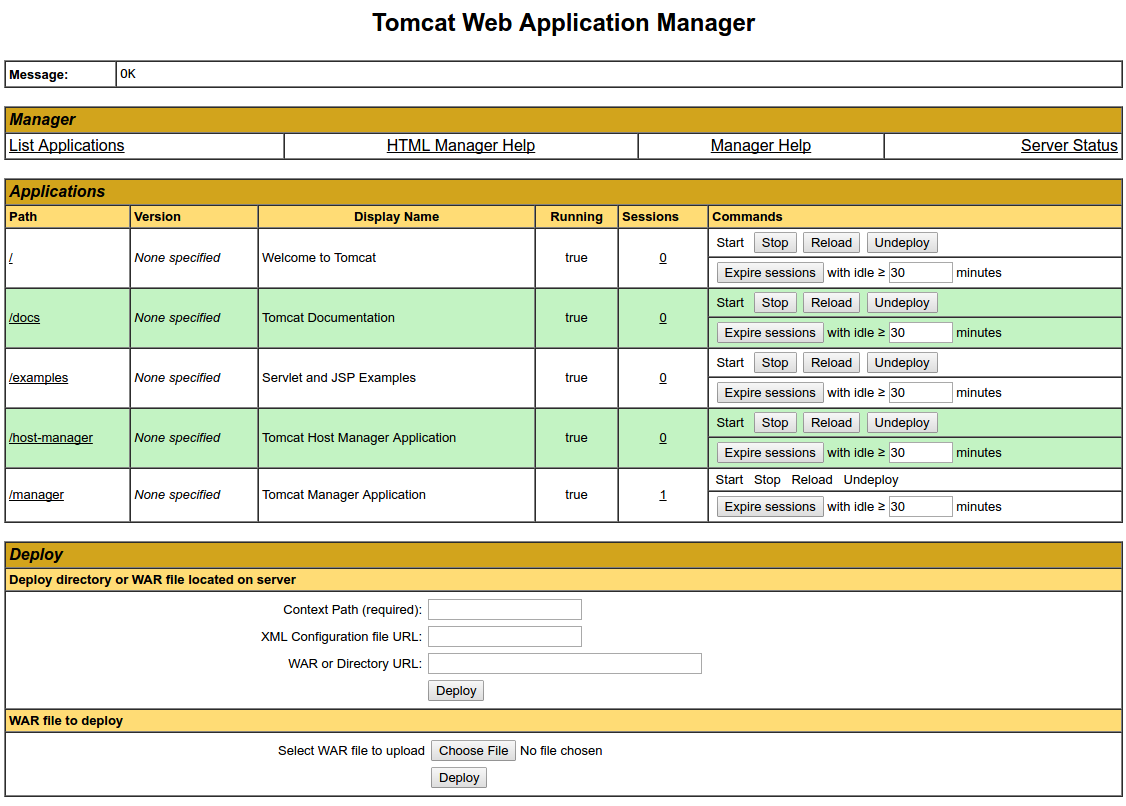
The Web Application Manager is used to manage your Java applications. You can Start, Stop, Reload, Deploy, and Undeploy here. You can also run some diagnostics on your apps (i.e. find memory leaks). Lastly, information about your server is available at the very bottom of this page.
Now let's take a look at the Host Manager, accessible via the link or http://server_domain_or_IP:8080/host-manager/html/:
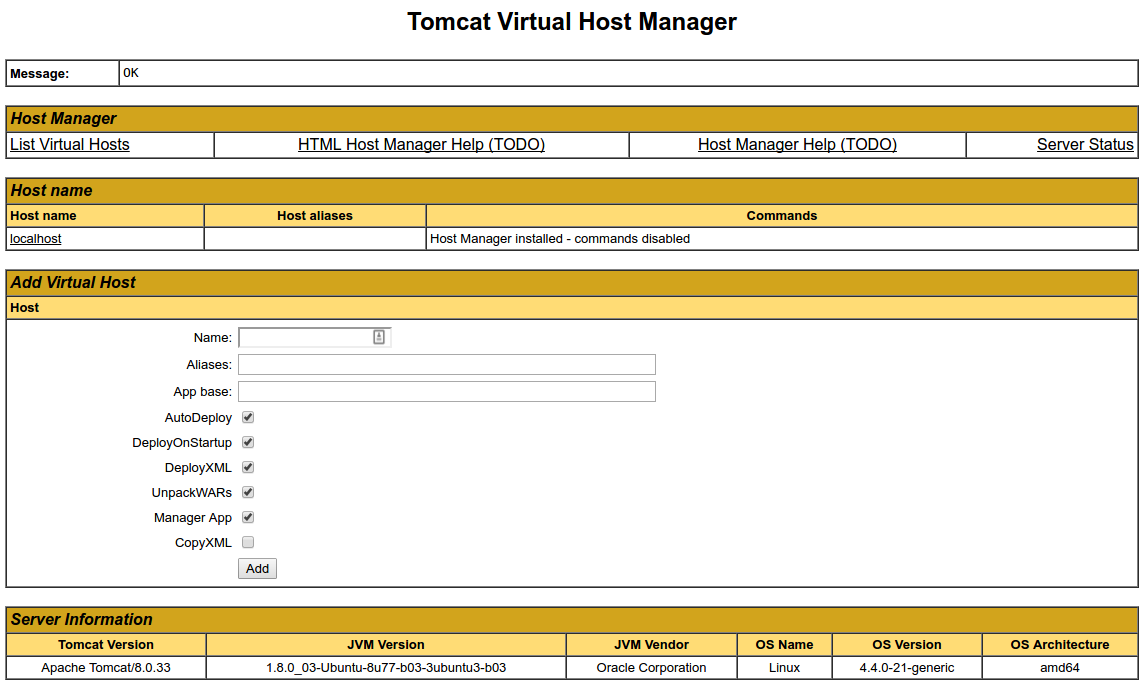
From the Virtual Host Manager page, you can add virtual hosts to serve your applications from.
Conclusion
Your installation of Tomcat is complete! Your are now free to deploy your own Java web applications!
Currently, your Tomcat installation is functional, but entirely unencrypted. This means that all data, including sensitive items like passwords, are sent in plain text that can be intercepted and read by other parties on the internet. In order to prevent this from happening, it is strongly recommended that you encrypt your connections with SSL. You can find out how to encrypt your connections to Tomcat by following this guide.
digitalocean --- How To Install Apache Tomcat 8 on Ubuntu 16.04的更多相关文章
- ubuntu 16.04源码编译和配置caffe详细教程 | Install and Configure Caffe on ubuntu 16.04
本文首发于个人博客https://kezunlin.me/post/b90033a9/,欢迎阅读! Install and Configure Caffe on ubuntu 16.04 Series ...
- Ubuntu 16.04上源码编译Poco并编写cmake文件 | guide to compile and install poco cpp library on ubuntu 16.04
本文首发于个人博客https://kezunlin.me/post/281dd8cd/,欢迎阅读! guide to compile and install poco cpp library on u ...
- [Part 1] Ubuntu 16.04安装和配置QT5 | Part-1: Install and Configure Qt5 on Ubuntu 16.04
本文首发于个人博客https://kezunlin.me/post/91842b71/,欢迎阅读! Part-1: Install and Configure Qt5 on Ubuntu 16.04 ...
- How To Install Java with Apt-Get on Ubuntu 16.04
Introduction Java and the JVM (Java's virtual machine) are widely used and required for many kinds o ...
- How to Install LibreOffice 6.0 on Ubuntu 16.04 LTS +
1. Add the LibreOffice 6.0 PPA The LibreOffice Fresh PPA is maintained by LibreOffice. It provides l ...
- install oh my zsh on ubuntu 16.04
first,install zsh #安装zsh sudo apt-get install zsh #是否安装成功 cat /etc/shells #/bin/sh #/bin/bash #/bin/ ...
- Install and Configure Apache Kafka on Ubuntu 16.04
https://devops.profitbricks.com/tutorials/install-and-configure-apache-kafka-on-ubuntu-1604-1/ by hi ...
- How to Install Apache Tomcat 8.5 on CentOS 7.3
How to Install Apache Tomcat 8.5 on CentOS 7.3 From: https://www.howtoforge.com/tutorial/how-to-inst ...
- Ubuntu 16.04安装Tomcat 8
此篇为http://www.cnblogs.com/EasonJim/p/7139275.html的分支页. 前提:必须正确安装JDK. 一.通过二进制包(tar.gz)安装 下载: https:// ...
随机推荐
- ant design pro (十一)advanced Mock 和联调
一.概述 原文地址:https://pro.ant.design/docs/mock-api-cn Mock 数据是前端开发过程中必不可少的一环,是分离前后端开发的关键链路.通过预先跟服务器端约定好的 ...
- JSON格式校验
<!DOCTYPE html> <html lang="zh"> <head> <meta charset="UTF-8&quo ...
- 【BIRT】Format Number下的Round Mode中的各项解释
页面展示 从上图我们可以才看出,共有Half Up.Half Down.Half Even.Up.Down.Celling.Floor.Unnecessary 下面一一介绍每一个的意思 Half Up ...
- Windows 开发之VC++垃圾清理程序软件
概述 本程序软件的主要实现垃圾文件清理的功能,即对指定的文件格式的临时文件或垃圾文件进行遍历.扫描.显示.删除清理等功能.在程序界面设计方面,对默认对话框重新自定义绘制,主要包括标题栏的重绘.对话框边 ...
- Android高效异步图片加载框架
概述 Android高效异步图片加载框架:一个高效的异步加载显示的图片加载框架,同时具备图片压缩,缓存机制等特性. 详细 代码下载:http://www.demodashi.com/demo/1214 ...
- 【CentOS6.5】MySQL安装和配置
1./etc/my.cnf 这是mysql的主配置文件 2.数据存放位置 3.错误存放位置
- Python 以指定的概率选取元素
Python 以指定的概率选取元素 Problem You want to pick an item at random from a list, just about as random.choic ...
- JavaScript 中的所有数据都是以 64 位浮点型数据(float) 来存储。浮点型数据使用注意事项。全局变量特殊之处
JavaScript 中的所有数据都是以 64 位浮点型数据(float) 来存储. 所有的编程语言,包括 JavaScript,对浮点型数据的精确度都很难确定: <!DOCTYPE html& ...
- Linux 间网线直连
核心提示:两台linux 系统用交叉线直连的方法: 1.交叉网线制作 A头:白橙,橙,白绿,蓝,白蓝,绿,白褐,褐 B头:白绿,绿,白橙,蓝,白蓝,橙,白褐,褐 即 B头的1.3脚相对A头互换:2脚与 ...
- 输出流格式化(以操纵子方式格式化,以ios类成员函数方式格式化)
一.以操纵子方式格式化 数据输入输出的格式控制使用系统头文件<iomanip>中提供的操纵符.把它们作为插入操作符<<的输出对象即可.如setiosflags.setw.set ...