mybatis之generator生成代码
首先在pom文件中引入以下代码
<plugin>
    <groupId>org.mybatis.generator</groupId>
    <artifactId>mybatis-generator-maven-plugin</artifactId>
    <version>1.3.2</version>
    <configuration>
    <verbose>true</verbose>
    <overwrite>true</overwrite>
    </configuration>
</plugin>
在resource目录下放generatorConfig.xml,具体配置如下:
<?xml version="1.0" encoding="UTF-8"?>
<!DOCTYPE generatorConfiguration
        PUBLIC "-//mybatis.org//DTD MyBatis Generator Configuration 1.0//EN"
        "http://mybatis.org/dtd/mybatis-generator-config_1_0.dtd">

<generatorConfiguration>
    <!--导入属性配置-->
    <properties resource="datasource.properties"></properties>

    <!--指定特定数据库的jdbc驱动jar包的位置-->
    <classPathEntry location="./src/main/resources/mysql-connector-java-5.1.6-bin.jar"/>

    <context id="default" targetRuntime="MyBatis3">

        <!-- optional,旨在创建class时,对注释进行控制 -->
        <commentGenerator>
            <property name="suppressDate" value="true"/>
            <property name="suppressAllComments" value="true"/>
        </commentGenerator>

        <!--jdbc的数据库连接 -->
        <jdbcConnection
                driverClass="${db.driverClassName}"
                connectionURL="${db.url}"
                userId="${db.username}"
                password="${db.password}">
        </jdbcConnection>

        <!-- 非必需,类型处理器,在数据库类型和java类型之间的转换控制-->
        <javaTypeResolver>
            <property name="forceBigDecimals" value="false"/>
        </javaTypeResolver>

        <!-- Model模型生成器,用来生成含有主键key的类,记录类 以及查询Example类
            targetPackage     指定生成的model生成所在的包名
            targetProject     指定在该项目下所在的路径
        -->
        <!--<javaModelGenerator targetPackage="com.mmall.pojo" targetProject=".\src\main\java">-->
        <javaModelGenerator targetPackage="com.mmall.pojo" targetProject="./src/main/java">
            <!-- 是否允许子包,即targetPackage.schemaName.tableName -->
            <property name="enableSubPackages" value="false"/>
            <!-- 是否对model添加 构造函数 -->
            <property name="constructorBased" value="true"/>
            <!-- 是否对类CHAR类型的列的数据进行trim操作 -->
            <property name="trimStrings" value="true"/>
            <!-- 建立的Model对象是否 不可改变  即生成的Model对象不会有 setter方法,只有构造方法 -->
            <property name="immutable" value="false"/>
        </javaModelGenerator>

        <!--mapper映射文件生成所在的目录 为每一个数据库的表生成对应的SqlMap文件 -->
        <!--<sqlMapGenerator targetPackage="mappers" targetProject=".\src\main\resources">-->
        <sqlMapGenerator targetPackage="mappers" targetProject="./src/main/resources">
            <property name="enableSubPackages" value="false"/>
        </sqlMapGenerator>

        <!-- 客户端代码,生成易于使用的针对Model对象和XML配置文件 的代码
                type="ANNOTATEDMAPPER",生成Java Model 和基于注解的Mapper对象
                type="MIXEDMAPPER",生成基于注解的Java Model 和相应的Mapper对象
                type="XMLMAPPER",生成SQLMap XML文件和独立的Mapper接口
        -->

        <!-- targetPackage:mapper接口dao生成的位置 -->
        <!--<javaClientGenerator type="XMLMAPPER" targetPackage="com.mmall.dao" targetProject=".\src\main\java">-->
        <javaClientGenerator type="XMLMAPPER" targetPackage="com.mmall.dao" targetProject="./src/main/java">
            <!-- enableSubPackages:是否让schema作为包的后缀 -->
            <property name="enableSubPackages" value="false" />
        </javaClientGenerator>

        <table tableName="mmall_shipping" domainObjectName="Shipping" enableCountByExample="false" enableUpdateByExample="false" enableDeleteByExample="false" enableSelectByExample="false" selectByExampleQueryId="false"></table>
        <table tableName="mmall_cart" domainObjectName="Cart" enableCountByExample="false" enableUpdateByExample="false" enableDeleteByExample="false" enableSelectByExample="false" selectByExampleQueryId="false"></table>
        <table tableName="mmall_cart_item" domainObjectName="CartItem" enableCountByExample="false" enableUpdateByExample="false" enableDeleteByExample="false" enableSelectByExample="false" selectByExampleQueryId="false"></table>
        <table tableName="mmall_category" domainObjectName="Category" enableCountByExample="false" enableUpdateByExample="false" enableDeleteByExample="false" enableSelectByExample="false" selectByExampleQueryId="false"></table>
        <table tableName="mmall_order" domainObjectName="Order" enableCountByExample="false" enableUpdateByExample="false" enableDeleteByExample="false" enableSelectByExample="false" selectByExampleQueryId="false"></table>
        <table tableName="mmall_order_item" domainObjectName="OrderItem" enableCountByExample="false" enableUpdateByExample="false" enableDeleteByExample="false" enableSelectByExample="false" selectByExampleQueryId="false"></table>
        <table tableName="mmall_pay_info" domainObjectName="PayInfo" enableCountByExample="false" enableUpdateByExample="false" enableDeleteByExample="false" enableSelectByExample="false" selectByExampleQueryId="false"></table>
        <table tableName="mmall_product" domainObjectName="Product" enableCountByExample="false" enableUpdateByExample="false" enableDeleteByExample="false" enableSelectByExample="false" selectByExampleQueryId="false">
            <columnOverride column="detail" jdbcType="VARCHAR" />
            <columnOverride column="sub_images" jdbcType="VARCHAR" />
        </table>
        <table tableName="mmall_user" domainObjectName="User" enableCountByExample="false" enableUpdateByExample="false" enableDeleteByExample="false" enableSelectByExample="false" selectByExampleQueryId="false"></table>

        <!-- geelynote mybatis插件的搭建 -->
    </context>
</generatorConfiguration>
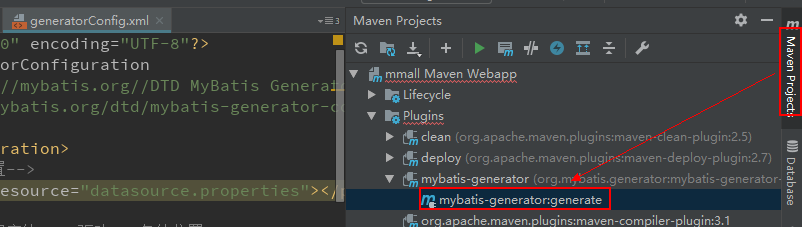
双击插件自动生成代码
mybatis之generator生成代码的更多相关文章
- Mybatis自己主动生成代码
在mybatis自己主动生成代码有两种方式: 方式一:是通过使用eclipse作为开发工具.採用maven来构建项目生成的.以下的演示是通过第一种方式. 今天来记录下mybatis-generator ...
- (转)MyBatis框架的学习(七)——MyBatis逆向工程自动生成代码
http://blog.csdn.net/yerenyuan_pku/article/details/71909325 什么是逆向工程 MyBatis的一个主要的特点就是需要程序员自己编写sql,那么 ...
- MyBatis框架之mybatis逆向工程自动生成代码
http://www.jb51.net/article/82062.htm Mybatis属于半自动ORM,在使用这个框架中,工作量最大的就是书写Mapping的映射文件,由于手动书写很容易出错,我们 ...
- mybatis Generator生成代码及使用方式
本文原创,转载请注明:http://www.cnblogs.com/fengzheng/p/5889312.html 为什么要有mybatis mybatis 是一个 Java 的 ORM 框架,OR ...
- Mybatis逆向工程自动生成代码(Ubuntu18.04-idea环境)
最近在学习taotao商城项目,有一节是关于mybatis逆向工程的,参考了这个博文,https://blog.csdn.net/yerenyuan_pku/article/details/71909 ...
- 回顾一下MyBatis逆向工程——自动生成代码
前言 最近做的项目(SSM+Shiro)的数据库表已经创建完成,一共有15张表,如果我们一个个去写pojo/bean的代码以及各种sql语句的话未免太过麻烦而且很容易出错,这个时候我们就需要MyBat ...
- 【MyBatis学习15】MyBatis的逆向工程生成代码
1. 什么是逆向工程 mybatis的一个主要的特点就是需要程序员自己编写sql,那么如果表太多的话,难免会很麻烦,所以mybatis官方提供了一个逆向工程,可以针对单表自动生成mybatis执行所需 ...
- SpringBoot+Mybatis+MySql 自动生成代码 自动分页
一.配置文件 <!-- 通用mapper --> <dependency> <groupId>tk.mybatis</groupId> <arti ...
- 使用mybatis插件自动生成代码以及问题处理
1.pom.xml中加入依赖插件 <!-- mybatis generator 自动生成代码插件 --> <plugin> <groupId>org.mybatis ...
随机推荐
- 将新浪博客里的表情包存入MySQL数据库不完整版本一堆可能用到的散乱代码
header = {'Cookie': 'SINAGLOBAL=7368591819178.463.1491810091070; ALF=1558832450; SCF=Ajrc1sxuwynVIu_ ...
- Velocity基本常用语法
Velocity是一个基于java的模板引擎(template engine),它允许任何人仅仅简单的使用模板语言(template language)来引用由java代码定义的对象.作为一个比较完善 ...
- [C++]复制构造函数、赋值操作符与隐式类类型转换
问题:现有类A定义如下: class A{public: A(int a) //构造函数 { ...
- Go - coding之前的准备
Go tool 的使用 Go的tool要求我们对于code有一定的结构化组织和管理,下面我们就来一介绍他们: --GoPath environment variable: 顾名思义,环境变量,指定了 ...
- java.lang.ArrayIndexOutOfBoundsException异常分析及解决
这是一个非常常见的异常,从名字上看是数组下标越界错误,解决方法就是查看为什么下标越界. 下面是一个错误示例: Exception in thread "main" java.lan ...
- Julia - If 条件语句
Julia 中使用 if,elseif,else 进行条件判断 格式: if expression1 statement1 elseif expression2 statement2 else sta ...
- 16_Java正则和日期对象
01正则表达式的概念和作用 * A: 正则表达式的概念和作用 * a: 正则表达式的概述 * 正则表达式也是一个字符串,用来定义匹配规则,在Pattern类中有简单的规则定义. 可以结合字符串类的方法 ...
- Linux6系统安装
- 爬虫之 图片懒加载, selenium , phantomJs, 谷歌无头浏览器
一.图片懒加载 懒加载 : JS 代码 是页面自然滚动 window.scrollTo(0,document.body.scrollHeight) (重点) bro.execute_ ...
- ztree--插件实现增删改查demo(完整版)
ztree--插件实现增删改查demo(完整版) var setting = { async: { enable: true, ...