
Xamarin.Android 调用Web Api(通过ListView展示远程获取的数据)
xamarin.android如何调用sqlserver 数据库呢(或者其他的),很多新手都会有这个疑问。xamarin.android调用远程数据主要有两种方式:
在Android中保存数据或调用数据库可以利用SQLite,android中提供了几个类来管理SQLite数据库,对数据进行增删改查
直接调用Asp.net Web API对数据进行增删改查
这两种方式到底选择哪一种方式好一点呢?哪一种方式好不好我不敢确定,市场上大部分app都是调用api来clud的。当然我也推荐大家使用web api来调用远程数据,至少目前来看我们公司都是使用web api来做的。好吧废话不多说,下面就是ListView来调用web api执行增删改查的例子。
在listview上展示的数据是直接调用远程的web api中的数据。主要实现步骤
- 新建一个web api的项目,写好要用到的方法。
- 在MainActivity.cs中发送请求并将相应的json字符串序列化成List集合。
一、web api
由于我主要介绍下如何在xamarin中使用listview,所以web api我这里不做介绍了,相信聪明的你已经知道如何建立web api并写好方法了。
二、xamarin.android使用listview控件
1.新建xamarin.android项目,这里示例取名为listviewdemo
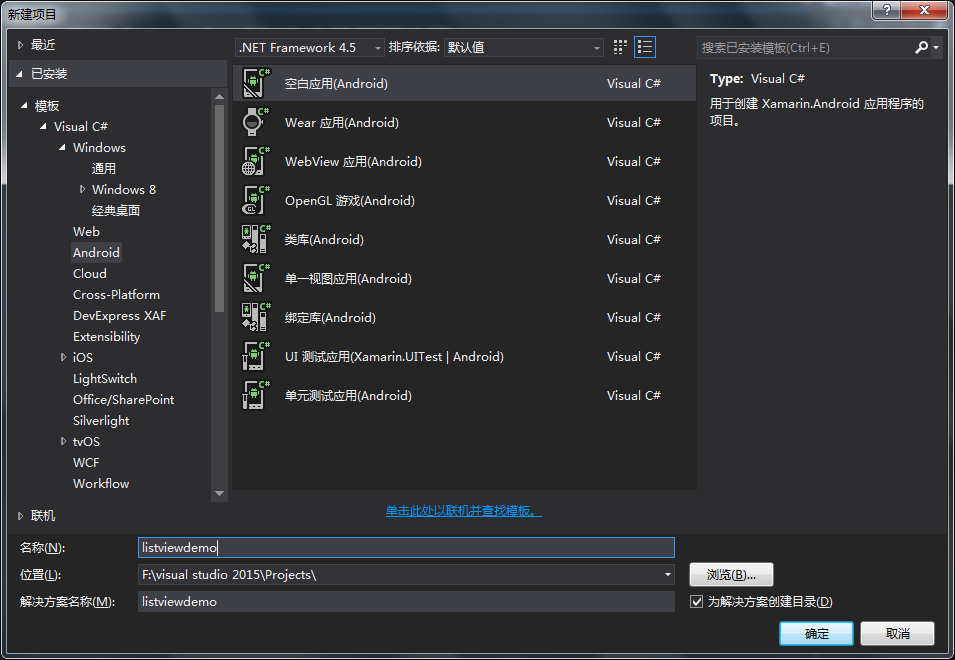
2.建好的项目如下图,这是可以看到运行按键显示了一个“实时播放器”,为何没有显示出模拟器来呢?由于我安装的是海马玩模拟器,请注意,请先运行模拟器,再打开VS项目,这里没有显示出我的模拟器,这是因为当前项目版本高于模拟器版本,我们只需要更改下项目最低兼容版本就可以了,项目属性--android选项--最低安卓版本选择android4.0,这是看到运行按键显示出来模拟器名称了,后面我们可以通过该模拟器进行调试。


3.我们打开layout文件夹下的main.axml文件,在该页面添加一个按钮,用于打开listview页面,main.axml文件修改如下:
<?xml version="1.0" encoding="utf-8"?>

<LinearLayout xmlns:android="http://schemas.android.com/apk/res/android"

    android:orientation="vertical"

    android:layout_width="match_parent"

    android:layout_height="match_parent"

    android:minWidth="25px"

    android:minHeight="25px">

  <Button

      android:text="获取产品信息"

      android:layout_width="match_parent"

      android:layout_height="wrap_content"

      android:id="@+id/GetProductInfo" />

</LinearLayout>
4.在layout文件夹新建2个视图文件,即添加新项,选择android布局,创建ProductAdapter和ProductList两个android布局视图文件。
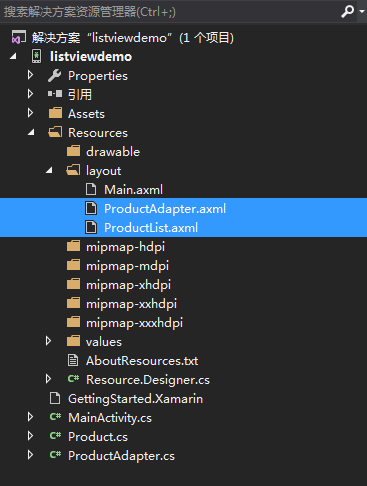
然后开始编辑我们的视图,将下列代码复制并替换到ProductAdapter中:
<?xml version="1.0" encoding="utf-8"?>

<LinearLayout xmlns:android="http://schemas.android.com/apk/res/android"

    android:orientation="vertical"

    android:layout_width="match_parent"

    android:layout_height="match_parent"

    android:minWidth="25px"

    android:minHeight="25px">

    <LinearLayout

        android:orientation="horizontal"

        android:layout_width="match_parent"

        android:layout_height="30.5dp"

        android:id="@+id/linearLayout1">

        <TextView

            android:text="产品型号:"

            android:layout_width="wrap_content"

            android:layout_height="match_parent"

            android:id="@+id/textView1" />

        <TextView

            android:text="Text"

            android:layout_width="wrap_content"

            android:layout_height="match_parent"

            android:id="@+id/ProductModel" />

    </LinearLayout>

    <LinearLayout

        android:orientation="horizontal"

        android:layout_width="match_parent"

        android:layout_height="30.5dp"

        android:id="@+id/linearLayout2">

        <TextView

            android:text="产品名称:"

            android:layout_width="wrap_content"

            android:layout_height="match_parent"

            android:id="@+id/textView2" />

        <TextView

            android:text="Text"

            android:layout_width="wrap_content"

            android:layout_height="match_parent"

            android:id="@+id/ProductName" />

    </LinearLayout>

    <LinearLayout

        android:orientation="horizontal"

        android:layout_width="match_parent"

        android:layout_height="wrap_content"

        android:id="@+id/linearLayout3">

        <TextView

            android:text="产品类型:"

            android:layout_width="wrap_content"

            android:layout_height="match_parent"

            android:id="@+id/textView3" />

        <TextView

            android:text="Text"

            android:layout_width="wrap_content"

            android:layout_height="match_parent"

            android:id="@+id/ProductType" />

    </LinearLayout>

</LinearLayout>
将下列代码复制并替换到ProductList中:
<?xml version="1.0" encoding="utf-8"?>

<LinearLayout xmlns:android="http://schemas.android.com/apk/res/android"

    android:orientation="vertical"

    android:layout_width="match_parent"

    android:layout_height="match_parent"

    android:minWidth="25px"

    android:minHeight="25px">

  <ListView

      android:minWidth="25px"

      android:minHeight="25px"

      android:layout_width="match_parent"

      android:layout_height="match_parent"

      android:id="@+id/StList" />

</LinearLayout>
5.新建一个Product类,用来定义产品信息实体,该实体容器存放我们需要的数据,于是我们在Product中添加如下代码:
   public class Product

    {

        public string ProductModel { get; set; }//产品型号

        public string ProductName { get; set; }//产品名称

        public string ProductType { get; set; }//产品类型

    }
6.新建一个ProductAdapter类,用于把我们的实体数据绑定到适配器,并且继承BaseAdapter类,添加以下代码:
public class ProductAdapter : BaseAdapter

    {

        private List<Product> data;

        private Context context;

        public override int Count

        {

            get

            {

                return data.Count;

            }

        }

        public ProductAdapter(List<Product> data, Context context)

        {

            this.data = data;

            this.context = context;

        }

        public override Java.Lang.Object GetItem(int position)

        {

            return null;

        }

        public override long GetItemId(int position)

        {

            return position;

        }

        public override View GetView(int position, View convertView, ViewGroup parent)

        {

            convertView = LayoutInflater.From(context).Inflate(Resource.Layout.ProductAdapter, parent, false);

            TextView ProductModel = convertView.FindViewById<TextView>(Resource.Id.ProductModel);

            TextView ProductName = convertView.FindViewById<TextView>(Resource.Id.ProductName);

            TextView ProductType = convertView.FindViewById<TextView>(Resource.Id.ProductType);

            ProductModel.Text = data[position].ProductModel;

            ProductName.Text = data[position].ProductName;

            ProductType.Text = data[position].ProductType;

            return convertView;

        }

    }
7.项目添加新建一个活动取名为ProductList,然后我们就可以绑定列表了,将下列代码添加到ProductList活动中,代码中有个url,表示你获取web api服务的IP地址,这里填你实际的web api地址,可以通过花生壳映射内网来操作。
namespace listviewdemo

{

    [Activity(Label = "产品信息")]

    public class ProductList : Activity

    {

        public List<Product> item;//定义一个列表

        public ListView listview;//定义控件

        public ProductAdapter adapter;//定义数据源

        protected override void OnCreate(Bundle savedInstanceState)

        {

            base.OnCreate(savedInstanceState);

            SetContentView(Resource.Layout.ProductList);//设置要显示的视图

            listview = FindViewById<ListView>(Resource.Id.StList);//找到控件

            try

            {

                string url = "http://192.168.1.126:4479/api/app/CompanyServer/GetProduct";

                string content = GetRouteData(url); //接收到响应的json 字符串

                List<Product> list = JsonConvert.DeserializeObject<List<Product>>(content); //已经获取到远程数据的List<News>和之前的本地data就是一样的了。

                adapter = new ProductAdapter(list, this);

                listview.Adapter = adapter;

            }

            catch (Exception ex)

            {

                var dlg = new AlertDialog.Builder(this).SetTitle("警告")

                 .SetMessage(ex.Message);

                dlg.Show();

            }

        }

        public static string GetRouteData(string url)

        {

            //构建请求

            HttpWebRequest request = (HttpWebRequest)WebRequest.Create(url);

            request.ContentType = "text/json;chartset=UTF-8";

            //request.UserAgent = "";

            request.Method = "POST";

            request.ContentLength = ;//如果调用的API无须传递参数,那么请加上这一句

            //接收响应

            HttpWebResponse response = (HttpWebResponse)request.GetResponse();

            Stream stream = response.GetResponseStream();

            StreamReader streamReader = new StreamReader(stream, Encoding.UTF8);

            string retString = streamReader.ReadToEnd();

            return retString;

        }

    }

}
由于使用了HttpWebRequest进行web api请求,请添加如下引用:
using System.Net;

using System.IO;
由于使用到了json转换,请在项目引用进行NuGet,进行添加安装Newtonsoft.Json包。然后进行引用。
using Newtonsoft.Json;
8.完成这种步骤,最后在我们的mainactivity活动中重写button的点击事件用来跳转到ProductList就ok了。
namespace listviewdemo

{

    [Activity(Label = "listviewdemo", MainLauncher = true)]

    public class MainActivity : Activity

    {

        protected override void OnCreate(Bundle savedInstanceState)

        {

            base.OnCreate(savedInstanceState);

            // Set our view from the "main" layout resource

            SetContentView(Resource.Layout.Main);

            Button btnProductInfo = FindViewById<Button>(Resource.Id.GetProductInfo);

            btnProductInfo.Click += btnProductInfo_Click;

        }

        private void btnProductInfo_Click(object sender, EventArgs e)

        {

            Intent intent = new Intent();

            intent.SetClass(this, typeof(ProductList));

            StartActivity(intent);

        }

    }

}
9.运行效果图
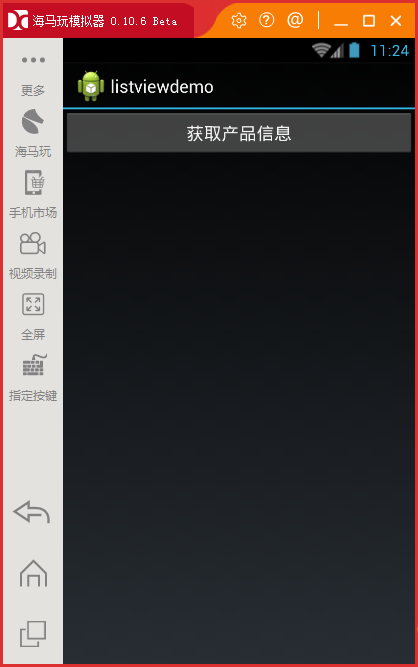

以上说明了使用listview展示数据的方法,并通过模拟器进行运行,若进行发布生成APK时,手机却无法使用闪退,有几个地方是需要设置配置下的,请点击
xamarin.android 发布生成APK真机运行闪退问题
Xamarin.Android 调用Web Api(通过ListView展示远程获取的数据)的更多相关文章
- [置顶]
Xamarin android 调用Web Api(ListView使用远程数据)
xamarin android如何调用sqlserver 数据库呢(或者其他的),很多新手都会有这个疑问.xamarin android调用远程数据主要有两种方式: 在Android中保存数据或调用数 ...
- 【ASP.NET Web API教程】3.3 通过WPF应用程序调用Web API(C#)
原文:[ASP.NET Web API教程]3.3 通过WPF应用程序调用Web API(C#) 注:本文是[ASP.NET Web API系列教程]的一部分,如果您是第一次看本博客文章,请先看前面的 ...
- ASP.NET MVC4中调用WEB API的四个方法
http://tech.it168.com/a2012/0606/1357/000001357231_all.shtml [IT168技术]当今的软件开发中,设计软件的服务并将其通过网络对外发布,让各 ...
- 【ASP.NET Web API教程】3.2 通过.NET客户端调用Web API(C#)
原文:[ASP.NET Web API教程]3.2 通过.NET客户端调用Web API(C#) 注:本文是[ASP.NET Web API系列教程]的一部分,如果您是第一次看本博客文章,请先看前面的 ...
- 通过.NET客户端调用Web API(C#)
3.2 Calling a Web API From a .NET Client (C#) 3.2 通过.NET客户端调用Web API(C#) 本文引自:http://www.asp.net/web ...
- WebApi系列~通过HttpClient来调用Web Api接口
回到目录 HttpClient是一个被封装好的类,主要用于Http的通讯,它在.net,java,oc中都有被实现,当然,我只会.net,所以,只讲.net中的HttpClient去调用Web Api ...
- Android调用Web服务
现在大部分应用程序都把业务逻辑处理,数据调用等功能封装成了服务的形式,应用程序只需要调用这些web服务就好了,在这里就不赘述web服务的优点了.本文总结如何在android中调用Web服务,通过传递基 ...
- 通过HttpClient来调用Web Api接口
回到目录 HttpClient是一个被封装好的类,主要用于Http的通讯,它在.net,java,oc中都有被实现,当然,我只会.net,所以,只讲.net中的HttpClient去调用Web Api ...
- Http下的各种操作类.WebApi系列~通过HttpClient来调用Web Api接口
1.WebApi系列~通过HttpClient来调用Web Api接口 http://www.cnblogs.com/lori/p/4045413.html HttpClient使用详解(java版本 ...
随机推荐
- SpringBoot整合Redis、ApachSolr和SpringSession
SpringBoot整合Redis.ApachSolr和SpringSession 一.简介 SpringBoot自从问世以来,以其方便的配置受到了广大开发者的青睐.它提供了各种starter简化很多 ...
- Sql Server的艺术(三) SQL聚合函数的应用
SQL提供的聚合函数有求和,最大值,最小值,平均值,计数函数等. 聚合函数及其功能: 函数名称 函数功能 SUM() 返回选取结果集中所有值的总和 MAX() 返回选取结果集中所有值的最大值 MIN( ...
- windows的MySQL安装
Window环境下: 1.下载MySQL MySQL社区版:https://dev.mysql.com/downloads/mysql/ MySQL商业版:https://www.mysql.com/ ...
- Jmeter之性能测试插件PerfMon Metrics Collector监听器,实时监听服务器资源(十四)
Servers Performance Monitoring Introduction During a load test, it is important to know the health o ...
- C#基础(三)--运算符及条件控制语句
上一章我们了解了C#的一些数据基本类型.如何定义使用变量及类型之间的相互转换.可能大家会发现程序只能按照我们的要求从上向下这样顺序一条一条的执行. 那么程序能按照我们的要求,当某个条件成立的时候才执行 ...
- JAVA设计模式---迭代器模式
1.定义: 提供一种方法顺序访问一个聚合对象中的各个元素,而又不暴露其内部的表示. 2.实例:1)需求: 菜单(煎饼屋菜单.餐厅菜单和咖啡菜单)采用不同的集合存取(ArrayList,String[] ...
- Cypher查询语言--Neo4j 综合(四)
目录 返回节点 返回关系 返回属性 带特殊字符的标识符 列的别名 可选属性 特别的结果 查询中的返回部分,返回途中定义的感兴趣的部分.可以为节点.关系或其上的属性. 图 返回节点 返回一个节点,在 ...
- Hands-On Machine Learning with Scikit-Learn and TensorFlow---读书笔记
去年在北京参加了一次由O'Reilly和Cloudera联合举办的大数据会议Strata Data Conference,并有幸获得了O'Reilly出版的Hands-On Machine Learn ...
- GreenDao 兼容升级,保留旧数据的---全方面解决方案
作者:林冠宏 / 指尖下的幽灵 掘金:https://juejin.im/user/587f0dfe128fe100570ce2d8 博客:http://www.cnblogs.com/linguan ...
- python学习交流 - 匿名函数
匿名函数 匿名函数是一个很有特色的定义函数的功能.在实际使用的过程,用户有时不得不为一些一行代码即可实现的功能来定义一个函数,例如像map, max, filter等内置函数的key参数只能接收可调用 ...