
【ASP.NET Web API教程】3.3 通过WPF应用程序调用Web API(C#)
原文:【ASP.NET Web API教程】3.3 通过WPF应用程序调用Web API(C#)
注:本文是【ASP.NET Web API系列教程】的一部分,如果您是第一次看本博客文章,请先看前面的内容。
3.3 Calling a Web API From a WPF Application (C#)
3.3 通过WPF应用程序调用Web API(C#)
本文引自:http://www.asp.net/web-api/overview/web-api-clients/calling-a-web-api-from-a-wpf-application
By Mike Wasson | August 22, 2012
作者:Mike Wasson | 日期:2012-8-22
This tutorial shows how to call a web API from a Windows Presentation Foundation (WPF) application, using HttpClient.
本教程展示如何用HttpClient通过WPF应用程序(Windows Presentation Foundation — Windows表现基础,WPF应用程序指常规的窗口应用程序 — 译者注)调用Web API。
The main purpose of this tutorial is to see how asynchronous operations are handled in HttpClient. In this tutorial, we will consume the "ProductStore" API, described in "Creating a Web API that Supports CRUD Operations".
本教程的主要目的是考查在HttpClient中如何处理异步操作。在本教程中,我们将使用在“创建支持CRUD操作的Web API”小节中描述的“ProductStore”API。
Before you read this tutorial, you might want to read Calling a Web API From a .NET Client. That article introduces some of the concepts that I use in this tutorial.
在阅读这篇文章之前,你或许想阅读“通过.NET客户端调用Web API”(本系列教程的上一小节 — 译者注)。这篇文章中介绍了本教程使用的一些概念。
Asynchronous Calls
异步调用
HttpClient is designed to be non-blocking. Potentially long-running operations are implemented as asynchonrous methods, such as GetAsync and PostAsync. These methods return without waiting for the operation to complete. The previous tutorial (Calling a Web API From a Console Application) showed only blocking calls:
HttpClient被设计成是非阻塞的。潜在地,长时间运行的操作是作为异步方法实现的,例如,GetAsync和PostAsync。这些方法不会等待操作完成便会返回。上一教程(通过控制台应用程序调用Web API)只展示了阻塞调用:
HttpResponseMessage response = client.GetAsync("api/products").Result; // Blocking call(阻塞)!
This code blocks the calling thread by taking the Result property. That's OK for a console application, but you should not do it from a UI thread, because it blocks the UI from responding to user input.
这段代码通过采用Result属性,会阻塞调用线程。对于一个控制台应用程序,这没问题,但你不应该在一个UI线程中采用这一做法,因为这会阻止UI去响应用户输入。
The asynchronous methods of HttpClient return Task objects that represent the asynchronous operation.
HttpClient的异步方法会返回表示异步操作的Task对象。
Create the WPF Project
创建WPF项目
Start Visual Studio. From the Start menu, select New Project. In the Templates pane, select Installed Templates and expand the Visual C# node. In the list of project templates, select WPF Application. Name the project and click OK.
启动Visual Studio。从“开始”菜单选择“新项目”。在“模板”面板中,选择“已安装模板”,并展开“Viusal C#”节点。在项目模板列表中,选择“WPF应用程序”。命名此项目并点击“OK”。
Open MainWindow.xaml and add the following XAML markup inside the Grid control:
打开MainWindow.xaml,并在Grid控件中添加以下XAML标记:
<StackPanel Width="250" >

    <Button Name="btnGetProducts" Click="GetProducts">Get Products</Button>

    <ListBox Name="ProductsList">

        <ListBox.ItemTemplate>

            <DataTemplate>

                <StackPanel Margin="2">

                    <TextBlock Text="{Binding Path=Name}" />

                    <TextBlock >Price: $<Run Text="{Binding Path=Price}" />

                        (<Run Text="{Binding Path=Category}" />)</TextBlock>

                </StackPanel>

            </DataTemplate>

        </ListBox.ItemTemplate>

    </ListBox>

</StackPanel>
This markup defines a ListBox that will be data-bound to the list of products. The DataTemplate defines how each product will be displayed.
这段标记定义了一个将被数据绑定到产品列表的ListBox(列表框)。DataTemplate(数据模板)定义了如何显示每个产品。(其效果如图3-4所示)。
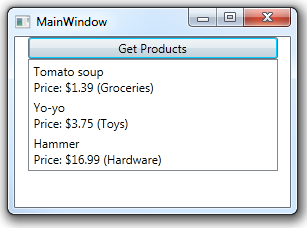
图3-4. WPF界面效果
Add the Model Class
添加模型类
Add the following class to the application:
将以下类添加到应用程序:
class Product

{

    public string Name { get; set; }

    public double Price { get; set; }

    public string Category { get; set; }

}
This class defines a data object that HttpClient will write into the HTTP request body and read from the HTTP response body.
这个类定义了一个数据对象,HttpClient将把它写入HTTP请求体,也从HTTP响应体中读取它。
We'll also add an observable class for data binding:
我们也要添加一个用于数据绑定的可见对象类(observable class):
class ProductsCollection : ObservableCollection<Product>

{

    public void CopyFrom(IEnumerable<Product> products)

    {

        this.Items.Clear();

        foreach (var p in products)

        {

            this.Items.Add(p);

        }


        this.OnCollectionChanged(

            new NotifyCollectionChangedEventArgs(NotifyCollectionChangedAction.Reset));

    }

}
Install NuGet Package Manager
安装NuGet包管理器
NuGet Package Manager is the easiest way to add the Web API Client library to a project. If you do not have NuGet Package Manager already installed, install it as follows.
将Web API客户端库添加到项目最容易的办法是安装“NuGet包管理器(NuGet Package Manager)”。如果尚未安装NuGet包管理器,按如下步骤安装。
- Start Visual Studio.
启动Visual Studio. - From the Tools menu, select Extensions and Updates.
从“工具”菜单选择“扩展与更新” - In the Extensions and Updates dialog, select Online.
在“扩展与更新”对话框中,选择“在线” - If you don't see "NuGet Package Manager", type "nuget package manager" in the search box.
如果未看到“NuGet包管理器”,在搜索框中输入“nuget package manager”。 - Select the NuGet Package Manager and click Download.
选择“NuGet包管理器”,并点击“下载”。 - After the download completes, you will be prompted to install.
下载完成后,会提示你安装。 - After the installation completes, you might be prompted to restart Visual Studio.
安装完成后,可能会提示重启Visual Studio。
上述安装过程如图3-5所示。
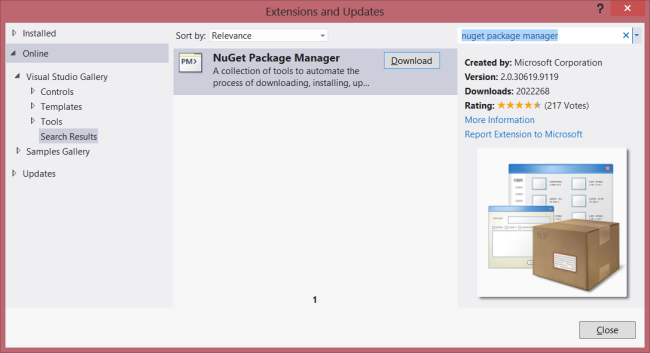
图3-5. 安装NuGet包管理器
Install the Web API Client Libraries
安装Web API客户端库
After NuGet Package Manager is installed, add the Web API Client Libraries package to your project.
安装NuGet包管理器后,把Web API客户端库包添加到你的项目。步骤如下:
- From the Tools menu, select Library Package Manager. Note: If do you not see this menu item, make sure that NuGet Package Manager installed correctly.
从“工具”菜单选择“库包管理器”。注:如果看不到这个菜单项,请确保已正确安装了NuGet包管理器。 - Select Manage NuGet Packages for Solution...
选择“管理解决方案的NuGet包…” - In the Manage NuGet Packages dialog, select Online.
在“管理NuGet包”对话框中,选择“在线”。 - In the search box, type "Microsoft.AspNet.WebApi.Client".
在搜索框中输入“Microsoft.AspNet.WebApi.Client”。 - Select the ASP.NET Web API Self Host package and click Install.
选择“ASP.NET Web API自托管包”,并点击“安装”。 - After the package installs, click Close to close the dialog.
这个包安装后,点击“关闭”,关闭此对话框。
上述安装步骤如图3-6所示。
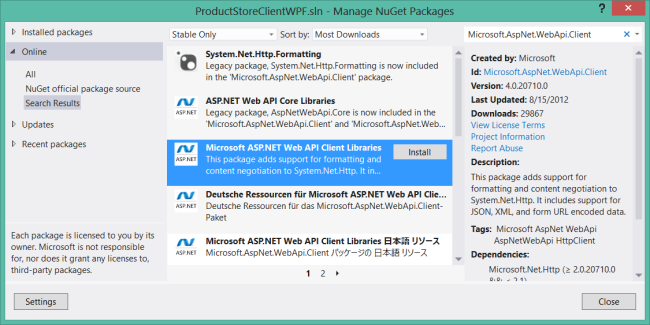
图3-6. 安装Web API客户端库
Initialize HttpClient
初始化HttpClient
From Solution Explorer, open the file MainWindow.xaml.cs. Add the following code.
在“解决方案资源管理器”中,打开MainWindow.xaml.cs文件。添加以下代码:
namespace WpfProductClient

{

    using System;

    using System.Collections.Generic;

    using System.Net.Http;

    using System.Net.Http.Headers;

    using System.Windows;


    public partial class MainWindow : Window

    {

        HttpClient client = new HttpClient();

        ProductsCollection _products = new ProductsCollection();


        public MainWindow()

        {

            InitializeComponent();


            client.BaseAddress = new Uri("http://localhost:9000");

            client.DefaultRequestHeaders.Accept.Add(

                new MediaTypeWithQualityHeaderValue("application/json"));


            this.ProductsList.ItemsSource = _products;

        }

    }

}
This code creates a new instance of HttpClient. It also sets the base URI to "http://localhost:9000/", and sets the Accept header to "application/json", which tells the server to send data in JSON format.
这段代码创建了一个新的HttpClient实例。也把基URI设置为“http://localhost:9000/”,并且把Accept报头设置为“application/json”,这是告诉服务器,以JSON格式发送数据。
Notice that we also created a new ProductsCollection class and set it as the binding for the ListBox.
注意,我们也创建了一个新的ProductsCollection类,并把它设置为对ListBox的绑定。
Getting a Resource (HTTP GET)
获取资源(HTTP GET)
If you are targeting .NET Framework 4.5, the async and await keywords make it much easier to write asynchronous code.
如果你的目标是.NET Framework 4.5(意即,你所开发的应用程序将在.NET 4.5平台上运行 — 译者注),async和await关键字会让你很容易编写异步代码。
If you are targeting .NET Framework 4.0 with Visual Studio 2012, you can install the Async Targeting Pack to get async/await support.
如果你的目标是使用Visual Studio 2012的.NET Framework 4.0,可以安装Async Targeting Pack来获得async/await支持。
The following code queries the API for a list of products. Add this code to the MainWindow class:
以下代码查询产品列表API。将此代码添加到MainWindow类:
private async void GetProducts(object sender, RoutedEventArgs e)

{

    try

    {

        btnGetProducts.IsEnabled = false;


        var response = await client.GetAsync("api/products");

        response.EnsureSuccessStatusCode(); // Throw on error code(有错误码时报出异常).


        var products = await response.Content.ReadAsAsync<IEnumerable<Product>>();

        _products.CopyFrom(products);


    }

    catch (Newtonsoft.Json.JsonException jEx)

    {

        // This exception indicates a problem deserializing the request body.

        // 这个异常指明了一个解序列化请求体的问题。

        MessageBox.Show(jEx.Message);

    }

    catch (HttpRequestException ex)

    {

        MessageBox.Show(ex.Message);

    }

    finally

    {

        btnGetProducts.IsEnabled = true;

    }

}
The GetAsync method sends an HTTP GET request. If the HTTP response indicates success, the response body contains a list of products in JSON format. To parse the list, call ReadAsAsync. This method reads the response body and tries to deserialize it to a specified CLR type.
GetAsync方法发送一个HTTP GET请求。如果HTTP响应指示成功,响应体会含有一个JSON格式的产品列表。要解析这个列表,调用ReadAsAsync。这个方法会读取响应体,并试图把它解序列化成一个具体的CLR类型。
As their names imply, GetAsync and ReadAsAsync are asynchronous methods, meaning they return immediately, without waiting for the operation to complete. The await keyword suspends execution until the operation completes. For example:
正如其名称所暗示的,GetAsync和ReadAsAsync是异步方法,意即,它们立即返回,不会等待操作完成。await关键字会挂起执行,直到操作完成。例如:
var response = await client.GetAsync("api/products");
The code that appears after this statement does not execute until the HTTP request is completed. But that does not mean the event handler blocks, waiting for GetAsync to complete. Just the opposite — control returns to the caller. When the HTTP request is completed, execution continues from the point where it was suspended.
出现在这条语句之后的代码直到HTTP请求完成时才会执行。但这并不意味着事件处理器(event handler,也可以叫做事件处理程序 — 译者注)会阻塞,以等待GetAsync完成。恰恰相反 — 控制会返回给调用者。当HTTP请求完成时,执行会从挂起点继续。
If a method uses await, it must have the async modifier:
如果一个方法使用await,它必须有async修饰符:
private async void GetProducts(object sender, RoutedEventArgs e)
Without the await keyword, you would need to call ContinueWith on the Task object:
没有这个await关键字,你就需要调用Task对象上的ContinueWith:
private void GetProducts(object sender, RoutedEventArgs e)

{

    btnGetProducts.IsEnabled = false;


    client.GetAsync("api/products/2").ContinueWith((t) =>

    {

        if (t.IsFaulted)

        {

            MessageBox.Show(t.Exception.Message);

            btnGetProducts.IsEnabled = true;

        }

        else

        {

            var response = t.Result;

            if (response.IsSuccessStatusCode)

            {

                response.Content.ReadAsAsync<IEnumerable<Product>>().

                    ContinueWith(t2 =>

                        {

                            if (t2.IsFaulted)

                            {

                                MessageBox.Show(t2.Exception.Message);

                                btnGetProducts.IsEnabled = true;

                            }

                            else

                            {

                                var products = t2.Result;

                                _products.CopyFrom(products);

                                btnGetProducts.IsEnabled = true;

                            }

                        }, TaskScheduler.FromCurrentSynchronizationContext());

            }

        }

    }, TaskScheduler.FromCurrentSynchronizationContext());

}
This type of code is difficult to get right, so it's recommended to target .NET 4.5, or if that's not possible, install the Async Targeting Pack.
这种型式的代码难以正确,因此建议把目标定为.NET 4.5,或者,如果这不可能,需安装Async Targeting Pack(Async目标包)。
Creating a Resource (HTTP POST)
创建资源(HTTP POST)
Go back to the MainWindow.xaml file and add some (very) UI for creating a new product:
回到MainWindow.xaml文件,添加一些创建一个新产品的UI:
<Label FontWeight="ExtraBold">New Product</Label>

<Label>Name</Label>

<TextBox Name="textName"></TextBox>

<Label>Price</Label>

<TextBox Name="textPrice"></TextBox>

<Label>Category</Label>

<TextBox Name="textCategory"></TextBox>

<Button Name="btnPostProduct" Click="PostProduct">Post Product</Button>
Now add the following code to the MainWindow class.
现在把以下代码添加到MainWindow类:
private async void PostProduct(object sender, RoutedEventArgs e)

{

    btnPostProduct.IsEnabled = false;


    try

    {

        var product = new Product()

        {

            Name = textName.Text,

            Price = decimal.Parse(textPrice.Text),

            Category = textCategory.Text

        };

        var response = await client.PostAsJsonAsync("api/products", product);

        response.EnsureSuccessStatusCode(); // Throw on error code(有错误码时抛出).


        _products.Add(product);

    }

    catch (HttpRequestException ex)

    {

        MessageBox.Show(ex.Message);

    }

    catch (System.FormatException)

    {

        MessageBox.Show("Price must be a number");

    }

    finally

    {

        btnPostProduct.IsEnabled = true;

    }

}
This code sends a POST request that contains a Product instance in JSON format. PostAsJsonAsync is an extension method defined in System.Net.Http.HttpClientExtensions. Internally, this method uses the JSON media-type formatter to serialize the Product to JSON and write it into the request body. For XML format, use the PostAsXmlAsync method.
这段代码发送一个POST请求,它含有一个JSON格式的Product实例。PostAsJsonAsync是一个在System.Net.Http.HttpClientExtensions中定义的扩展方法。内在地,这个方法使用JSON媒体类型格式化器把Product序列化成JSON,并把它写入请求体。对于XML格式,使用PostAsXmlAsync方法。
看完此文如果觉得有所收获,恳请给个推荐
【ASP.NET Web API教程】3.3 通过WPF应用程序调用Web API(C#)的更多相关文章
- 【ASP.NET Web API教程】3.2 通过.NET客户端调用Web API(C#)
原文:[ASP.NET Web API教程]3.2 通过.NET客户端调用Web API(C#) 注:本文是[ASP.NET Web API系列教程]的一部分,如果您是第一次看本博客文章,请先看前面的 ...
- C#之VS2010ASP.NET页面调用Web Service和winform程序调用Web Service
一:用ASP.NET调用Web Service 打开VS2010,打开“文件-新建-网站”,选择“ASP.NET网站” 选好存储位置,语言后点击确定,进入默认页面.然后先添加Web引用,把WebSer ...
- 迁移桌面程序到MS Store(4)——桌面程序调用Win10 API
上一篇我们讨论了如何在转制的桌面程序中,通过StartupTask来实现转制版本的开机自启动.实际操作中,我们通过编辑Packaging工程中的Package.appxmanifest文件,来添加自启 ...
- ASP.NET Core:CMD命令行+记事本 创建Console程序和Web Application
今天看了Scott关于ASP.NET Core的介绍视频,发现用命令行一步一步新建项目.添加Package.Restore.Build.Run 执行的实现方式,更让容易让我们了解.NET Core的运 ...
- 【ASP.NET Web API教程】3 Web API客户端
原文:[ASP.NET Web API教程]3 Web API客户端 Chapter 3: Web API Clients 第3章 Web API客户端 本文引自:http://www.asp.net ...
- 通过.NET客户端调用Web API(C#)
3.2 Calling a Web API From a .NET Client (C#) 3.2 通过.NET客户端调用Web API(C#) 本文引自:http://www.asp.net/web ...
- 基于Web Service的客户端框架搭建一:C#使用Http Post方式传递Json数据字符串调用Web Service
引言 前段时间一直在做一个ERP系统,随着系统功能的完善,客户端(CS模式)变得越来越臃肿.现在想将业务逻辑层以下部分和界面层分离,使用Web Service来做.由于C#中通过直接添加引用的方来调用 ...
- 【ASP.NET Web API教程】6.4 模型验证
本文是Web API系列教程的第6.4小节 6.4 Model Validation 6.4 模型验证 摘自:http://www.asp.net/web-api/overview/formats-a ...
- ASP.NET 5系列教程 (六): 在 MVC6 中创建 Web API
ASP.NET 5.0 的主要目标之一是统一MVC 和 Web API 框架应用. 接下来几篇文章中您会了解以下内容: ASP.NET MVC 6 中创建简单的web API. 如何从空的项目模板中启 ...
随机推荐
- 富文本编辑器 - wangEditor 上传图片
效果: . 项目结构图: wangEditor-upload-img.html代码: <html> <head> <title>wangEditor-图片上传< ...
- Gas Station|leetcode 贪心
贪心:尽量将gas[i]-cost[i]>0的放在前面,gas[i]-cost[i]<0的放在后面.(路程的前面有汽油剩下,耗汽油的放在路程的后面). 能否全程通过的 条件 是:sum(g ...
- Vi/VIM键盘图, Vi/vim学习图
Vi/vim学习图 引用: Vi键盘图片可视化教程 http://www.cnblogs.com/me115/archive/2010/11/16/1878295.html 网上的文章易流失.感谢分享 ...
- arm:jlink调试和直接烧写运行的不同 [mdk s3c2440]
1.对全局变量的初始化. 2.还没发现的事例. /*************************************************/ 先上连接文件sct LR_ROM1 0x3000 ...
- 使用Spring标签库
A.Spring标签库 Web项目若使用Spring Web MVC并使用JSP作为表现的话.从Spring2.0版本开始提供一套标签库可供使用. 使用标签库无非是易于开发,维护之类云云.这里就不阐述 ...
- Tri_integral Summer Training 9 总结
比赛链接 A B C D H I J K 多灾多难的 Summer Training 9,前一天挂了一场比赛,结果题一半不能做,于是打了一个小时就放弃了.之后的两场Summer Training 9一 ...
- SAP 金税接口介绍
一.金税发票与SAP系统发票的税额差异分析 1.1 金税系统中的税额说明 国内企业销售产品给国内客户时,正常产品须要缴纳17%的增值税,而金税(Golden Tax)系统就是用来出具纸面的增值税发票的 ...
- 用定时器T0的中断控制8位LED闪烁
#include<reg52.h> #define uchar unsigned char #define uint unsigned int uint i; void main() { ...
- js判断是否为pc端或移动端
function IsPC() { var userAgentInfo = navigator.userAgent; var Agents = new Array("Android" ...
- Adrnoid开发系列(二十五):使用AlertDialog创建各种类型的对话框
AlertDialog能够生成各种内容的对话框.可是每种对话框都会有这样的的结构: 类似下边这样的的: watermark/2/text/aHR0cDovL2Jsb2cuY3Nkbi5uZXQvdTA ...