SprintBoot学习(二)
Spring Boot的入口类
1、名为xxxApplication的就是入口类,在main方法中使用SpringApplication.run(SpringBootTestApplication.class, args);启动Spring Boot应用项目。
2、@SpringBootApplication是由@SpringBootConfiguration、@EnableAutoConfiguration、@ComponentScan的组合注解。其中@EnableAutoConfiguration让Spring Boot 根据类路径中的jar包依赖为当前项目进行自动配置。
Spring Boot定制banner
1、查找顺序:依次在 Classpath 下找 文件 banner.gif , banner.jpg , banner.png 和 banner.txt,都没有找到的话, 用默认的 SpringBootBanner , 就是我们最常见到的那个。
2、测试案例:
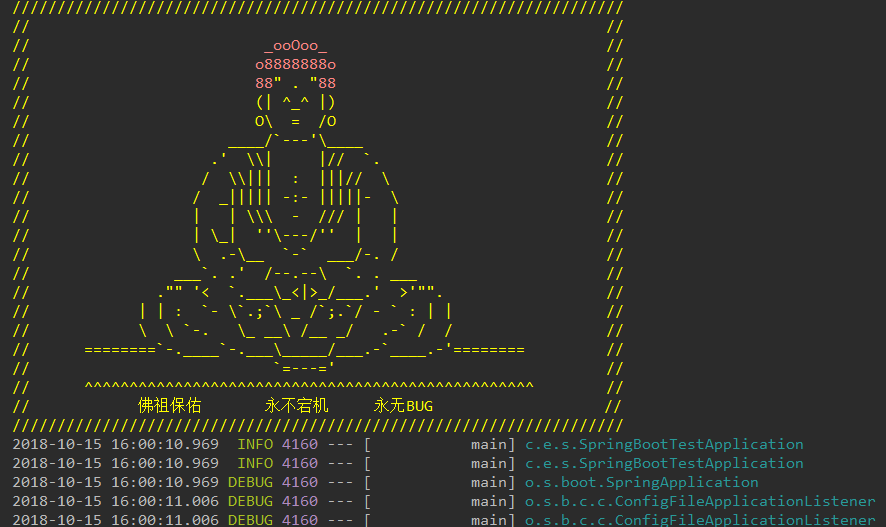
新banner.txt
${AnsiColor.BRIGHT_YELLOW}

////////////////////////////////////////////////////////////////////

//                                                                //

//                          ${AnsiColor.BRIGHT_RED}_ooOoo_${AnsiColor.BRIGHT_YELLOW}                               //

//                         ${AnsiColor.BRIGHT_RED}o8888888o${AnsiColor.BRIGHT_YELLOW}                              //

//                         ${AnsiColor.BRIGHT_RED}88${AnsiColor.BRIGHT_YELLOW}" . "${AnsiColor.BRIGHT_RED}88${AnsiColor.BRIGHT_YELLOW}                              //

//                         (| ^_^ |)                              //

//                         O\  =  /O                              //

//                      ____/`---'\____                           //

//                    .'  \\|     |//  `.                         //

//                   /  \\|||  :  |||//  \                        //

//                  /  _||||| -:- |||||-  \                       //

//                  |   | \\\  -  /// |   |                       //

//                  | \_|  ''\---/''  |   |                       //

//                  \  .-\__  `-`  ___/-. /                       //

//                ___`. .'  /--.--\  `. . ___                     //

//              ."" '<  `.___\_<|>_/___.'  >'"".                  //

//            | | :  `- \`.;`\ _ /`;.`/ - ` : | |                 //

//            \  \ `-.   \_ __\ /__ _/   .-` /  /                 //

//      ========`-.____`-.___\_____/___.-`____.-'========         //

//                           `=---='                              //

//      ^^^^^^^^^^^^^^^^^^^^^^^^^^^^^^^^^^^^^^^^^^^^^^^^^^        //

//            佛祖保佑       永不宕机     永无BUG                   //

////////////////////////////////////////////////////////////////////
运行结果:
3、关闭banner
SpringApplication springApplication = new SpringApplication(SpringBootTestApplication.class);

springApplication.setBannerMode(Banner.Mode.OFF);

springApplication.run(args);
Spring Boot配置文件
1、Spring Boot使用一个全局的配置文件application.properties 或application.yml,作用是对一些默认配置的配置值进行修改。
2、profile配置:输Spring 针对不同的环境对不同的配置提供的支持,全局的profile配置使用application-{profile}.properties,通过application.properties中设置spring.profiles.active = prod来指定活动的profile。
测试案例:
spring.profiles.active=daily

#修改访问路径

server.servlet.context-path=/springboot

my.username=Amy
3、日志配置:默认情况下使用Logback做为日志框架
测试案例:
spring.profiles.active=daily

#修改访问路径

server.servlet.context-path=/springboot

my.username=Amy

#指定日志文件保存地址

logging.file=D:/study/SpringBoot/log.log

debug=true
4、常规属性配置:在Spring环境下需要用@PropertySource来指定文件的位置再用@Value来指定注入的值。再Spring Boot 中只需要用@Value的注解
配置文件:
ser.nikename=Saber

user.age=21
启动类:
package com.example.spring_boot_test;

import org.springframework.beans.factory.annotation.Value;

import org.springframework.boot.SpringApplication;

import org.springframework.boot.autoconfigure.SpringBootApplication;

import org.springframework.web.bind.annotation.RequestMapping;

import org.springframework.web.bind.annotation.RestController;

@RestController

@SpringBootApplication//开启自动配置

public class SpringBootTestApplication {

    //通过@Value注入值

    @Value("${my.username}")

    private String userName;

    public static void main(String[] args) {

        //关闭banner

        /*SpringApplication springApplication = new SpringApplication(SpringBootTestApplication.class);

        springApplication.setBannerMode(Banner.Mode.OFF);

        springApplication.run(args);*/

        SpringApplication.run(SpringBootTestApplication.class, args);

    }

    @RequestMapping("/")

    String index() {

        return "hello " + userName + " spring boot !!!";

    }

}
5、类型安全的配置:如果每次使用@Value注解逐一注入属性会很麻烦,因此可以通过@ConfigurationProperties将properties属性和一个bean关联起来,从而实现类型安全的配置。
配置文件:
ser.nikename=Saber

user.age=21
类型安全的Bean:
package com.example.spring_boot_test.entity;

import org.springframework.boot.context.properties.ConfigurationProperties;

import org.springframework.context.annotation.PropertySource;

import org.springframework.stereotype.Component;

@Component//要使用这个注解,这样就可以在 component scan时候被发现了,不然会无法自动注入,

@PropertySource({"classpath:/my.properties"})//注意路径的书写格式

@ConfigurationProperties(prefix = "user")

public class User {

    String nikename;

    int age;

    public String getNikename() {

        return nikename;

    }

    public void setNikename(String nikename) {

        this.nikename = nikename;

    }

    public int getAge() {

        return age;

    }

    public void setAge(int age) {

        this.age = age;

    }

}
启动类:
package com.example.spring_boot_test;

import com.example.spring_boot_test.entity.User;

import org.springframework.beans.factory.annotation.Autowired;

import org.springframework.beans.factory.annotation.Value;

import org.springframework.boot.SpringApplication;

import org.springframework.boot.autoconfigure.SpringBootApplication;

import org.springframework.web.bind.annotation.RequestMapping;

import org.springframework.web.bind.annotation.RestController;

@RestController

@SpringBootApplication//开启自动配置

public class SpringBootTestApplication {

    @Autowired

    private User user;

    //通过@Value注入值

    @Value("${my.username}")

    private String userName;

    public static void main(String[] args) {

        //关闭banner

        /*SpringApplication springApplication = new SpringApplication(SpringBootTestApplication.class);

        springApplication.setBannerMode(Banner.Mode.OFF);

        springApplication.run(args);*/

        SpringApplication.run(SpringBootTestApplication.class, args);

    }

    @RequestMapping("/")

    String index() {

        System.out.println(user.getNikename() + ":" + user.getAge());

        return "hello " + userName + " spring boot !!!";

    }

}
Spring Boot运行原理
1、@SpringBootApplication是由@SpringBootConfiguration、@EnableAutoConfiguration、@ComponentScan的组合注解。核心功能由EnableAutoConfiguration提供。
- @Configuration:@SpringBootConfiguration的本质是@Configuration,@Configuration相当于把该类作为spring的xml配置文件中的
<beans>,作用为配置spring容器(应用上下文),任何一个标注了@Configuration的Java类定义都是一个JavaConfig配置类。 - @ComponentScan:@ComponentScan自动扫描并加载符合条件的组件(比如@Component和@Repository等)或者bean定义,最终将这些bean定义加载到IoC容器中。
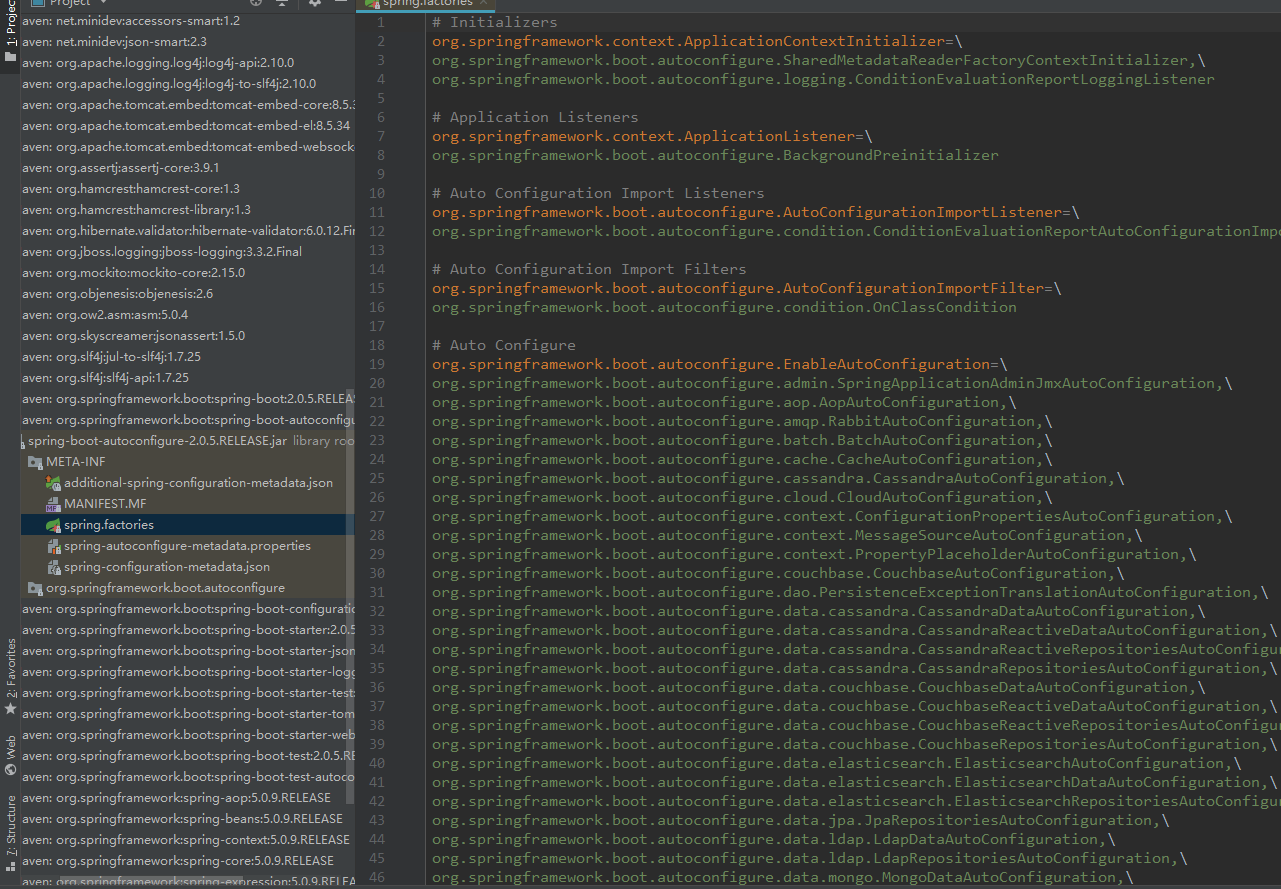
- @EnableAutoConfiguration:@EnableAutoConfiguration的部分源码如下:
@Target(ElementType.TYPE)

@Retention(RetentionPolicy.RUNTIME)

@Documented

@Inherited

@AutoConfigurationPackage

@Import(AutoConfigurationImportSelector.class)

public @interface EnableAutoConfiguration {

    String ENABLED_OVERRIDE_PROPERTY = "spring.boot.enableautoconfiguration";

        Class<?>[] exclude() default {};

    String[] excludeName() default {};

}
其中@Import注解将所有符合自动配置条件的bean定义加载到IoC容器,AutoConfigurationImportSelector通过getCandidateConfigurations方法来扫描具有MWTA-INF/spring.factories文件的jar包(spring-boot-autoconfigure.jar),spring.factories文件声明了自动配置。然后根据@EnableAutoConfiguration的完整类名org.springframework.boot.autoconfigure.EnableAutoConfiguration作为查找的Key,获取对应的一组@Configuration类,然后通过反射(Java Refletion)实例化为对应的标注了@Configuration的JavaConfig形式的IoC容器配置类,最后汇总为一个并加载到IoC容器。
Spring Boot执行流程
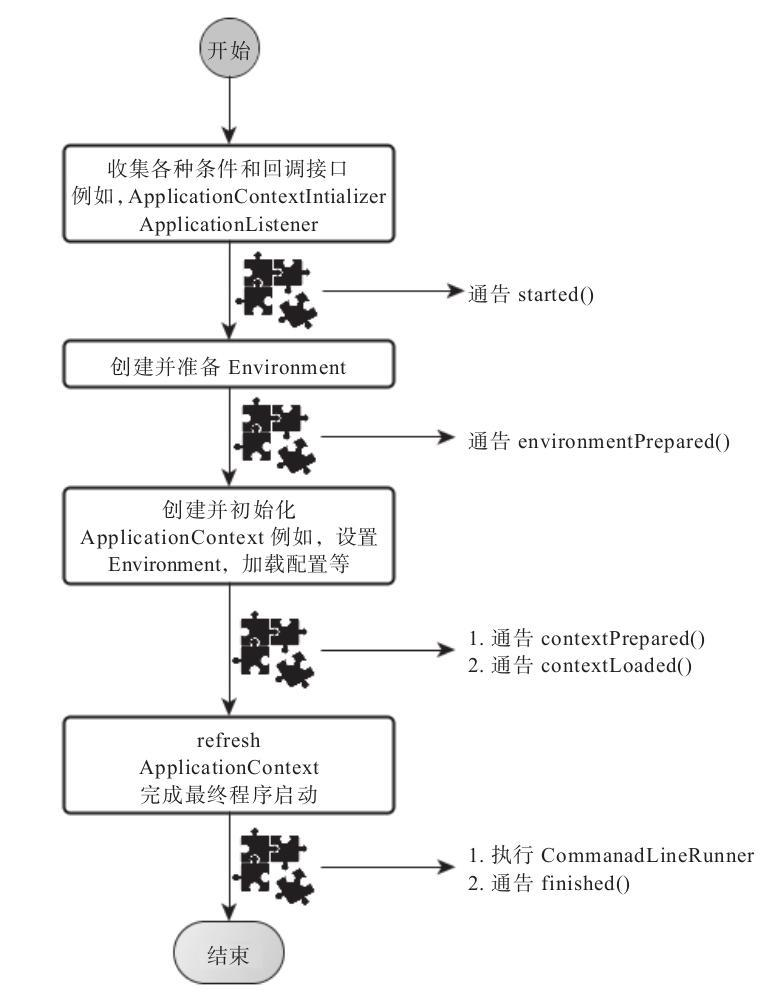
Spring Boot的执行流程主要分为两大部分:创建一个SpringApplication对象实例 ,调用这个创建好的SpringApplication的实例方法。
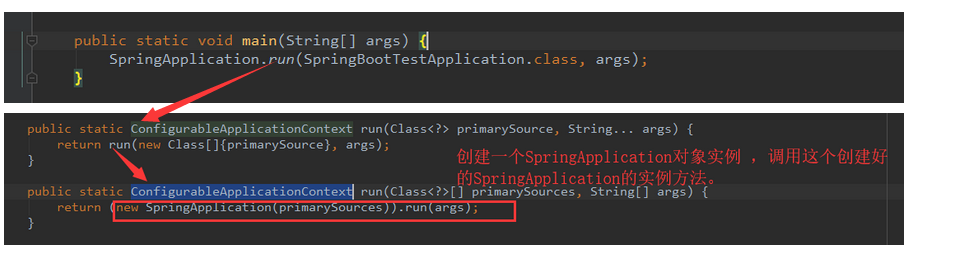
1、创建一个SpringApplication对象实例
public SpringApplication(Class... primarySources) {
  //创建一个SpringApplication对象实例

    this((ResourceLoader)null, primarySources);

}

public SpringApplication(ResourceLoader resourceLoader, Class... primarySources) {

    this.sources = new LinkedHashSet();

    this.bannerMode = Mode.CONSOLE;

    this.logStartupInfo = true;

    this.addCommandLineProperties = true;

    this.headless = true;

    this.registerShutdownHook = true;

    this.additionalProfiles = new HashSet();

    this.isCustomEnvironment = false;

    this.resourceLoader = resourceLoader;

    Assert.notNull(primarySources, "PrimarySources must not be null");

    this.primarySources = new LinkedHashSet(Arrays.asList(primarySources));

    //推断应用类型。

    this.webApplicationType = this.deduceWebApplicationType();

    //使用SpringFactoriesLoader在应用的classpath中查找并加载所有可用的ApplicationContextInitializer。

    this.setInitializers(this.getSpringFactoriesInstances(ApplicationContextInitializer.class));

    //使用SpringFactoriesLoader在应用的classpath中查找并加载所有可用的ApplicationListener。

    this.setListeners(this.getSpringFactoriesInstances(ApplicationListener.class));

    //通过抛出异常来获取到异常栈从而得到入口类的名称设置main方法的定义类。

    this.mainApplicationClass = this.deduceMainApplicationClass();

}
2、调用这个创建好的SpringApplication的实例方法
public ConfigurableApplicationContext run(String... args) {

   //计时开始

    StopWatch stopWatch = new StopWatch();

    stopWatch.start();

    ConfigurableApplicationContext context = null;

    Collection<SpringBootExceptionReporter> exceptionReporters = new ArrayList();

    this.configureHeadlessProperty();

    //获取所有通过SpringFactoriesLoader可以查找到并加载的SpringApplicationRunListener

    SpringApplicationRunListeners listeners = this.getRunListeners(args);

    listeners.starting();

    Collection exceptionReporters;

    try {

        ApplicationArguments applicationArguments = new DefaultApplicationArguments(args);

        //创建并配置当前Spring Boot应用将要使用的Environment(包括配置要使用的PropertySource以及Profile)。

        //遍历调用所有SpringApplicationRunListener的environmentPrepared()的方法,告诉他们:“当前SpringBoot应用使用的Environment准备好了咯!”。

        ConfigurableEnvironment environment = this.prepareEnvironment(listeners, applicationArguments);

        this.configureIgnoreBeanInfo(environment);

        //是否打印banner

        Banner printedBanner = this.printBanner(environment);

        // 创建上下文对象,根据用户是否明确设置了applicationContextClass类型以及初始化阶段的推断结果,决定该为当前SpringBoot应用创建什么类型的

        context = this.createApplicationContext();

     //异常报警

        exceptionReporters = this.getSpringFactoriesInstances(SpringBootExceptionReporter.class, new Class[]{ConfigurableApplicationContext.class}, context);

     //spring上下文对象的前置处理

        this.prepareContext(context, environment, listeners, applicationArguments, printedBanner);

     //spring上下文对象的刷新

        this.refreshContext(context);

     //spring上下文对象的后置处理

        this.afterRefresh(context, applicationArguments);

     //计算器关闭

        stopWatch.stop();

        if (this.logStartupInfo) {

            (new StartupInfoLogger(this.mainApplicationClass)).logStarted(this.getApplicationLog(), stopWatch);

        }

        //遍历执行listeners,调用它们的started()方法,告诉这些SpringApplicationRunListener,“嘿,SpringBoot应用要开始执行咯!”。

        listeners.started(context);

        this.callRunners(context, applicationArguments);

    } catch (Throwable var10) {

        this.handleRunFailure(context, var10, exceptionReporters, listeners);

        throw new IllegalStateException(var10);

    }

    try {

        listeners.running(context);

        return context;

    } catch (Throwable var9) {

        this.handleRunFailure(context, var9, exceptionReporters, (SpringApplicationRunListeners)null);

        throw new IllegalStateException(var9);

    }
Spring Boot中的starter pom
1、Spring Boot为我们提供了简化企业级开发的绝大多数场景的stater pom,只要使用了应用场景所需要的starter pom就会得到Spring Boot为我们提供的自动配置的bean。
2、自定义starter pom 测试案例:
- 新建maven工程
发尺寸


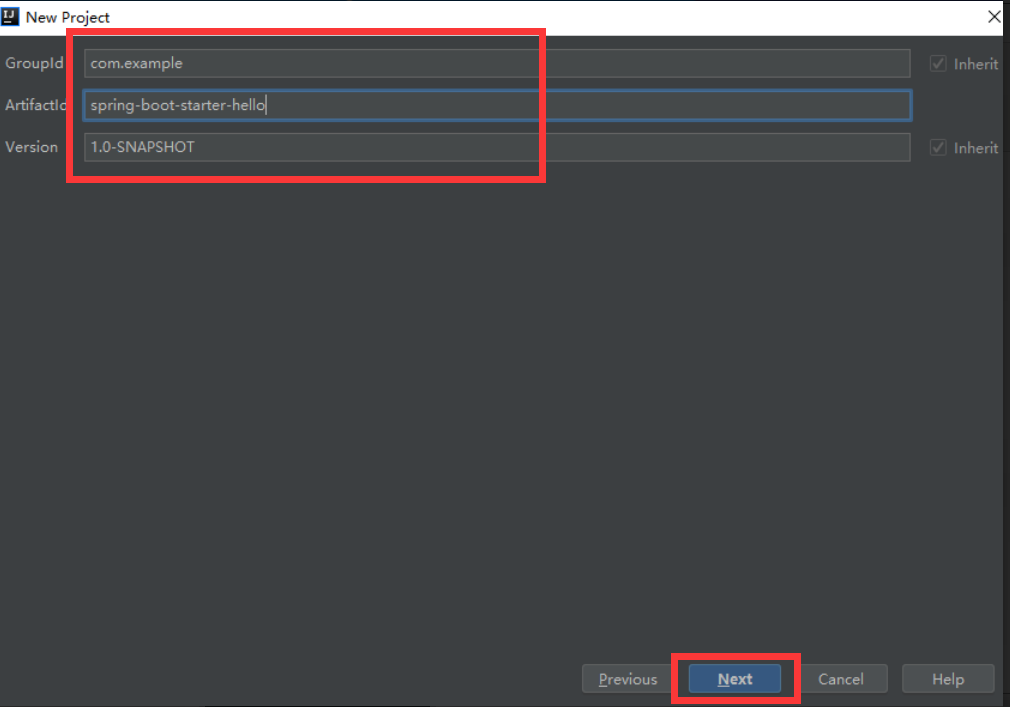
填写完工程名点击finish,工程创建完成
- 修改pom文件如下:
<?xml version="1.0" encoding="UTF-8"?>
<project xmlns="http://maven.apache.org/POM/4.0.0"
xmlns:xsi="http://www.w3.org/2001/XMLSchema-instance"
xsi:schemaLocation="http://maven.apache.org/POM/4.0.0 http://maven.apache.org/xsd/maven-4.0.0.xsd">
<modelVersion>4.0.0</modelVersion> <groupId>com.example</groupId>
<artifactId>spring-boot-starter-hello</artifactId>
<version>1.0-SNAPSHOT</version>
<packaging>jar</packaging>
<properties>
<project.build.sourceEncoding>UTF-8</project.build.sourceEncoding>
<project.reporting.outputEncoding>UTF-8</project.reporting.outputEncoding>
<java.version>1.8</java.version>
</properties>
<dependencies>
<dependency>
<groupId>org.springframework.boot</groupId>
<artifactId>spring-boot-autoconfigure</artifactId>
<version>1.4.3.RELEASE</version>
</dependency>
<dependency>
<groupId>org.springframework.boot</groupId>
<artifactId>spring-boot-configuration-processor</artifactId>
<version>1.4.3.RELEASE</version>
<optional>true</optional>
</dependency>
</dependencies>
<build>
<plugins>
<plugin>
<groupId>org.springframework.boot</groupId>
<artifactId>spring-boot-maven-plugin</artifactId>
</plugin>
</plugins>
</build> </project> - 属性配置:
package com.example.spring_boot_starter_hello;

import org.springframework.boot.context.properties.ConfigurationProperties;

import org.springframework.context.annotation.PropertySource;

//类型安全的属性配置

@PropertySource({"classpath:/my.properties"})//注意路径的书写格式

@ConfigurationProperties(prefix = "hello")

public class HelloServiceProperties {

    private static final String MSG="world";

    private String msg=MSG;

    public String getMsg() {

        return msg;

    }

    public void setMsg(String msg) {

        this.msg = msg;

    }

}
是类型安全的属性配置与properties文件中的属性相对应。
- service类
package com.example.spring_boot_starter_hello;

public class HelloService {

    private String msg;

    public String sayHello(){

        return "hello "+msg;

    }

    public String getMsg() {

        return msg;

    }

    public void setMsg(String msg) {

        this.msg = msg;

    }

} - 自动配置类
package com.example.spring_boot_starter_hello;

import org.springframework.beans.factory.annotation.Autowired;

import org.springframework.boot.autoconfigure.condition.ConditionalOnClass;

import org.springframework.boot.autoconfigure.condition.ConditionalOnMissingBean;

import org.springframework.boot.autoconfigure.condition.ConditionalOnProperty;

import org.springframework.boot.context.properties.EnableConfigurationProperties;

import org.springframework.context.annotation.Bean;

import org.springframework.context.annotation.Configuration;

//@Configuration标注在类上,相当于把该类作为spring的xml配置文件中的<beans>,作用为:配置spring容器(应用上下文)

@Configuration

//开启属性输入

@EnableConfigurationProperties(HelloServiceProperties.class)

//判断HelloService这个类在类路径中是否存在,且在没有这个bean的情况下会自动配置这个bean

@ConditionalOnClass(HelloService.class)

//当设置hello=enable的情况下,如果没有设置默认为true,即条件符合

@ConditionalOnProperty(prefix = "hello",value = "enabled",matchIfMissing = true)

public class HelloServiceAutoConfiguration {

    @Autowired

    private HelloServiceProperties helloServiceProperties;

    //使用Java配置的方式配置bean

    @Bean

    //当容器没有这个bean的时候会新建bean

    @ConditionalOnMissingBean(HelloService.class)

    public  HelloService helloService(){

        HelloService helloService = new HelloService();

        helloService.setMsg(helloServiceProperties.getMsg());

        return helloService;

    }

} - 注册配置,在src/main/resources下新建META-INF/spring.factories,内容如下:
#注册自动配置类

org.springframework.boot.autoconfigure.EnableAutoConfiguration=\

com.example.spring_boot_starter_hello.HelloServiceAutoConfiguration - 使用starter 在之前的Spring Boot 中将自定义的starter作为依赖,在pom文件中新增spring-boot-stater-hello的依赖。修改pom文件如下:
<?xml version="1.0" encoding="UTF-8"?>

<project xmlns="http://maven.apache.org/POM/4.0.0" xmlns:xsi="http://www.w3.org/2001/XMLSchema-instance"

    xsi:schemaLocation="http://maven.apache.org/POM/4.0.0 http://maven.apache.org/xsd/maven-4.0.0.xsd">

    <modelVersion>4.0.0</modelVersion>

    <groupId>com.example</groupId>

    <artifactId>spring-boot-test</artifactId>

    <version>0.0.1-SNAPSHOT</version>

    <packaging>jar</packaging>

    <name>spring_boot_test</name>

    <description>Demo project for Spring Boot</description>

    <!--spring boot的父级依赖-->

    <parent>

        <groupId>org.springframework.boot</groupId>

        <artifactId>spring-boot-starter-parent</artifactId>

        <version>2.0.5.RELEASE</version>

        <relativePath/> <!-- lookup parent from repository -->

    </parent>

    <properties>

        <project.build.sourceEncoding>UTF-8</project.build.sourceEncoding>

        <project.reporting.outputEncoding>UTF-8</project.reporting.outputEncoding>

        <java.version>1.8</java.version>

    </properties>

    <dependencies>

        <!--添加web依赖的起步依赖-->

        <dependency>

            <groupId>org.springframework.boot</groupId>

            <artifactId>spring-boot-starter-web</artifactId>

        </dependency>

        <dependency>

            <groupId>org.springframework.boot</groupId>

            <artifactId>spring-boot-starter-test</artifactId>

            <scope>test</scope>

        </dependency>

        <!--需要添加依赖ConfigurationProperties才会起作用-->

        <dependency>

            <groupId>org.springframework.boot</groupId>

            <artifactId>spring-boot-configuration-processor</artifactId>

            <optional>true</optional>

        </dependency>

        <!--添加spring-boot-stater-hello的依赖-->

        <dependency>

            <groupId>com.example</groupId>

            <artifactId>spring-boot-starter-hello</artifactId>

            <version>1.0-SNAPSHOT</version>

        </dependency>

    </dependencies>

    <!--添加springboot的编译插件-->

    <build>

        <plugins>

            <plugin>

                <groupId>org.springframework.boot</groupId>

                <artifactId>spring-boot-maven-plugin</artifactId>

            </plugin>

        </plugins>

    </build>

</project>
通过mvn install安装到本地,或者发布到远程maven私服上。
- 在properties文件中增加属性:hello.msg=hello
- 在Spring Boot中注入HelloService并使用
package com.example.spring_boot_test;

import com.example.spring_boot_starter_hello.HelloService;

import org.springframework.boot.SpringApplication;

import org.springframework.boot.autoconfigure.SpringBootApplication;

import org.springframework.web.bind.annotation.RequestMapping;

import org.springframework.web.bind.annotation.RestController;

import javax.annotation.Resource;

@RestController

@SpringBootApplication//开启自动配置

public class SpringBootTestApplication {

    @Resource

    private HelloService helloService;

    public static void main(String[] args) {

        //关闭banner

        /*SpringApplication springApplication = new SpringApplication(SpringBootTestApplication.class);

        springApplication.setBannerMode(Banner.Mode.OFF);

        springApplication.run(args);*/

        SpringApplication.run(SpringBootTestApplication.class, args);

    }

    @RequestMapping("hello")

    String hello() {

        return helloService.sayHello();

    }

}
转载请于明显处标明出处
https://www.cnblogs.com/AmyZheng/p/9791552.html
SprintBoot学习(二)的更多相关文章
- emberjs学习二(ember-data和localstorage_adapter)
emberjs学习二(ember-data和localstorage_adapter) 准备工作 首先我们加入ember-data和ember-localstorage-adapter两个依赖项,使用 ...
- ReactJS入门学习二
ReactJS入门学习二 阅读目录 React的背景和基本原理 理解React.render() 什么是JSX? 为什么要使用JSX? JSX的语法 如何在JSX中如何使用事件 如何在JSX中如何使用 ...
- TweenMax动画库学习(二)
目录 TweenMax动画库学习(一) TweenMax动画库学习(二) TweenMax动画库学习(三) Tw ...
- Hbase深入学习(二) 安装hbase
Hbase深入学习(二) 安装hbase This guidedescribes setup of a standalone hbase instance that uses the local fi ...
- Struts2框架学习(二) Action
Struts2框架学习(二) Action Struts2框架中的Action类是一个单独的javabean对象.不像Struts1中还要去继承HttpServlet,耦合度减小了. 1,流程 拦截器 ...
- Python学习二:词典基础详解
作者:NiceCui 本文谢绝转载,如需转载需征得作者本人同意,谢谢. 本文链接:http://www.cnblogs.com/NiceCui/p/7862377.html 邮箱:moyi@moyib ...
- Quartz学习--二 Hello Quartz! 和源码分析
Quartz学习--二 Hello Quartz! 和源码分析 三. Hello Quartz! 我会跟着 第一章 6.2 的图来 进行同步代码编写 简单入门示例: 创建一个新的java普通工程 ...
- SpringCloud学习(二):微服务入门实战项目搭建
一.开始使用Spring Cloud实战微服务 1.SpringCloud是什么? 云计算的解决方案?不是 SpringCloud是一个在SpringBoot的基础上构建的一个快速构建分布式系统的工具 ...
- DjangoRestFramework学习二之序列化组件、视图组件 serializer modelserializer
DjangoRestFramework学习二之序列化组件.视图组件 本节目录 一 序列化组件 二 视图组件 三 xxx 四 xxx 五 xxx 六 xxx 七 xxx 八 xxx 一 序列化组 ...
- SpringMVC入门学习(二)
SpringMVC入门学习(二) ssm框架 springMVC 在上一篇博客中,我简单介绍了一下SpringMVC的环境配置,和简单的使用,今天我们将进一步的学习下Springmvc的操作. mo ...
随机推荐
- 爬虫入门 beautifulsoup库(一)
先贴一个beautifulsoup的官方文档,https://www.crummy.com/software/BeautifulSoup/bs4/doc/index.zh.html#id12 requ ...
- 微信小程序 scroll-view 左右横向滑动没有效果(无法滑动)问题
小程序组件 scroll-view 中分别有上下竖向滑动和左右横向滑动之分,在这次项目中刚好需要用到横向滑动,但在测试过程中发现横向滑动没有了效果(静止在那里没移动过),经调试发现: 1.scroll ...
- 微信小程序 购物车流程
购物车流程 一.需求分析 a:全选,单选,根据选中的计算数目和总价 b:单个商品加减 c:删除一个商品 wxml 布局 <view> <view v-if="flag&qu ...
- OSS链接出现 connection pool shutdown错误修改
在类中创建了OSSClient对象 ,方法共用此实例对象,在前端很短的时间内连续提交,造成异常错误. 解决方法时将OSSClient对象在方法中创建
- 【转载】Mapreduce实现自定义的InputFormat
转自:http://www.cnblogs.com/dlutxm/archive/2011/09/30/2196653.html 在mapreduce程序运行的开始阶段,hadoop需要将待处理的输入 ...
- zookeeper linux分布式部署
安装包下载地址:http://mirror.bit.edu.cn/apache/zookeeper,记住要下载那个bin的不要下tar.gz包不然即使你安装了也会报错误: 找不到或无法加载主类org. ...
- Codeforces C. Almost Equal (数学规律)
题目链接:http://codeforces.com/contest/1206/problem/C 题解 : 观察可以发现当n为偶数时,1 - 2n是不满足题意的,可以举例n = 2,n = 4试一试 ...
- 剑指offer 面试题35.复杂链表的复制
时间O(N),空间O(N) /* struct RandomListNode { int label; struct RandomListNode *next, *random; RandomList ...
- docker删除镜像时报错解决办法
报错信息 [root@kvm ~]# docker rmi 4950a54ede5a Error response from daemon: conflict: unable to delete 49 ...
- php商城数据库的设计 之无限分类
商品分类,使用无限分类 即: -------如何创建数据表 pid---父级分类id,如果是顶级分类则为0 path---1,用户分类的排序 . 排序示例: 实现逻辑:获取type表的所有分类,ord ...