centos7下Redis-Sentinel安装和配置
一、Redis的安装
1、从官网https://redis.io/download下载最新的stable版本(也可以下载unstable版本)redis-4.0.9.tar.gz。
2、上传到CentOS 7服务器的 /data/目录
3、解压缩文件到 /data/redis-4.0.9目录下
> cd /data

> tar -zxvf redis-4.0..tar.gz -C /data/redis-4.0.
4、在centOs上安装编译必要的软件(根据自己机器情况,如果已有请忽略)
# yum install gcc gcc-c++

# yum -y install automake autoconf libtool
5、开始编译Redis
# make
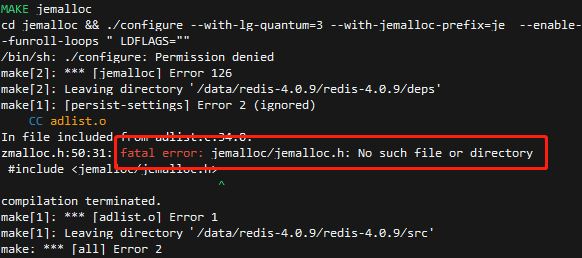
编译过程中可能会出现这个错误,因为默认分配器是jemalloc,我机器没有,具体可以自行度娘 。。。。。
解决办法之一就是修改默认分配器(我使用的办法)
# make MALLOC=libc //改为libc
没什么意外稍等一下就编译通过了
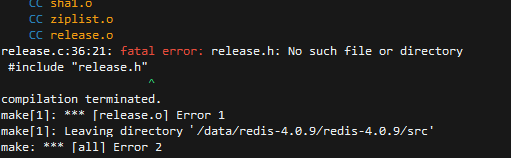
等等,我还遇到了一个问题,截图如下
因为一个文件没有执行权限,解决办法很简单
chmod mkreleasehdr.sh
再次执行make命令 “# make MALLOC=libc” , 应该就没啥问题了
不过编译最后出现了一句话
Hint: It's a good idea to run 'make test' ;)
什么意思呢? 执行下make test 是个好主意
我真的执行了,结果如下
[root@vm82220 redis-4.0.9]# make test

cd src && make test

make[1]: Entering directory `/data/redis-4.0.9/redis-4.0.9/src'

/bin/sh: ./runtest: Permission denied

make[1]: *** [test] Error 126

make[1]: Leaving directory `/data/redis-4.0.9/redis-4.0.9/src'

make: *** [test] Error 2
继续添加权限 “chmod 777 runtest” ,再次执行 make test, 又出问题了
[root@vm82220 redis-4.0.9]# make test

cd src && make test

make[1]: Entering directory `/data/redis-4.0.9/redis-4.0.9/src'

You need tcl 8.5 or newer in order to run the Redis test

make[1]: *** [test] Error 1

make[1]: Leaving directory `/data/redis-4.0.9/redis-4.0.9/src'

make: *** [test] Error 2
看到红字了吧,需要8.5以上的版本
安装tcl
# yum install tcl
再make test 就没什么问题了
6、安装Redis到指定地方
本人喜欢把常用服务放到喜欢地方,这次就放到/data/redis目录下吧
# mkdir /data/redis
执行安装命令
# make PREFIX=/data/redis/ install
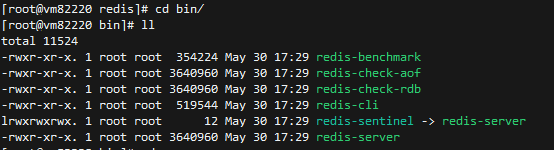
其实/data/redis 下只有一个bin目录,里面有几个命令文件
为了后续方面使用命令,可以把bin文件夹放到环境变量中,也可以把这几个命令连接到/usr/local/bin中,我采用后者
//软连接一定要是有全路径哦,否则可能出现错误

# ln -s /data/redis/bin/redis-server /usr/local/bin/redis-server

# ln -s /data/redis/bin/redis-server /usr/local/bin/redis-sentinel

# ln -s /data/redis/bin/redis-benchmark^Cusr/local/bin/redis-sentinel

# ln -s /data/redis/bin/redis-benchmark /usr/local/bin/redis-benchmark

# ln -s /data/redis/bin/redis-check-aof /usr/local/bin/redis-check-aof

# ln -s /data/redis/bin/redis-check-rdb /usr/local/bin/redis-check-rdb
至此,安装就完成了
二、Redis配置
1、打开端口:6379 , Redis默认端口就是6379,可以在配置文件中修改
firewall-cmd --permanent --zone=public --add-port=/tcp

firewall-cmd --reload
2、修改配置文件
把配置文件/data/redis-4.0.9/redis.conf复制到/data/redis/conf文件夹中,修改配置
protected-mode no   //打开其他机器连接

port     //端口

daemonize yes  //启用守护进程

pidfile /data/redis/run/redis_6379.pid  //运行时

logfile /data/redis/log/redis_6379.log  //日志

dir /data/redis/dir  //数据文件夹

dbfilename dump_6379.rdb  //数据文件
还有很多配置信息,建议仔细阅读一遍,满满干活啊 。。。。
3、启动Redis
redis-server /data/redis/config/redis.conf
4、登陆测试一下
# redis-cli
单机的Redis安装配置完成
三、Redis-Sentinel的配置
下面说一下单机中哨兵HA的配置
哨兵模式中至少需要三个redis节点启用,一个主节点,两个从节点,我们分别使用6379(主)、6380(从)、6381(从)端口启动三个redis服务。
1、部署redis主从模式
创建文件夹/data/redis/conf,把redis.conf 分别复制三份 redis_6379.conf、redis_6380.conf、redis_6381.conf,vi打开redis_6380.conf修改
#端口

port 6380

#运行时

pidfile /data/redis/run/redis_6380.pid

#日至

logfile /data/redis/log/redis_6380.log

#数据

dbfilename dump_6380.rdb

#指定master

slaveof 10.60.82.220 6379
redis_6381.conf把端口改为6381,其他也做类似修改
2、启动redis服务
先启动主服务
# redis-server redis_6379.conf //主服务
再分别启动两个从服务
# redis-server redis_slave_6380.conf //从服务

# redis-server redis_slave_6381.conf  //从服务
查看进程状态

登陆主节点
# redis-cli -h 10.60.82.220 -p
3、配置sentinel
也分别复制三个文件sentinel_26379.conf、sentinel_26380.conf、sentinel_26381.conf, 相关信息修改如下:
port

daemonize yes

protected-mode no

dir "/data/redis/log/"

logfile "sentinel_26379.log"

sentinel monitor mymaster 10.60.82.220

sentinel down-after-milliseconds mymaster

sentinel failover-timeout mymaster

sentinel parallel-syncs mymaster

#sentinel auth-pass mymaster YKHykh123456

sentinel known-slave mymaster 10.60.82.220

sentinel known-slave mymaster 10.60.82.220

#sentinel current-epoch
其他两个文件也做相应修改
4、启动sentinel服务
# redis-sentinel sentinel_26379.conf

# redis-sentinel sentinel_26380.conf

# redis-sentinel sentinel_26381.conf
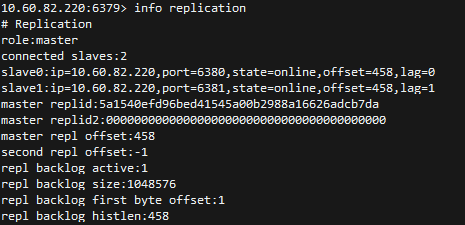
5、检查sentinel
# redis-cli -h 10.60.82.220 -p //登陆服务
> sentinel masters  //查看主服务信息

> sentinel slaves mymaster //查看所有从服务信息
配置相关就算完成了
centos7下Redis-Sentinel安装和配置的更多相关文章
- mac与centos下redis的安装与配置
前言 最近在用redis,下面简单写一下mac和centos下redis的安装与配置方法. 安装 mac下面 安装命令:brew intall redis 运行命令:brew services sta ...
- Centos7 下的SVN安装与配置
Centos7 下的SVN安装与配置 1.关闭防火墙 临时关闭防火墙 systemctl stop firewalld 永久防火墙开机自关闭 systemctl disable firewalld 临 ...
- centos6.8下redis的安装和配置
centos6.8下redis的安装和配置 下载.安装 在redis官网可以获取到最新版本的redis 进入/usr/local/目录,执行如下命令 wget http://download.redi ...
- linux下redis的安装及配置启动
linux下redis的安装及配置启动 标签: redisnosql 2014-10-24 14:04 19732人阅读 评论(0) 收藏 举报 分类: 数据与性能(41) wget http:/ ...
- CentOS7下NFS服务安装及配置固定端口
CentOS7下NFS服务安装及配置 系统环境:CentOS Linux release 7.4.1708 (Core) 3.10.0-693.el7.x86_64 软件版本:nfs-utils-1. ...
- 莫小安 Linux下Redis的安装与配置
转载自--Linux下Redis的安装与配置 redis是当前比较热门的NOSQL系统之一,它是一个key-value存储系统.和Memcached类似,但很大程度补偿了 memcached的不足,它 ...
- [Linux]Linux下redis的安装及配置.
在上一篇[Linux] linux下安装配置 zookeeper/redis/solr/tomcat/IK分词器 详细实例. 我们已经将redis所需tar包拷贝到了linux下的root 根目录下, ...
- Linux下Redis的安装与配置
redis是当前比较热门的NOSQL系统之一,它是一个key-value存储系统.和Memcached类似,但很大程度补偿了 memcached的不足,它支持存储的value类型相对更多,包括stri ...
- Linux下Redis的安装、配置操作说明
Redis 是一个高性能的key-value数据库. redis的出现,很大程度补偿了memcached这类keyvalue存储的不足,在部分场合可以对关系数据库起到很好的补充作用.它提供了Pytho ...
- centos7下git的安装和配置
git的安装: yum 源仓库里的 Git 版本更新不及时,最新版本的 Git 是 1.8.3.1,但是官方最新版本已经到了 2.9.2.想要安装最新版本的的 Git,只能下载源码进行安装. 1. 查 ...
随机推荐
- @SuppressWarings注解的作用和用法
一.前言 编码时我们总会发现如下变量未被使用的警告提示: 上述代码编译通过且可以运行,但每行前面的“感叹号”就严重阻碍了我们判断该行是否设置的断点了.这时我们可以在方法前添加 @SuppressWar ...
- Python非递归遍历多叉树
class Queue: def __init__(self,max_size): self.max_size = int(max_size) self.queue = [] def put(self ...
- POJ 2117 Electricity(割点求连通分量)
http://poj.org/problem?id=2117 题意:求删除图中任意一个顶点后的最大连通分量数. 思路: 求出每个割点对应的连通分量数,注意这道题目中图可能是不连通的. 这道题目我wa了 ...
- c++ 匹配A容器中最先出现的b容器中的元素,返回iterator,(find_first_of)
#include <iostream> // std::cout #include <algorithm> // std::find_first_of #include < ...
- SetParent
1.http://bbs.csdn.net/topics/390672855 该帖子中 第15楼: “ MSDN里面说了:if hWndNewParent is not NULL and the wi ...
- MyBatis中的@Mapper注解 @Mappe与@MapperScan关系
从mybatis3.4.0开始加入了@Mapper注解,目的就是为了不再写mapper映射文件 现在项目中的配置 public interface DemoMapper{ int deleteByPr ...
- 雷林鹏分享:C# 集合(Collection)
C# 集合(Collection) 集合(Collection)类是专门用于数据存储和检索的类.这些类提供了对栈(stack).队列(queue).列表(list)和哈希表(hash table)的支 ...
- LeetCode--110--平衡二叉树
问题描述: 给定一个二叉树,判断它是否是高度平衡的二叉树. 本题中,一棵高度平衡二叉树定义为: 一个二叉树每个节点 的左右两个子树的高度差的绝对值不超过1. 示例 1: 给定二叉树 [3,9,20,n ...
- 20170707xlVBA多区域拆分多表保持行高列宽
Public Sub 多个区域拆分到多表() AppSettings On Error GoTo ErrHandler Dim StartTime, UsedTime As Variant Start ...
- Vue.js 渲染函数, JSX(未掌握,未学完)
渲染函数 , JSX(没完成学习) 基础: 实例属性:vm.$slots default 属性包括了所有没有被包含在具名插槽中的节点. 渲染函数: render: function(createEle ...