新手介绍简单一下iOS开发中几种界面传值
首先在处理iOS-UI中,也许在很多地方需要用到两种甚至多种不同界面之间的传值,相比这也是很多iOS入门成员头疼问题,同样作为新手的我在接触这类传值时候也一脸懵然,经过一段时间的研究,对于简单的传值有一定的了解,下面依次对属性传值,代理传值做一定的说明,希望对于部分有需要的朋友有帮助。
一、属性传值: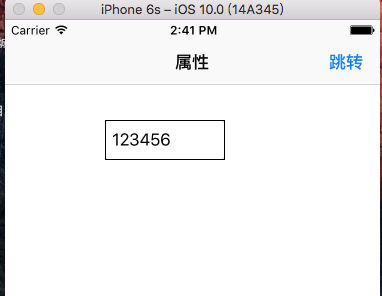

通过图片可以看出,属性传值的是当前界面往后面的界面传值。首先根据个人的需要创建两个不同的界面,在前面的
UITextField中输入需要的值然后点击跳转就可以进入下一届面,然后对应的值会显示在下界面的提示框中:这里用两个例子(firstViewController,secondViewController),在secondViewController的.h文件中声明属性:
@property(nonatomic,strong)NSString *textString;(属性传值第一步)
然后在.m文件中声明属性
@property(nonatomic,strong)UILabel *label;
接着:
- (void)viewDidLoad {
[super viewDidLoad];
self.view.backgroundColor = [UIColor whiteColor];
//配置导航栏标题
self.navigationItem.title = @"属性";
[self uibuttongs];
//创建lable
[self customLable];
//属性传值第三步
//将属性中存储的值取出来赋值给_lable.text
_label.text= _textString;
}
- (void)dealloc{
self.textString = nil;
}
- (void)customLable{
//创建lable对象
_label = [[UILabel alloc]initWithFrame:CGRectMake(100, 100, 120, 40)];
_label.layer.cornerRadius = 7;
_label.backgroundColor = [UIColor cyanColor];
_label.textColor = [UIColor blackColor];
[self.view addSubview:_label];
}
- (void)uibuttongs{
UIButton *button = [[UIButton alloc]initWithFrame:CGRectMake(100, 160, 60, 30)];
button.backgroundColor =[UIColor lightGrayColor];
[button setTitle:@"上一页" forState:UIControlStateNormal];
[button addTarget:self action:@selector(acction_butong:) forControlEvents:UIControlEventTouchUpInside];
[self.view addSubview:button];
}
- (void)acction_butong:(UIButton *)sender//这里是返回上界面
{
[self.navigationController popViewControllerAnimated:YES];
}
然后只需要在 firstViewController中的.m文件完成如下声明属性:
@property(nonatomic,strong)UITextField *textField;
然后:
- (void)viewDidLoad {
[super viewDidLoad];
self.view.backgroundColor = [UIColor whiteColor];
//配置导航栏标题
self.tabBarItem.title = @"属性传值";
//创建导航栏右功能键
[self customRightItem];
//创建textField
[self customTextFied];
}
#pragma mark - 创建导航栏右侧按钮
- (void)customTextFied{
//创建控件
_textField = [[UITextField alloc]initWithFrame:CGRectMake(100, 100, 120, 40)];
_textField.borderStyle = UITextBorderStyleRoundedRect;
_textField.layer.borderWidth = 1;
[self.view addSubview:_textField];
}
#pragma mark - 创建导航栏右侧按钮
- (void)customRightItem{
UIBarButtonItem *rightItem =[[UIBarButtonItem alloc]initWithTitle:@"跳转" style:UIBarButtonItemStyleDone target:self action:@selector(handleRight:)];
self.navigationItem.rightBarButtonItem = rightItem;
}
#pragma mark - 导航栏右侧按钮关联方法
- (void)handleRight:(UIBarButtonItem *)sender{
//创建跳转页面视图
scendViewController *scender = [[scendViewController alloc]init];
//属性传值第二步
//在push之前将——textField的值取出来赋值给second.textString
scender.textString = _textField.text;
[self.navigationController pushViewController:scender animated:YES];
}
二、代理传值:
a.后一个页面(找代理) 制定协议
b.写delegate属性
c.在合适的时候, 让代理执行协议方法
d.前一个页面(成为代理) 建立关系
e.遵守协议
f.实现协议方法
g.通知代理执行协议方法
*/
1、 2、
2、 3、
3、
这里依旧用(firstViewController,secondViewController)两个界面来做例子,具体的界面根据个人的需求来定义声明。
从图片不难看出代理传值时一种传值方式从后界面往前界面往前传值的过程,首先在secondViewController的.h文件中制定协议;
@protocol senderViewControllerDelegate <NSObject>
//代理传值第一步:制定协议
//根据要传的数据类型设计方法的参数
- (void)passValue:(NSString *)string;
@end
然后定义属性:
@property(nonatomic,assign)id<senderViewControllerDelegate>delegate;
//代理传值第二步,定义代理协议属性
然后在其.m文件中封装的属性:
@property(nonatomic,strong)UITextField *textField;
接着:
- (void)viewDidLoad {
[super viewDidLoad];
self.view.backgroundColor = [UIColor whiteColor];
self.navigationItem.rightBarButtonItem = [[UIBarButtonItem alloc]initWithTitle:@"返回" style:UIBarButtonItemStylePlain target:self action:@selector(hengde:)];
_textField = [[UITextField alloc]initWithFrame:CGRectMake(50, 100, 220, 40)];
_textField.layer.borderWidth = 1;
[self.view addSubview:_textField];
}
- (void)hengde:(UIBarButtonItem *)sender{
//代理传值第六步:在pop之前代理对象执行协议中的方法
if ([_delegate respondsToSelector:@selector(passValue:)]) {
[_delegate passValue:_textField.text];
}
[self.navigationController popViewControllerAnimated:YES];
}
完成在 secondViewController的操作后,在firstViewController中.m文件的操作:
//代理传值第四步:代理对象所在的类遵循协议
@interface firstViewController ()<senderViewControllerDelegate>
@property(nonatomic,strong)UILabel *lable;//封装属性
@end
- (void)viewDidLoad {
[super viewDidLoad];
self.view.backgroundColor = [UIColor whiteColor];
self.title = @"代理";
_lable = [[UILabel alloc]initWithFrame:CGRectMake(100, 100, 120, 40)];
_lable.layer.borderWidth = 1;
[self.view addSubview:_lable];
UIButton *button = [[UIButton alloc]initWithFrame:CGRectMake(130, 180, 100, 50)];
[button setTitle:@"下一页" forState:UIControlStateNormal];
[button addTarget:self action:@selector(hended:) forControlEvents:UIControlEventTouchUpInside];
[button setTitleColor:[UIColor blackColor] forState:UIControlStateNormal];
[self.view addSubview:button];
}
- (void)hended:(UIBarButtonItem *)sender{
senderViewController *sendedfr = [[senderViewController alloc]init];
//代理传值第三步:指定代理对象
sendedfr.delegate = self;
[self.navigationController pushViewController:sendedfr animated:YES];
}
//代理传值第五步:实现协议方法
- (void)passValue:(NSString *)string{
_lable.text = string;
}
然后代理的简单传值方式大概即使这样!
附:别忘了在firstViewController或者secondVIewController中导入对应的文件.h文件!
新手介绍简单一下iOS开发中几种界面传值的更多相关文章
- iOS开发UI篇—iOS开发中三种简单的动画设置
iOS开发UI篇—iOS开发中三种简单的动画设置 [在ios开发中,动画是廉价的] 一.首尾式动画 代码示例: // beginAnimations表示此后的代码要“参与到”动画中 [UIView b ...
- iOS开发 — (UINaVigationController)导航控制器,界面传值
UINavigationController 继承于 UIViewController , 以栈的方式管理所 控制的视图控制器 . 至少要有一个被管理的视图控制器 ,这个控制器我们称作导航控制器的根视 ...
- iOS开发中几种常见的存储方式
1.archive 归档 数据的保存 1: let result = NSKeyedArchiver.archiveRootObject(contacts, toFile: path as Strin ...
- iOS开发中的Html解析方法
iOS开发中的Html解析方法 本文作者为大家介绍了在iOS开发中的Html解析方法,并同时提供了Demo代码的下载链接,Demo 解析了某个网站(具体可在代码中查看)的html网页,提取了图片以及标 ...
- IOS开发中如何判断程序第一次启动(根据判断结果决定是否显示新手操作引导)
IOS开发中如何判断程序第一次启动 在软件下载安装完成后,第一次启动往往需要显示一个新手操作引导,来告诉用户怎么操作这个app,这就需要在程序一开始运行就判断程序是否第一次启动,如果是,则显示新手操作 ...
- ios开发中超简单抽屉效果(MMDrawerController)的实现
ios开发中,展示类应用通常要用到抽屉效果,由于项目需要,本人找到一个demo,缩减掉一些不常用的功能,整理出一个较短的实例. 首先需要给工程添加第三方类库 MMDrawerController: 这 ...
- 总结iOS开发中的断点续传那些事儿
前言 断点续传概述 断点续传就是从文件赏赐中断的地方重新开始下载或者上传数据,而不是从头文件开始.当下载大文件的时候,如果没有实现断点续传功能,那么每次出现异常或者用户主动的暂停,都会从头下载,这样很 ...
- iOS开发中的4种数据持久化方式【二、数据库 SQLite3、Core Data 的运用】
在上文,我们介绍了ios开发中的其中2种数据持久化方式:属性列表.归档解档.本节将继续介绍另外2种iOS持久化数据的方法:数据库 SQLite3.Core Data 的运 ...
- iOS开发中的4种数据持久化方式【一、属性列表与归档解档】
iOS中的永久存储,也就是在关机重新启动设备,或者关闭应用时,不会丢失数据.在实际开发应用时,往往需要持久存储数据的,这样用户才能在对应用进行操作后,再次启动能看到自己更改的结果与痕迹.ios开发中, ...
随机推荐
- 辗转相除法求H.C.F小结
辗转相除法 大纲: 问题 原理 反思 1. 问题 一个试题,请完成以下填空 下列程序是利用辗转相除法求H.C.F(最大公约数) include <stdio.h> int main ...
- Phpcms 详情页显示所属栏目的同级栏目
Phpcms详情页是不显示所属栏目的同级栏目的,如果按下面的方式 {loop subcat($parentid) $v} <li{if $v[catid]==$catid} class=&quo ...
- 基于vue的多引擎搜索及关键字提示
关键代码: <div class="header-search"> <form id="form" action="http://m ...
- WebLogic写的网络爬虫
一.前言 最近因为有爬一些招聘网站的招聘信息的需要,而我之前也只是知道有"网络爬虫"这个神奇的名词,具体是什么.用什么实现.什么原理.如何实现比较好都不清楚,因此最近大致研究了一下 ...
- noscript 标签,一个被忽视的重要标签
打开 Drupal 的新后台,发现显示大面积空白 .本以为是 CSS 的问题,后来折腾好久才发现是我之前因为某些站的安全问题把浏览器的 Javascript 给禁用了.Javascript 的日益强大 ...
- PHP-配置方法
由于php是一个zip文件(非install版),安装较为简单,解压就行.把解压的 php5.2.1-Win32重命名为 php5.并复制到C盘目录下.即安装路径为 c:\php5 1 找到php目录 ...
- #MainTest
'界面设计' --- <TextView android:layout_width="wrap_content" android:layout_height="wr ...
- JSON的服务器开发之路
JSON的服务器开发之路 不知道需要哪儿些包... /dcywpt/WebRoot/WEB-INF/lib/commons-collections-3.2.jar /dcywpt/WebRoot/WE ...
- Webpack多入口文件、热更新等体验
Webpack现今流行的前端打包工具,今儿本人也来分享下自己学习体验. 一.html-webpack-plugin 实现html模板文件的解析与生成 在plugins加入HtmlWebpackPlug ...
- 【Spring】使用Spring和AMQP发送接收消息(中)
上篇讲了RabbitMQ连接工厂的作用是用来创建RabbitMQ的连接,本篇就来讲讲RabbitMQ的发送消息.通过RabbitMQ发送消息最简单的方式就是将connectionFactory Bea ...