
Angular整合zTree
1 前提准备
1.1 新建一个angular4项目
参考博文:点击前往
1.2 去zTree官网下载zTree
zTree官网:点击前往
三少使用的版本:点击前往

1.3 参考博客
2 编程步骤
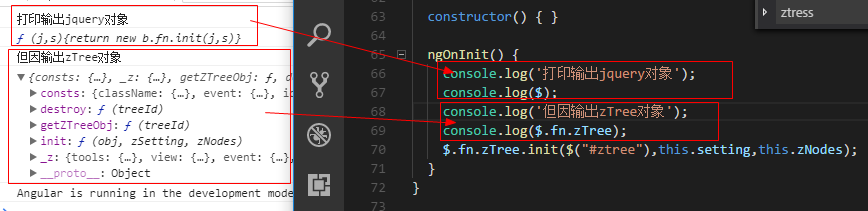
从打印出zTree对象可以看出,zTree对象利用init方法来实现zTree结构;init方法接收三个参数
参数1:一个ul标签的DOM节点对象
参数2:基本配置对象
参数3:标题信息数组
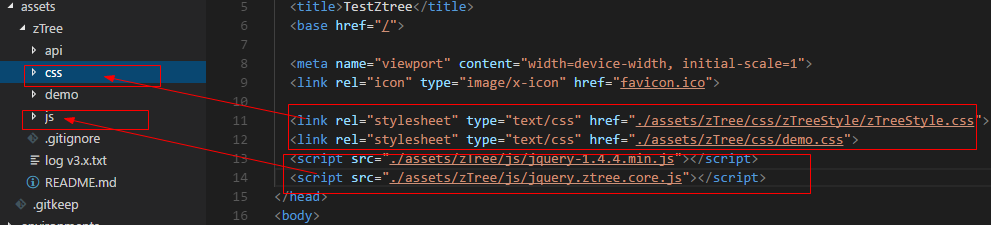
2.1 在index.html中引入相关js、css
<!doctype html>

<html lang="en">

<head>

  <meta charset="utf-8">

  <title>TestZtree</title>

  <base href="/">

  <meta name="viewport" content="width=device-width, initial-scale=1">

  <link rel="icon" type="image/x-icon" href="favicon.ico">

  <link rel="stylesheet" type="text/css" href="./assets/zTree/css/zTreeStyle/zTreeStyle.css">

  <link rel="stylesheet" type="text/css" href="./assets/zTree/css/demo.css">

  <script src="./assets/zTree/js/jquery-1.4.4.min.js"></script>

  <script src="./assets/zTree/js/jquery.ztree.core.js"></script>

</head>

<body>

  <app-root></app-root>

</body>

</html>
2.2 在TS文件中声明jquery对象
declare var $ : any;
2.3 在TS文件中编写代码
import { Component, OnInit } from '@angular/core';

declare var $ : any;

@Component({

  selector: 'app-root',

  templateUrl: './app.component.html',

  styleUrls: ['./app.component.scss']

})

export class AppComponent implements OnInit {

  // setting = {

  //   view: {

  //       showLine: true,

  //       showIcon: true,

  //       fontCss: this.getFont

  //   },

  //   data: {

  //     simpleData: {

  //       enable: true,

  //       idKey: 'id',

  //       pIdKey: 'pId'

  //     }

  //   },

  //   callback: {

  //     onClick: this.onCzTreeOnClick

  //   }

  // };

  // zNodes = [

  //   {id: 1, pId: 0, name: '1 一级标题', open: true, iconOpen:"assets/zTree/css/zTreeStyle/img/diy/1_open.png", iconClose:"assets/zTree/css/zTreeStyle/img/diy/1_close.png"},

  //   {id: 11, pId: 1, name: '1.1 二级标题', open: true, font:{'background-color':'skyblue', 'color':'white'}},

  //   {id: 111, pId: 11, name: '1.1.1 三级标题 -> 博客园', url: 'http://www.cnblogs.com/NeverCtrl-C/'},

  //   {id: 112, pId: 11, name: '1.1.2 三级标题 -> 单击', click: "alert('你单击了')"},

  //   {id: 12, pId: 1, name: '1.2 二级标题'},

  //   {id: 2, pId: 0, name: '2 一级标题'}

  // ]

  // getFont(treeId, node) {

  //   return node.font ? node.font : {};

  // }

  // onCzTreeOnClick(event, treeId, treeNode, clickFlag) {

  //   alert(treeNode.name);

  // }

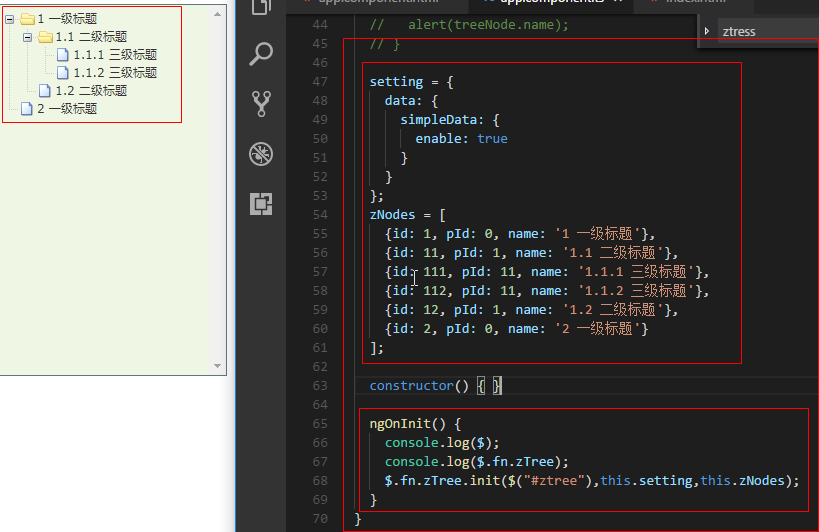
  setting = {

    data: {

      simpleData: {

        enable: true

      }

    }

  };

  zNodes = [

    {id: 1, pId: 0, name: '1 一级标题'},

    {id: 11, pId: 1, name: '1.1 二级标题'},

    {id: 111, pId: 11, name: '1.1.1 三级标题'},

    {id: 112, pId: 11, name: '1.1.2 三级标题'},

    {id: 12, pId: 1, name: '1.2 二级标题'},

    {id: 2, pId: 0, name: '2 一级标题'}

  ];

  constructor() { }

  ngOnInit() {

    console.log($);

    console.log($.fn.zTree);

    $.fn.zTree.init($("#ztree"),this.setting,this.zNodes);

  }

}
2.4 在组件HTML中编写代码
<ul id="ztree" class="ztree"><ul></ul>
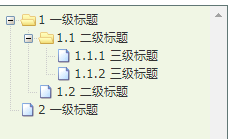
2.5 效果展示
3 zTree基本功能
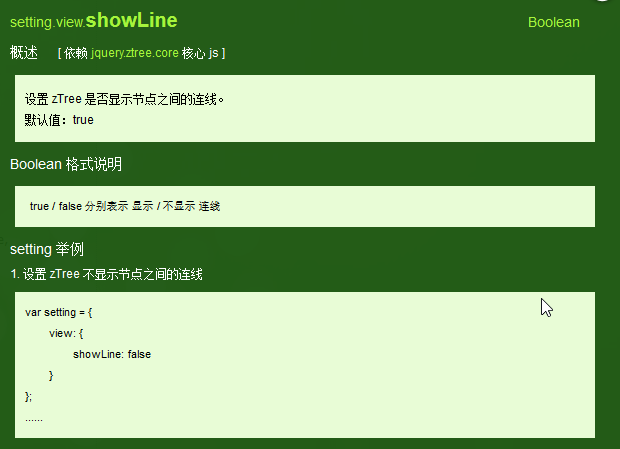
3.1 不显示连接线
3.1.1 官方文档
不显示标题之间的连接线
3.1.2 编程步骤
在基本配置对象中指定showLine属性的值为false即可
  setting = {

    data: {

      simpleData: {

        enable: true

      }

    },

    view: {

      showLine: false

    }

  };
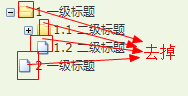
3.2 不显示节点图标
3.2.1 官方文档
去掉节点前面的图标
3.2.2 编程步骤
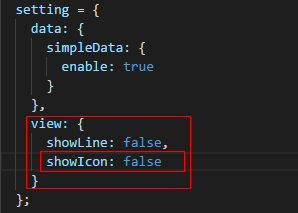
将基本配置对象的showIcon属性设为false即可
setting = {

    data: {

      simpleData: {

        enable: true

      }

    },

    view: {

      showLine: false,

      showIcon: false

    }

  };
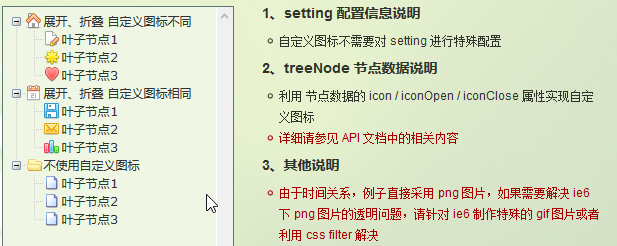
3.3 自定义节点图标
3.3.1 官方文档
更改节点的图标
3.3.2 编程步骤
为treeNode节点数据设置icon/iconOpen/iconClose属性即可

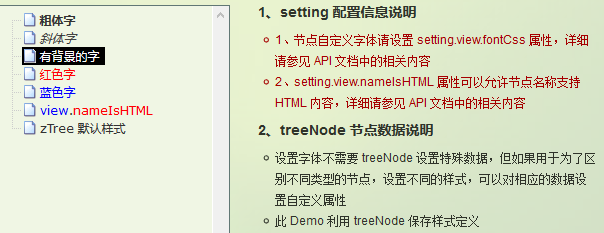
3.4 自定义字体
3.4.1 官方文档
更改节点字体的样式
3.4.2 编程步骤
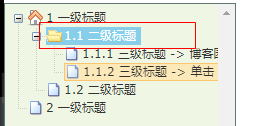
为treeNode节点数据设置font属性即可,font属性的值是一个对象,该对象的内容和style的数据一样

3.4.3 效果展示
3.5 超链接
3.5.1 官方文档
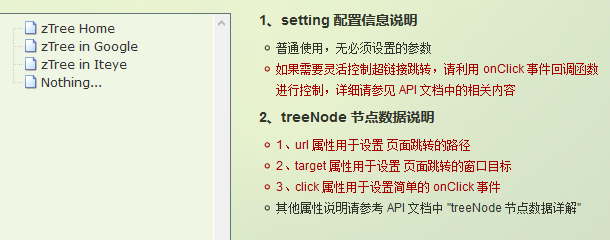
点击节点标题就会自动跳转到对应的url
注意01:click属性只能进行最简单的 click 事件操作。相当于 onclick="..." 的内容。 如果操作较复杂,请使用 onClick 事件回调函数。
3.5.2 编程步骤
为treeNode节点数据设置url、click属性即可
技巧01:设置click属性时,属性值必须是一些简单的onClick事件
技巧02:设置target属性时,属性值有 _blank 和 _self
_blank -> 用一个新窗口打开
_self -> 在原来的窗口打开

  zNodes = [

    {id: 1, pId: 0, name: '1 一级标题', open: true, iconOpen:"assets/zTree/css/zTreeStyle/img/diy/1_open.png", iconClose:"assets/zTree/css/zTreeStyle/img/diy/1_close.png"},

    {id: 11, pId: 1, name: '1.1 二级标题', open: true, font:{'background-color':'skyblue', 'color':'white'}},

    {id: 111, pId: 11, name: '1.1.1 三级标题 -> 博客园1', url: 'http://www.cnblogs.com/NeverCtrl-C/', target: '_blank'},

    {id: 113, pId: 11, name: '1.1.1 三级标题 -> 博客园2', url: 'http://www.cnblogs.com/NeverCtrl-C/', target: '_self'},

    {id: 112, pId: 11, name: '1.1.2 三级标题 -> 单击', click: "alert('你单击了')"},

    {id: 12, pId: 1, name: '1.2 二级标题'},

    {id: 2, pId: 0, name: '2 一级标题'}

  ]
3.6 单击控制
3.6.1 官方文档
点击节点标题时触发相应的方法
技巧01:在angular中可以利用这个用法来实现路由跳转

3.6.2 编程步骤
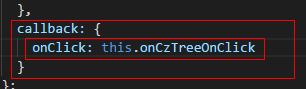
设置基本配置对象的onClick属性
技巧01:onClick属性值是一个方法的引用,我们需要自己编写这个方法
  setting = {

    view: {

        showLine: true,

        showIcon: true,

        fontCss: this.getFont

    },

    data: {

      simpleData: {

        enable: true,

        idKey: 'id',

        pIdKey: 'pId'

      }

    },

    callback: {

      onClick: this.onCzTreeOnClick

    }

  };
编写onClick触发方法

  onCzTreeOnClick(event, treeId, treeNode, clickFlag) {

    alert(treeNode.name);

  }
3.6.3 代码汇总
import { Component, OnInit } from '@angular/core';

declare var $ : any;

@Component({

  selector: 'app-root',

  templateUrl: './app.component.html',

  styleUrls: ['./app.component.scss']

})

export class AppComponent implements OnInit {

  setting = {

    view: {

        showLine: true,

        showIcon: true,

        fontCss: this.getFont

    },

    data: {

      simpleData: {

        enable: true,

        idKey: 'id',

        pIdKey: 'pId'

      }

    },

    callback: {

      onClick: this.onCzTreeOnClick

    },

    // async: {

    //   enable: true,

    //   url:"http://localhost:3000/data",

    //   type: "get",

    //   // autoParam:["id", "name=n", "level=lv"],

    //   // otherParam:{"otherParam":"zTreeAsyncTest"},

    //   dataFilter: this.filter

    // }

  };

  zNodes = [

    {id: 1, pId: 0, name: '1 一级标题', open: true, iconOpen:"assets/zTree/css/zTreeStyle/img/diy/1_open.png", iconClose:"assets/zTree/css/zTreeStyle/img/diy/1_close.png"},

    {id: 11, pId: 1, name: '1.1 二级标题', open: true, font:{'background-color':'skyblue', 'color':'white'}},

    {id: 111, pId: 11, name: '1.1.1 三级标题 -> 博客园1', url: 'http://www.cnblogs.com/NeverCtrl-C/', target: '_blank'},

    {id: 113, pId: 11, name: '1.1.1 三级标题 -> 博客园2', url: 'http://www.cnblogs.com/NeverCtrl-C/', target: '_self'},

    {id: 112, pId: 11, name: '1.1.2 三级标题 -> 单击', click: "alert('你单击了')"},

    {id: 12, pId: 1, name: '1.2 二级标题'},

    {id: 2, pId: 0, name: '2 一级标题'}

  ]

  getFont(treeId, node) {

    return node.font ? node.font : {};

  }

  // filter(treeId, parentNode,responseData) {

  //   console.log(responseData);

  //   if (responseData) {

  //     for(var i =0; i < responseData.length; i++) {

  //       responseData[i].name += "动态节点数据" + responseData[i].id;

  //     }

  //   }

  //   return responseData;

  // }

  onCzTreeOnClick(event, treeId, treeNode, clickFlag) {

    alert(treeNode.name);

  }

  constructor() { }

  ngOnInit() {

    console.log('打印输出jquery对象');

    console.log($);

    console.log('但因输出zTree对象');

    console.log($.fn.zTree);

    $.fn.zTree.init($("#ztree"),this.setting,this.zNodes);

    // $.fn.zTree.init($("#ztree"),this.setting);

  }

}
3.7 异步加载节点数据
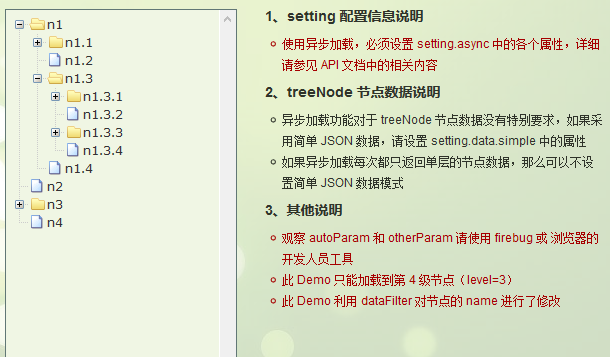
3.7.1 官方文档
节点的数据是从后台进行获取的
3.7.2 编程步骤
技巧01:异步加载节点数据时init方法不用传递第三个参数

> 准备一个后台用于返回JSON格式的数据
技巧01:返回的JSON数据是一个列表,格式为
[

    {

      "id": 1,

      "pId": 0,

      "name": "1 one"

    },

    {

      "id": 2,

      "pId": 0,

      "name": "2 two"

    }

  ]
技巧02:三少偷懒,是利用json-server模拟的后台数据,哈哈;json-server 使用教程请参见 -> 点击前往
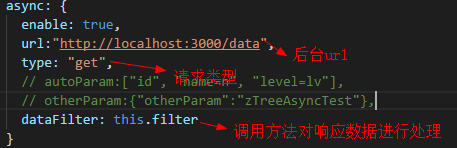
> 设置基本配置对象的async属性
  setting = {

    view: {

        showLine: true,

        showIcon: true,

        fontCss: this.getFont

    },

    data: {

      simpleData: {

        enable: true,

        idKey: 'id',

        pIdKey: 'pId'

      }

    },

    callback: {

      onClick: this.onCzTreeOnClick

    },

    async: {

      enable: true,

      url:"http://localhost:3000/data",

      type: "get",

      // autoParam:["id", "name=n", "level=lv"],

      // otherParam:{"otherParam":"zTreeAsyncTest"},

      dataFilter: this.filter

    }

  };
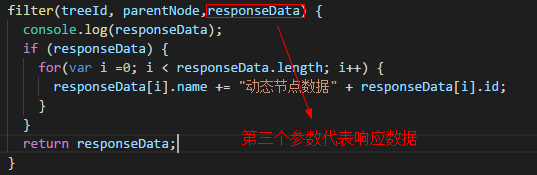
> 编写响应数据处理方法
  filter(treeId, parentNode,responseData) {

    console.log(responseData);

    if (responseData) {

      for(var i =0; i < responseData.length; i++) {

        responseData[i].name += "动态节点数据" + responseData[i].id;

      }

    }

    return responseData;

  }
3.7.3 代码总汇
{

  "data":

  [

    {

      "id": 1,

      "pId": 0,

      "name": "1 one"

    },

    {

        "id": 11,

        "pId": 1,

        "name": "1.1 oneToOne"

    },

    {

        "id": 12,

        "pId": 1,

        "name": "1.2 oneToTwo"

    },

    {

      "id": 2,

      "pId": 0,

      "name": "2 two"

    }

  ]

}
模拟后台响应数据
<ul id="ztree" class="ztree"><ul></ul>
HTML
import { Component, OnInit } from '@angular/core';

declare var $ : any;

@Component({

  selector: 'app-root',

  templateUrl: './app.component.html',

  styleUrls: ['./app.component.scss']

})

export class AppComponent implements OnInit {

  setting = {

    view: {

        showLine: true,

        showIcon: true,

        fontCss: this.getFont

    },

    data: {

      simpleData: {

        enable: true,

        idKey: 'id',

        pIdKey: 'pId'

      }

    },

    callback: {

      onClick: this.onCzTreeOnClick

    },

    async: {

      enable: true,

      url:"http://localhost:3000/data",

      type: "get",

      // autoParam:["id", "name=n", "level=lv"],

      // otherParam:{"otherParam":"zTreeAsyncTest"},

      dataFilter: this.filter

    }

  };

  // zNodes = [

  //   {id: 1, pId: 0, name: '1 一级标题', open: true, iconOpen:"assets/zTree/css/zTreeStyle/img/diy/1_open.png", iconClose:"assets/zTree/css/zTreeStyle/img/diy/1_close.png"},

  //   {id: 11, pId: 1, name: '1.1 二级标题', open: true, font:{'background-color':'skyblue', 'color':'white'}},

  //   {id: 111, pId: 11, name: '1.1.1 三级标题 -> 博客园1', url: 'http://www.cnblogs.com/NeverCtrl-C/', target: '_blank'},

  //   {id: 113, pId: 11, name: '1.1.1 三级标题 -> 博客园2', url: 'http://www.cnblogs.com/NeverCtrl-C/', target: '_self'},

  //   {id: 112, pId: 11, name: '1.1.2 三级标题 -> 单击', click: "alert('你单击了')"},

  //   {id: 12, pId: 1, name: '1.2 二级标题'},

  //   {id: 2, pId: 0, name: '2 一级标题'}

  // ]

  getFont(treeId, node) {

    return node.font ? node.font : {};

  }

  filter(treeId, parentNode,responseData) {

    console.log(responseData);

    if (responseData) {

      for(var i =0; i < responseData.length; i++) {

        responseData[i].name += "动态节点数据" + responseData[i].id;

      }

    }

    return responseData;

  }

  onCzTreeOnClick(event, treeId, treeNode, clickFlag) {

    alert(treeNode.name);

  }

  constructor() { }

  ngOnInit() {

    console.log('打印输出jquery对象');

    console.log($);

    console.log('但因输出zTree对象');

    console.log($.fn.zTree);

    // $.fn.zTree.init($("#ztree"),this.setting,this.zNodes);

    $.fn.zTree.init($("#ztree"),this.setting);

  }

}
TS
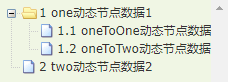
3.7.4 效果展示
3.7.5 参考博文
Angular整合zTree的更多相关文章
- requirejs整合ztree
{block name='script'} <script> require(['jquery.ztree'], function () { var zTreeObj; var setti ...
- angular整合环信webIM
此处有两大坑: 1.下载easemob-websdk此npm包时,并没有下载strophe.js.crypto-js.underscore这三个包,需要自己手动下载. 2.如下方标红位置所示,需要自己 ...
- 把angular项目整合到.net mvc中
之前的开发选择的是完全舍弃服务端,仅保留最简单web服务器提供angular经打包的静态资源,此外所有的业务与数据请求都访问一个分离的WebApi来实现.不过最近碰到一个需求,有必要使用多个客户端,而 ...
- ztree使用系列三(ztree与springmvc+spring+mybatis整合实现增删改查)
在springmvc+spring+mybatis里整合ztree实现增删改查,上一篇已经写了demo,以下就仅仅贴出各层实现功能的代码: Jsp页面实现功能的js代码例如以下: <script ...
- Intergate flot with Angular js ——Angular 图形报表
下面这篇文章最终的结论就是 Flot 插件 结合 Angular 的Directive 来处理 图表的绘制 给出github上的一个demo源码.https://gist.github.com/fly ...
- net mvc中angular
把angular项目整合到.net mvc中 之前的开发选择的是完全舍弃服务端,仅保留最简单web服务器提供angular经打包的静态资源,此外所有的业务与数据请求都访问一个分离的WebApi来实 ...
- AntD01 Angular2整合AntD、Angular2整合Material、利用Angular2,AntD,Material联合打造后台管理系统 ???
待更新... 2018-5-21 13:53:52 1 环境说明 2 搭建Angular项目 详情参见 -> 点击前往 辅助技能 -> 点击前往 3 创建共享模块 ng g m share ...
- Ztree + bootstarp-table 使用
Ztree + bootstarp-table 使用 一. Ztree 1.引入js/css文件 Ztree官网 <!--ztree--> <link rel="sty ...
- express搭建权限管理系统
express搭建权限管理系统 权限管理,是管理系统中的常见组件.通常需要定义资源,把资源调配给用户,通过判断用户是否有权限增删改查来实现. 初衷: 使用express开发过的项目大大小小加在一起也有 ...
随机推荐
- mybatis的#{}占位符和${}拼接符的区别
#{}占位符:占位 如果传入的是基本类型,那么#{}中的变量名称可以随意写 如果传入的参数是pojo类型,那么#{}中的变量名称必须是pojo中的属性.属性.属性- ${}拼接符:字符串原样拼接 如果 ...
- 微信小程序使用场景延伸:扫码登录、扫码支付
微信小程序使用场景延伸:扫码登录.扫码支付 小程序最适合的使用场景有哪些?相比大家能列举出来很多,但这个场景,大家可能多数没想到_^ 笔者团队近期接到了一个PC项目:转转游戏租号PC官网,该项目要求在 ...
- 【java】Vector
package com.tn.collect; import java.util.Enumeration; import java.util.Iterator; import java.util.Ve ...
- TCP/IP----基本知识
就以这篇文章为起点,开始自己的学习计算机网络之路.这些仅是我个人之言,如有差错,希望读者能够逐一指出,在下不胜感激. 首先,我们需要知道一些关于网络的基本知识. 网络中的关系大多为拓扑结构.那么,何为 ...
- 将Maven的Web项目部署到windows的Tomcat里
这里我用的是win7和tomcat8,且tomcat8下载的是压缩包而非安装文件. 第一步:先将tomcat8安装服务,cmd里更改目录为tomcat8(即压缩包解压后的那个文件夹)的bin文件夹, ...
- tensorflow ckpt文件转caffemodel时遇到的坑
p.p1 { margin: 0.0px 0.0px 0.0px 0.0px; font: 12.0px ".PingFang SC"; color: #454545 } p.p2 ...
- bzoj 3139: [Hnoi2013]比赛
Description 沫沫非常喜欢看足球赛,但因为沉迷于射箭游戏,错过了最近的一次足球联赛.此次联 赛共N支球队参加,比赛规则如下: (1) 每两支球队之间踢一场比赛. (2) 若平局,两支球队各得 ...
- hashlib 简单加密
import hashlib def md5(arg):#这是加密函数 md5_pwd = hashlib.md5(bytes('meac',encoding='utf-8')) md5_pwd.up ...
- Sublime Text 3 配置分析与我的配置---小结
Sublime Text 3 配置解释(默认){// 设置主题文件"color_scheme": "Packages/Color Scheme – Default/Mon ...
- 判断python对象是否可调用的三种方式及其区别
查找资料,基本上判断python对象是否为可调用的函数,有三种方法 使用内置的callable函数 callable(func) 用于检查对象是否可调用,返回True也可能调用失败,但是返回False ...