Installing Cygwin and Starting the SSH Daemon
This chapter explains how to install Cygwin and start the SSH daemon on Microsoft Windows hosts. This chapter is applicable only when you want to install a Management Agent on a Microsoft Windows host, using the Add Host Targets Wizard or EM CLI. In particular, this chapter covers the following:
7.1 Overview
The Add Host Targets Wizard is an application built into the Enterprise Manager Cloud Control console. It offers GUI-rich, interactive screens that enable you to install Oracle Management Agents (Management Agents) on unmanaged hosts and convert them to managed hosts, so that they can be monitored and managed in Enterprise Manager Cloud Control.
When you use the Add Host Targets Wizard to install a Management Agent on a host running on Microsoft Windows, as a prerequisite, you must install Cygwin and start the SSH Daemon on the host. To do so, follow the steps listed in Section 7.3.
Cygwin is essentially a utility that offers a Linux-like environment on a Microsoft Windows host. Technically, it is a DLL (cygwin1.dll) that acts as a Linux API layer providing substantial Linux API functionality. Once you install Cygwin, you can configure the SSH Daemon on the host. The Add Host Targets Wizard is certified and supported with Cygwin 1.7.
The SSH Daemon enables the Add Host Targets Wizard to establish SSH connectivity between the OMS host and the host on which you want to install a Management Agent. Using this connectivity, the wizard transfers the Management Agent software binaries to the destination host over SSH protocol, installs the Management Agent, and configures it.
7.2 Before You Begin
Before starting with the SSHD setup, ensure you are not using OpenSSH and MKSNT when using the Add Host Targets Wizard. To do so, perform the following checks:
Ensure
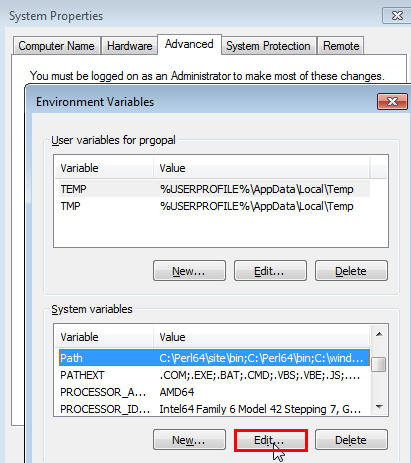
OpenSSH\binandmksntare not in yourPATHenvironment variable. If they are, remove them by doing the following:Right-click on My Computer and go to Properties.
In the System Properties window, click Advanced.
In this tab, click Environment Variables.
Here, search for the
PATHsystem variable, select it, and if theOpenSSH\binandmksntare present inPATH,click Edit.In the Edit System Variable dialog box, delete these two values from
PATH,then click OK.
Stop the SSH Daemon if it is running from
OpenSSH,MKSor any other vendor. If the SSH Daemon is running, stop it by doing the following:Right-click on My Computer, and select Manage.
In the Computer Management window, in the left pane, expand Services and Applications, and select Services.
In the right pane, click the SSH Daemon/MKS Secure Shell service, then click the Stop button.

Note:
The navigational steps described in this section may vary for different Microsoft Windows operating systems.
7.3 Installing Cygwin
To install Cygwin on a Microsoft Windows host, follow these steps:
Access the following URL, then click Install Cygwin:
Download the 32-bit version (if you are running a 32-bit version of Microsoft Windows) or the 64-bit version (if you are running a 64-bit version of Microsoft Windows) of the Cygwin setup executable.
Run the setup executable, then click Next to proceed.
On the Choose Installation Type screen, select Install from Internet, then click Next.
On the Choose Installation Directory screen, enter C:\cygwin as the Root Directory, then click Next.
Note:
If you choose to install Cygwin in a different directory, then ensure that you update the
SSH_PATH, SCP_PATH, MKDIR_PATH, SH_PATH, CHMOD_PATH, andTRUEproperties present in the$<OMS_HOME>/oui/prov/resources/ssPaths_msplats.propertiesfile to their proper Cygwin binary values, after installing the Enterprise Manager system.For example, if you choose to install Cygwin in the
D:/software/cygwindirectory, then update the specified properties in the following manner:SCP_PATH=D:/software/cygwin/bin/scp.exe
SH_PATH=D:/software/cygwin/bin/sh.exe
CHMOD_PATH=D:/software/cygwin/bin/chmod.exe
LS_PATH=D:/software/cygwin/bin/ls.exe
On the Select Local Package Directory screen, select a directory on your local machine where you want to store the downloaded installation files, then click Next.

On the Select Connection Type screen, select appropriate settings to connect to the internet, then click Next.

On the Choose Download Site(s) screen, select any site from the available list, then click Next.
On the select packages screen, ensure that you select the following packages, then click Next:
From the Archive category, select
unzipandzipas follows: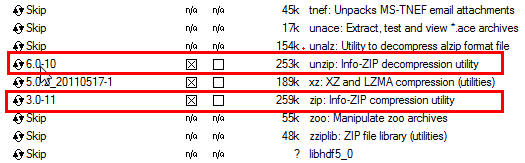
From the Net category, select
opensshandopensslas follows:
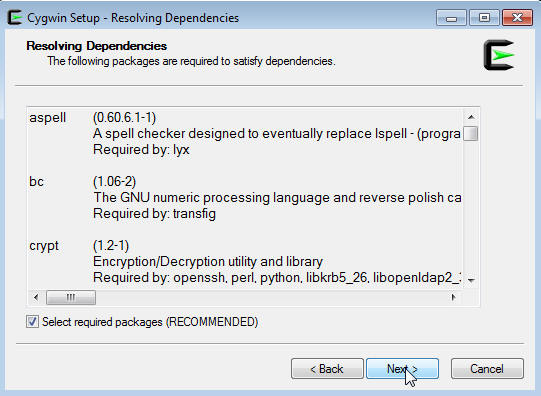
After selecting the packages and clicking Next, the Resolving Dependencies screen is displayed. Click Next to proceed.
On the Installation Status and Create Icons screen, do not make any changes. Click Finish to complete the installation process.
7.4 Configuring SSH After Installing Cygwin
This section describes how to configure SSH and test your Cygwin setup after installing Cygwin on a host.
Note:
While configuring SSH, you may need to run the cygwin.bat script. While running cygwin.bat in Microsoft Windows Server 2008 and Microsoft Windows Vista, ensure that you invoke it in administrator mode. To do this, right-click the cygwin.bat file and select Run as administrator.
To configure SSH and test your Cygwin setup, follow these steps:
After you install Cygwin, navigate to the
C:\cygwindirectory, open theCygwin.batfile in edit mode using any editor, and add the following line before invoking the bash shell.set CYGWIN=binmode ntsecFor example, here are the contents for the
Cygwin.batfile after adding the above line:@echo off C:
chdir C:\cygwin\bin
set CYGWIN=binmode ntsec
bash --login -iTo verify if Cygwin (
cygrunsrv)is installed properly, runC:\cygwin\Cygwin.bat, and execute the following command:cygrunsrv -h
If Cygwin is installed properly, then all the Cygwin help options are displayed on the screen. However, if this command returns an error message, then you may have to reinstall Cygwin.
To install the SSHD service, run
C:\cygwin\Cygwin.bat, and execute the following command:ssh-host-config
After running the command, you are prompted the following questions:
*** Query: Should privilege separation be used? <yes/no>: yes

*** Query: New local account 'sshd'? <yes/no>: yes

*** Query: Do you want to install sshd as a service?

*** Query: <Say "no" if it is already installed as a service> <yes/no>: yes

*** Query: Enter the value of CYGWIN for the deamon: [] binmode ntsec

*** Query: Do you want to use a different name? (yes/no) yes/no
At this point, if you want to use the same name, that is
cyg_server,enterno.You are then prompted the following questions:*** Query: Create new privileged user account 'cyg_server'? (yes/no) yes
*** Query: Please enter the password:
*** Query: Renter:However, if you want to use a different name, enter
yes.You are then prompted the following questions:*** Query: Enter the new user name: cyg_server1
*** Query: Reenter: cyg_server1
*** Query: Create new privileged user account 'cyg_server1'? (yes/no) yes
*** Query: Please enter the password:
*** Query: Reenter:If the configuration is successful, you will see the following message:
Host configuration finished. Have fun!
Backup the
c:\cygwin\etc\passwdfile and then use any editor to open the file in edit mode. Remove only those entries of the user that you will use to connect to the host on which you want to install a Management Agent. Ask the user to make a backup of thec:\cygwin\etc\passwdfile before editing.If the user that you are employing to connect to the host on which you want to install the Management Agent is a local user, run
C:\cygwin\Cygwin.batand execute the following:/bin/mkpasswd -l –u <USER> >> /etc/passwd (for example, /bin/mkpasswd -l -u pjohn >> /etc/passwd)
If the user you are employing to connect to the host on which you want to install the Management Agent running is a domain user, run
C:\cygwin\Cygwin.batand execute the following:/bin/mkpasswd -d -u <USER> >> /etc/passwd (for example, /bin/mkpasswd -d -u pjohn >> /etc/passwd)
mkdir -p /home/<USER> (for example, mkdir -p /home/pjohn)
chown <USER> /home/<USER> (for example, chown pjohn /home/pjohn)
(domain user only) If the user you are employing to connect to the host on which you want to install the Management Agent is a domain user, do the following to start the SSH daemon:
Right-click on My Computer, and select Manage.
In the Computer Management dialog box that appears, go to Services and Applications, and select CYGWIN sshd.
Right-click CYGWIN sshd and select Properties.
In the Properties dialog box, go to the Log On tab.
Here, specify the domain/user name and password. Click Apply.
Run
C:\cygwin\Cygwin.bat, and execute the following:chown <USERNAME> /var/log/sshd.log
chown -R <USERNAME> /var/empty
chown <USERNAME> /etc/ssh*
chmod 755 /var/empty
chmod 644 /var/log/sshd.logNote:
If
/var/log/sshd.logdoes not exist, you do not have to execute the following commands:chown <USERNAME> /var/log/sshd.log
chmod 644 /var/log/sshd.log
Perform one of the following steps to start the SSH daemon:
Run
C:/cygwin/Cygwin.batand execute the following command:/usr/sbin/sshdOR
Run
C:/cygwin/Cygwin.batand execute the following command:cygrunsrv -S sshdOR
Perform these steps:
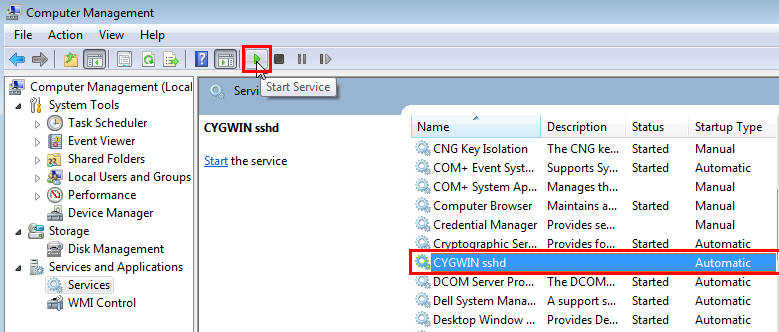
Right-click on My Computer, and select Manage.
In the Computer Management dialog box that appears, go to Services and Applications, and select CYGWIN sshd.
Click CYGWIN sshd, then click the Start button.
Note:
If the SSH daemon does not start up, view the
c:\cygwin\var\log\sshd.logfile for information on why the start up failed.You can now test your Cygwin setup.
To do this, go to a different machine (that has the
sshclient running), and execute the following command:ssh -l <USERNAME> <localhost> 'date' OR ssh -l <USERNAME> <this node> 'date'
For example,
ssh -l pjohn example.com 'date'
This command will prompt you to specify the password. When you specify the correct password, the command should return the accurate date.
Note:
If you experience a process fork failure, memory leak error, or a file access error after configuring SSH, view the following website for a workaround:
If you are unable to find a workaround for your problem, report your problem to the Cygwin community using the following website:
http://cygwin.com/problems.html
原文引自:http://docs.oracle.com/cd/E24628_01/install.121/e22624/preinstall_req_cygwin_ssh.htm#CBHIAFGI
Installing Cygwin and Starting the SSH Daemon的更多相关文章
- Windows上安装配置SSH教程(5)——win10下使用Cygwin+Expect自动登陆ssh
1.安装Cygwin,安装上Tcl和Expect两个工具. 可以使用apt-cyg命令安装,也可以在安装Cygwin的时候选中这两个包. 命令安装的话使用下面的两个命令: apt-cyg instal ...
- Starting a Gradle Daemon, 5 busy and 1 incompatible and 1 stopped Daemons could not be reused, use --status for details FAILURE: Build failed with an exception. * What went wrong: Could not dispatch
执行gradle build出的问题,查看hs_err_pid11064.log日志文件发现,是电脑的RAM不足导致
- [原创]EBAZ4205 Linux log打印输出
下载器与板级之前的连接 JTAG红色为1脚,请注意 RX接板级TX TX接板级RX UART_Vref接板级VCC GND接板级GND U-Boot 2014.01 (Apr 14 2019 - 10 ...
- [原创]基于Zynq Linux环境搭建(四)
此篇编译根文件系统 下载busybox和dropbear, [#73#13:04:52 FPGADeveloper@ubuntu ~/Zybo_Demo/XilinxFS]$wget --no-che ...
- [转]busybox中telnet 功能添加
使用busybox制作的一个基本根文件系统如何添加telnetd服务呢? 下面把本人的添加过程列出来供大家分享,如有不同意见请不吝赐教! 1. 添加telnet的支持(busybox中配置) Netw ...
- cygwin在Windows8.1中设置ssh的问题解决
为了在Windows 8.1上直接使用Linux环境和hadoop开发,装了cygwin,同时设置ssh无密码登录. 但正常ssh-keygen后复制到authorised_keys后登录出现提示 ...
- linux ssh 使用深度解析(key登录详解)
SSH全称Secure SHell,顾名思义就是非常安全的shell的意思,SSH协议是IETF(Internet Engineering Task Force)的Network Working Gr ...
- 远程之SSH
SSH(Secure Shell的缩写),由 IETF 的网络工作小组(Network Working Group)所制定:SSH 为建立在应用层和传输层基础上的安全协议.SSH 是目前较可靠,专为远 ...
- [转]Creating an iPhone Daemon
ref: http://chrisalvares.com/blog/7/creating-an-iphone-daemon-part-1/ http://chrisalvares.com/blog/3 ...
随机推荐
- 【转】java多态详解
1. Java中除了static和final方法外,其他所有的方法都是运行时绑定的.private方法都被隐式指定为final的,因此final的方法不会在运行时绑定.当在派生类中重写基 ...
- Unity3D研究院编辑器之不实例化Prefab获取删除更新组件(十五)
http://www.xuanyusong.com/archives/3727 感谢楼下的牛逼回复更正一下,我表示我也是才知道.. 其实不需要实例化也能查找,你依然直接用GetComponentsIn ...
- maven 添加支持编译jdk1.7
1.在<profiles>元素内增加如下内容 <profile> <id>jdk17</id> <activation> ...
- svn 大杂烩
svn : trunk 日常开发 branch 多版开发,或者修复bug,测试 tag 开发到一阶段打一个tag,给外部使用 属性externals:可以引用外部的公共工程.这个工程最好是稳定的,不 ...
- 资源 之 4.2 内置Resource实现(拾)
4.2 内置Resource实现 4.2.1 ByteArrayResource ByteArrayResource代表byte[]数组资源,对于"getInputStream" ...
- Spring3.1新特性
一.Spring2.5之前,我们都是通过实现Controller接口或其实现来定义我们的处理器类. 二.Spring2.5引入注解式处理器支持,通过@Controller 和 @RequestMa ...
- Nodejs开发框架Express3.0开发手记–从零开始
转载请注明出处: http://blog.fens.me/nodejs-express3/ 程序代码已经上传到github有需要的同学,自行下载. https://github.com/bsspiri ...
- C类型
类型 32位 64位 char 1 1 short 2 2 int 4 4 long 4 8 指针 4 8 float 4 4 double 8 8 long 8 8 常用的基本 ...
- md5算法原理一窥(其一)
首先,需要了解的事,md5并不是传说中的加密算法,只是一种散列算法.其加密的算法并不是我们说所的那样固定不变,只是一种映射的关系. 所以解密MD5没有现成的算法,只能用穷举法,把可能出现的明文,用MD ...
- 张艾迪(创始人):拥抱单身与自由的Eidyzhang
拥抱单身与自由(Single+Freedom) 拥抱伟大的梦想与理想.年轻一代的张扬与自信 拥抱AOOOiA.Global.224C的一切是我对这个世界的态度 +AOOOiA.Global.224C创 ...